Welcome to Remix’s documentation!
Remix IDE is used for the entire journey of smart contract development by users at every knowledge level. It requires no setup, fosters a fast development cycle, and has a rich set of plugins with intuitive GUIs. The IDE comes in two flavors (web app or desktop app) and as a VSCode extension.
Remix Online IDE, see: https://remix.ethereum.org
Supported browsers: Firefox, Chrome, Brave. We do not support use of Remix on tablets or mobile devices.
Remix Desktop IDE, see releases: https://github.com/ethereum/remix-desktop/releases
Ethereum Remix, the VSCode extension, see here. Documentation for the VSCode extension is located here.
Remix Project
Remix IDE is part of the Remix Project which also includes the Remix Plugin Engine and Remix Libraries, which are low-level tools for wider use.
Remix IDE is available at remix.ethereum.org and more information can be found in these docs. Our IDE tool is available at our GitHub repository.
This set of documents covers instructions on how to use Remix. Additional information can be found in our blog and in our tutorial tool, LearnEth located inside of Remix IDE.
Useful links:
Remix Alpha - The version where we test new Remix release (not stable!).
Remix Desktop - Remix Desktop’s release page.
Remix-IDE Layout
The new structure
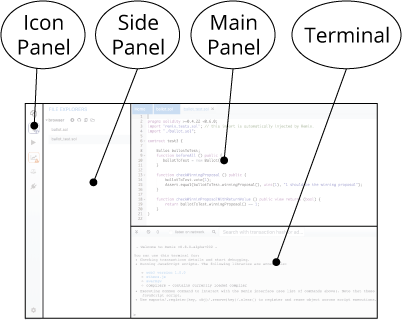
Icon Panel - click to change which plugin appears in the Side Panel
Side Panel - Most but not all plugins will have their GUI here.
Main Panel - In the old layout this was just for editing files. In the tabs can be plugins or files for the IDE to compile.
Terminal - where you will see the results of your interactions with the GUI’s. Also you can run scripts here.
Icon Panel at Page Load
When you load remix - the icon panel show these icons by default.
![]()
Everything in Remix is a plugin… so the Plugin Manager is very important.
Home tab

The home tab is located in the Main Panel. It can be closed.
You can also access it (even if closed) by clicking the Remix logo at the top of the icon panel.
The hometab contains links to resources - including links to these docs as well as our Twitter feed, our Medium blog, gitter chat and more. There are also shortcuts for loading files into Remix.
Solidity Environment
Clicking the Solidity button in the featured plugins section of the home tab will activate Solidity Static Analysis and Solidity Unit Testing as well as the Solidity Compiler and Deploy & Run (which are there by default).
To see all the plugins go to the Plugin Manager - by selecting the plug in the icon panel.

You can also get there by clicking the More button in the featured plugin list.
Plugin Manager
In Remix, you only need to load the functionality you need - and the Plugin Manger is where you manage what plugins are turned off or on.
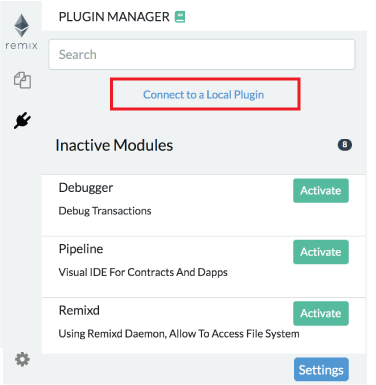
The Plugin Manager is also the place you go when you are creating your own plugin and you want to load your local plugin into Remix. In that case you’d click on the “Connect to a Local Plugin” link at the top of the Plugin Manager panel.
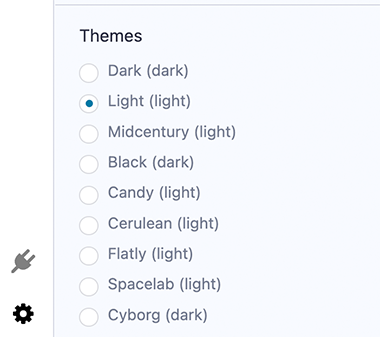
Themes
So you want to work on Remix with a dark theme or a light theme or just a different theme than the one you are currently looking at? At the bottom of the Settings plugin is where you can choose a theme. These are bootstrap based themes. The Dark and Light theme have been the most customized for Remix.
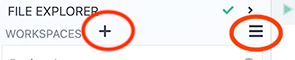
File Explorer
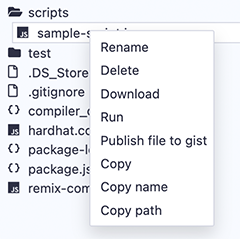
The File Explorer is for managing workspaces and files. This plugin also contains many shortcuts and commands. For a quick tour, right-click on a file to get a pop-up menu and also check the hamburger menu at the top right of the plugin.
To find the File Explorer module - click the File Explorer icon.
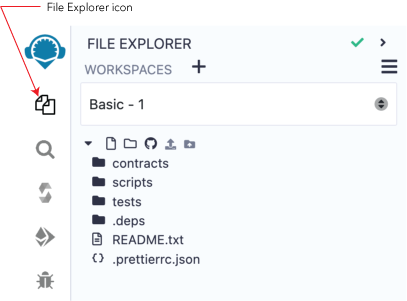
The green checkmark at the top of the page means that this plugin is maintained by Remix Team. When the caret is clicked, more info about the plugin will be shown -including a link to this documentation.
![]()
File Storage
By default, Remix IDE stores files in IndexedDB.
Coding in Remix IDE Online is different from writing in a Google doc.
A Google doc saves your work to your account on Google’s servers.
Remix has no user accounts. By default, files are ONLY saved locally in the browser’s storage. So tread carefully, browser storage is not permanent!
It is very important to have a file backup & file saving strategy.
Check the following techniques for:
Important Note: Clearing the browser storage & IndexedDB will permanently delete all the files stored there. It is prudent to backup your workspaces before deleting them…just in case.
File Storage on your hard drive
Remixd
For storing files on your computer’s hard drive when using Remix Online IDE, use Remixd
Remixd is an NPM module that runs on your computer. It allows you to share a specified folder on your computer with Remix IDE.
Remix Desktop
Remix Desktop is a version of Remix IDE in an Electron app. Note that when using Remix Desktop, you cannot use a browser wallet like MetaMask, because Remix Desktop does not run in a browser. To connect to public networks, you need to use service like Infura and then use the WalletConnect plugin to approve transactions on your mobile device.
Connecting Remix to remote Git repos
If you are not using Remixd, it is highly recommended that you save to a remote repo. (Browsers do crash causing localstorage & indexedDB to be corrupted)
Remix IDE can be connected to remote Git repos hosted in GitHub (or similar service) or in IPFS.
Most of the Git operations are done in the DGit pluin. (DGit stands for Decentralized GIT).
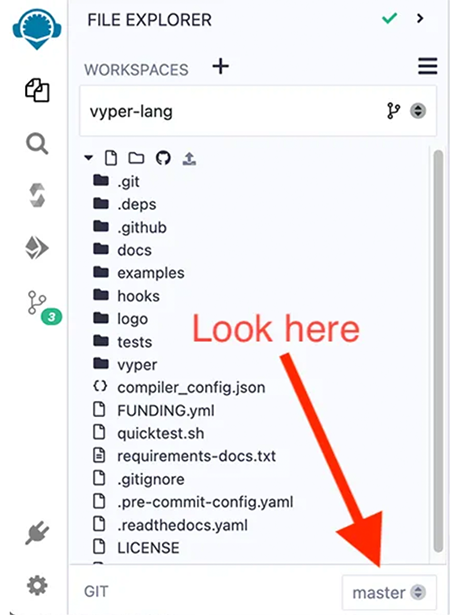
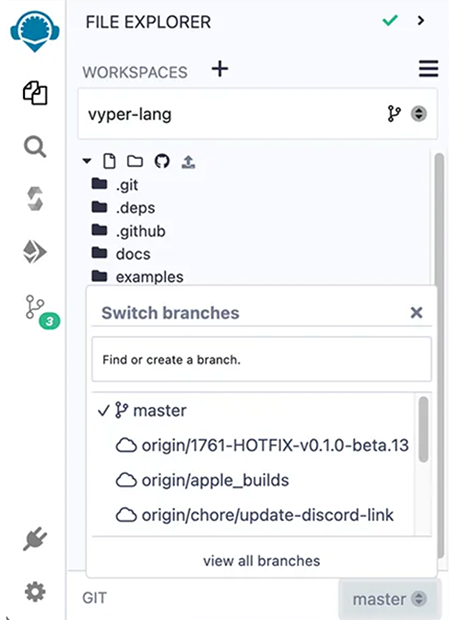
Branch management is also available at the bottom of the File Explorer when the Workspace is Git initialized.
Also see this article about securing your files in Remix
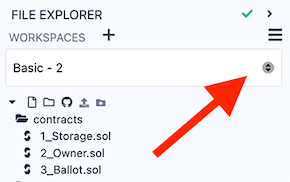
Workspaces
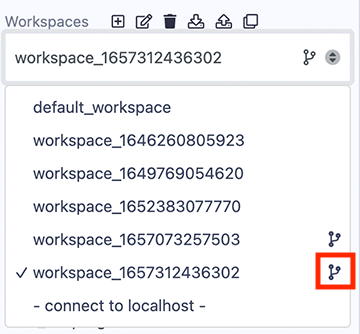
Workspaces in Remix are special folders that separate projects. Files in one workspace cannot import or access files in different workspace. Choosing a workspace is done with the Workspaces select box.
New Workspace
Workspaces are created by clicking the + button or by going to the hamburger menu in the upper right side of the File Explorer.
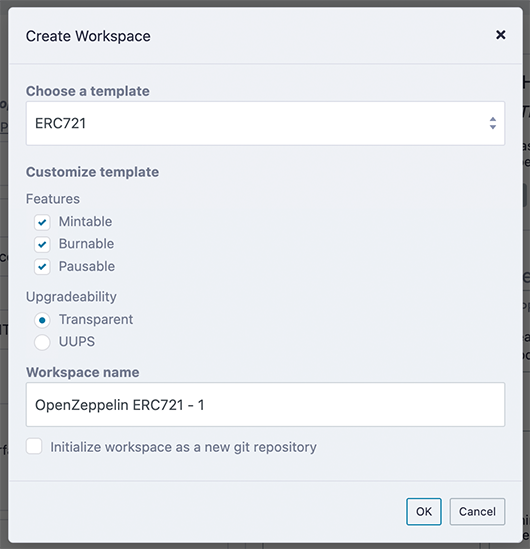
When making a new workspace, Remix offers the following templates:
Blank
Remix Default
OpenZeppelin ERC20
OpenZeppelin ERC721
OpenZeppelin ERC1155
0xProject ERC20
Gnosis MultiSig
When choosing an OpenZeppelin template, additional functionality can be added.
Workspace operations
The Workspace hamburger menu is for operations that work on an entire workspace.
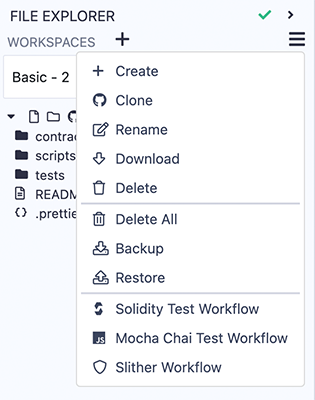
Clone
When clicking Clone, you’ll be asked for the url of a remote repo. A new workspace will be created that will contain the cloned repo. To manage the Git repo, go to the Dgit plugin.
Backup
Backup is for downloading all the Workspaces in a .zip file. The zip file will have a folder called .workspaces that will contain a folder of each Workspace. Depending on your OS, you may need to change the preferences on .workspaces folder to make it visible.
Restore
Restore is only for uploading the backup zip file.
Create GitHub Actions
The Workspace operations to create Solidity Test Workflow, Mocha Chai Test Workflow, and Slither Workflow are for creating GitHub actions. When clicked, a .yml file is created in the .workflows folder of the active Workspace.
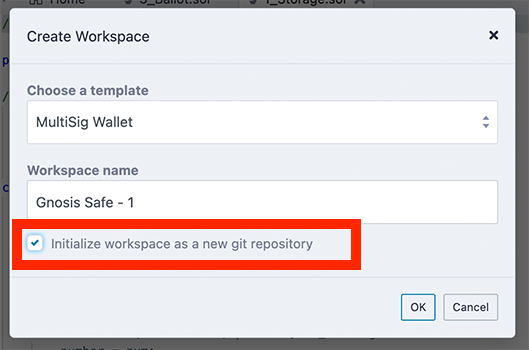
Workspaces initialized with Git
Git intialized workspaces will have the Git icon next to them in the Workspaces select box.
To initialize a new Workspace for GIT, check the box at the bottom of the Create Workspace modal.
Working with Files
When a file is clicked on it will appear in the Editor.
Under the Workspaces select box are a number of icons that perform operations on files. More operations can be accessed by right-clicking on a file or folder (see below).
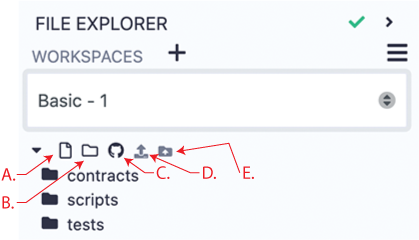
A. Create a file
B. Create a folder
C. Publish all the file in this Workspace to a GIST
D. Upload a file into the current Workspace
E. Upload a folder into the current Workspace
Creating new files
There are 2 ways of creating files:
The first is to click on the new file icon (H. in fig.1), then an input for the new file’s name will appear in the File Explorer. Once a name is entered, a new empty file will open in the Editor. If the file’s name is entered without a file extension, the extension .sol will be appended by default.

The second way of creating a file is to right-click on a file or folder to get a popup menu.
The new file will be placed in the currently selected folder of the Workspace. If a file and not a folder is selected, then the new file will be placed in that file’s folder. And if nothing is selected, then the file will be placed in the root of the current workspace’s folder. Or to be brief — just be mindful of what folder it lands in.
Publish to Gist
The icon (marked J. in fig.1) publishes all files from the current Workspace to a gist. The Gist API requires users to be authenticated to be able to publish a gist.
Click this link to Github tokens setup and select Generate new token. Then check the Create gists checkbox and generate a new token. Also make sure you check the box to enable the creation of Gists with this token.
Take the token and paste it in Remix’s Settings module in the Github Access Token section. And then click Save.
You can also publish by right-clicking on the file or folder.
Right-Click popup menu
Right-Click on a folder
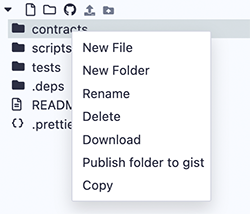
Right-clicking on a folder will bring a popup menu for operations you can do on that folder.
The right-click popup menu also works with Remixd (which gives you access to a folder on your hard drive).
Note: When working with RemixD, and when adding files to the shared folder from your computer (and not from Remix), you’ll need to open and close the containing folder or switch in and out of localhost workspace to refresh the view.
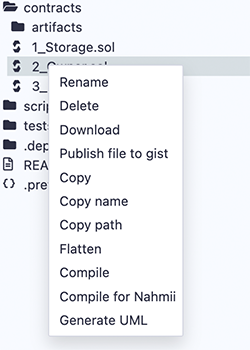
Right-Click on a Solidity file
Right-clicking on a file with a .sol extension will bring up a popup menu - which includes options for compiling & flattening, creating UML diagrams, and generating documentation.
Right-Click on a Script
Right-click on any file with a .js or .ts extension to get the Run option in the popup menu to run the script.
If the script you want to run is the active file in the Editor, you can also run it by using play button at the top left of the Editor or by inputting the command remix.exeCurrent() in the console.
Git in the File Explorer
In Remix, a workspace can be initialized with Git. The Git commands then operate on the workspace.
Initialize
For information about initializing a workspace, see this section.
Clone
The clone command is located in the Workspace hamburger menu. For more information, see the section about workspace operations
Branch Management
When you are in a workspace that is initialized with Git, at the bottom of the File Explorer, you’ll see the place for managing branches.
Then when you click on the branch name, this section will expand with an interface for switching branches and for creating a new branch.
For the rest of the Git commands, go to the DGit plugin.
For more info about the DGit plugin, see .
Plugin Manager
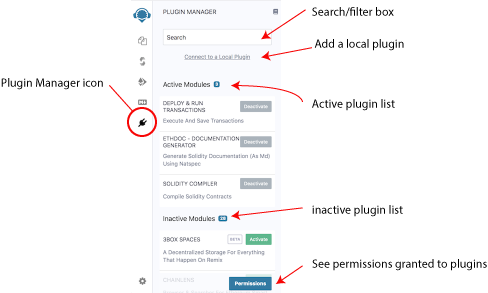
In Remix IDE you only load the functionality you need. Controlling which plugins are active or inactive happens in the Plugin Manager.
This plugin architecture has made it possible to integrate tools made by the Remix team with tools made by external teams. This architecture also allows Remix or just parts of Remix to be integrated into other projects.
Manage permissions
When plugins need to access other plugins for their operation, a modal will appear to ask you for permission.
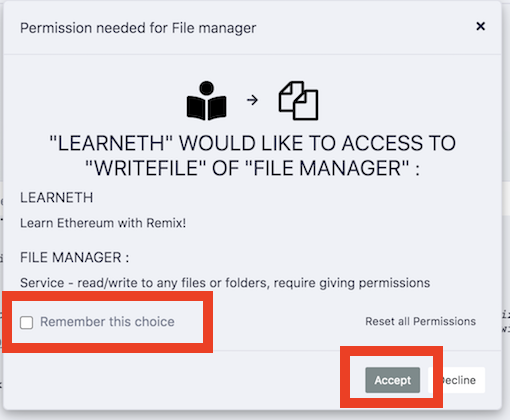
Often, the same plugin will want to do the same action multiple times. So when granting permission, its helpful to click the Remember this choice box. If you don’t, you might get this modal repeatedly popping up.
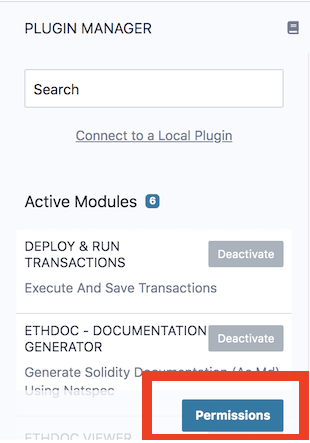
View permissions
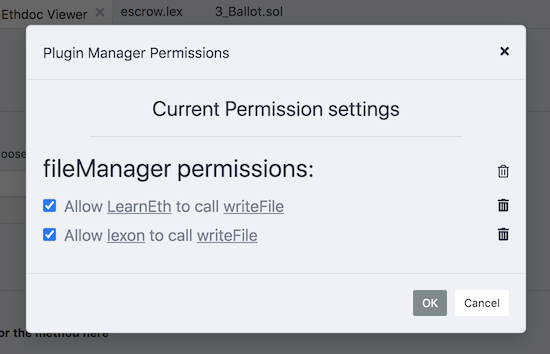
You can view the permissions that you have granted to plugins by clicking on the Permissions button at the bottom of the Plugin Manager.
A modal will appear like the one below where you can view and erase the granted permission.
Plugin Devs: Load a local plugin
A plugin in development can be loaded into Remix IDE by clicking the “Connect to a Local Plugin” link at the top of the Plugin Manager panel.
To learn more about how to create your own plugin, go to the README of remix-plugin repo.
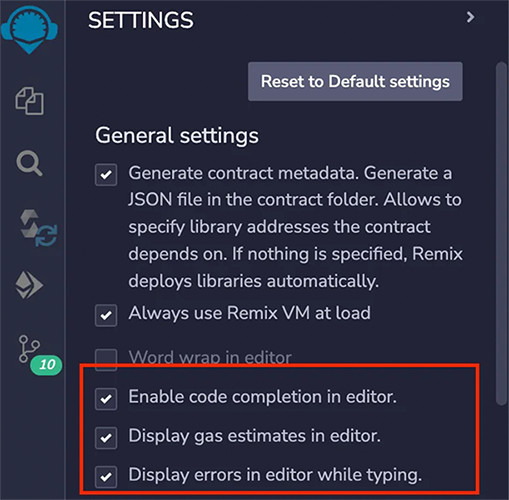
Settings
To get to Settings click the gear at the very bottom of the icon panel.
General Settings

Generate contract metadata is used for deploying with libraries. See our blog post on the subject: Deploying with Libraries
Always use Remix VM at Load: will make the Remix VM the selected environment when Remix loads.
Text wrap: controls if the text in the editor should be wrapped.
Personal mode: can be used when one is connecting to a local node. It is used to have Remix temporarily save the passphrase - so that you don’t need to unlock the account in GETH. Remix will not persist the passphrase - so if you refresh your browser the passphrase will be gone.
Matomo Analytics: This is where you can turn off and on your approval for us to use Matomo. We do not collect any personally identifiable information (PII) and our reports are public. See our blog post on the subject.
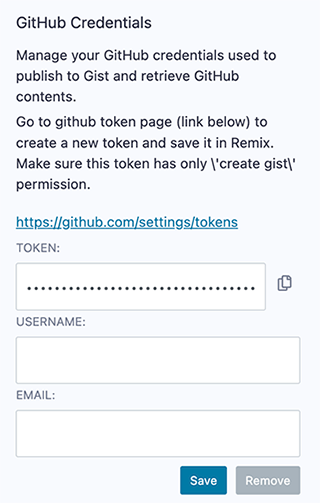
Github Access Token
When performing Git operations on Github and when creating GISTs, it may be necessary to input an access token. This token has the specific permissions for your Git commands. Depending on the operation, you may also need to input your Github username & email address. Remix does not save your password info outside of your browser’s localstorage. https://github.com/settings/tokens
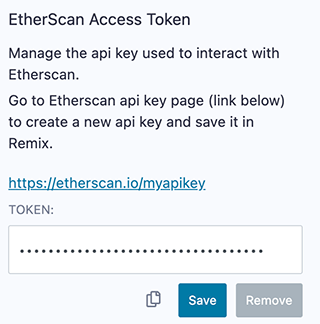
Etherscan Access Token
You need to input your Etherscan access token when debugging verified contracts with the Remix Debugger. When verifying a contract with the Etherscan plugin, you need to put the API key in that plugin and not in the Settings panel.
Click here to get your Etherscan API key.
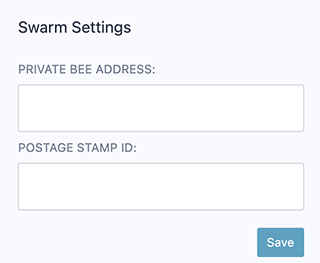
Swarm Settings
In the Solidity Compiler, after the compilation is completed, there is a button to publish to Swarm.
Without putting in an address & postage stamp, you’ll be using the public gateway, which may not persist you content as surely as if you put in your own info.
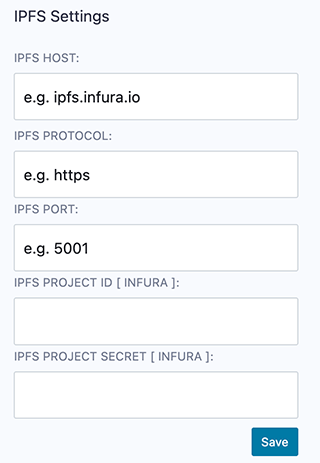
IPFS Settings
Just like the Swarm settings above, IPFS settings are for publishing your contracts to IPFS from the Solidity Compiler.
If you do not put in any settings here, you will be using the public INFURA node. This will not guarantee your data will persist.
Other options are to:
Use your own INFURA IPFS node. This requires a subscription. Learn more
Use any external IPFS which doesn’t require any authentification.
Use your own local ipfs node (which usually runs under http://localhost:5001)
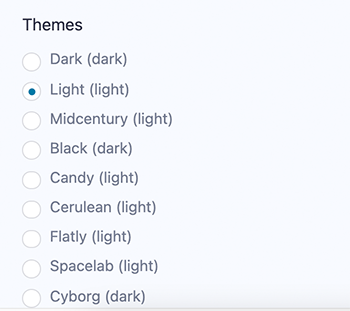
Themes
Choose themes here. The Dark & Light themes are the themes that the Remix team actively maintains.
Editor
Remix uses the Monaco editor. This is the same editor used by VSCode.
Remix saves the current file every 5 seconds.
The Remix Editor will highlight keywords in Soldiity, JS, and TS.
Editor displays information from other plugins
The main purpose of the Editor is, of course, to edit code. But it also works with other plugins, notably, the Soldity Compiler and the Debugger.
The Solidity Compiler will display warnings and errors in the Editor’s gutter at the problematic line.
Breakpoints for the Debugger are input in the Editor’s gutter.
When stepping through code in the Debugger, the relevant code will be highlighted in the Editor.
General Operations
Files are open as tabs. When there are too many tabs to display, scrolling with a mouse wheel will horizontally scroll the tabs.
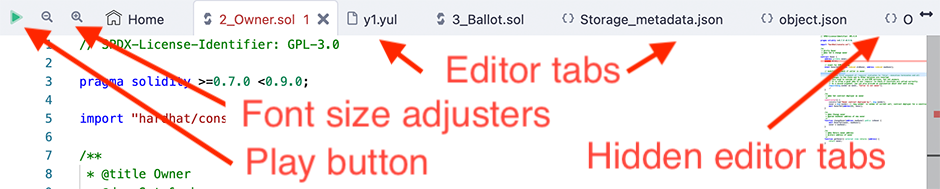
The Play button works on the active tab. If a Solidity file is active, clicking Play will compile it. If a TS or JS file is active, Play will run the script.
The magnifying glass icons (+/-) on the top left corner are to increase/decrease the font size.
The small type on the far right of the Editor is clickable to jump to a section.
TypeScript
The Editor and Script Runner support TypeScript, which means that you can write TypeScript, have some auto-completion, and run it straight from Remix. As stated above, there is syntax highlighting in TS.
The default Workspace contains example TypeScript files.
Editor & Autocompile
When autocompile is enabled (in the Settings panel), compilation will occur each time the current file is changed, or another file is selected.
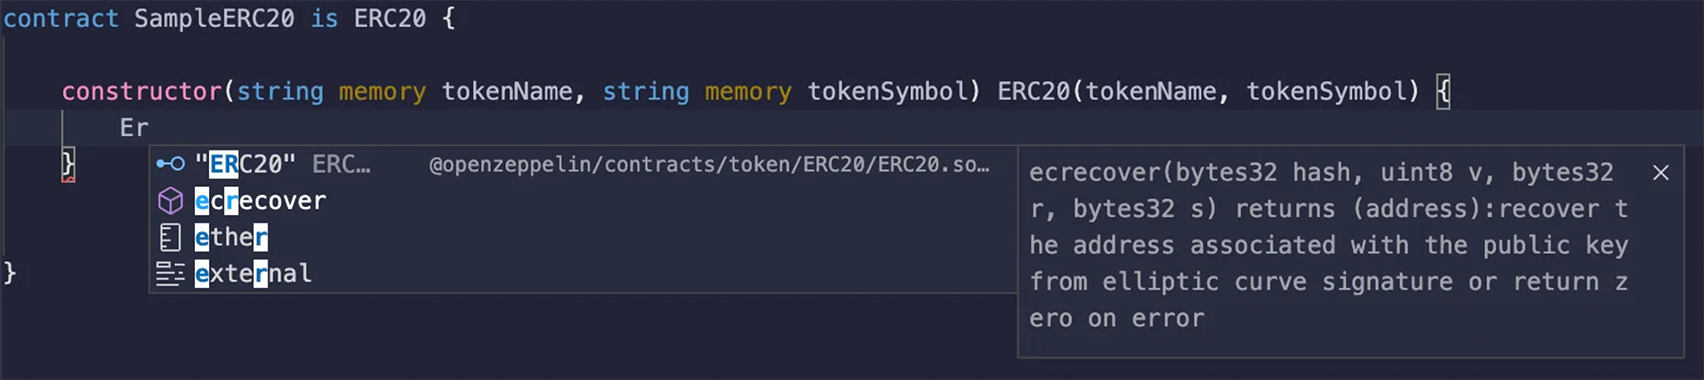
Autocomplete
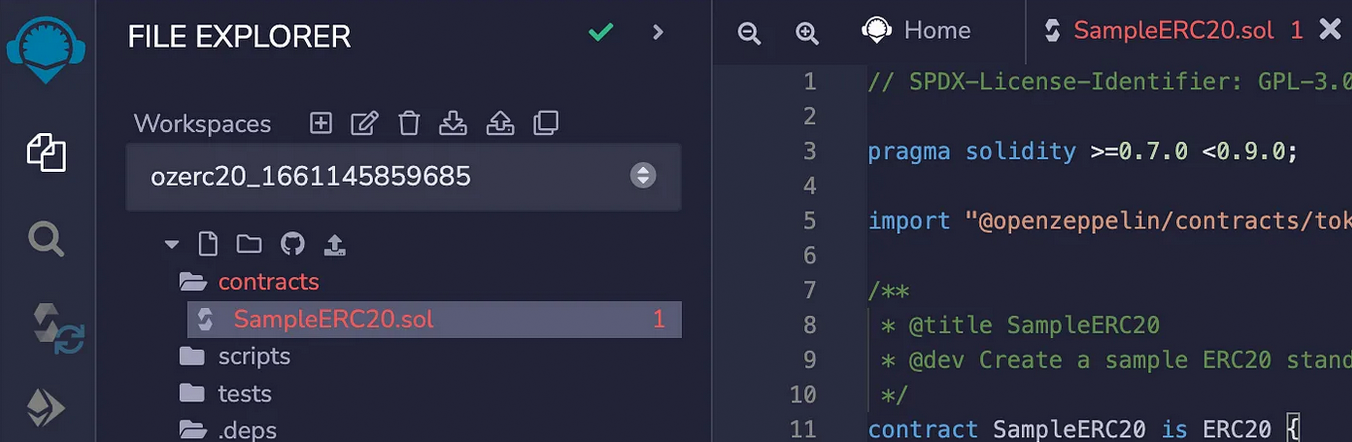
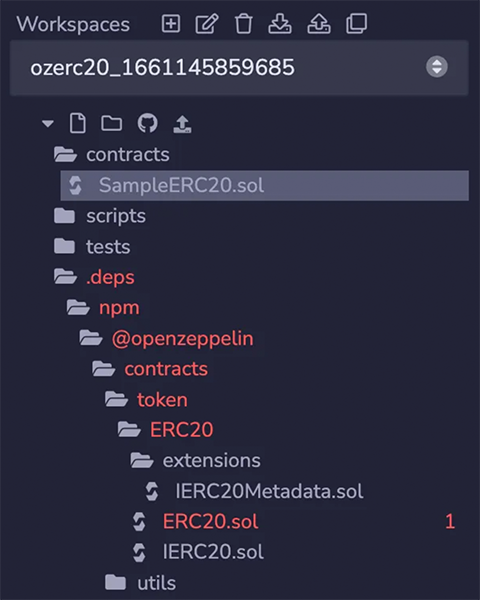
Autocompleting Solidity code happens when you start typing in the Editor. The Compiler will run in the background, and process any imports you have. You will see these imports appear in the .deps directory in the File Explorer.

Tip: If you start with a Solidity file that contains errors, the Compiler might not be able to compile it. In that case, the Editor’s autocomplete features will not fully work until after the file is successfully compiled. After that, autocomplete will work even if there are errors, but only for the elements the Compiler already understands. For example, if you add a new function in a file that contains errors, autocomplete will not be able to find that function because it can’t compile the file.
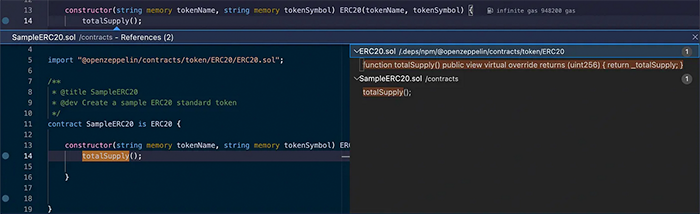
Auto complete on imports
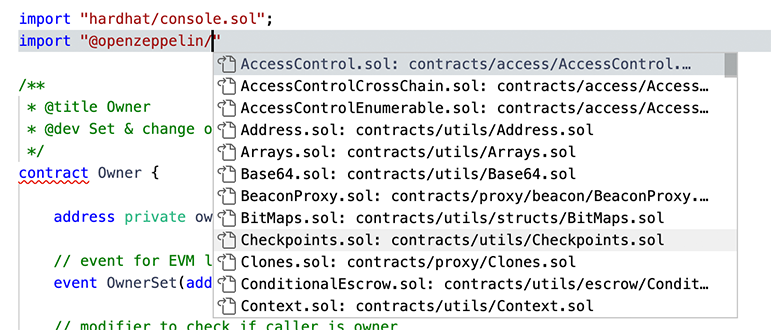
The Editor’s autocomplete will offer the option to bring in OpenZeppelin contracts, Uniswap contracts, and the paths to all the files in the current Workspace.
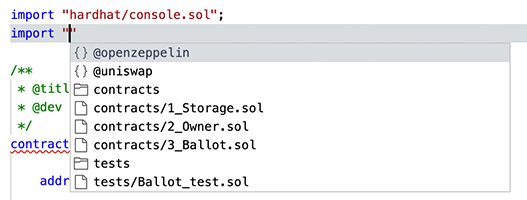
So, when choosing @openzeppelin, you’ll get this:
And the same with Uniswap:

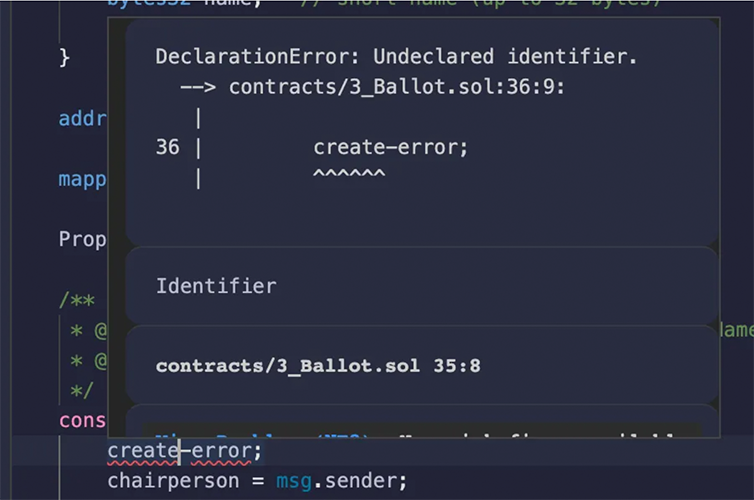
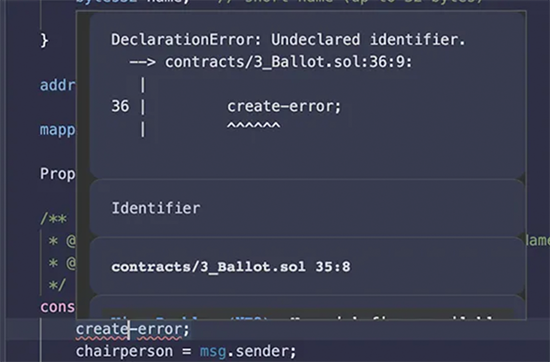
Errors and Warnings
You can tell the file was successfully compiled if no errors or warnings are displayed in the Editor. Errors are displayed using squiggly lines. A red line indicates an error, a yellow line is a warning.
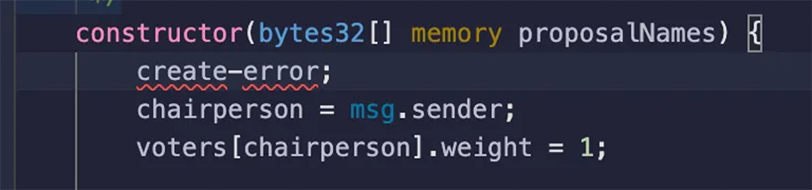
Hovering over the squiggly line shows you the message from the Compiler.
Tabs and the File Explorer will also will also display whether a file contains errors or warnings.
Errors on Imported Files
A file with errors in one of the files that it imports will also trigger an error in the Editor. Your main file might not compile, but you will see there is a problem immediately.
Hovering over an Error Number in the File Explorer
The number of errors in a file is also reported in the File Explorer. Hovering over the number, which indicates the amount of errors/warnings, will display the information from the Compiler.
Gas Estimates
Gas estimates are displayed on the same line where a function is declared.

Constructor gas estimates are also displayed, and consist of two components: creation cost and code deposit cost.
Go to Definition and References
Definitions
By right-clicking, you can go to a definition. You can also use the shortcut displayed.
You can also right-click on the filename of an import statement and jump to that file.

You can also ‘peek’ at the definition inline in the Editor. You can then jump to a definition by double-clicking on the right hand side of the line.
References
By right-clicking, you can display all the references. You can also use the shortcut displayed.

You can jump to a reference by double-clicking on the right hand side of the line.
Highlighted References
References are highlighted in the Editor.

Hovering
When you hover over a term with a definition, the definition will pop up. Hovering over code that has triggered an error (underlined with a red squiggly line) will show the error message.
Files with Errors turn Red
When a file contains an error, its name will turn red, both in the File Explorer and on its tab at the top of the Editor.
More about the Editor updates in this article: Major Updates to Remix Editor
Terminal
Features, available in the terminal:
It integrates a JavaScript interpreter and the
web3object. It enables the execution of the JavaScript script which interacts with the current context. (note thatweb3is only available if theweb providerorinjected providermode is selected).It displays important actions made while interacting with the Remix IDE (i.e. sending a new transaction).
It displays transactions that are mined in the current context. You can choose to display all transactions or only transactions that refers to the contracts Remix knows (e.g transaction created from the Remix IDE).
It allows searching for the data and clearing the logs from the terminal.
You can run scripts by inputting them at the bottom after the
>.
Solidity Compiler
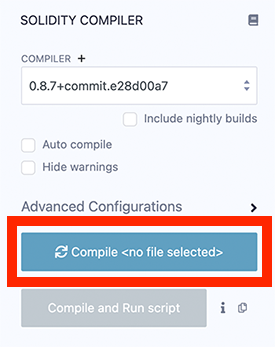
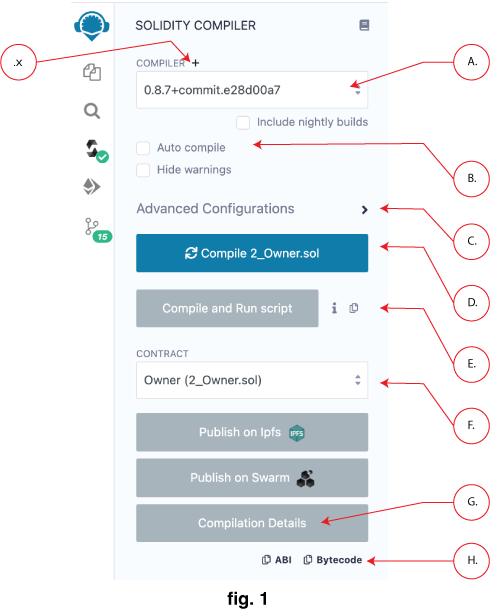
Clicking the Solidity icon in the icon panel brings you to the Solidity Compiler. The default view of the Solidity Compiler shows the basic configuration. To open the Advanced Configuration panel, click the Advanced Configuration button (C. in fig. 1). For details on advanced features - see below.
Solidity Compiler Basics
Selecting a contract to compile
To select a contract to compile, choose a file in the File Explorer. Or if there are several files open, make sure the one you want to compile is the active file in the Editor.
If there is not an active file in the editor or a file has not already been compiled, then the Solidity compiler will look like this:
Triggering compilation
Compiling is triggered when you:
click the compile button (D. in fig. 1 below)
use the shortcut
control + s.right click on a file in the File Explorer and selecting Compile option
Auto Compile
If the auto compile checkbox (B. in fig. 1 above) is checked, compiliation will occur every few seconds (when the file is auto-saved) as well as when another file is selected. If a contract has a lot of dependencies, it can take a while to compile - so you use autocompilation at your discretion.
Solidity versions & Remix functionality
The compiler version is selected in the COMPILER dropdown list (A. in fig. 1 above).
You can compile (and deploy) contracts with versions of Solidity older than 0.4.12. However, the older compilers use a legacy AST — which we no longer support. Consequently, some plugins may not work and some functionality - e.g. source highlighting in the Editor may only be partially working.
Using the Contract select box
Because a Solidity file can include multiple contracts and because contracts can import other contracts, multiple contracts are often compiled. However, only 1 contract’s compilation details can be retrieved at a time.
To select the desired contract, use the Contract select box (F. in fig. 1). Forgetting to select the right contract is a common mistake - so remember to verify that the contract you want is selected.
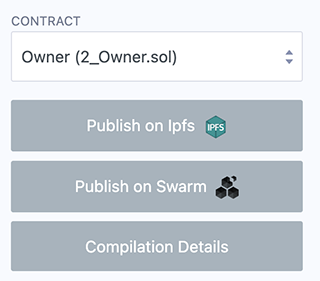
Compilation Details and Publishing
Using the publish button, you can upload your contract to IPFS or Swarm (only non abstract contracts can be published to Swarm).
When publishing a contract that imports other contracts, the main contract and all of its imported contracts will be published - each to their own address.
Published data contains the contract’s metadata and the solidity source code.
After either Publish on IPFS or Publish on Swarm is clicked a modal will pop up. This modal contains the contract’s address as well as the addreses of the contracts that it imported and the address of the contract’s metadata.
When the “Compilation Details” button is clicked (G. in fig. 1), a modal opens displaying detailed information about the current selected contract.
If you just want to get the ABI or the Bytecode - click the appropriate button see H. in fig. 1.
Passive Contract Verification
When you publish your metadata to IPFS and deploy your code to the mainnet or a public testnet, the contract verification service Sourcify, will verifiy your contracts without you needing to do anything.
Compile and Run script
The Compile and Run script button (E. in fig. 1) is for compiling and then immediately running a script. It’s a time saver so that you can write some code, automatically run script that sets state of the contract - thus allowing you to quickly understand how the code is working. (more about Compile & Run)
Compilation Errors and Warning
Compilation Errors and Warning are displayed below the contract section. At each compilation, the static analysis tab builds a report.
It is important to address reported issues even if the compiler doesn’t complain. (more about static analysis)
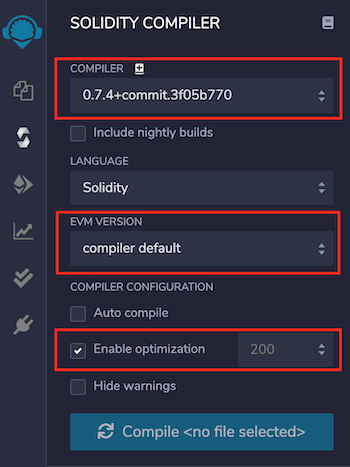
Advanced Compiler Configurations
Clicking on Advanced Compiler Configurations will open this panel (M. in fig. 2 below).
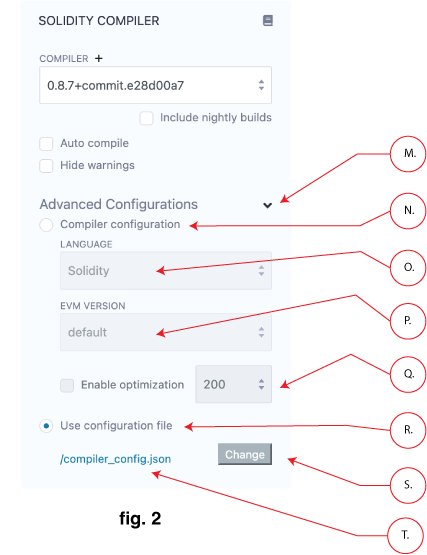
There is a radio button to choose whether to configure the compiler through the interface (N. in fig 2) or to use a JSON file for the cofiguration (R. in fig 2).
Solidity or YUL
Since the Solidity version 0.5.7, it is possible to compile Yul files. Please read the (solidity documentation about Yul) which contain some code examples.
You can use the language dropdown (O. in fig 2) to switch the language. This dropdown list is only available for versions greater than or equal to 0.5.7.
Select an EVM version
The EVM dropdown list (P. in fig 2) allows to compile code against a specific Ethereum hard fork.
The compiler default corresponds to the default hard fork used by a specific version.
To see the name of the hard fork used in the current compilation, click the “Compilation Details” button and in the Metadata section there will be a sub-section called settings. Open up the settings to see the EVM version’s name.
Enable optimization
According to the the Solidity Docs, “the optimizer tries to simplify complicated expressions, which reduces both code size and execution cost, i.e., it can reduce gas needed for contract deployment as well as for external calls made to the contract.”
For recent versions of Solidity, it is recommended to enable optimization .
To learn more about optimization, (Q. in the fig 2) visit the Solidity docs on the optimizer.
To the right of the Enable optimization checkbox is the box to input the number of Optimization runs. The default value is 200.
You may ask — “What is the right number of runs for my contract?” And the Solidity docs say:
If you want the initial contract deployment to be cheaper and the later function executions to be more expensive, set it to –optimize-runs=1. If you expect many transactions and do not care for higher deployment cost and output size, set –optimize-runs to a high number.
To learn more about the optimization runs, visit the Solidity docs about Optimizer options.
JSON file for Compiler configuration
Selecting the radio button next to Use configuration file will let you set the configuration using a JSON file (T. in fig 2). When you switch to compile with a config file, a sample compiler config file is created. This file can be edited with all the available options.
Clicking the config file’s name will open it up in the Editor. To change the config file click the Change button. If you update the text box with a file name of a file that does not exist, a new file will be created containing the default file’s contents.
There is no error checking when using the .json file for configuration settings, so make sure your config file is correct.
Use a Custom Solidity Compiler
For those writing your own custom solidity compiler, you can import that by clicking the + button (X. in fig 1) to open a modal where you can input the url of the compiler to be loaded.
Deploy & Run
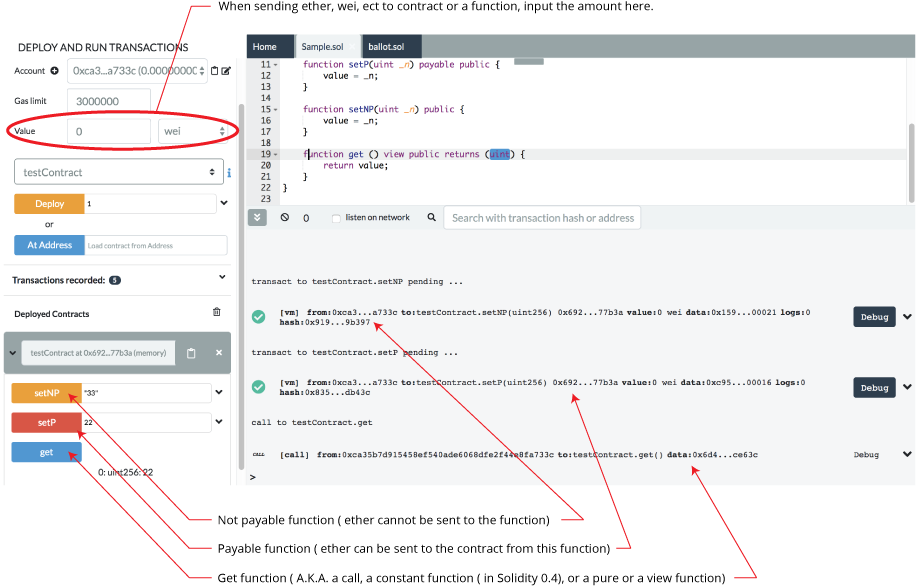
![]() The Deploy & Run module is for sending transactions to the current Environment.
The Deploy & Run module is for sending transactions to the current Environment.
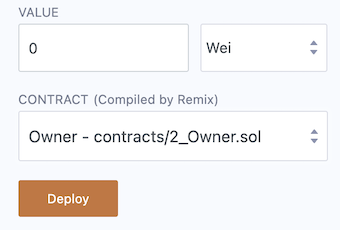
For deploying, you need to have a contract compiled. To check that there is a compiled contract, find the CONTRACT select box (which is under the VALUE input field), you can use this module.
If nothing is there, you need to compile a file. If you do not see the contract you want, you need to select a contract in the editor to make it active.
Environment
Remix VM (Merge): Connects to a sandbox blockchain in the browser. The Remix VM (previously called JavaScript VM) is its own “blockchain” and on each reload the old chain will be cleared and a new blockchain will be started. The old one will not be saved. Merge refers to the fork of Ethereum when the Merge occurred. This fork is also known as the Paris fork.Remix VM (London): Same as above except this chain is using the London fork of Ethereum.Remix VM (Berlin): Same as above except this chain is using the Berlin fork of Ethereum.Remix VM - Mainnet fork: This will fork the Ethereum mainnet and will load it into the Remix VM. It is useful for developing contracts that need to access deployed mainnet contracts. (See below for more info about Forking)Remix VM - Goerli fork: Same as above except this forks the Goerli testnet. (See below for more info about Forking)Remix VM - Sepolia fork: Same as above except this forks the Sepolia testnet. (See below for more info about Forking)Remix VM - Custom fork: Forks a chain, at block number, and in an EVM version of your choice. (See below for more info about Forking)Injected Provider - provider name: Connects Remix to an injected web3 provider. The most common injected provider isMetamask.Custom - External HTTP Provider: Remix will connect to a remote node. You will need to provide the URL to the selected provider: geth, parity or any Ethereum client. This was previously called Web3 Provider. (See below for more info about External HTTP Provider)Dev - Hardhat Provider: Connects Remix to a local Hardhat test chain.Dev - Ganache Provider: Connects Remix to a local Truffle Ganache test chain.Dev - Foundry Provider: Connects Remix to a local Foundry Anvil test chain.L2 - Optimism Provider: Connects Remix to an Injected Provider (usually Metamask) with the settings for the mainnet of Optimism.L2 - Arbitrum One Provider: Connects Remix to an Injected Provider (usually Metamask) with the settings for the Arbitrum One network.WalletConnect: Connects Remix to a wallet on a mobile device.
Forking chains in Remix
Forking is a great technique for developing a contract that interacts with deployed contracts on a specific chain. By bringing in a chain to the Remix VM, you’ll have the 10 accounts loaded with 100ETH.
Careful though, if you refresh the browser, you’ll lose the forked chain.
Custom Fork
The Custom fork option allows you to specify a chain’s RPC server, a block number, and an EVM version.
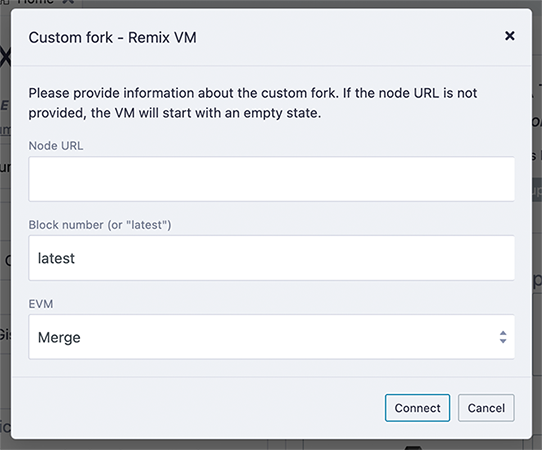
You can get the Node URL from chainlist.org. If the chain does not load, you may need to choose a different RPC server. You will also need to choose an EVM version appropriate to the block number. So, if you choose a very low block number, the EVM with the Merge “flavor” won’t work because this version of the EVM came out later.
More about External HTTP Provider
If you are using Geth & https://remix.ethereum.org, please use the following Geth command to allow requests from Remix:
geth --http --http.corsdomain https://remix.ethereum.org
Also see Geth Docs about the http server
To run Remix using https://remix.ethereum.org & a local test node, use this Geth command:
geth --http --http.corsdomain="https://remix.ethereum.org" --http.api web3,eth,debug,personal,net --vmdebug --datadir <path/to/local/folder/for/test/chain> --dev console
If you are using remix-alpha or a local version of remix - replace the url of the –http.corsdomain with the url of Remix that you are using.
To run Remix Desktop & a local test node, use this Geth command:
geth --http --http.corsdomain="package://a7df6d3c223593f3550b35e90d7b0b1f.mod" --http.api web3,eth,debug,personal,net --vmdebug --datadir <path/to/local/folder/for/test/chain> --dev console
Also see Geth Docs on Dev mode
The Web3 Provider Endpoint for a local node is http://localhost:8545
WARNING: Don’t get lazy. It is a bad idea to use the Geth flag –http.corsdomain with a wildcard: --http.corsdomain *
If you put the wildcard *, it means everyone can request the node. Whereas, if you put a URL, it restricts the urls to just that one - e.g. --http.corsdomain 'https://remix-alpha.ethereum.org'
Only use --http.corsdomain * when using a test chain AND using only test accounts. For real accounts or on the mainchain specify the url.
Account:
Account: the list of accounts associated with the current environment (and their associated balances). On the Remix VM, you have a choice of 5 accounts. If using Injected Web3 with MetaMask, you need to change the account in MetaMask.
Gas Limit:
This sets the maximum amount of gas that will be allowed for all the transactions created in Remix.
Value:
This sets the amount of ETH, WEI, GWEI etc that is sent to a contract or a payable function.
Note: payable functions have a red button.
The Value field is always reset to 0 after each transaction execution.
The Value field is NOT for gas.
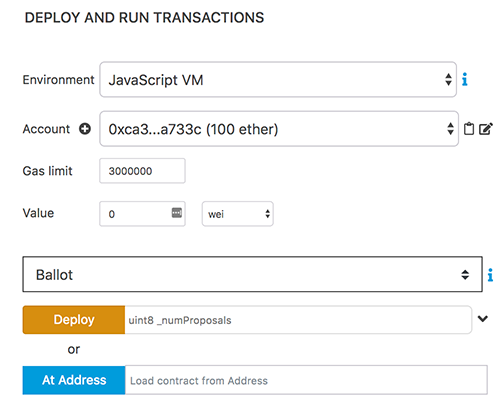
Deploy & AtAddress
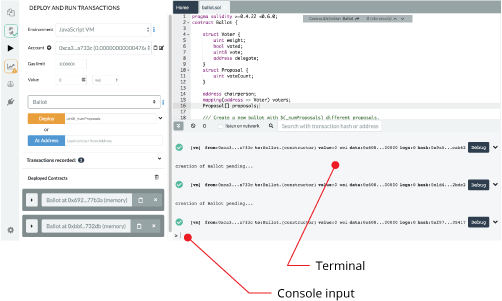
In the image above, the select box is set to Ballot. This select box will contain the list of compiled contracts.
Deploysends a transaction that deploys the selected contract. When the transaction is mined, the newly created instance will be added (this might take several seconds).
Note: If the contract’s constructor function has parameters, you need to specify them.At Addressis used to access a contract that has already been deployed. Because the contract is already deployed, accessing a contract with AtAddress does not cost gas.
Note: When using AtAddress, be sure you trust the contract at that address.
To use AtAddress, you need to have the source code or ABI of the deployed contract in the active tab of the editor. When using the source code, it must be compiled with the same compilation settings as the deployed contract that you are trying access.
Using the ABI with AtAddress
The ABI is a JSON array which describes the contract’s interface.
To interact with a contract using the ABI, create a new file in Remix with extension *.abi and copy the ABI content to it.
Make sure this file is the active tab in the editor. Then, in the field next to At Address, input the contract’s address and click on At Address. If successful, an instance of the contract will appear below - in the list of Deployed Contracts.
Note: To generate the ABI, in the Solidity compiler, after a contract is compiled, click on the Compilation Details button. A modal will come up with that contains the ABI among other info.
Pending Instances
Validating a transaction takes several seconds. During this time, the GUI shows it in a pending mode. When the transaction is mined, the number of pending transactions is updated and the transaction is added to the log (see terminal).
Using the Recorder
The Recorder is a tool used to save a bunch of transactions in a JSON file and re-run them later either in the same environment or in another.
Saving to the JSON file ( by default its called scenario.json) allows one to easily check the transaction list, tweak input parameters, change linked library, etc…
There are many use cases for the recorder.
For instance:
After having coded and tested contracts in a constrained environment (like the Remix VM), you could then change the environment and redeploy it to a more realistic environment like a public testnet or to a Geth node. By using the generated scenario.json file, you will be using all the same settings that you used in the Remix VM. And this means that you won’t need to click the interface 100 times or whatever to get the state that you achieved originally. So the recorder could be a tool to protect your sanity.
You can also change the settings in the scenario.json file to customize the playback.
Deploying contract does often require more than creating one transaction and so the recorder will automate this deployment.
Working in a dev environment often requires setting up the state in a first place.
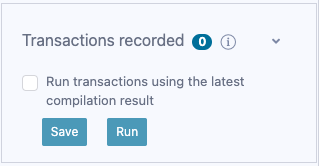
When checked, the option Run transactions using the last compilation result allows you to develop a contract and easily set the state using the latest compiled versions of the contracts.
scenario.json
To create this file in the recorder, you first of course need to have run some transactions. In the image above - it has a 0 next to Transactions Recorded. So this isn’t the right moment to save transactions because - well because there aren’t any. Each time you make a transaction, that number will increment. Then when you are ready, click the floppy disk icon and the scenario.json file will be created.
The JSON file below is an example of the scenario.json file.
In it, 3 transactions are executed:
The first corresponds to the deployment of the lib testLib.
The second corresponds to the deployment of the contract test with the
first parameter of the constructor set to 11. That contract depends
on a library. The linkage is done using the property linkReferences.
In that case we use the address of the previously created library :
created{1512830014773}. The number is the id (timestamp) of the
transaction that led to the creation of the library.
The third record corresponds to the call to the function set of the
contract test (the property to is set to: created{1512830015080}) .
Input parameters are 1 and
0xca35b7d915458ef540ade6068dfe2f44e8fa733c
All these transactions are created using the value of the accounts
account{0}.
{
"accounts": {
    "account{0}": "0xca35b7d915458ef540ade6068dfe2f44e8fa733c"
},
"linkReferences": {
    "testLib": "created{1512830014773}"
},
"transactions": [
    {
    "timestamp": 1512830014773,
    "record": {
        "value": "0",
        "parameters": [],
        "abi": "0xbc36789e7a1e281436464229828f817d6612f7b477d66591ff96a9e064bcc98a",
        "contractName": "testLib",
        "bytecode": "60606040523415600e57600080fd5b60968061001c6000396000f300606060405260043610603f576000357c0100000000000000000000000000000000000000000000000000000000900463ffffffff1680636d4ce63c146044575b600080fd5b604a6060565b6040518082815260200191505060405180910390f35b6000610d809050905600a165627a7a7230582022d123b15248b8176151f8d45c2dc132063bcc9bb8d5cd652aea7efae362c8050029",
        "linkReferences": {},
        "type": "constructor",
        "from": "account{0}"
    }
    },
    {
    "timestamp": 1512830015080,
    "record": {
        "value": "100",
        "parameters": [
        11
        ],
        "abi": "0xc41589e7559804ea4a2080dad19d876a024ccb05117835447d72ce08c1d020ec",
        "contractName": "test",
        "bytecode": "60606040526040516020806102b183398101604052808051906020019091905050806000819055505061027a806100376000396000f300606060405260043610610062576000357c0100000000000000000000000000000000000000000000000000000000900463ffffffff1680632f30c6f61461006757806338cc48311461009e57806362738998146100f357806387cc10e11461011c575b600080fd5b61009c600480803590602001909190803573ffffffffffffffffffffffffffffffffffffffff16906020019091905050610145565b005b34156100a957600080fd5b6100b1610191565b604051808273ffffffffffffffffffffffffffffffffffffffff1673ffffffffffffffffffffffffffffffffffffffff16815260200191505060405180910390f35b34156100fe57600080fd5b6101066101bb565b6040518082815260200191505060405180910390f35b341561012757600080fd5b61012f6101c4565b6040518082815260200191505060405180910390f35b8160008190555080600160006101000a81548173ffffffffffffffffffffffffffffffffffffffff021916908373ffffffffffffffffffffffffffffffffffffffff1602179055505050565b6000600160009054906101000a900473ffffffffffffffffffffffffffffffffffffffff16905090565b60008054905090565b600073__browser/ballot.sol:testLib____________636d4ce63c6000604051602001526040518163ffffffff167c010000000000000000000000000000000000000000000000000000000002815260040160206040518083038186803b151561022e57600080fd5b6102c65a03f4151561023f57600080fd5b505050604051805190509050905600a165627a7a72305820e0b2510bb2890a0334bfe5613d96db3e72442e63b514cdeaee8fc2c6bbd19d3a0029",
        "linkReferences": {
        "browser/ballot.sol": {
            "testLib": [
            {
                "length": 20,
                "start": 511
            }
            ]
        }
        },
        "name": "",
        "type": "constructor",
        "from": "account{0}"
    }
    },
    {
    "timestamp": 1512830034180,
    "record": {
        "value": "1000000000000000000",
        "parameters": [
        1,
        "0xca35b7d915458ef540ade6068dfe2f44e8fa733c"
        ],
        "to": "created{1512830015080}",
        "abi": "0xc41589e7559804ea4a2080dad19d876a024ccb05117835447d72ce08c1d020ec",
        "name": "set",
        "type": "function",
        "from": "account{0}"
    }
    }
],
"abis": {
    "0xbc36789e7a1e281436464229828f817d6612f7b477d66591ff96a9e064bcc98a": [
    {
        "constant": true,
        "inputs": [],
        "name": "get",
        "outputs": [
        {
            "name": "",
            "type": "uint256"
        }
        ],
        "payable": false,
        "stateMutability": "view",
        "type": "function"
    }
    ],
    "0xc41589e7559804ea4a2080dad19d876a024ccb05117835447d72ce08c1d020ec": [
    {
        "constant": true,
        "inputs": [],
        "name": "getInt",
        "outputs": [
        {
            "name": "",
            "type": "uint256"
        }
        ],
        "payable": false,
        "stateMutability": "view",
        "type": "function"
    },
    {
        "constant": true,
        "inputs": [],
        "name": "getFromLib",
        "outputs": [
        {
            "name": "",
            "type": "uint256"
        }
        ],
        "payable": false,
        "stateMutability": "view",
        "type": "function"
    },
    {
        "constant": true,
        "inputs": [],
        "name": "getAddress",
        "outputs": [
        {
            "name": "",
            "type": "address"
        }
        ],
        "payable": false,
        "stateMutability": "view",
        "type": "function"
    },
    {
        "constant": false,
        "inputs": [
        {
            "name": "_t",
            "type": "uint256"
        },
        {
            "name": "_add",
            "type": "address"
        }
        ],
        "name": "set",
        "outputs": [],
        "payable": true,
        "stateMutability": "payable",
        "type": "function"
    },
    {
        "inputs": [
        {
            "name": "_r",
            "type": "uint256"
        }
        ],
        "payable": true,
        "stateMutability": "payable",
        "type": "constructor"
    }
    ]
}
}
Deploy & Run (part 2)
Deployed contracts
This section in the Run tab contains a list of deployed contracts to interact with through autogenerated UI of the deployed contract (also called udapp).
The deployed contract appears but is in its collapsed form.

Click the sideways caret to open it up.
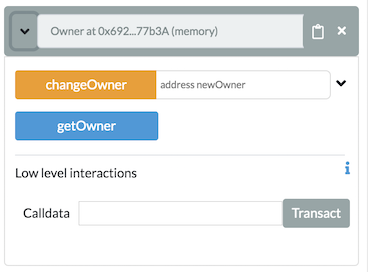
You will see the functions in the contract. The functions buttons can have different color buttons.
Functions that are
constantorpurefunctions in Solidity have a blue buttons. Clicking one of this type does not create a new transaction. So clicking will not cause state changes - it will only return a value stored in the contract - so it won’t cost you anything in gas fees.Functions that change the state of the contract AND that do not accept Ether are called
non-payablefunctions and have an orange button. Clicking on them will create a transaction and thus cost gas.Functions that have red buttons are
payablefunctions in Solidity. Clicking one of these will create a new transaction and this transaction can accept a value. The value is put in in the Value field which is under the Gas Limit field.
See more information about Solidity modifiers in the Solidity docs. .
If a function requires input parameters, well.. you gotta put them in.
Inputting parameters
Inputting parameters in the collapsed view
(Inputting all the parameters in a single input box)
The input box tells you what type each parameter needs to be.
Numbers and addresses do not need to be wrapped in double quotes.
Strings do not need to be wrapped.
Parameters are separated by commas.
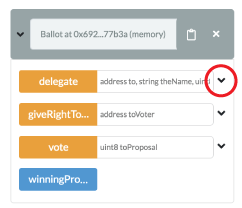
In the example above the “delegate” function has 3 parameters.
Inputting parameters in the expanded view
Clicking the ‘down’ caret brings you to the Multi-param Manager - where you can input the parameters one at a time. Much less confusing!
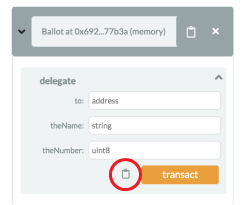
In the expanded view, strings do not need to be wrapped.
Clicking the clipboard icon will encode the inputs and will copy them. Only a valid set of inputs can be encoded.
So if you made a mistake and put a uint8 where an address should have been, clicking the clipboard here will give you an error.
Low level interactions
Low level interactions are used to send funds or calldata or funds & calldata to a contract through the receive() or fallback() function. Typically, you should only need to implement the fallback function if you are following an upgrade or proxy pattern.
The low level interactions section is below the functions in each deployed contract.
Please note the following:
If you are executing a plain Ether transfer to a contract, you need to have the receive() function in your contract. If your contract has been deployed and you want to send it funds, you would input the amount of Ether or Wei etc. (see A in graphic below), and then input NOTHING in the calldata field of Low level interactions (see B in graphic) and click the Transact button (see C in graphic below).
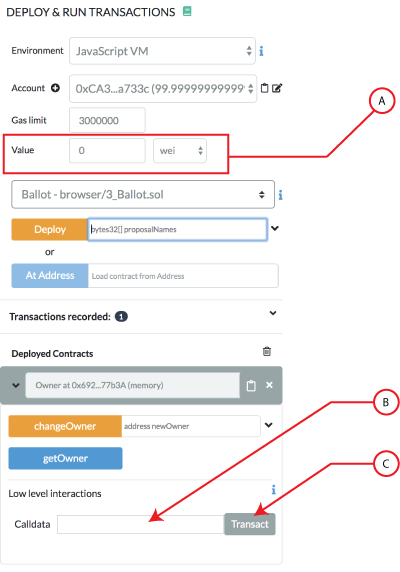
If you are sending calldata to your contract with Ether, then you need to use the fallback() function and have it with the state mutability of payable.
If you are not sending ether to the contract but are sending call data then you need to use the fallback() function.
If you break the rules when using the Low level interactions you will be slapped with a warning.
Please see the solidity docs for more specifics about using the fallback and receive functions.
Passing in a tuple or a struct to a function
To pass a tuple in, you need to put in an array [].
Similarly, to pass in a struct as a parameter of a function, it needs to be put in as an array []. Also note that the line
pragma experimental ABIEncoderV2;
needs to put in at the top of the solidity file.
Example of passing nested struct to a function
Consider a nested struct defined like this:
struct gardenPlot {
    uint slugCount;
    uint wormCount;
    Flower[] theFlowers;
}
struct Flower {
    uint flowerNum;
    string color;
}
If a function has the signature fertilizer(Garden memory gardenPlot) then the correct syntax is:
[1,2,[[3,"Petunia"]]]
To continue on this example, here’s a sample contract:
pragma solidity >=0.4.22 <0.7.0;
pragma experimental ABIEncoderV2;

contract Sunshine {
    struct Garden {
      uint slugCount;
      uint wormCount;
      Flower[] theFlowers;
    }
    struct Flower {
        uint flowerNum;
        string color;
    }

    function picker(Garden memory gardenPlot) public {
        uint a = gardenPlot.slugCount;
        uint b = gardenPlot.wormCount;
        Flower[] memory cFlowers = gardenPlot.theFlowers;
        uint d = gardenPlot.theFlowers[0].flowerNum;
        string memory e = gardenPlot.theFlowers[0].color;
    }
}
After compiling, deploying the contract and opening up the deployed instance, we can then add the following input parameters to the function named fertilizer :
[1,2,[[3,"Black-eyed Susan"],[4,"Pansy"]]]
The function fertilizer accepts a single parameter of the type Garden. The type Garden is a struct. Structs are wrapped in square brackets. Inside Garden is an array that is an array of structs named theFlowers. It gets a set of brackets for the array and another set for the struct. Thus the double square brackets.
Deploy & Run Proxy Contracts
Remix IDE has functionality to assist in the handeling of proxy contracts that use the UUPS pattern.
A UUPS proxy contract is the implementation side of an ERC1967Proxy.
Once you have deployed a UUPS implementation contract, Remix will deploy a ERC1967 with your implementation contract’s address.
To interact with the functions in the implementation contract, use the deployed instance of the ERC1967 instance not on the implementation contract.
When its time to upgrade you contract, Remix has a UI for this.
To try this out, you will need to get a proxy contract. Go to wizard.openzeppelin.com and select a contract. Then, in the Upgradeability section, check the UUPS option. Then, copy and paste the file into Remix. Compile the file and go to Deploy & Run.
Deploying
When a UUPS contract is selected in Deploy & Run’s Contract select box, you’ll see some checkboxes below the Deploy button:
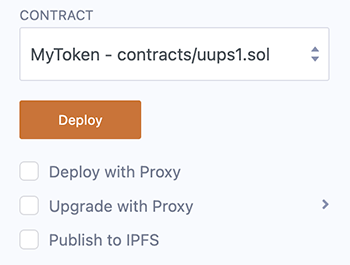
Check the box for Deploy with Proxy. This will create two transactions: one for the implementation (your contract) and the other for the ERC1967 proxy contract. You will get two modals to check through:
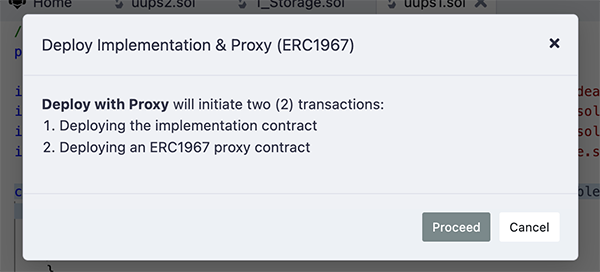
and then

If you are deploying to the Remix VM, these modals will appear one after the other. If you are connected to the mainnet or a public testnet, then the second modal will appear after the first transaction has gone through.
After the ERC1967 proxy contract is deployed, in the Deployed Contracts section, you’ll see two deployed instances.
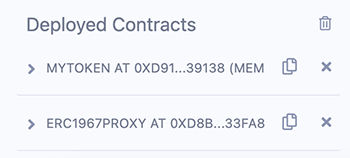
To interact with your implementation contract DO NOT use the instance of your contract. Instead, you should use the ERC1967 Proxy. The proxy will have all the functions of your implementation.
Upgrading
To upgrade, check the Upgrade with Proxy box and dial down the caret to see the options:
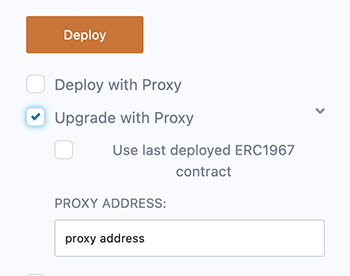
You’ll either need to use the last deployed ERC1967 contract, or input the address of the ERC1967 contract that you want to use.
Debugger
The Debugger shows the contract’s state while stepping through a transaction.
It can be used on transactions created on Remix or by providing a transaction’s hash. The latter assumes that you have the contract’s source code or that you have input the address of a verified contract.
To start a debugging session either:
Click the debug button in the Terminal when a successful or failed transaction appears there. The Debugger will be activated and will gain the focus in the Side Panel.
Activate the Debugger in the Plugin Manager and then click the bug in the icon panel. To start the debugging session, input the address of a deployed transaction - while having the source code in the editor and then click the Start debugging button.
The debugger will highlight the relevant code in the Editor. If you want to go back to editing the code without the Debugger’s highlights, then click the Stop Debugging button.
To learn more about how to use this tool go to the Debugging Transactions page.
This page will go over the Debugger’s Use generated sources option, its navigation and its panels.
Use generated sources
This option is available for contracts using Solidity 0.7.2 or greater. See the solidity blog for more details about generated sourcess.
Using generated sources will make it easier to audit your contracts. When the option is checked, you can step into those compiler outputs — while debugging.
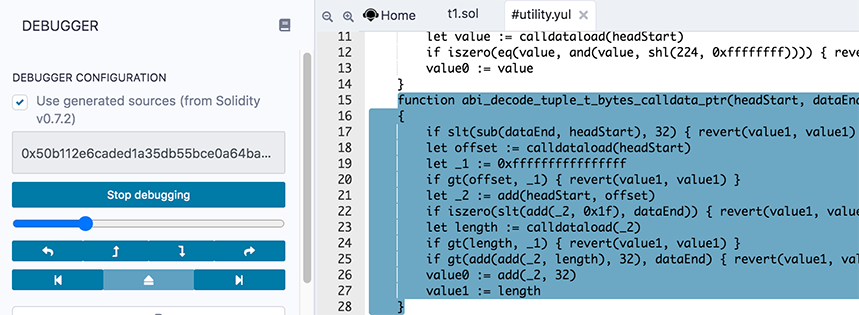
These compiler outputs will appear in a separate .yul file in the Remix editor.
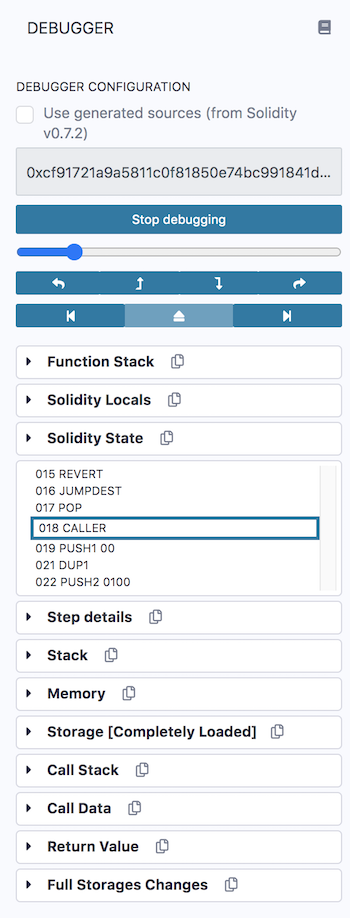
The Debugger’s Navigation
Slider & buttons
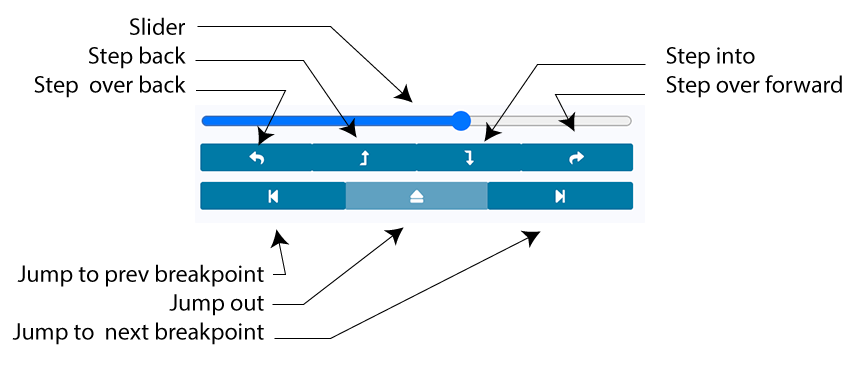
Slider
Moving the slider will highlight the relevant code in the Editor. On the most granular level, it scrolls through a transaction’s opcodes (see the opcode section below). At each opcode, the transaction’s state changes and these changes are reflected in the Debugger’s panels.
Step over back
This button goes to the previous opcode. If the previous step involves a function call, function will not be entered.
Step back
This button steps back to the previous opcode.
Step into
This button advances to the next opcode. If the next line contains a function call, Step into will go into the function.
Step over forward
This button advances to the next opcode. If the next step involves a function call, function will not be entered.
Jump to the previous breakpoint
Breakpoints can be placed in the gutter of the Editor. If the current step in the call has passed a breakpoint, this button will move the slider to the most recently passed breakpoint.
Jump out
When you are in a call and click on this button, the slider will be moved to the end of the call.
Jump to the next breakpoint
If a breakpoint is ahead in the code, this button will advance to that point.
The Debugger’s Panels
Function Stack
The Function stack lists the functions that the transaction is interacting with.

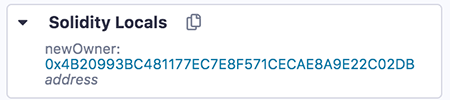
Solidity Locals
The Solidity Locals are the local variables inside a function.
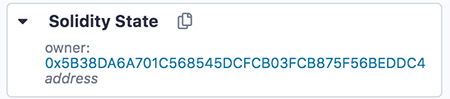
Solidity State
These are the state variables of the contract.
Opcodes
This panel shows the step number and the opcode that the debugger is currently on.
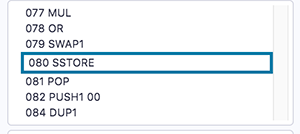
As you drag the slider (which is above the navigation buttons), the focussed step number & opcode changes.
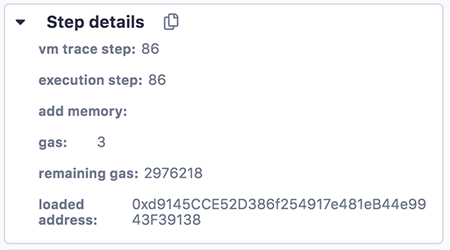
Step details
Step details shows more info about the opcode step.
Stack
This panel shows the EVM Stack.
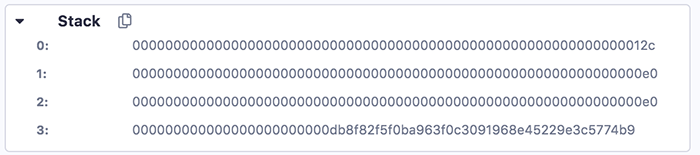
For more info about the stack.
Memory
Memory is cleared for each new message call. Memory is linear and can be addressed at byte level. Reads are limited to a width of 256 bits while writes can be either 8 bits or 256 bits wide.
The Memory panel consists of 3 columns. You might need to make Remix’s side panel a bit wider to get the formatting to be correct. (Drag the border between the main panel and the side panel to the right).
The 1st column is the location in memory. The 2nd column is the hex encoded value. The 3rd column is the decoded value. If there is nothing, then the question marks (?) will show - like this:
0x10: 00000000000000000000000000000000 ????????????????
Here is a full example of the Memory panel,
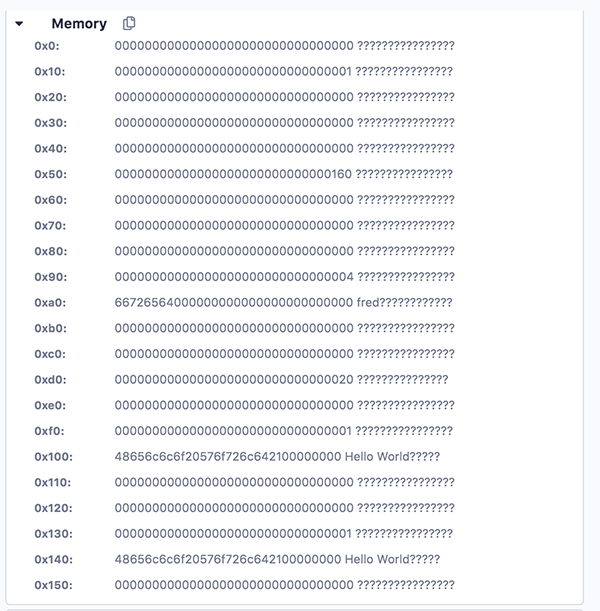
Some address slots have hex encoded values and those values are then decoded. For example, check position 0xa0 and 0x140.
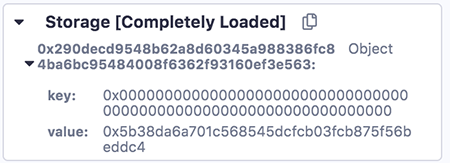
Storage
This is the persistant storage.
Call Stack
All computations are performed on a data array called the call stack. It has a maximum size of 1024 elements and contains words of 256 bits.

Call Data
The call data contains the functions parameters.

Return Value
The refers to the value that the function will return.

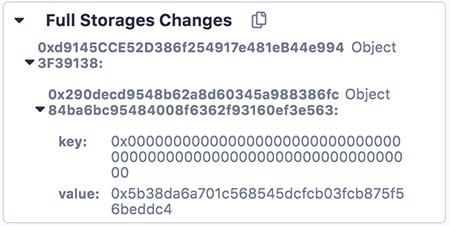
Full Storage Changes
This shows the persistant storage at the end of the function.
Breakpoints
Breakpoints can be placed in the gutter of the Editor to pause the debugger.
Additional Info
The debugger’s granular information gives users detailed information about what is happening in a transaction - so not only is the debugger good for debugging, it is also an excellent teaching tool.
To learn about using the debugger, go to Debugging Transactions.
Solidity Static Analysis
Static code analysis is a process to debug the code by examining it and without actually executing the code.
Solidity Static Analysis plugin performs static analysis on Solidity smart contracts once they are compiled. It checks for security vulnerabilities and bad development practices, among other issues. It can be activated from Remix Plugin Manager.
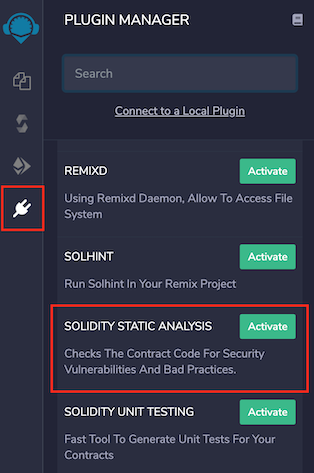
This plugin comes with Solidity environment of Remix IDE.
How to use
If you select this plugin, you will see a number of modules listed along with checkboxes, one Auto run checkbox and a Run button. Run button will be disabled as there is no compiled contract for now.
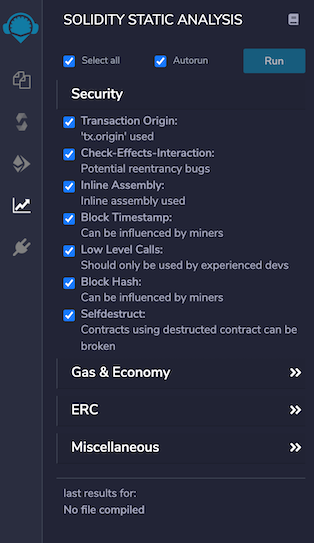
By default, all modules are selected for analysing a smart contract.
One can select/deselect the modules under which contract should be analyzed and can run the analysis for last compiled contract by clicking on Run.
If Auto run checkbox is checked, analysis will be performed each time a contract is compiled. Uncheck the checkbox if you want to stop this behaviour.
Run
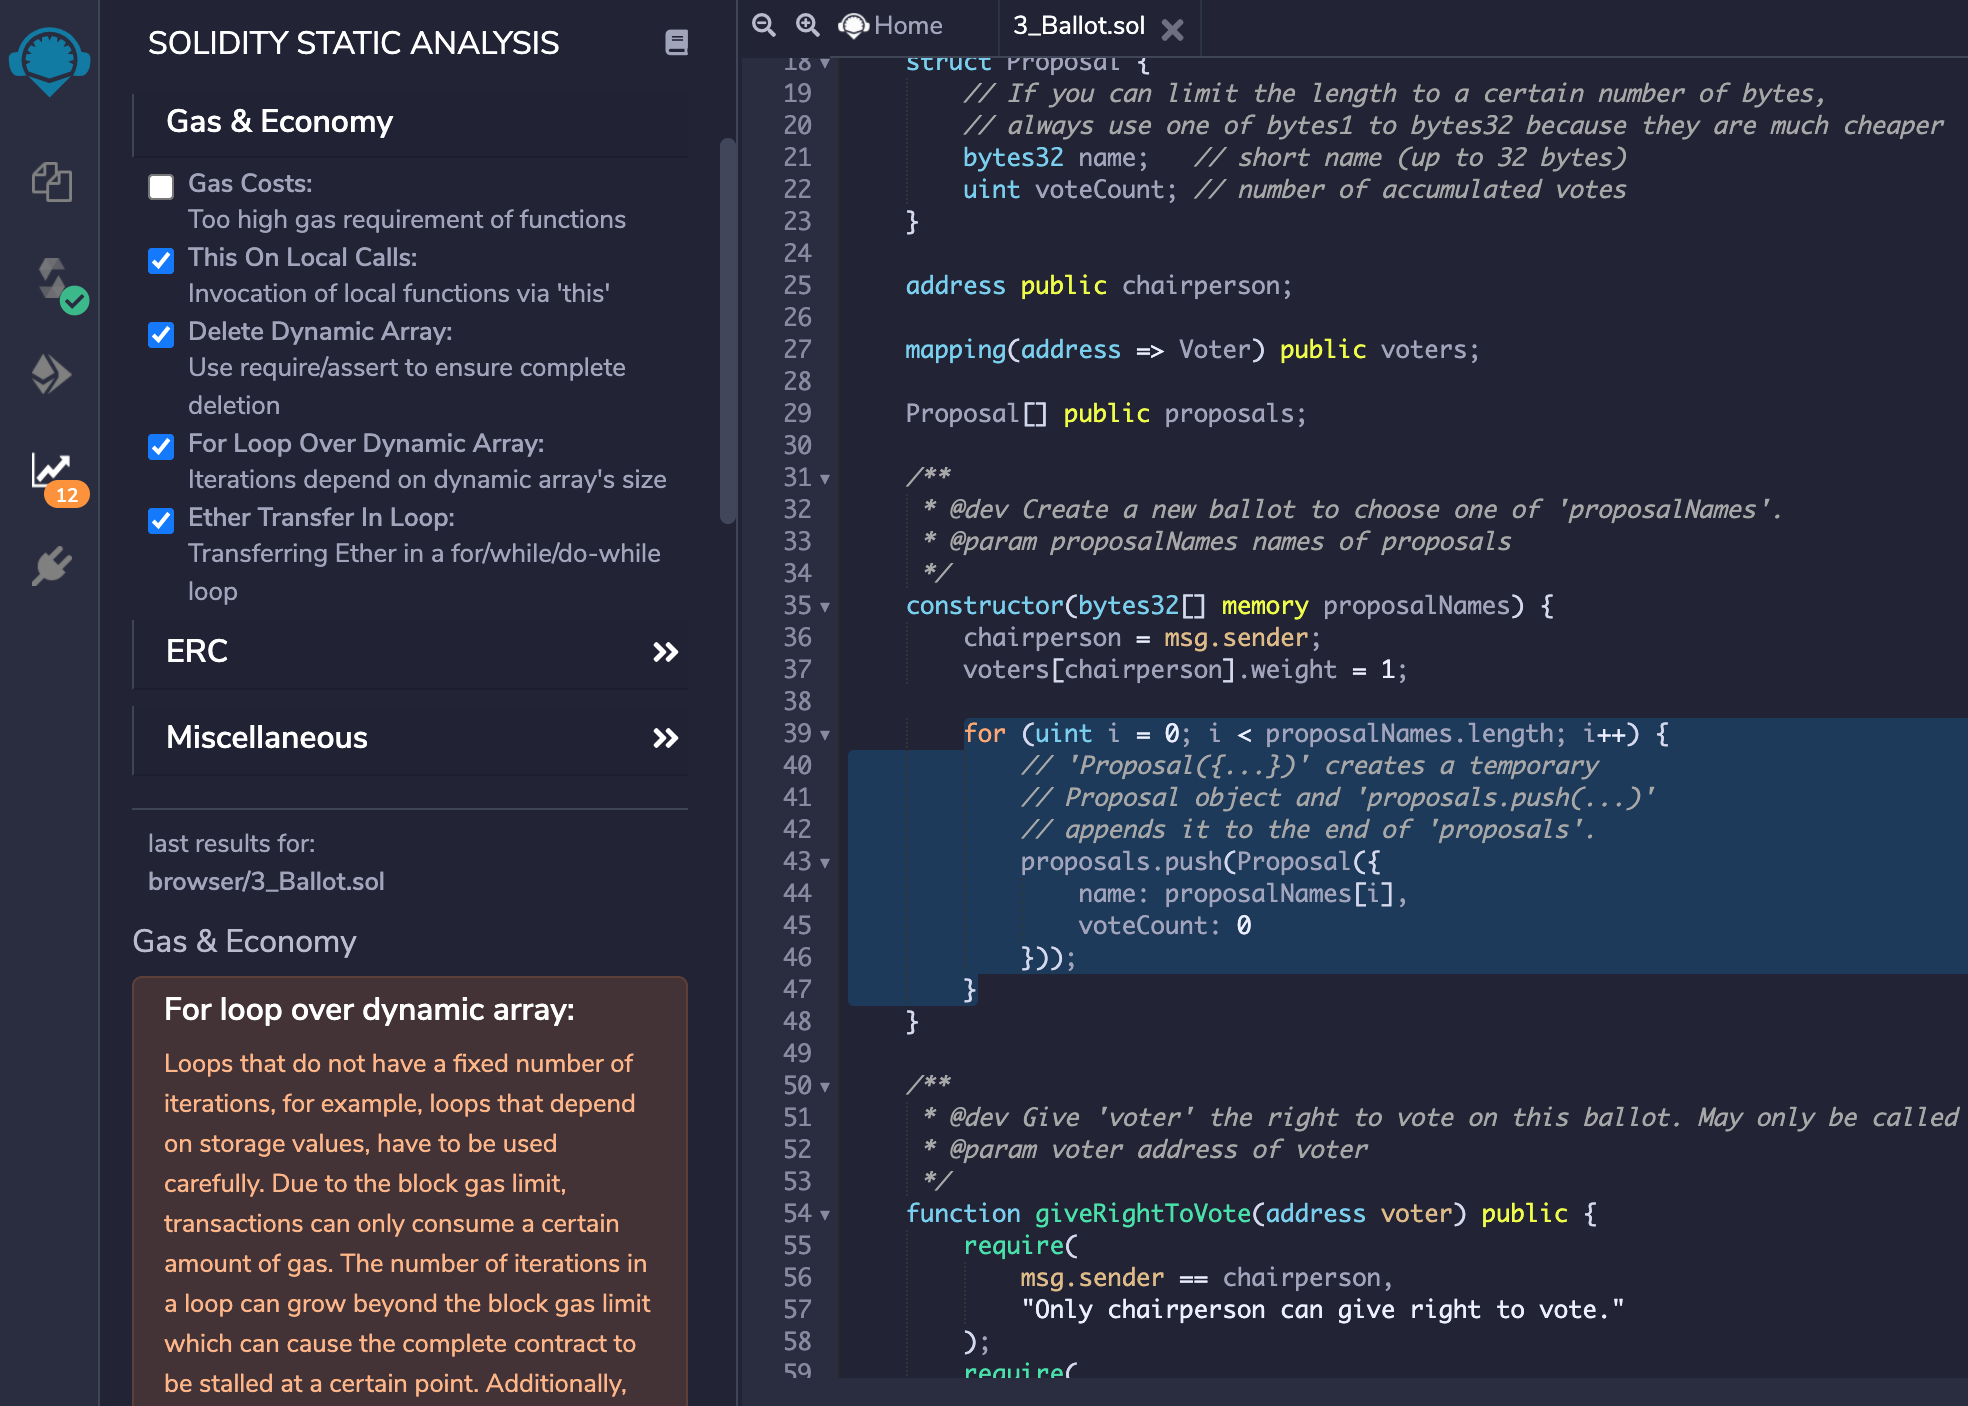
If Auto run checkbox is checked, analysis will be performed on compiling a contract and result will be shown as badge to the plugin icon. This number tells warnings count for the contract (e.g; 12 in attached image below) .
By visiting the plugin UI, the details of the warning can be seen along with the category name for each warning.
Clicking on warning details will highlight the relevant code in the editor.
Analysis Modules
Currently, with Remix IDE v0.10.1, there are 21 analysis modules listed under 4 categories. Categories are: Security, Gas & Economy, ERC & Miscellaneous.
Here is the list of modules under each category along with the example code which should be avoided or used very carefully while development:
Category: Security
Transaction origin: ‘tx.origin’ is used
tx.origin is useful only in very exceptional cases. If you use it for authentication, you usually want to replace it by “msg.sender”, because otherwise any contract you call can act on your behalf.
Example:
require(tx.origin == owner);
Check effects: Potential reentrancy bugs
Potential Violation of Checks-Effects-Interaction pattern can lead to re-entrancy vulnerability.
Example:
// sending ether first
msg.sender.transfer(amount);

// updating state afterwards
balances[msg.sender] -= amount;
Inline assembly: Inline assembly used
Use of inline assembly is advised only in rare cases.
Example:
assembly {
            // retrieve the size of the code, this needs assembly
            let size := extcodesize(_addr)
}
Block timestamp: Semantics maybe unclear
now does not mean current time. now is an alias for block.timestamp. block.timestamp can be influenced by miners to a certain degree, be careful.
Example:
// using now for date comparison
if(startDate > now)
    isStarted = true;

// using block.timestamp
uint c = block.timestamp;
Low level calls: Semantics maybe unclear
Use of low level call, callcode or delegatecall should be avoided whenever possible. send does not throw an exception when not successful, make sure you deal with the failure case accordingly. Use transfer whenever failure of the ether transfer should rollback the whole transaction.
Example:
x.call('something');
x.send(1 wei);
Blockhash usage: Semantics maybe unclear
blockhash is used to access the last 256 block hashes. A miner computes the block hash by “summing up” the information in the current block mined. By summing up the information in a clever way a miner can try to influence the outcome of a transaction in the current block.
Example:
bytes32 b = blockhash(100);
Selfdestruct: Beware of caller contracts
selfdestruct can block calling contracts unexpectedly. Be especially careful if this contract is planned to be used by other contracts (i.e. library contracts, interactions). Selfdestruction of the callee contract can leave callers in an inoperable state.
Example:
selfdestruct(address(0x123abc..));
Category: Gas & Economy
Gas costs: Too high gas requirement of functions
If the gas requirement of a function is higher than the block gas limit, it cannot be executed. Please avoid loops in your functions or actions that modify large areas of storage
Example:
for (uint8 proposal = 0; proposal < proposals.length; proposal++) {
    if (proposals[proposal].voteCount > winningVoteCount) {
        winningVoteCount = proposals[proposal].voteCount;
        winningProposal = proposal;
    }
}
This on local calls: Invocation of local functions via ‘this’
Never use this to call functions in the same contract, it only consumes more gas than normal local calls.
Example:
contract test {

    function callb() public {
        address x;
        this.b(x);
    }

    function b(address a) public returns (bool) {}
}
Delete on dynamic Array: Use require/assert appropriately
The delete operation when applied to a dynamically sized array in Solidity generates code to delete each of the elements contained. If the array is large, this operation can surpass the block gas limit and raise an OOG exception. Also nested dynamically sized objects can produce the same results.
Example:
contract arr {
    uint[] users;
    function resetState() public{
        delete users;
    }
}
For loop over dynamic array: Iterations depend on dynamic array’s size
Loops that do not have a fixed number of iterations, for example, loops that depend on storage values, have to be used carefully: Due to the block gas limit, transactions can only consume a certain amount of gas. The number of iterations in a loop can grow beyond the block gas limit which can stall the complete contract at a certain point. Additionally, using unbounded loops can incur in a lot of avoidable gas costs. Carefully test how many items at maximum you can pass to such functions to make it successful.
Example:
contract forLoopArr {
    uint[] array;

    function shiftArrItem(uint index) public returns(uint[] memory) {
        for (uint i = index; i < array.length; i++) {
            array[i] = array[i+1];
        }
        return array;
    }
}
Ether transfer in loop: Transferring Ether in a for/while/do-while loop
Ether payout should not be done in a loop. Due to the block gas limit, transactions can only consume a certain amount of gas. The number of iterations in a loop can grow beyond the block gas limit which can cause the complete contract to be stalled at a certain point. If required, make sure that number of iterations are low and you trust each address involved.
Example:
contract etherTransferInLoop {
    address payable owner;

    function transferInForLoop(uint index) public  {
        for (uint i = index; i < 100; i++) {
            owner.transfer(i);
        }
    }

    function transferInWhileLoop(uint index) public  {
        uint i = index;
        while (i < 100) {
            owner.transfer(i);
            i++;
        }
    }
}
Category: ERC
ERC20: ‘decimals’ should be ‘uint8’
ERC20 Contracts decimals function should have uint8 as return type.
Example:
contract EIP20 {

    uint public decimals = 12;
}
Category: Miscellaneous
Constant/View/Pure functions: Potentially constant/view/pure functions
It warns for the methods which potentially should be constant/view/pure but are not.
Example:
function b(address a) public returns (bool) {
        return true;
}
Similar variable names: Variable names are too similar
It warns on the usage of similar variable names.
Example:
// Variables have very similar names voter and voters.
function giveRightToVote(address voter) public {
    require(voters[voter].weight == 0);
    voters[voter].weight = 1;
}
No return: Function with ‘returns’ not returning
It warns for the methods which define a return type but never explicitly return a value.
Example:
function noreturn(string memory _dna) public returns (bool) {
       dna = _dna;
   }
Guard conditions: Use ‘require’ and ‘assert’ appropriately
Use assert(x) if you never ever want x to be false, not in any circumstance (apart from a bug in your code). Use require(x) if x can be false, due to e.g. invalid input or a failing external component.
Example:
assert(a.balance == 0);
Result not used: The result of an operation not used
A binary operation yields a value that is not used in the following. This is often caused by confusing assignment (=) and comparison (==).
Example:
c == 5;
or
a + b;
String Length: Bytes length != String length
Bytes and string length are not the same since strings are assumed to be UTF-8 encoded (according to the ABI definition) therefore one character is not necessarily encoded in one byte of data.
Example:
function length(string memory a) public pure returns(uint) {
    bytes memory x = bytes(a);

    return x.length;
}
Delete from dynamic array: ‘delete’ on an array leaves a gap
Using delete on an array leaves a gap. The length of the array remains the same. If you want to remove the empty position you need to shift items manually and update the length property.
Example:
contract arr {
    uint[] array = [1,2,3];

    function removeAtIndex() public returns (uint[] memory) {
        delete array[1];
        return array;
    }
}
Data Truncated: Division on int/uint values truncates the result
Division of integer values yields an integer value again. That means e.g. 10 / 100 = 0 instead of 0.1 since the result is an integer again. This does not hold for division of (only) literal values since those yield rational constants.
Example:
function contribute() payable public {
    uint fee = msg.value * uint256(feePercentage / 100);
    fee = msg.value * (p2 / 100);
}
Remix-analyzer
remix-analyzer is the library which works underneath of remix-ide Solidity Static Analysis plugin.
remix-analyzer is an NPM package. It can be used as a library in a solution supporting node.js. Find more information about this type of usage in the remix-analyzer repository
Unit Testing Plugin
Click the
![]() (double check)
icon from icon bar to move to the
(double check)
icon from icon bar to move to the Solidity Unit Testing plugin.
If you haven’t used this plugin before and are not seeing double check icon, you have to activate it from Remix plugin manager.
Go to the plugin manager by clicking the (plug) icon and activate Solidity Unit Testing plugin.
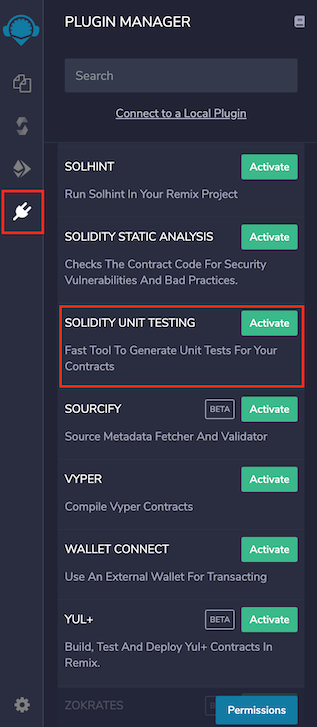
Now double check icon will appear on the left side icon bar. Clicking on icon will load the plugin in the side panel.
Alternatively, just select Solidity environment from Remix IDE Home tab. This will activate Solidity Unit Testing plugin along with Solidity Compiler, Deploy & Run Transactions & Solidity Static Analysis plugins.
After successful loading, plugin looks like this:
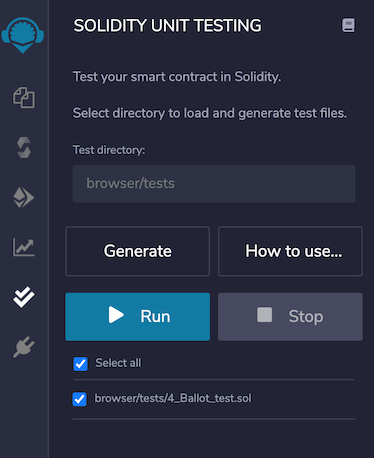
Test directory
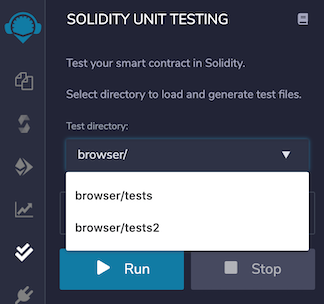
Plugin asks you to provide a directory which will be your workspace only for this plugin. To select directory, as soon as you add / to the path, it shows the possible options.
Once selected, this directory will be used to load test files and to store newly generated test files.
Default test directory is browser/tests.
Generate
Select a solidity file which you want to test and click on the button Generate. It will generate a test file dedicated to selected file in the test directory.
If no file is selected, it will still create a file with generic name as newFile_test.sol.
This file contains sufficient information to give better understanding about developing tests for a contract.
Generic file looks as:
pragma solidity >=0.4.22 <0.8.0;
import "remix_tests.sol"; // this import is automatically injected by Remix.
import "remix_accounts.sol";
// Import here the file to test.

// File name has to end with '_test.sol', this file can contain more than one testSuite contracts
contract testSuite {

    /// 'beforeAll' runs before all other tests
    /// More special functions are: 'beforeEach', 'beforeAll', 'afterEach' & 'afterAll'
    function beforeAll() public {
        // Here should instantiate tested contract
        Assert.equal(uint(1), uint(1), "1 should be equal to 1");
    }

    function checkSuccess() public {
        // Use 'Assert' to test the contract,
        // See documentation: https://remix-ide.readthedocs.io/en/latest/assert_library.html
        Assert.equal(uint(2), uint(2), "2 should be equal to 2");
        Assert.notEqual(uint(2), uint(3), "2 should not be equal to 3");
    }

    function checkSuccess2() public pure returns (bool) {
        // Use the return value (true or false) to test the contract
        return true;
    }

    function checkFailure() public {
        Assert.equal(uint(1), uint(2), "1 is not equal to 2");
    }

    /// Custom Transaction Context
    /// See more: https://remix-ide.readthedocs.io/en/latest/unittesting.html#customization
    /// #sender: account-1
    /// #value: 100
    function checkSenderAndValue() public payable {
        // account index varies 0-9, value is in wei
        Assert.equal(msg.sender, TestsAccounts.getAccount(1), "Invalid sender");
        Assert.equal(msg.value, 100, "Invalid value");
    }
}
Write Tests
Write sufficient unit tests to ensure that your contract works as expected under different scenarios.
Remix injects a built-in assert library which can be used for testing. You can visit the library documentation here.
Apart from this, Remix allows usage of some special functions in the test file to make testing more structural. They are as:
beforeEach()- Runs before each testbeforeAll()- Runs before all testsafterEach()- Runs after each testafterAll()- Runs after all tests
To get started, see this simple example.
Run
Once you are done with writing tests, select the file(s) and click on Run to execute the tests. The execution will run in a separate environment. After completing the execution of one file, a test summary will be shown as below:
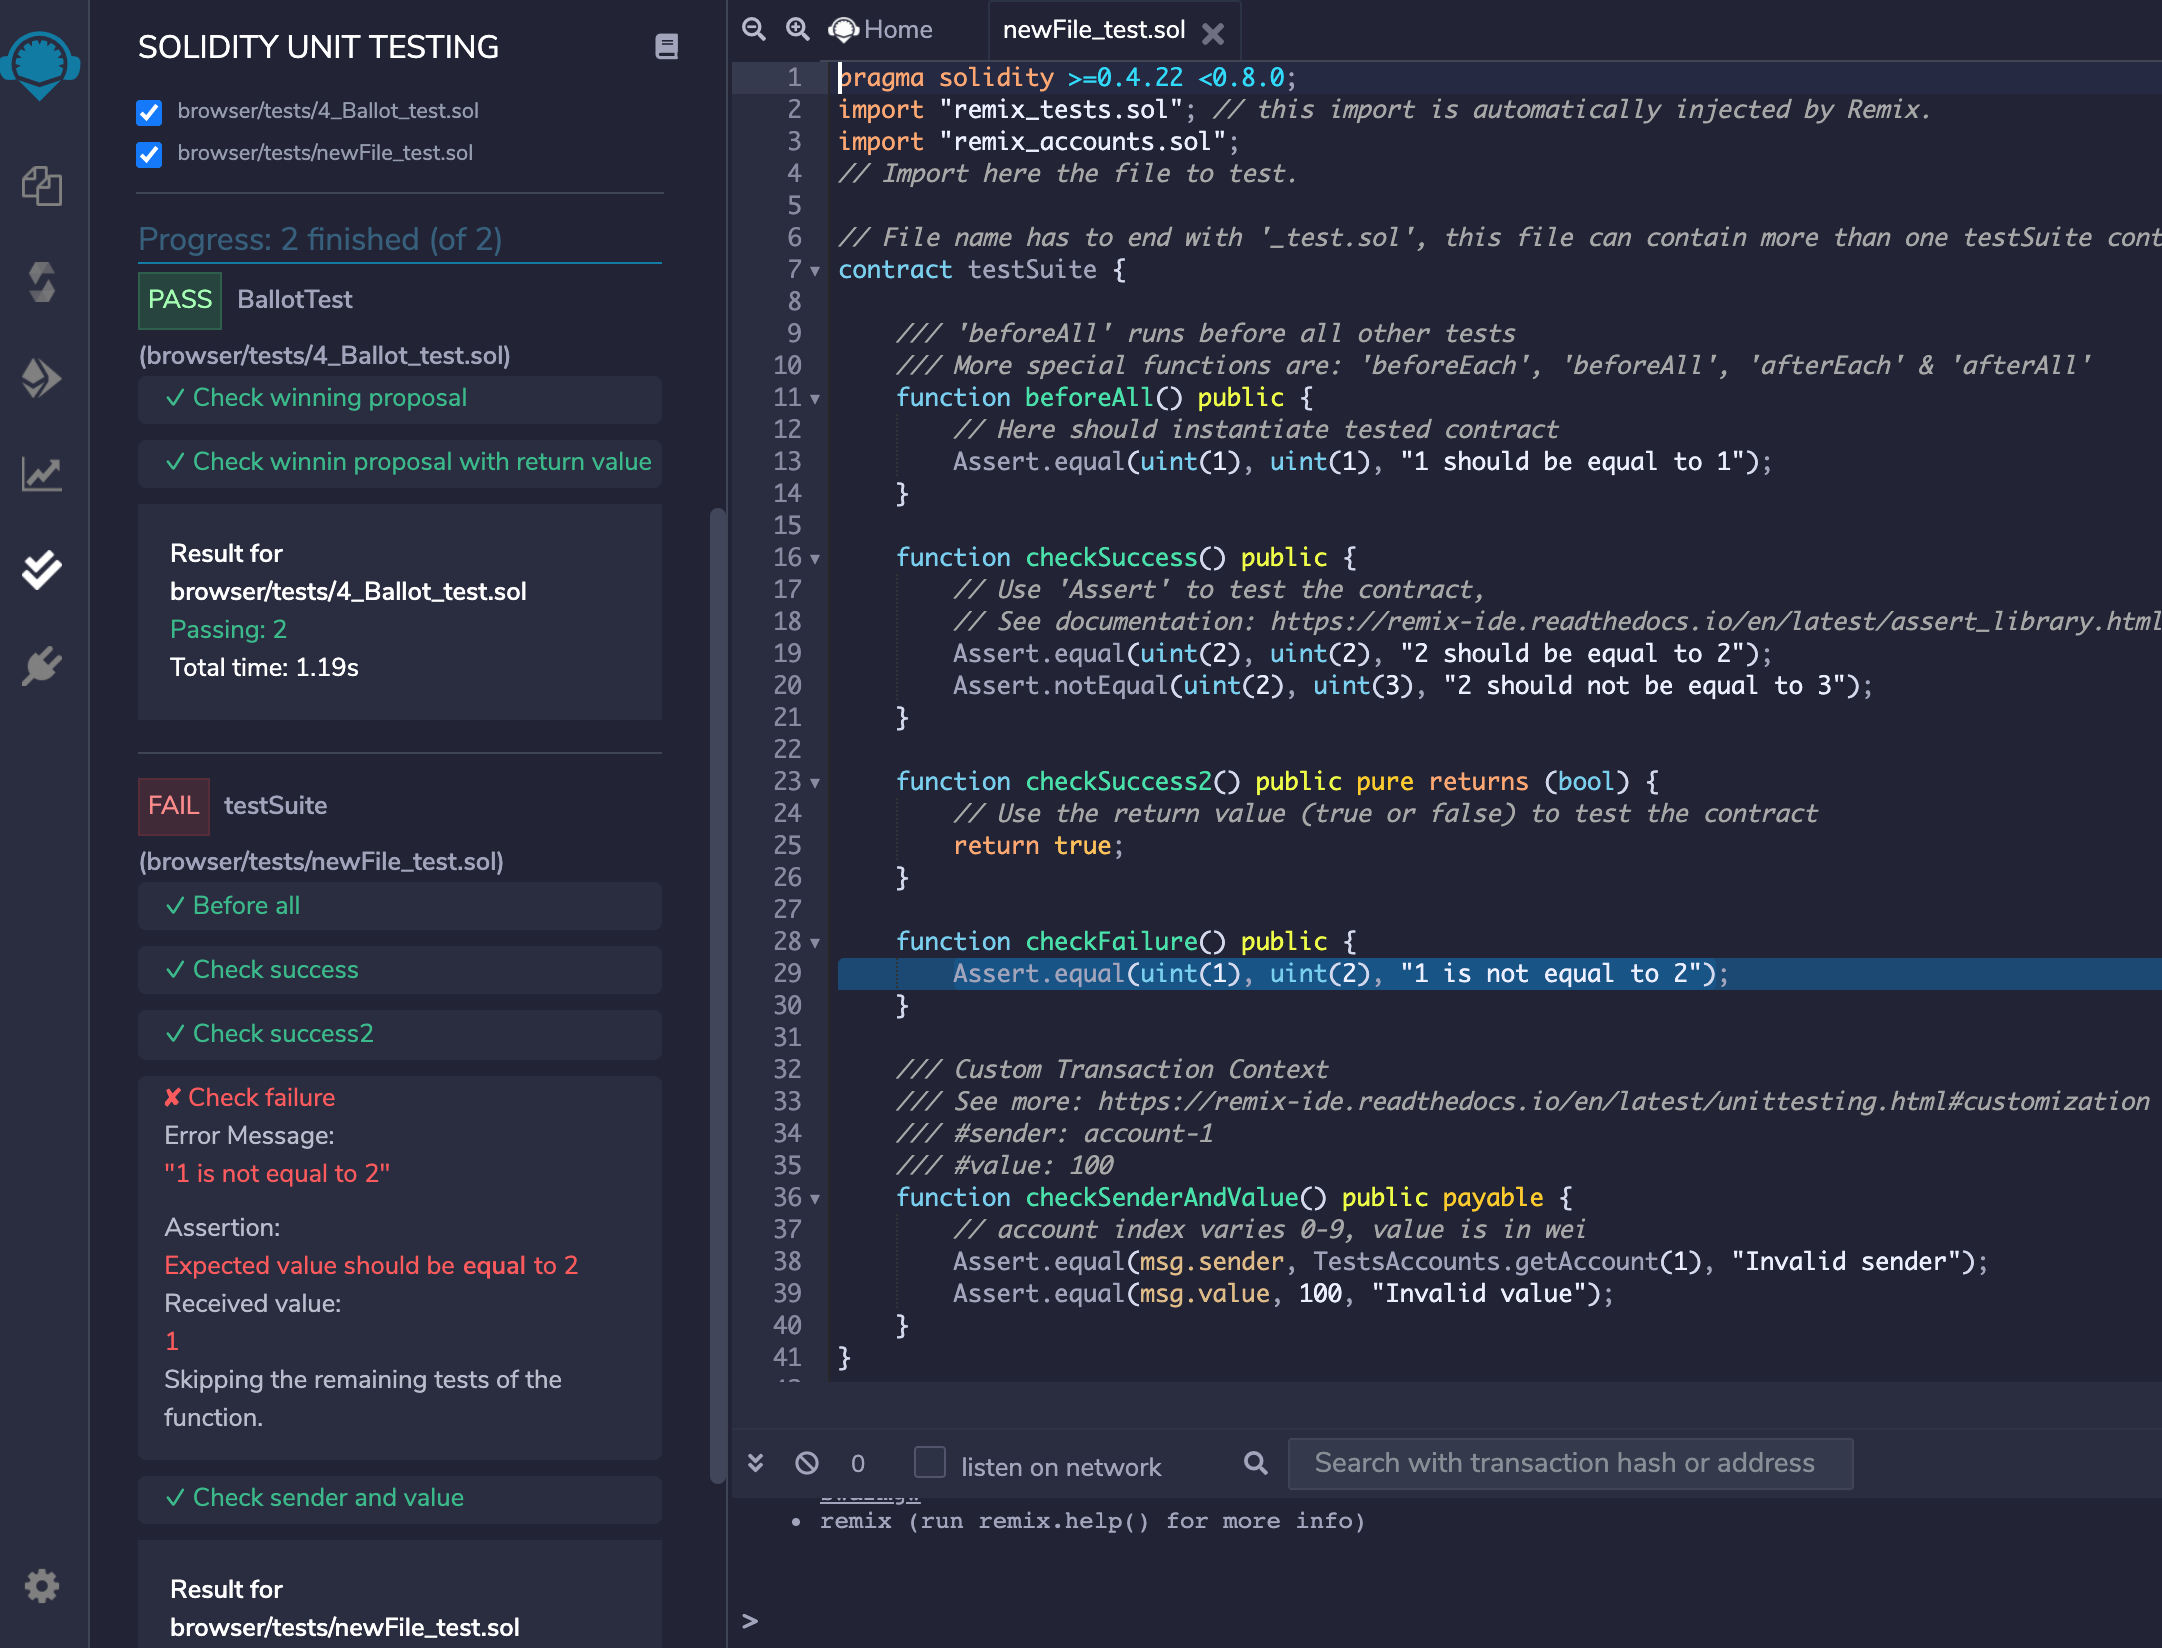
For failed tests, there will be more assertion details to analyze the issue. Clicking on failed test will highlight the relevant line of code in the editor.
Stop
If you have selected multiple files to run the tests and want to stop the execution, click on Stop button. It will stop execution after running the tests for current file.
Customization
Remix facilitates users with various types of customizations to test a contract properly.
1. Custom Compiler Context
Solidity Unit Testing refers to the Solidity Compiler plugin for compiler configurations. Configure Compiler, EVM Version, Enable Optimization & runs in the Solidity Compiler plugin and this will be used in the Solidity Unit Testing plugin for contract compilation before running unit tests.
2. Custom Transaction Context
For interacting with a contract’s method, the prime parameters of a transaction are from address, value & gas. Typically, a method’s behaviour is tested with different values of these parameters.
One can input custom values for msg.sender & msg.value of transaction using NatSpec comments, like:
/// #sender: account-0
/// #value: 10
function checkSenderIs0AndValueis10 () public payable {
    Assert.equal(msg.sender, TestsAccounts.getAccount(0), "wrong sender in checkSenderIs0AndValueis10");
    Assert.equal(msg.value, 10, "wrong value in checkSenderIs0AndValueis10");
}
Instructions to use:
Parameters must be defined in the method’s NatSpec
Each parameter key should be prefixed with a hash (#) and end with a colon following a space (: ) like
#sender:&#value:For now, customization is only available for parameters
sender&valueSender is the
fromaddress of a transaction which is accessed usingmsg.senderinside a contract method. It should be defined in a fixed format as ‘account-<account_index>’<account_index>varies from0-2before remix-ide release v0.10.0 and0-9afterwardsremix_accounts.solmust be imported in your test file to use customsenderValue is
valuesent along with a transaction inweiwhich is accessed usingmsg.valueinside a contract method. It should be a number.
Regarding gas, Remix estimates the required gas for each transaction internally. Still if a contract deployment fails with Out-of-Gas error, it tries to redeploy it by doubling the gas. Deployment failing with double gas will show error: contract deployment failed after trying twice: The contract code couldn't be stored, please check your gas limit
Various test examples can be seen in examples section.
Points to remember
A test contract cannot have a method with parameters. Having one such method will show error:
Method 'methodname' can not have parameters inside a test contractNumber of test accounts are
3before remix-ide release v0.10.0 and10afterwardsWhile a test file which imports
remix_accounts.solmight not compile successfully withSolidity Compilerplugin, do not worry, this will have no bearing on its success withSolidity Unit Testingplugin.
Command Line Interface
remix-tests  
remix-tests is a tool which can be used as a CLI (Command Line Interface) solution to run the solidity unit tests. This is the same tool which works as a library underneath Remix’s Solidity Unit Testing plugin. It is available on NPM as @remix-project/remix-tests.
Get started
You can install it using NPM:
As a dev dependency:
npm install --save-dev @remix-project/remix-tests
As a global NPM module:
npm install -g @remix-project/remix-tests
To confirm installation, run:
$ remix-tests version
0.1.36
Version should be same as on NPM.
How to use
You can see all available options using help command.
$ remix-tests help
Usage: remix-tests [options] [command]

Options:
  -V, --version            output the version number
  -c, --compiler <string>  set compiler version (e.g: 0.6.1, 0.7.1 etc)
  -e, --evm <string>       set EVM version (e.g: petersburg, istanbul etc)
  -o, --optimize <bool>    enable/disable optimization
  -r, --runs <number>      set runs (e.g: 150, 250 etc)
  -v, --verbose <level>    set verbosity level (0 to 5)
  -h, --help               output usage information

Commands:
  version                  output the version number
  help                     output usage information
General structure of a command is as:
$ remix-tests <options> <file/directory path>
To run all test files inside examples directory
$ remix-tests examples/
To run single test file named simple_storage_test.sol inside examples directory
$ remix-tests examples/simple_storage_test.sol
NOTE: remix-tests will assume that name of test(s) file ends with "_test.sol". e.g simple_storage_test.sol
Example
Consider for a simple storage contract named simple_storage.sol:
pragma solidity >=0.4.22 <=0.8.0;

contract SimpleStorage {
  uint public storedData;

  constructor() public {
    storedData = 100;
  }

  function set(uint x) public {
    storedData = x;
  }

  function get() public view returns (uint retVal) {
    return storedData;
  }
}
Test file simple_storage_test.sol can be as:
pragma solidity >=0.4.22 <=0.8.0;
import "remix_tests.sol"; // injected by remix-tests
import "./simple_storage.sol";

contract MyTest {
  SimpleStorage foo;

  function beforeAll() public {
    foo = new SimpleStorage();
  }

  function initialValueShouldBe100() public returns (bool) {
    return Assert.equal(foo.get(), 100, "initial value is not correct");
  }

  function initialValueShouldNotBe200() public returns (bool) {
    return Assert.notEqual(foo.get(), 200, "initial value is not correct");
  }

  function shouldTriggerOneFail() public {
    Assert.equal(uint(1), uint(2), "uint test 1 fails");
    Assert.notEqual(uint(1), uint(2), "uint test 2 passes");
  }

  function shouldTriggerOnePass() public {
    Assert.equal(uint(1), uint(1), "uint test 3 passes");
  }
}
Running simple_storage_test.sol file will output as:
$ remix-tests simple_storage_test.sol

	👁	:: Running remix-tests - Unit testing for solidity ::	👁

'creation of library remix_tests.sol:Assert pending...'

	◼  MyTest
	✓  Initial value should be100
	✓  Initial value should not be200
	✘  Should trigger one fail
	✓  Should trigger one pass


3 passing (0.282s)
1 failing

  1) MyTest: Should trigger one fail

	 error: uint test 1 fails
	 expected value to be equal to: 2
	 returned: 1
Custom compiler context
Most of the remix-tests options are there to define a custom compiler context. With an extended custom compiler context, execution of above test file will go as:
$ remix-tests --compiler 0.7.4 --evm istanbul --optimize true --runs 300 simple_storage_test.sol

	👁	:: Running remix-tests - Unit testing for solidity ::	👁

[14:03:18] info: Compiler version set to 0.7.4. Latest version is 0.8.0
[14:03:18] info: EVM set to istanbul
[14:03:18] info: Optimization is enabled
[14:03:18] info: Runs set to 300
Loading remote solc version v0.7.4+commit.3f05b770 ...
'creation of library remix_tests.sol:Assert pending...'

	◼  MyTest
	✓  Initial value should be100
	✓  Initial value should not be200
	✘  Should trigger one fail
	✓  Should trigger one pass


3 passing (0.316s)
1 failing

  1) MyTest: Should trigger one fail

	 error: uint test 1 fails
	 expected value to be equal to: 2
	 returned: 1
Rememeber, custom compiler version will require internet connection to load compiler.
As a CI solution
remix-tests can also be used for continuous integration (CI) testing.
For implementation example, see Su Squares contract and Travis build that uses remix-tests for continuous integration.
Remix Assert Library
Assert
Assert.ok(value[, message])
value: <bool>message: <string>
Tests if value is truthy. message is returned in case of failure.
Examples:
Assert.ok(true);
// OK
Assert.ok(false, "it\'s false");
// error: it's false
Assert.equal(actual, expected[, message])
actual: <uint | int | bool | address | bytes32 | string>expected: <uint | int | bool | address | bytes32 | string>message: <string>
Tests if actual & expected values are same. message is returned in case of failure.
Examples:
Assert.equal(string("a"), "a");
// OK
Assert.equal(uint(100), 100);
// OK
foo.set(200)
Assert.equal(foo.get(), 200);
// OK
Assert.equal(foo.get(), 100, "value should be 100");
// error: value should be 100
Assert.notEqual(actual, expected[, message])
actual: <uint | int | bool | address | bytes32 | string>expected: <uint | int | bool | address | bytes32 | string>message: <string>
Tests if actual & expected values are not same. message is returned in case of failure.
Examples:
Assert.notEqual(string("a"), "b");
// OK
foo.set(200)
Assert.notEqual(foo.get(), 200, "value should not be 200");
// error: value should not be 200
Assert.greaterThan(value1, value2[, message])
value1: <uint | int>value2: <uint | int>message: <string>
Tests if value1 is greater than value2. message is returned in case of failure.
Examples:
Assert.greaterThan(uint(2), uint(1));
// OK
Assert.greaterThan(uint(-2), uint(1));
// OK
Assert.greaterThan(int(2), int(1));
// OK
Assert.greaterThan(int(-2), int(-1), "-2 is not greater than -1");
// error: -2 is not greater than -1
Assert.lesserThan(value1, value2[, message])
value1: <uint | int>value2: <uint | int>message: <string>
Tests if value1 is lesser than value2. message is returned in case of failure.
Examples:
Assert.lesserThan(int(-2), int(-1));
// OK
Assert.lesserThan(int(2), int(1), "2 is not lesser than 1");
// error: 2 is not lesser than 1
Testing by Example
Here are some examples which can give you better understanding to plan your tests.
Note: Examples in this section are intended to give you a push for development. We don’t recommend to rely on them without verifying at your end.
1. Simple example
In this example, we test setting & getting variables.
Contract/Program to be tested: Simple_storage.sol
pragma solidity >=0.4.22 <0.7.0;

contract SimpleStorage {
    uint public storedData;

    constructor() public {
        storedData = 100;
    }

    function set(uint x) public {
        storedData = x;
    }

    function get() public view returns (uint retVal) {
        return storedData;
    }
}
Test contract/program: simple_storage_test.sol
pragma solidity >=0.4.22 <0.7.0;
import "remix_tests.sol";
import "./Simple_storage.sol";

contract MyTest {
    SimpleStorage foo;

    // beforeEach works before running each test
    function beforeEach() public {
        foo = new SimpleStorage();
    }

    /// Test if initial value is set correctly
    function initialValueShouldBe100() public returns (bool) {
        return Assert.equal(foo.get(), 100, "initial value is not correct");
    }

    /// Test if value is set as expected
    function valueIsSet200() public returns (bool) {
        foo.set(200);
        return Assert.equal(foo.get(), 200, "value is not 200");
    }
}
2. Testing a method involving msg.sender
In Solidity, msg.sender plays a great role in access management of a smart contract methods interaction. Different msg.sender can help to test a contract involving multiple accounts with different roles. Here is an example for testing such case:
Contract/Program to be tested: Sender.sol
pragma solidity >=0.4.22 <0.7.0;
contract Sender {
    address private owner;

    constructor() public {
        owner = msg.sender;
    }

    function updateOwner(address newOwner) public {
        require(msg.sender == owner, "only current owner can update owner");
        owner = newOwner;
    }

    function getOwner() public view returns (address) {
        return owner;
    }
}
Test contract/program: Sender_test.sol
pragma solidity >=0.4.22 <0.7.0;
import "remix_tests.sol"; // this import is automatically injected by Remix
import "remix_accounts.sol";
import "./Sender.sol";

// Inherit 'Sender' contract
contract SenderTest is Sender {
    /// Define variables referring to different accounts
    address acc0;
    address acc1;
    address acc2;

    /// Initiate accounts variable
    function beforeAll() public {
        acc0 = TestsAccounts.getAccount(0);
        acc1 = TestsAccounts.getAccount(1);
        acc2 = TestsAccounts.getAccount(2);
    }

    /// Test if initial owner is set correctly
    function testInitialOwner() public {
        // account at zero index (account-0) is default account, so current owner should be acc0
        Assert.equal(getOwner(), acc0, 'owner should be acc0');
    }

    /// Update owner first time
    /// This method will be called by default account(account-0) as there is no custom sender defined
    function updateOwnerOnce() public {
        // check method caller is as expected
        Assert.ok(msg.sender == acc0, 'caller should be default account i.e. acc0');
        // update owner address to acc1
        updateOwner(acc1);
        // check if owner is set to expected account
        Assert.equal(getOwner(), acc1, 'owner should be updated to acc1');
    }

    /// Update owner again by defining custom sender
    /// #sender: account-1 (sender is account at index '1')
    function updateOwnerOnceAgain() public {
        // check if caller is custom and is as expected
        Assert.ok(msg.sender == acc1, 'caller should be custom account i.e. acc1');
        // update owner address to acc2. This will be successful because acc1 is current owner & caller both
        updateOwner(acc2);
        // check if owner is set to expected account i.e. account2
        Assert.equal(getOwner(), acc2, 'owner should be updated to acc2');
    }
}
3. Testing method execution
With Solidity, one can directly verify the changes made by a method in storage by retrieving those variables from a contract. But testing for a successful method execution takes some strategy. Well that is not entirely true, when a test is successful - it is usually obvious why it passed. However, when a test fails, it is essential to understand why it failed.
To help in such cases, Solidity introduced the try-catch statement in version 0.6.0. Previously, we had to use low-level calls to track down what was going on.
Here is an example test file that use both try-catch blocks and low level calls:
Contract/Program to be tested: AttendanceRegister.sol
pragma solidity >=0.4.22 <0.7.0;
contract AttendanceRegister {
    struct Student{
            string name;
            uint class;
        }

    event Added(string name, uint class, uint time);

    mapping(uint => Student) public register; // roll number => student details

    function add(uint rollNumber, string memory name, uint class) public returns (uint256){
        require(class > 0 && class <= 12, "Invalid class");
        require(register[rollNumber].class == 0, "Roll number not available");
        Student memory s = Student(name, class);
        register[rollNumber] = s;
        emit Added(name, class, now);
        return rollNumber;
    }

    function getStudentName(uint rollNumber) public view returns (string memory) {
        return register[rollNumber].name;
    }
}
Test contract/program: AttendanceRegister_test.sol
pragma solidity >=0.4.22 <0.7.0;
import "remix_tests.sol"; // this import is automatically injected by Remix.
import "./AttendanceRegister.sol";

contract AttendanceRegisterTest {

    AttendanceRegister ar;

    /// 'beforeAll' runs before all other tests
    function beforeAll () public {
        // Create an instance of contract to be tested
        ar = new AttendanceRegister();
    }

    /// For solidity version greater or equal to 0.6.0,
    /// See: https://solidity.readthedocs.io/en/v0.6.0/control-structures.html#try-catch
    /// Test 'add' using try-catch
    function testAddSuccessUsingTryCatch() public {
        // This will pass
        try ar.add(101, 'secondStudent', 11) returns (uint256 r) {
            Assert.equal(r, 101, 'wrong rollNumber');
        } catch Error(string memory /*reason*/) {
            // This is executed in case
            // revert was called inside getData
            // and a reason string was provided.
            Assert.ok(false, 'failed with reason');
        } catch (bytes memory /*lowLevelData*/) {
            // This is executed in case revert() was used
            // or there was a failing assertion, division
            // by zero, etc. inside getData.
            Assert.ok(false, 'failed unexpected');
        }
    }

    /// Test failure case of 'add' using try-catch
    function testAddFailureUsingTryCatch1() public {
        // This will revert on 'require(class > 0 && class <= 12, "Invalid class");' for class '13'
        try ar.add(101, 'secondStudent', 13) returns (uint256 r) {
            Assert.ok(false, 'method execution should fail');
        } catch Error(string memory reason) {
            // Compare failure reason, check if it is as expected
            Assert.equal(reason, 'Invalid class', 'failed with unexpected reason');
        } catch (bytes memory /*lowLevelData*/) {
            Assert.ok(false, 'failed unexpected');
        }
    }

    /// Test another failure case of 'add' using try-catch
    function testAddFailureUsingTryCatch2() public {
        // This will revert on 'require(register[rollNumber].class == 0, "Roll number not available");' for rollNumber '101'
        try ar.add(101, 'secondStudent', 11) returns (uint256 r) {
            Assert.ok(false, 'method execution should fail');
        } catch Error(string memory reason) {
            // Compare failure reason, check if it is as expected
            Assert.equal(reason, 'Roll number not available', 'failed with unexpected reason');
        } catch (bytes memory /*lowLevelData*/) {
            Assert.ok(false, 'failed unexpected');
        }
    }

    /// For solidity version less than 0.6.0, low level call can be used
    /// See: https://solidity.readthedocs.io/en/v0.6.0/units-and-global-variables.html#members-of-address-types
    /// Test success case of 'add' using low level call
    function testAddSuccessUsingCall() public {
        bytes memory methodSign = abi.encodeWithSignature('add(uint256,string,uint256)', 102, 'firstStudent', 10);
        (bool success, bytes memory data) = address(ar).call(methodSign);
        // 'success' stores the result in bool, this can be used to check whether method call was successful
        Assert.equal(success, true, 'execution should be successful');
        // 'data' stores the returned data which can be decoded to get the actual result
        uint rollNumber = abi.decode(data, (uint256));
        // check if result is as expected
        Assert.equal(rollNumber, 102, 'wrong rollNumber');
    }

    /// Test failure case of 'add' using low level call
    function testAddFailureUsingCall() public {
        bytes memory methodSign = abi.encodeWithSignature('add(uint256,string,uint256)', 102, 'duplicate', 10);
        (bool success, bytes memory data) = address(ar).call(methodSign);
        // 'success' will be false if method execution is not successful
        Assert.equal(success, false, 'execution should be successful');
    }
}
4. Testing a method involving msg.value
In Solidity, ether can be passed along with a method call which is accessed inside contract as msg.value. Sometimes, multiple calculations in a method are performed based on msg.value which can be tested with various values using Remix’s Custom transaction context. See the example:
Contract/Program to be tested: Value.sol
pragma solidity >=0.4.22 <0.7.0;
contract Value {
    uint256 public tokenBalance;

    constructor() public {
        tokenBalance = 0;
    }

    function addValue() payable public {
        tokenBalance = tokenBalance + (msg.value/10);
    }

    function getTokenBalance() view public returns (uint256) {
        return tokenBalance;
    }
}
Test contract/program: Value_test.sol
pragma solidity >=0.4.22 <0.7.0;
import "remix_tests.sol";
import "./Value.sol";

contract ValueTest{
    Value v;

    function beforeAll() public {
        // create a new instance of Value contract
        v = new Value();
    }

    /// Test initial balance
    function testInitialBalance() public {
        // initially token balance should be 0
        Assert.equal(v.getTokenBalance(), 0, 'token balance should be 0 initially');
    }

    /// For Solidity version greater than 0.6.1
    /// Test 'addValue' execution by passing custom ether amount
    /// #value: 200
    function addValueOnce() public payable {
        // check if value is same as provided through devdoc
        Assert.equal(msg.value, 200, 'value should be 200');
        // execute 'addValue'
        v.addValue{gas: 40000, value: 200}(); // introduced in Solidity version 0.6.2
        // As per the calculation, check the total balance
        Assert.equal(v.getTokenBalance(), 20, 'token balance should be 20');
    }

    /// For Solidity version less than 0.6.2
    /// Test 'addValue' execution by passing custom ether amount again using low level call
    /// #value: 100
    function addValueAgain() public payable {
        Assert.equal(msg.value, 100, 'value should be 100');
        bytes memory methodSign = abi.encodeWithSignature('addValue()');
        (bool success, bytes memory data) = address(v).call.gas(40000).value(100)(methodSign);
        Assert.equal(success, true, 'execution should be successful');
        Assert.equal(v.getTokenBalance(), 30, 'token balance should be 30');
    }
}
5. Testing a method involving msg.sender and msg.value
In the following test, we will be emulating multiple accounts making deposits in a smart contract to the same recipient and finally having the recipient withdraw the lump sum of all donations. We are also verifying that the donations match the expected amounts. This example really drives home how could you switch between different accounts, while using a set of different msg.value amounts.
Contract/Program to be tested: Donations.sol
// SPDX-License-Identifier: GPL-3.0
pragma solidity ^0.8.4;

contract donations{
    struct Donation {
        uint id;
        uint amount;
        string donor;
        string message;
        uint timestamp; //seconds since unix start
    }
    uint amount = 0;
    uint id = 0;
    mapping(address => uint) public balances;
    mapping(address => Donation[]) public donationsMap;

    function donate(address _recipient, string memory _donor, string memory _msg) public payable {
        require(msg.value > 0, "The donation needs to be >0 in order for it to go through");
        amount = msg.value;
        balances[_recipient] += amount;
        donationsMap[_recipient].push(Donation(id++,amount,_donor,_msg,block.timestamp));
    }

    function withdraw() public {  //whole thing by default.
        amount = balances[msg.sender];
        balances[msg.sender] -= amount;
        require(amount > 0, "Your current balance is 0");
        (bool success,) = msg.sender.call{value:amount}("");
        if(!success){
            revert();
        }
    }

    function balances_getter(address _recipient) public view returns (uint){
            return balances[_recipient];
    }

    function getBalance() public view returns(uint) {
            return msg.sender.balance;
    }
}
Test contract/program: Donations_test.sol
// SPDX-License-Identifier: GPL-3.0

pragma solidity >=0.4.22 <0.9.0;
import "remix_tests.sol";
import "remix_accounts.sol";
import "../donations.sol";

contract testSuite is donations {
    address acc0 = TestsAccounts.getAccount(0); //owner by default
    address acc1 = TestsAccounts.getAccount(1);
    address acc2 = TestsAccounts.getAccount(2);
    address acc3 = TestsAccounts.getAccount(3);
    address recipient = TestsAccounts.getAccount(4); //recipient

    /// #value: 1000000000000000000
    /// #sender: account-1
    function donateAcc1AndCheckBalance() public payable{
        Assert.equal(msg.value, 1000000000000000000, 'value should be 1 Eth');
        donate(recipient, "Mario", "Are you a bird?");
        Assert.equal(balances_getter(recipient), 1000000000000000000, 'balances should be 1 Eth');
    }

    /// #value: 1000000000000000000
    /// #sender: account-2
    function donateAcc2AndCheckBalance() public payable{
        Assert.equal(msg.value, 1000000000000000000, 'value should be 1 Eth');
        donate(recipient, "Tom", "Are you a plane?");
        Assert.equal(balances_getter(recipient), 2000000000000000000, 'balances should be 2 Eth');
    }

    /// #value: 2000000000000000000
    /// #sender: account-3
    function donateAcc3AndCheckBalance() public payable{
        Assert.equal(msg.value, 2000000000000000000, 'value should be 1 Eth');
        donate(recipient, "Maria", "Are you a car?");
        Assert.equal(balances_getter(recipient), 4000000000000000000, 'balances should be 4 Eth');
    }

    /// #sender: account-4
    function withdrawDonations() public payable{
        uint initialBal = getBalance();
        withdraw();
        uint finalBal = getBalance();
        Assert.equal(finalBal-initialBal, 4000000000000000000, 'balances should be 4 Eth');
    }
}
Hardhat
(Supported since Remix IDE v0.12.0 and Remixd v0.3.6)
Remixd and Hardhat
Note: If you have not used remixd before, read more about it here
If remixd is running locally on your device and shared folder is a Hardhat project, an additional websocket plugin will be listening on port 65522. According to its documentation,
Hardhat projects are npm projects with the hardhat package installed and a hardhat.config.js or hardhat.config.ts file.
Remixd looks for the hardhat.config.js or hardhat.config.ts file in shared folder, and if it finds the file, the Hardhat websocket listener will run.
The Hardhat websocket listener is a websocket plugin similar to remixd and is used to perform Hardhat specific actions with Remix IDE.
It doesn’t need any separate installation as it is shipped with remixd NPM module.

Enable Hardhat Compilation
Prerequisites
To use Hardhat compilation with Remix IDE efficiently:
Hardhat should be installed locally on the system https://hardhat.org/getting-started/#installation
Shared folder should be a Hardhat project containing
hardhat.config.jsorhardhat.config.tsRemixdHardhat websocket listener should be running at65522
How to use
If a hardhat project is shared through remixd and localhost workspace is loaded in Remix IDE, there will be an extra checkbox shown in Solidity Compiler plugin with the label Enable Hardhat Compilation.
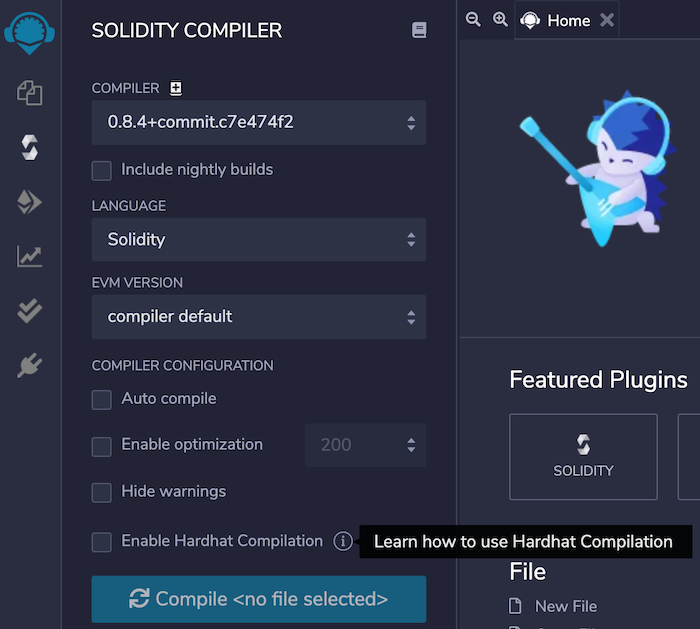
There is an info icon along side the label which redirects to a specific section of Remix official documentation that explains how to use Hardhat compilation.
One can check the Enable Hardhat Compilation box to run the compilation for Hardhat along with the Remix using the compiler configuration in Solidity Compiler plugin.
On clicking Compile button, a file with remix-compiler.config.js will be created on the project root which will be storing compiler configuration set in Remix’s Solidity Compiler plugin. It is passed to Hardhat for compilation.
The result of the compilation will be shown in the Remix IDE terminal
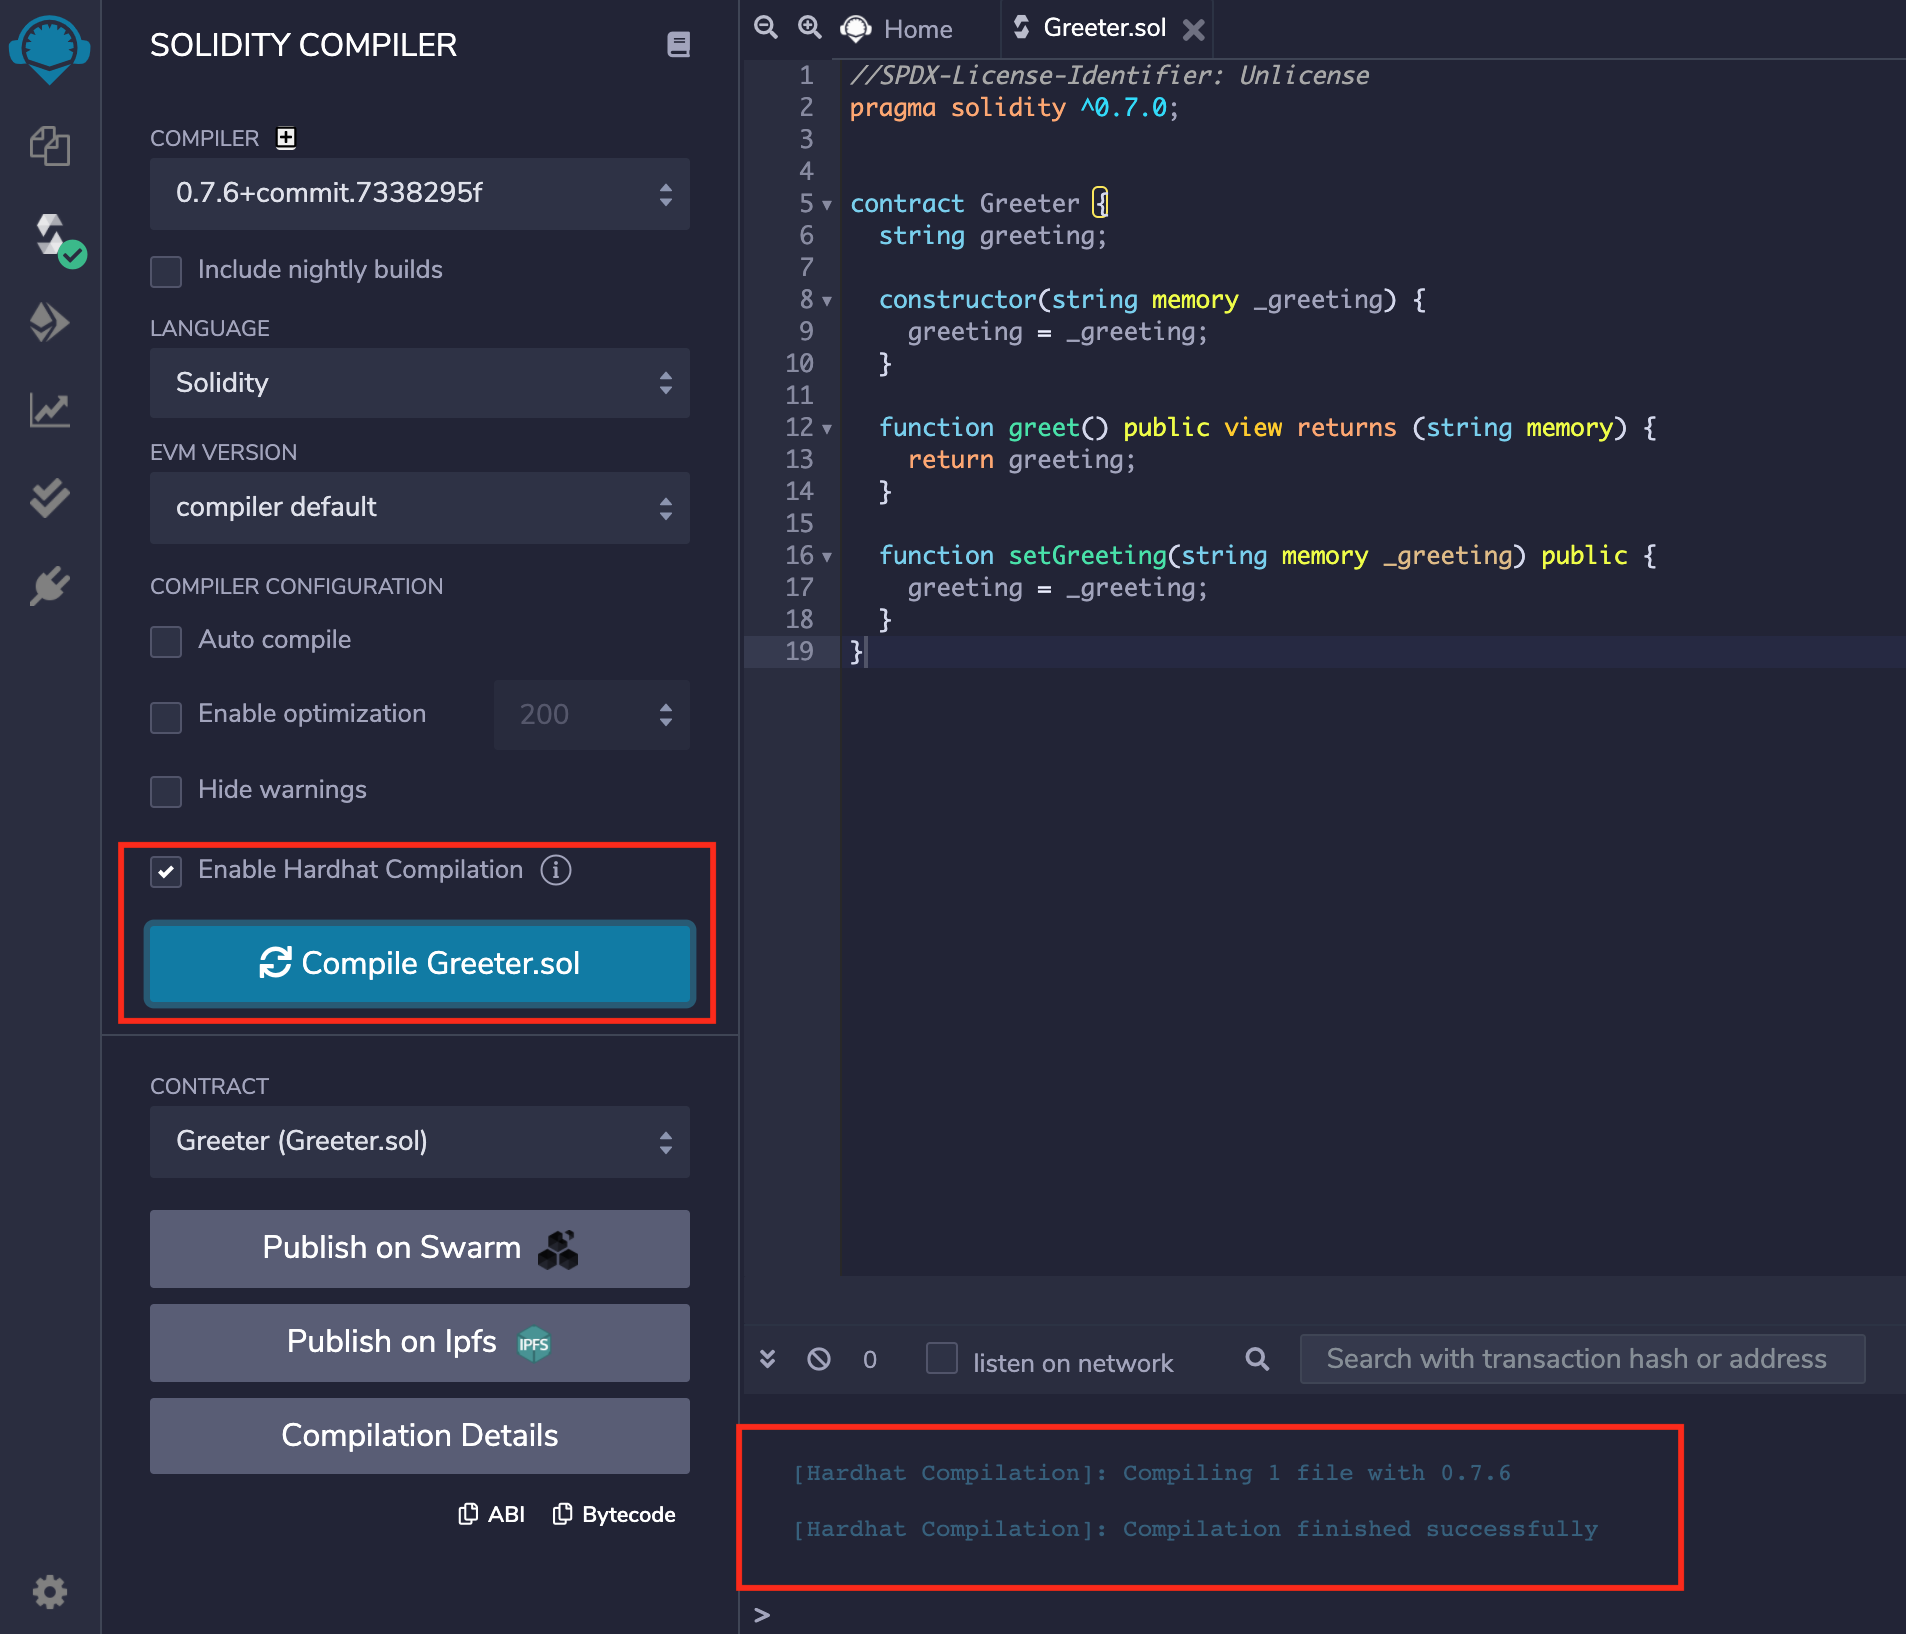
and also in the remixd terminal.

Hardhat Provider
In Hardhat, contracts are deployed by starting a local node. Read more about it in Hardhat documentation
Hardhat Provider is a plugin on Remix IDE which enables users to deploy the contract to the Hardhat ‘localhost’ network. This can be chosen from the ENVIRONMENT dropdown of Deploy and Run Transactions plugin.
As soon as you select Hardhat Provider, a modal is opened asking for the Hardhat JSON-RPC Endpoint.
If Hardhat node is running with default options, then the default endpoint value in modal will not need any change. In case, Hardhat node host and port are different, JSON-RPC endpoint should be updated in the modal text box.
Once the correct endpoint is filled in the modal, just click on OK and the accounts from the Hardhat node will be loaded in the ACCOUNT section. Network id will also be shown.
Now, one can start deploying the contract from Remix IDE to the Hardhat local node as usual.
console.log in Remix IDE
(Supported since Remix IDE v0.17.0)
Remix IDE supports hardhat console library while using Remix VM. It can be used while making a transaction or running unit tests.
Deploy and Run Transactions
To try it out, you need to put an import statement and use console.log to print the value as shown in image.
Further, once you execute the changeOwner method, the value from console statement will be shown in Remix terminal after transaction details as below:
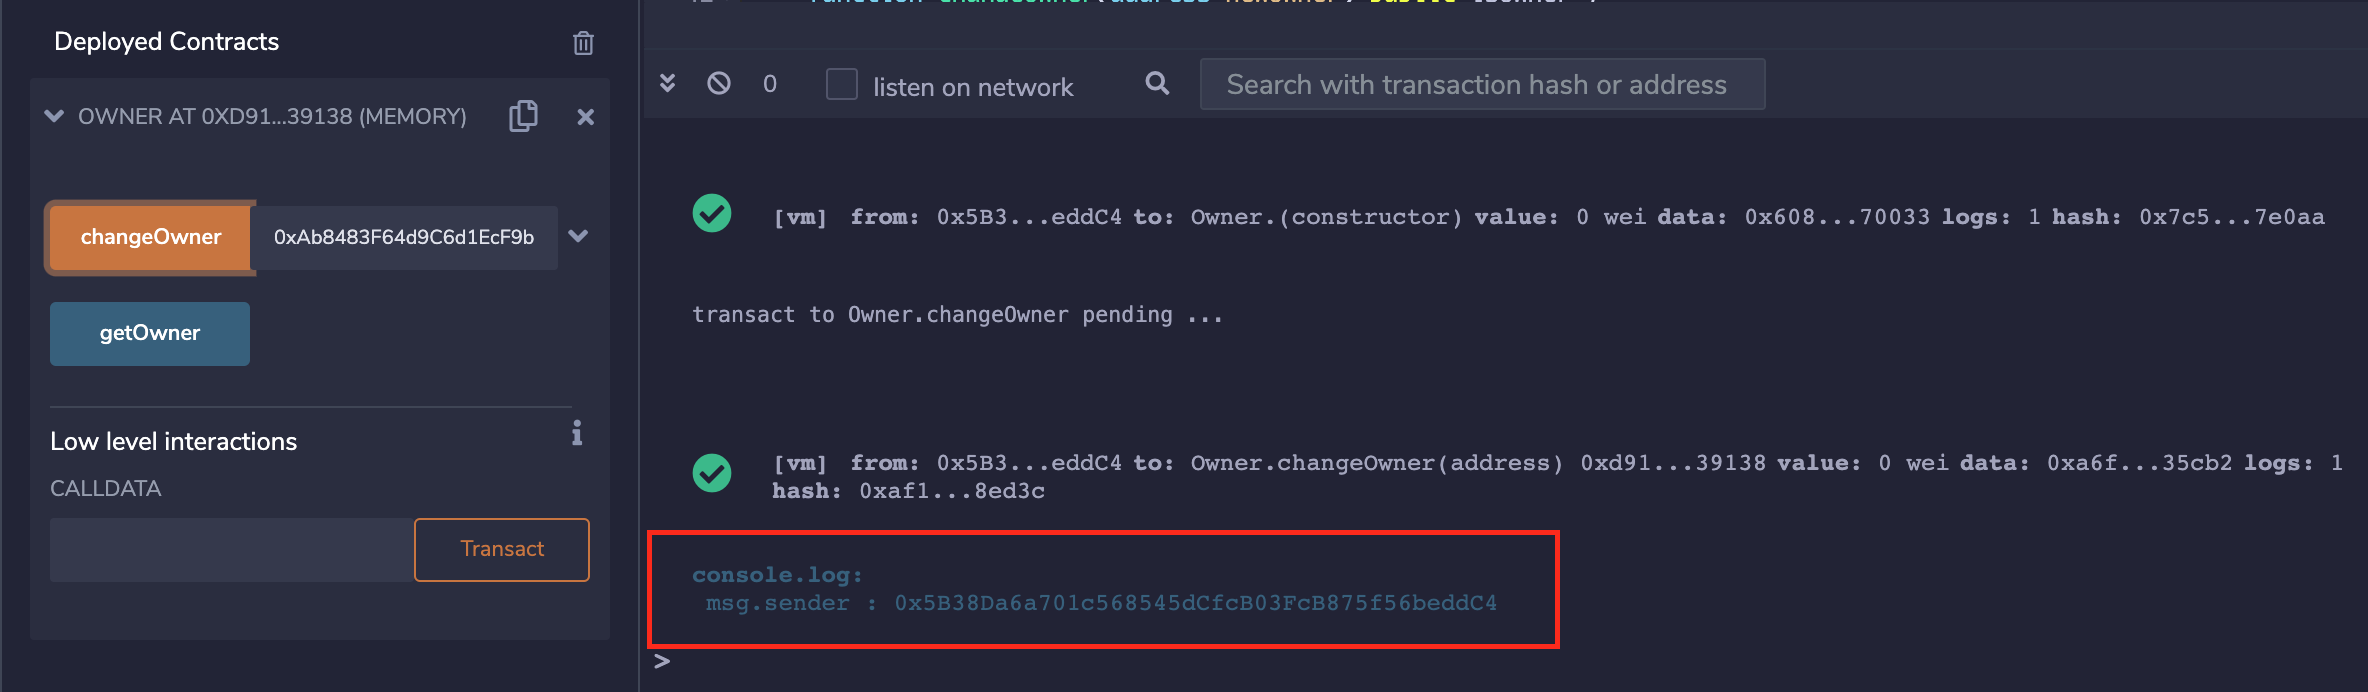
Solidity Unit Testing
Similarly, console.log can be used while running unit tests using Remix Solidity Unit Testing plugin. See image below.
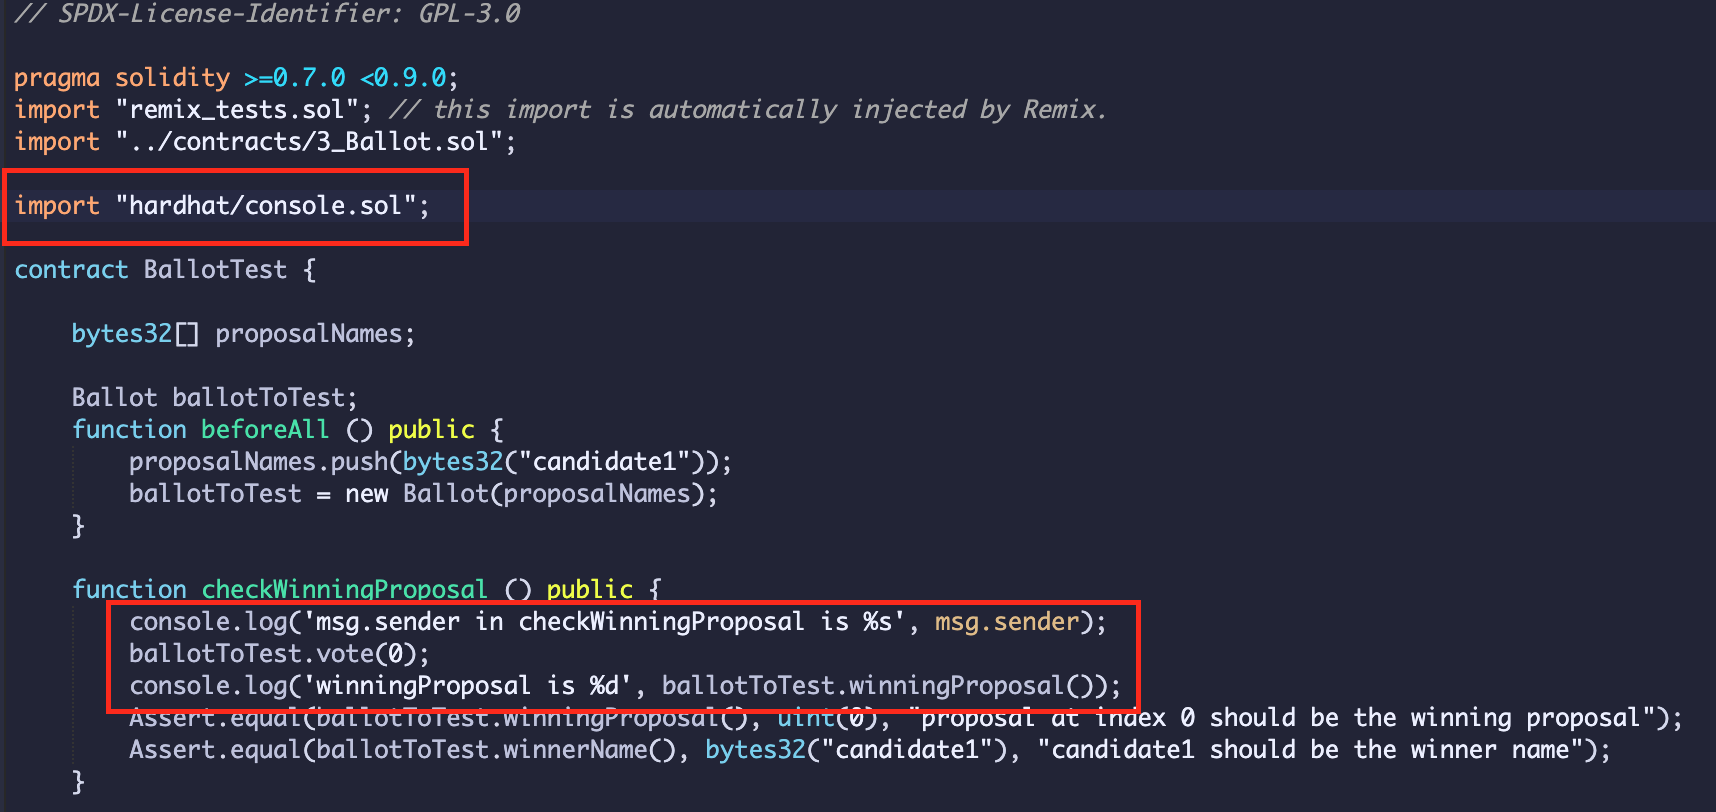
For the tests including logging message, it will display in the Remix Terminal corresponding to test name.
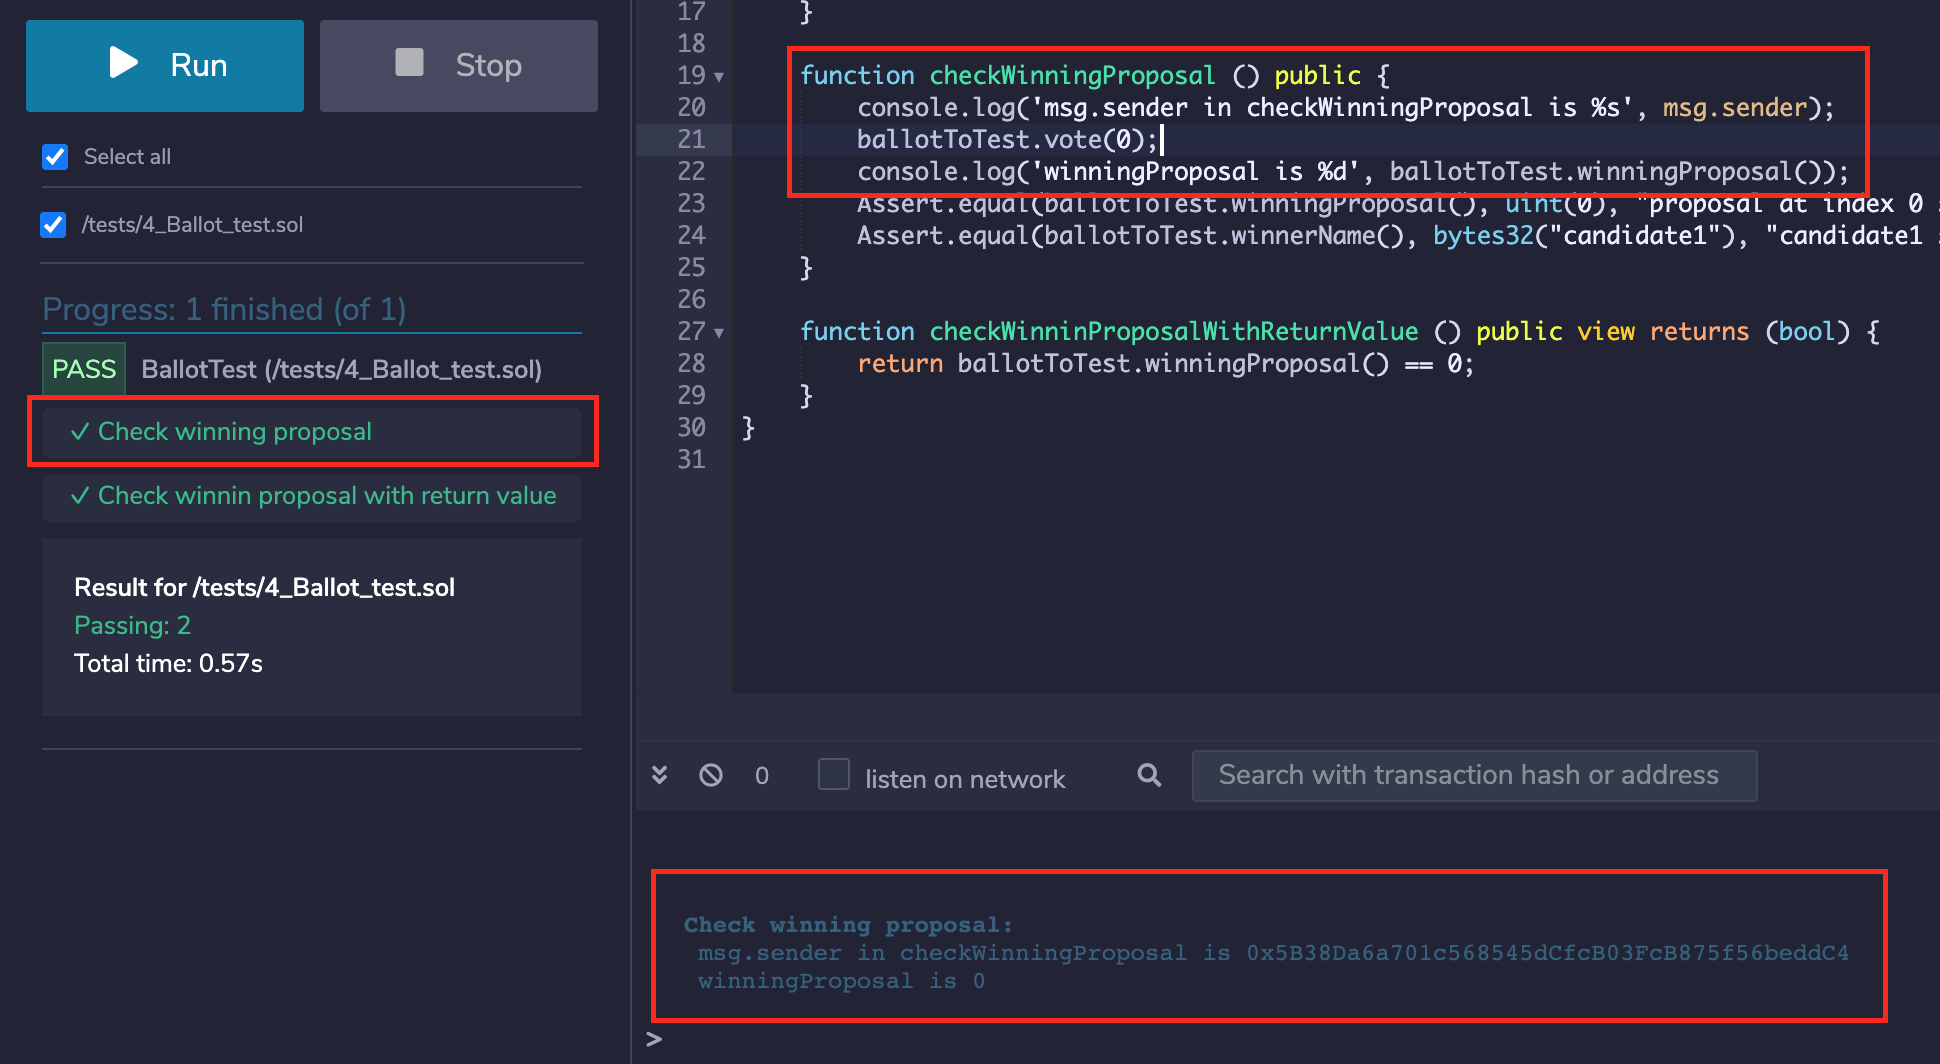
Truffle
(Supported since Remix IDE v0.23.0 and Remixd v0.6.0)
Remixd and Truffle
Note: If you have not used remixd before, read more about it here
If remixd is running locally on your device and shared folder is a Truffle project, an additional websocket plugin will be listening on port 65524. According to its documentation,
Truffle projects are projects with a truffle-config.js file.
Remixd looks for the truffle-config.js file in shared folder. If found, the Truffle websocket listener will run.
The Truffle websocket listener is a websocket plugin similar to remixd and is used to perform Truffle specific actions with Remix IDE.
It doesn’t need any separate installation as it is shipped with remixd NPM module.
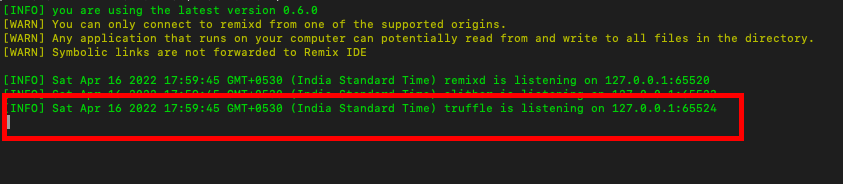
Enable Truffle Compilation
Prerequisites
To use Truffle compilation with Remix IDE efficiently:
Truffle should be installed locally on the system https://trufflesuite.com/docs/truffle/getting-started/installation/
Shared folder should be a Truffle project containing
truffle-config.jsRemixdTruffle websocket listener should be running at65524
How to use
If a truffle project is shared through remixd and localhost workspace is loaded in Remix IDE, there will be an extra checkbox shown in Solidity Compiler plugin with the label Enable Truffle Compilation.
There is an info icon along side the label which redirects to a specific section of Remix official documentation that explains how to use Truffle compilation.
One can check the Enable Truffle Compilation box to run the compilation for Truffle along with the Remix using the compiler configuration in Solidity Compiler plugin.
On clicking Compile button, a file named as remix-compiler.config.js will be created on the project root which will be storing compiler configuration set in Remix’s Solidity Compiler plugin. It is passed to Truffle for compilation.
The result of the compilation will be shown in the Remix IDE terminal
and also in the remixd terminal.
Ganache Provider
In Truffle, contracts are deployed by connecting to a built-in personal blockchain, i.e. Ganache. Read more about it in Truffle documentation
Ganache Provider is a plugin on Remix IDE which enables users to deploy the contract to the Truffle’s built-in Ganache blockchain. Ganache Provider can be chosen from the list of environments in Deploy & Run Transactions plugin.
As soon as you select Ganache Provider, a modal is opened asking for the Ganache JSON-RPC Endpoint.
If Ganache node is running with default options, the default endpoint value in modal will not need any change. In case, Ganache node host and port are different, JSON-RPC endpoint should be updated in the modal text box.
Once the correct endpoint is filled in the modal, just click on OK and the accounts from the Ganache node will be loaded in the ACCOUNT section. Network id will also be shown.
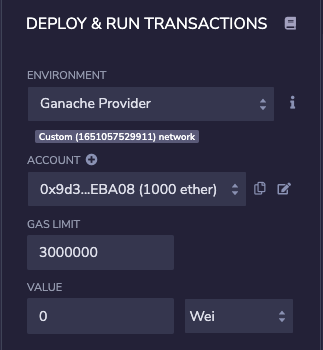
Now, one can start deploying the contract from Remix IDE to the local Ganache node as usual.
Slither
(Supported since Remix IDE v0.15.0 and Remixd v0.5.0)
Remixd and Slither
Note: If you have not used remixd before, read more about it here
When remixd NPM module is installed, it also installs Slither and solc-select and latest version of solc.
Python3.6+ (pip3) needs to already be installed on the System. In case of any discrepany, Slither can also installed along with other dependencies using command remixd -i slither (This packaging of Slither with the remixd module is supported since Remixd v0.6.3)
when remixd is running locally on your device, an additional websocket plugin will be listening on port 65523 which will be dedicated for Slither integration. (Supported since Remixd v0.5.0)
The remixd Slither listener is a websocket plugin similar to remixd and is used to perform Slither analysis with Remix IDE.

Enable Slither Analysis
Prerequisites
To use Slither analysis with Remix IDE efficiently, following tools should be installed locally on the system:
Solc: https://docs.soliditylang.org/en/latest/installing-solidity.html
Solc-select: https://github.com/crytic/solc-select#quickstart
There are setup with remixd installation or can be done using remixd -i slither commmand.
How to use
If a project is shared through remixd and localhost workspace is loaded in Remix IDE, there will be an extra checkbox shown in Solidity Static Analysis plugin with the label Enable Slither Analysis.
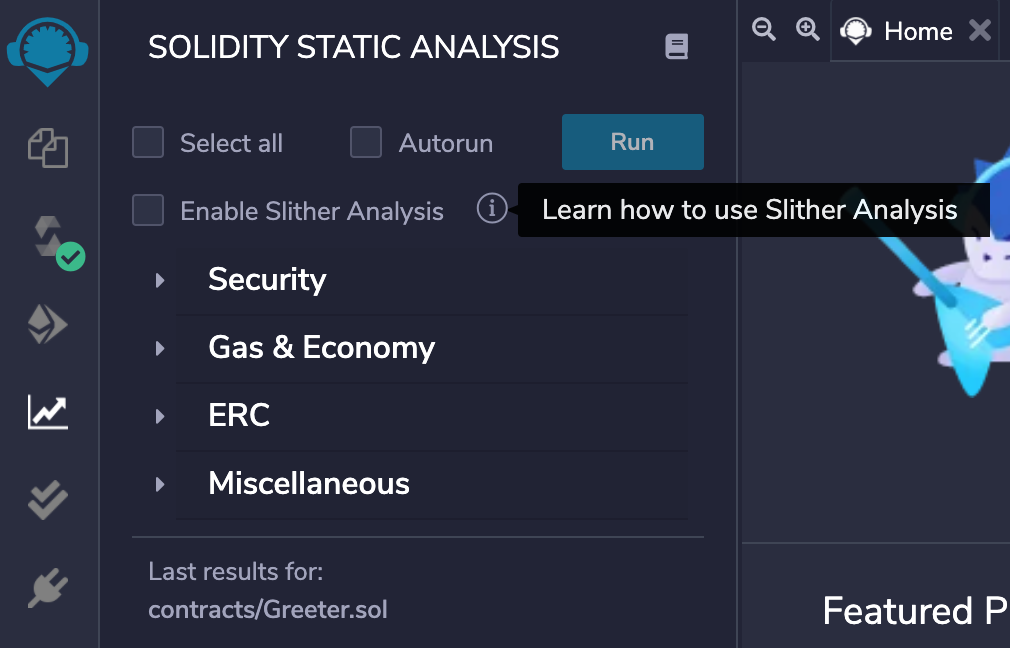
There is an info icon on the right side of the label which redirects to a specific section of Remix official documentation that explains how to use Slither Analysis and prerequisites for it.
One can check the Enable Slither Analysis box to run the analysis using Slither along with the Remix’s analysis library.
Latest report of Slither analysis will be stored locally on project root with a file named as remix-slither-report.json.
Slither Analysis report will also be displayed on the Remix IDE side after the Remix analysis report for better user readability.
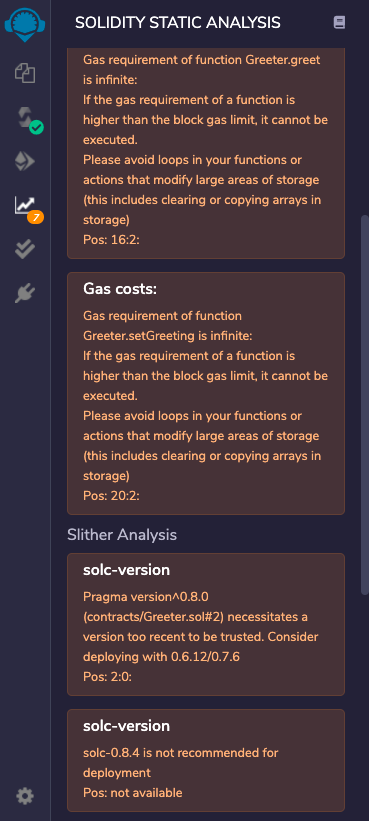
The result of the analysis will be shown in the Remix IDE terminal

and also in the remixd console.

To only run Slither Analysis, deselect Select all checkbox and click on Run. Now it will show only the Slither Analysis report.
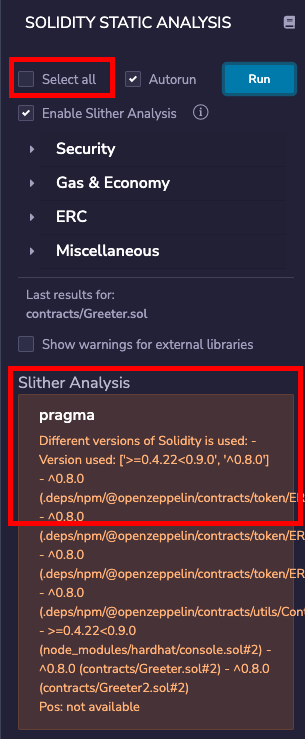
By default, it doesn’t show the warnings for external libraries like remix-tests.sol, hardhat/console.sol etc. To have a look on them, check the box with label Show warnings for external libraries.
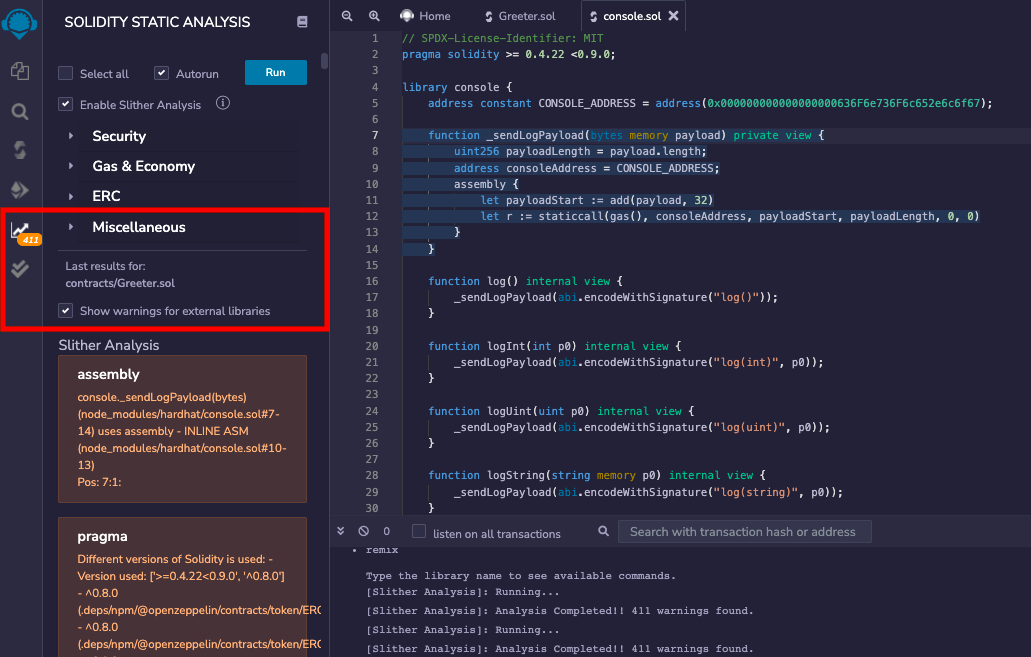
More Details
Analysis for Slither is run using the version set in Solidity Compiler plugin on Remix IDE. Slither is a CLI tool and requires solc to run the analysis. Before running the analysis, Slither websocket plugin checks if current version of solc is same as the version set in Remix IDE.
If the compiler version set in Solidity Compiler is different from current version of solc installed locally, the Slither websocket plugin will update the solc to be the same as the required version solc-select.
For example, if current solc version on the system is 0.8.4 and on the Remix IDE 0.8.6 is set, remixd logs explain remote solc version selection
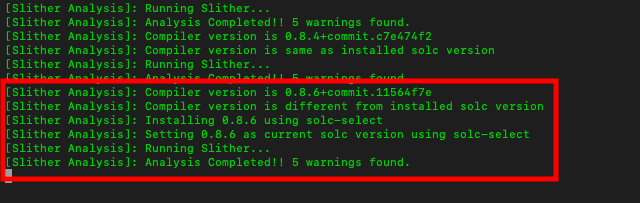
After successful analysis run:
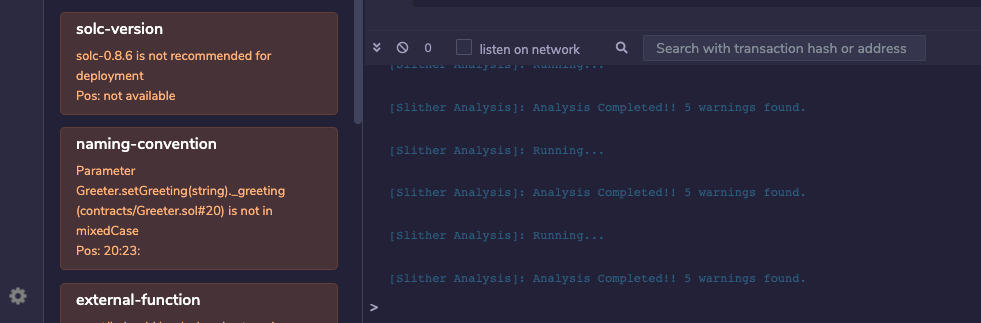
Foundry
(Supported since Remix IDE v0.25.0)
Foundry Provider
Foundry Provider is a plugin on Remix IDE which enables users to deploy the contract to the Foundry’s built-in Anvil blockchain. Foundry Provider can be chosen from the list of environments in Deploy & Run Transactions plugin.
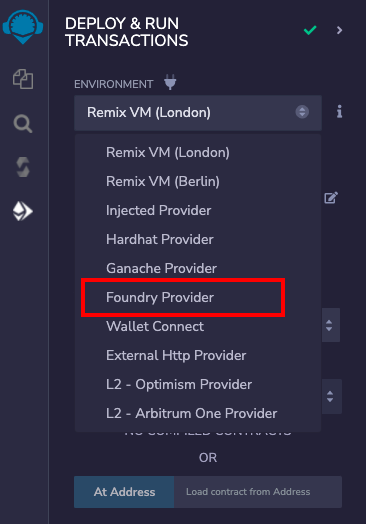
As soon as you select Foundry Provider, a modal is opened asking for the Anvil JSON-RPC Endpoint.
If Foundry Anvil node is running with default options, the default endpoint value in modal will not need any change. In case, Anvil node host and port are different, JSON-RPC endpoint should be updated in the modal text box.
Once the correct endpoint is filled in the modal, just click on OK and the accounts from the Anvil node will be loaded in the ACCOUNT section. Network id will also be shown.
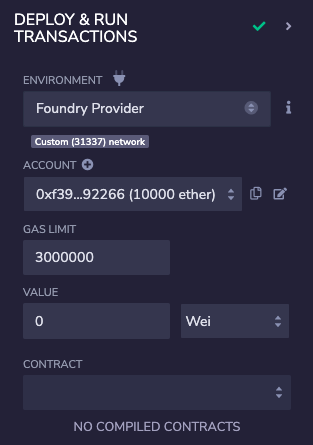
Now, one can start deploying the contract from Remix IDE to the local Anvil node as usual.
Foundry Remappings
Foundry manages dependencies using git submodules and can remap dependencies to make them easier to import. So import defined by remappings can have compilation errors on Remix IDE.
To support such compilation, Remix suggests running compilation using a compiler config file. Remix adds some default Forge remappings in the compiler config file when a Foundry project is loaded in Remix IDE using remixd.
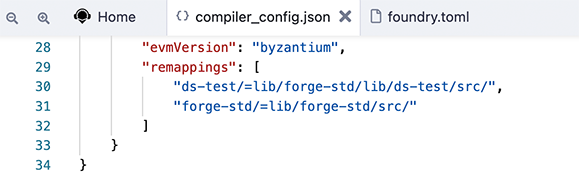
Further, more remappings can be added manually, if required.
Generate Artifact
When a compilation for a Solidity file succeeds, Remix creates three JSON files for each compiled contract. Files can be seen in the File Explorers plugin as:
artifacts/<contractName>.json: contains the link to the libraries, the bytecode, the deployed bytecode, the gas estimation, the method identifiers, and the ABI. It is used for linking a library address to the file.artifacts/<contractName_metadata>.json: contains the metadata from the output of Solidity compilation.artifacts/build-info/<dynamic_hash>.json: contains info aboutsolccompiler version, compiler input and output. This file is generated similar to the files generated through Hardhat compilation. You can also try Hardhat compilation from Remix.
Please note that in order to generate these artifact files, the Generate contract metadata box in the General settings section of the Settings module needs to be checked. By default, it is checked.
You can write scripts that can access either of these files.
Library Deployment with filename.json
By default Remix automatically deploys needed libraries.
When you open the metadata file for the libraries - artifact/filename.json you will see the following sections:
linkReferences contains a map representing libraries which depend on the current contract.
Values are addresses of libraries used for linking the contract.
autoDeployLib defines if the libraries should be auto deployed by Remix or if the contract should be linked with libraries described in linkReferences
Note that Remix will resolve addresses corresponding to the current network.
By default, a configuration key follows the form: <network_name>:<networkd_id>, but it is also possible
to define <network_name> or <network_id> as keys.
Here is a sample metadata file for linking a library:
{
	"VM:-": {
		"linkReferences": {
			"browser/Untitled.sol": {
				"lib": "<address>",
				"lib2": "<address>"
			}
		},
		"autoDeployLib": true
	},
	"main:1": {
		"linkReferences": {
			"browser/Untitled.sol": {
				"lib": "<address>",
				"lib2": "<address>"
			}
		},
		"autoDeployLib": true
	},
	"ropsten:3": {
		"linkReferences": {
			"browser/Untitled.sol": {
				"lib": "<address>",
				"lib2": "<address>"
			}
		},
		"autoDeployLib": true
	},
	"rinkeby:4": {
		"linkReferences": {
			"browser/Untitled.sol": {
				"lib": "<address>",
				"lib2": "<address>"
			}
		},
		"autoDeployLib": true
	},
	"kovan:42": {
		"linkReferences": {
			"browser/Untitled.sol": {
				"lib": "<address>",
				"lib2": "<address>"
			}
		},
		"autoDeployLib": true
	},
	"data": {
		"bytecode": {
			"linkReferences": {},
			"object": "608060405234801561001057600080fd5b506040516108723803806108728339818101604052602081101561003357600080fd5b8101908080519060200190929190505050336000806101000a81548173ffffffffffffffffffffffffffffffffffffffff021916908373ffffffffffffffffffffffffffffffffffffffff16021790555060018060008060009054906101000a900473ffffffffffffffffffffffffffffffffffffffff1673ffffffffffffffffffffffffffffffffffffffff1673ffffffffffffffffffffffffffffffffffffffff168152602001908152602001600020600001819055508060ff166002816100fd9190610104565b5050610157565b81548183558181111561012b5781836000526020600020918201910161012a9190610130565b5b505050565b61015491905b808211156101505760008082016000905550600101610136565b5090565b90565b61070c806101666000396000f3fe608060405234801561001057600080fd5b506004361061004c5760003560e01c80635c19a95c14610051578063609ff1bd146100955780639e7b8d61146100b9578063b3f98adc146100fd575b600080fd5b6100936004803603602081101561006757600080fd5b81019080803573ffffffffffffffffffffffffffffffffffffffff16906020019092919050505061012e565b005b61009d610481565b604051808260ff1660ff16815260200191505060405180910390f35b6100fb600480360360208110156100cf57600080fd5b81019080803573ffffffffffffffffffffffffffffffffffffffff1690602001909291905050506104f9565b005b61012c6004803603602081101561011357600080fd5b81019080803560ff1690602001909291905050506105f6565b005b6000600160003373ffffffffffffffffffffffffffffffffffffffff1673ffffffffffffffffffffffffffffffffffffffff16815260200190815260200160002090508060010160009054906101000a900460ff161561018e575061047e565b5b600073ffffffffffffffffffffffffffffffffffffffff16600160008473ffffffffffffffffffffffffffffffffffffffff1673ffffffffffffffffffffffffffffffffffffffff16815260200190815260200160002060010160029054906101000a900473ffffffffffffffffffffffffffffffffffffffff1673ffffffffffffffffffffffffffffffffffffffff16141580156102bc57503373ffffffffffffffffffffffffffffffffffffffff16600160008473ffffffffffffffffffffffffffffffffffffffff1673ffffffffffffffffffffffffffffffffffffffff16815260200190815260200160002060010160029054906101000a900473ffffffffffffffffffffffffffffffffffffffff1673ffffffffffffffffffffffffffffffffffffffff1614155b1561032b57600160008373ffffffffffffffffffffffffffffffffffffffff1673ffffffffffffffffffffffffffffffffffffffff16815260200190815260200160002060010160029054906101000a900473ffffffffffffffffffffffffffffffffffffffff16915061018f565b3373ffffffffffffffffffffffffffffffffffffffff168273ffffffffffffffffffffffffffffffffffffffff161415610365575061047e565b60018160010160006101000a81548160ff021916908315150217905550818160010160026101000a81548173ffffffffffffffffffffffffffffffffffffffff021916908373ffffffffffffffffffffffffffffffffffffffff1602179055506000600160008473ffffffffffffffffffffffffffffffffffffffff1673ffffffffffffffffffffffffffffffffffffffff16815260200190815260200160002090508060010160009054906101000a900460ff161561046457816000015460028260010160019054906101000a900460ff1660ff168154811061044557fe5b906000526020600020016000016000828254019250508190555061047b565b816000015481600001600082825401925050819055505b50505b50565b6000806000905060008090505b6002805490508160ff1610156104f4578160028260ff16815481106104af57fe5b906000526020600020016000015411156104e75760028160ff16815481106104d357fe5b906000526020600020016000015491508092505b808060010191505061048e565b505090565b6000809054906101000a900473ffffffffffffffffffffffffffffffffffffffff1673ffffffffffffffffffffffffffffffffffffffff163373ffffffffffffffffffffffffffffffffffffffff161415806105a15750600160008273ffffffffffffffffffffffffffffffffffffffff1673ffffffffffffffffffffffffffffffffffffffff16815260200190815260200160002060010160009054906101000a900460ff165b156105ab576105f3565b60018060008373ffffffffffffffffffffffffffffffffffffffff1673ffffffffffffffffffffffffffffffffffffffff168152602001908152602001600020600001819055505b50565b6000600160003373ffffffffffffffffffffffffffffffffffffffff1673ffffffffffffffffffffffffffffffffffffffff16815260200190815260200160002090508060010160009054906101000a900460ff168061065e57506002805490508260ff1610155b1561066957506106d4565b60018160010160006101000a81548160ff021916908315150217905550818160010160016101000a81548160ff021916908360ff160217905550806000015460028360ff16815481106106b857fe5b9060005260206000200160000160008282540192505081905550505b5056fea265627a7a72315820457d09494a1d1d64ebd9b931a6c692e671dc1f14d4a0c6600f7aa00fed36011064736f6c634300050b0032",
			"opcodes": "PUSH1 0x80 PUSH1 0x40 MSTORE CALLVALUE DUP1 ISZERO PUSH2 0x10 JUMPI PUSH1 0x0 DUP1 REVERT JUMPDEST POP PUSH1 0x40 MLOAD PUSH2 0x872 CODESIZE SUB DUP1 PUSH2 0x872 DUP4 CODECOPY DUP2 DUP2 ADD PUSH1 0x40 MSTORE PUSH1 0x20 DUP2 LT ISZERO PUSH2 0x33 JUMPI PUSH1 0x0 DUP1 REVERT JUMPDEST DUP2 ADD SWAP1 DUP1 DUP1 MLOAD SWAP1 PUSH1 0x20 ADD SWAP1 SWAP3 SWAP2 SWAP1 POP POP POP CALLER PUSH1 0x0 DUP1 PUSH2 0x100 EXP DUP2 SLOAD DUP2 PUSH20 0xFFFFFFFFFFFFFFFFFFFFFFFFFFFFFFFFFFFFFFFF MUL NOT AND SWAP1 DUP4 PUSH20 0xFFFFFFFFFFFFFFFFFFFFFFFFFFFFFFFFFFFFFFFF AND MUL OR SWAP1 SSTORE POP PUSH1 0x1 DUP1 PUSH1 0x0 DUP1 PUSH1 0x0 SWAP1 SLOAD SWAP1 PUSH2 0x100 EXP SWAP1 DIV PUSH20 0xFFFFFFFFFFFFFFFFFFFFFFFFFFFFFFFFFFFFFFFF AND PUSH20 0xFFFFFFFFFFFFFFFFFFFFFFFFFFFFFFFFFFFFFFFF AND PUSH20 0xFFFFFFFFFFFFFFFFFFFFFFFFFFFFFFFFFFFFFFFF AND DUP2 MSTORE PUSH1 0x20 ADD SWAP1 DUP2 MSTORE PUSH1 0x20 ADD PUSH1 0x0 KECCAK256 PUSH1 0x0 ADD DUP2 SWAP1 SSTORE POP DUP1 PUSH1 0xFF AND PUSH1 0x2 DUP2 PUSH2 0xFD SWAP2 SWAP1 PUSH2 0x104 JUMP JUMPDEST POP POP PUSH2 0x157 JUMP JUMPDEST DUP2 SLOAD DUP2 DUP4 SSTORE DUP2 DUP2 GT ISZERO PUSH2 0x12B JUMPI DUP2 DUP4 PUSH1 0x0 MSTORE PUSH1 0x20 PUSH1 0x0 KECCAK256 SWAP2 DUP3 ADD SWAP2 ADD PUSH2 0x12A SWAP2 SWAP1 PUSH2 0x130 JUMP JUMPDEST JUMPDEST POP POP POP JUMP JUMPDEST PUSH2 0x154 SWAP2 SWAP1 JUMPDEST DUP1 DUP3 GT ISZERO PUSH2 0x150 JUMPI PUSH1 0x0 DUP1 DUP3 ADD PUSH1 0x0 SWAP1 SSTORE POP PUSH1 0x1 ADD PUSH2 0x136 JUMP JUMPDEST POP SWAP1 JUMP JUMPDEST SWAP1 JUMP JUMPDEST PUSH2 0x70C DUP1 PUSH2 0x166 PUSH1 0x0 CODECOPY PUSH1 0x0 RETURN INVALID PUSH1 0x80 PUSH1 0x40 MSTORE CALLVALUE DUP1 ISZERO PUSH2 0x10 JUMPI PUSH1 0x0 DUP1 REVERT JUMPDEST POP PUSH1 0x4 CALLDATASIZE LT PUSH2 0x4C JUMPI PUSH1 0x0 CALLDATALOAD PUSH1 0xE0 SHR DUP1 PUSH4 0x5C19A95C EQ PUSH2 0x51 JUMPI DUP1 PUSH4 0x609FF1BD EQ PUSH2 0x95 JUMPI DUP1 PUSH4 0x9E7B8D61 EQ PUSH2 0xB9 JUMPI DUP1 PUSH4 0xB3F98ADC EQ PUSH2 0xFD JUMPI JUMPDEST PUSH1 0x0 DUP1 REVERT JUMPDEST PUSH2 0x93 PUSH1 0x4 DUP1 CALLDATASIZE SUB PUSH1 0x20 DUP2 LT ISZERO PUSH2 0x67 JUMPI PUSH1 0x0 DUP1 REVERT JUMPDEST DUP2 ADD SWAP1 DUP1 DUP1 CALLDATALOAD PUSH20 0xFFFFFFFFFFFFFFFFFFFFFFFFFFFFFFFFFFFFFFFF AND SWAP1 PUSH1 0x20 ADD SWAP1 SWAP3 SWAP2 SWAP1 POP POP POP PUSH2 0x12E JUMP JUMPDEST STOP JUMPDEST PUSH2 0x9D PUSH2 0x481 JUMP JUMPDEST PUSH1 0x40 MLOAD DUP1 DUP3 PUSH1 0xFF AND PUSH1 0xFF AND DUP2 MSTORE PUSH1 0x20 ADD SWAP2 POP POP PUSH1 0x40 MLOAD DUP1 SWAP2 SUB SWAP1 RETURN JUMPDEST PUSH2 0xFB PUSH1 0x4 DUP1 CALLDATASIZE SUB PUSH1 0x20 DUP2 LT ISZERO PUSH2 0xCF JUMPI PUSH1 0x0 DUP1 REVERT JUMPDEST DUP2 ADD SWAP1 DUP1 DUP1 CALLDATALOAD PUSH20 0xFFFFFFFFFFFFFFFFFFFFFFFFFFFFFFFFFFFFFFFF AND SWAP1 PUSH1 0x20 ADD SWAP1 SWAP3 SWAP2 SWAP1 POP POP POP PUSH2 0x4F9 JUMP JUMPDEST STOP JUMPDEST PUSH2 0x12C PUSH1 0x4 DUP1 CALLDATASIZE SUB PUSH1 0x20 DUP2 LT ISZERO PUSH2 0x113 JUMPI PUSH1 0x0 DUP1 REVERT JUMPDEST DUP2 ADD SWAP1 DUP1 DUP1 CALLDATALOAD PUSH1 0xFF AND SWAP1 PUSH1 0x20 ADD SWAP1 SWAP3 SWAP2 SWAP1 POP POP POP PUSH2 0x5F6 JUMP JUMPDEST STOP JUMPDEST PUSH1 0x0 PUSH1 0x1 PUSH1 0x0 CALLER PUSH20 0xFFFFFFFFFFFFFFFFFFFFFFFFFFFFFFFFFFFFFFFF AND PUSH20 0xFFFFFFFFFFFFFFFFFFFFFFFFFFFFFFFFFFFFFFFF AND DUP2 MSTORE PUSH1 0x20 ADD SWAP1 DUP2 MSTORE PUSH1 0x20 ADD PUSH1 0x0 KECCAK256 SWAP1 POP DUP1 PUSH1 0x1 ADD PUSH1 0x0 SWAP1 SLOAD SWAP1 PUSH2 0x100 EXP SWAP1 DIV PUSH1 0xFF AND ISZERO PUSH2 0x18E JUMPI POP PUSH2 0x47E JUMP JUMPDEST JUMPDEST PUSH1 0x0 PUSH20 0xFFFFFFFFFFFFFFFFFFFFFFFFFFFFFFFFFFFFFFFF AND PUSH1 0x1 PUSH1 0x0 DUP5 PUSH20 0xFFFFFFFFFFFFFFFFFFFFFFFFFFFFFFFFFFFFFFFF AND PUSH20 0xFFFFFFFFFFFFFFFFFFFFFFFFFFFFFFFFFFFFFFFF AND DUP2 MSTORE PUSH1 0x20 ADD SWAP1 DUP2 MSTORE PUSH1 0x20 ADD PUSH1 0x0 KECCAK256 PUSH1 0x1 ADD PUSH1 0x2 SWAP1 SLOAD SWAP1 PUSH2 0x100 EXP SWAP1 DIV PUSH20 0xFFFFFFFFFFFFFFFFFFFFFFFFFFFFFFFFFFFFFFFF AND PUSH20 0xFFFFFFFFFFFFFFFFFFFFFFFFFFFFFFFFFFFFFFFF AND EQ ISZERO DUP1 ISZERO PUSH2 0x2BC JUMPI POP CALLER PUSH20 0xFFFFFFFFFFFFFFFFFFFFFFFFFFFFFFFFFFFFFFFF AND PUSH1 0x1 PUSH1 0x0 DUP5 PUSH20 0xFFFFFFFFFFFFFFFFFFFFFFFFFFFFFFFFFFFFFFFF AND PUSH20 0xFFFFFFFFFFFFFFFFFFFFFFFFFFFFFFFFFFFFFFFF AND DUP2 MSTORE PUSH1 0x20 ADD SWAP1 DUP2 MSTORE PUSH1 0x20 ADD PUSH1 0x0 KECCAK256 PUSH1 0x1 ADD PUSH1 0x2 SWAP1 SLOAD SWAP1 PUSH2 0x100 EXP SWAP1 DIV PUSH20 0xFFFFFFFFFFFFFFFFFFFFFFFFFFFFFFFFFFFFFFFF AND PUSH20 0xFFFFFFFFFFFFFFFFFFFFFFFFFFFFFFFFFFFFFFFF AND EQ ISZERO JUMPDEST ISZERO PUSH2 0x32B JUMPI PUSH1 0x1 PUSH1 0x0 DUP4 PUSH20 0xFFFFFFFFFFFFFFFFFFFFFFFFFFFFFFFFFFFFFFFF AND PUSH20 0xFFFFFFFFFFFFFFFFFFFFFFFFFFFFFFFFFFFFFFFF AND DUP2 MSTORE PUSH1 0x20 ADD SWAP1 DUP2 MSTORE PUSH1 0x20 ADD PUSH1 0x0 KECCAK256 PUSH1 0x1 ADD PUSH1 0x2 SWAP1 SLOAD SWAP1 PUSH2 0x100 EXP SWAP1 DIV PUSH20 0xFFFFFFFFFFFFFFFFFFFFFFFFFFFFFFFFFFFFFFFF AND SWAP2 POP PUSH2 0x18F JUMP JUMPDEST CALLER PUSH20 0xFFFFFFFFFFFFFFFFFFFFFFFFFFFFFFFFFFFFFFFF AND DUP3 PUSH20 0xFFFFFFFFFFFFFFFFFFFFFFFFFFFFFFFFFFFFFFFF AND EQ ISZERO PUSH2 0x365 JUMPI POP PUSH2 0x47E JUMP JUMPDEST PUSH1 0x1 DUP2 PUSH1 0x1 ADD PUSH1 0x0 PUSH2 0x100 EXP DUP2 SLOAD DUP2 PUSH1 0xFF MUL NOT AND SWAP1 DUP4 ISZERO ISZERO MUL OR SWAP1 SSTORE POP DUP2 DUP2 PUSH1 0x1 ADD PUSH1 0x2 PUSH2 0x100 EXP DUP2 SLOAD DUP2 PUSH20 0xFFFFFFFFFFFFFFFFFFFFFFFFFFFFFFFFFFFFFFFF MUL NOT AND SWAP1 DUP4 PUSH20 0xFFFFFFFFFFFFFFFFFFFFFFFFFFFFFFFFFFFFFFFF AND MUL OR SWAP1 SSTORE POP PUSH1 0x0 PUSH1 0x1 PUSH1 0x0 DUP5 PUSH20 0xFFFFFFFFFFFFFFFFFFFFFFFFFFFFFFFFFFFFFFFF AND PUSH20 0xFFFFFFFFFFFFFFFFFFFFFFFFFFFFFFFFFFFFFFFF AND DUP2 MSTORE PUSH1 0x20 ADD SWAP1 DUP2 MSTORE PUSH1 0x20 ADD PUSH1 0x0 KECCAK256 SWAP1 POP DUP1 PUSH1 0x1 ADD PUSH1 0x0 SWAP1 SLOAD SWAP1 PUSH2 0x100 EXP SWAP1 DIV PUSH1 0xFF AND ISZERO PUSH2 0x464 JUMPI DUP2 PUSH1 0x0 ADD SLOAD PUSH1 0x2 DUP3 PUSH1 0x1 ADD PUSH1 0x1 SWAP1 SLOAD SWAP1 PUSH2 0x100 EXP SWAP1 DIV PUSH1 0xFF AND PUSH1 0xFF AND DUP2 SLOAD DUP2 LT PUSH2 0x445 JUMPI INVALID JUMPDEST SWAP1 PUSH1 0x0 MSTORE PUSH1 0x20 PUSH1 0x0 KECCAK256 ADD PUSH1 0x0 ADD PUSH1 0x0 DUP3 DUP3 SLOAD ADD SWAP3 POP POP DUP2 SWAP1 SSTORE POP PUSH2 0x47B JUMP JUMPDEST DUP2 PUSH1 0x0 ADD SLOAD DUP2 PUSH1 0x0 ADD PUSH1 0x0 DUP3 DUP3 SLOAD ADD SWAP3 POP POP DUP2 SWAP1 SSTORE POP JUMPDEST POP POP JUMPDEST POP JUMP JUMPDEST PUSH1 0x0 DUP1 PUSH1 0x0 SWAP1 POP PUSH1 0x0 DUP1 SWAP1 POP JUMPDEST PUSH1 0x2 DUP1 SLOAD SWAP1 POP DUP2 PUSH1 0xFF AND LT ISZERO PUSH2 0x4F4 JUMPI DUP2 PUSH1 0x2 DUP3 PUSH1 0xFF AND DUP2 SLOAD DUP2 LT PUSH2 0x4AF JUMPI INVALID JUMPDEST SWAP1 PUSH1 0x0 MSTORE PUSH1 0x20 PUSH1 0x0 KECCAK256 ADD PUSH1 0x0 ADD SLOAD GT ISZERO PUSH2 0x4E7 JUMPI PUSH1 0x2 DUP2 PUSH1 0xFF AND DUP2 SLOAD DUP2 LT PUSH2 0x4D3 JUMPI INVALID JUMPDEST SWAP1 PUSH1 0x0 MSTORE PUSH1 0x20 PUSH1 0x0 KECCAK256 ADD PUSH1 0x0 ADD SLOAD SWAP2 POP DUP1 SWAP3 POP JUMPDEST DUP1 DUP1 PUSH1 0x1 ADD SWAP2 POP POP PUSH2 0x48E JUMP JUMPDEST POP POP SWAP1 JUMP JUMPDEST PUSH1 0x0 DUP1 SWAP1 SLOAD SWAP1 PUSH2 0x100 EXP SWAP1 DIV PUSH20 0xFFFFFFFFFFFFFFFFFFFFFFFFFFFFFFFFFFFFFFFF AND PUSH20 0xFFFFFFFFFFFFFFFFFFFFFFFFFFFFFFFFFFFFFFFF AND CALLER PUSH20 0xFFFFFFFFFFFFFFFFFFFFFFFFFFFFFFFFFFFFFFFF AND EQ ISZERO DUP1 PUSH2 0x5A1 JUMPI POP PUSH1 0x1 PUSH1 0x0 DUP3 PUSH20 0xFFFFFFFFFFFFFFFFFFFFFFFFFFFFFFFFFFFFFFFF AND PUSH20 0xFFFFFFFFFFFFFFFFFFFFFFFFFFFFFFFFFFFFFFFF AND DUP2 MSTORE PUSH1 0x20 ADD SWAP1 DUP2 MSTORE PUSH1 0x20 ADD PUSH1 0x0 KECCAK256 PUSH1 0x1 ADD PUSH1 0x0 SWAP1 SLOAD SWAP1 PUSH2 0x100 EXP SWAP1 DIV PUSH1 0xFF AND JUMPDEST ISZERO PUSH2 0x5AB JUMPI PUSH2 0x5F3 JUMP JUMPDEST PUSH1 0x1 DUP1 PUSH1 0x0 DUP4 PUSH20 0xFFFFFFFFFFFFFFFFFFFFFFFFFFFFFFFFFFFFFFFF AND PUSH20 0xFFFFFFFFFFFFFFFFFFFFFFFFFFFFFFFFFFFFFFFF AND DUP2 MSTORE PUSH1 0x20 ADD SWAP1 DUP2 MSTORE PUSH1 0x20 ADD PUSH1 0x0 KECCAK256 PUSH1 0x0 ADD DUP2 SWAP1 SSTORE POP JUMPDEST POP JUMP JUMPDEST PUSH1 0x0 PUSH1 0x1 PUSH1 0x0 CALLER PUSH20 0xFFFFFFFFFFFFFFFFFFFFFFFFFFFFFFFFFFFFFFFF AND PUSH20 0xFFFFFFFFFFFFFFFFFFFFFFFFFFFFFFFFFFFFFFFF AND DUP2 MSTORE PUSH1 0x20 ADD SWAP1 DUP2 MSTORE PUSH1 0x20 ADD PUSH1 0x0 KECCAK256 SWAP1 POP DUP1 PUSH1 0x1 ADD PUSH1 0x0 SWAP1 SLOAD SWAP1 PUSH2 0x100 EXP SWAP1 DIV PUSH1 0xFF AND DUP1 PUSH2 0x65E JUMPI POP PUSH1 0x2 DUP1 SLOAD SWAP1 POP DUP3 PUSH1 0xFF AND LT ISZERO JUMPDEST ISZERO PUSH2 0x669 JUMPI POP PUSH2 0x6D4 JUMP JUMPDEST PUSH1 0x1 DUP2 PUSH1 0x1 ADD PUSH1 0x0 PUSH2 0x100 EXP DUP2 SLOAD DUP2 PUSH1 0xFF MUL NOT AND SWAP1 DUP4 ISZERO ISZERO MUL OR SWAP1 SSTORE POP DUP2 DUP2 PUSH1 0x1 ADD PUSH1 0x1 PUSH2 0x100 EXP DUP2 SLOAD DUP2 PUSH1 0xFF MUL NOT AND SWAP1 DUP4 PUSH1 0xFF AND MUL OR SWAP1 SSTORE POP DUP1 PUSH1 0x0 ADD SLOAD PUSH1 0x2 DUP4 PUSH1 0xFF AND DUP2 SLOAD DUP2 LT PUSH2 0x6B8 JUMPI INVALID JUMPDEST SWAP1 PUSH1 0x0 MSTORE PUSH1 0x20 PUSH1 0x0 KECCAK256 ADD PUSH1 0x0 ADD PUSH1 0x0 DUP3 DUP3 SLOAD ADD SWAP3 POP POP DUP2 SWAP1 SSTORE POP POP JUMPDEST POP JUMP INVALID LOG2 PUSH6 0x627A7A723158 KECCAK256 GASLIMIT PUSH30 0x9494A1D1D64EBD9B931A6C692E671DC1F14D4A0C6600F7AA00FED360110 PUSH5 0x736F6C6343 STOP SDIV SIGNEXTEND STOP ORIGIN ",
			"sourceMap": "33:2130:0:-;;;382:163;8:9:-1;5:2;;;30:1;27;20:12;5:2;382:163:0;;;;;;;;;;;;;;;13:2:-1;8:3;5:11;2:2;;;29:1;26;19:12;2:2;382:163:0;;;;;;;;;;;;;;;;446:10;432:11;;:24;;;;;;;;;;;;;;;;;;495:1;466:6;:19;473:11;;;;;;;;;;;466:19;;;;;;;;;;;;;;;:26;;:30;;;;525:13;506:32;;:9;:32;;;;;:::i;:::-;;382:163;33:2130;;;;;;;;;;;;;;;;;;;;;;;;;;;;;;:::i;:::-;;;;;:::o;:::-;;;;;;;;;;;;;;;;;;;;;;;;;;;;;:::o;:::-;;;;;;;"
		},
		"deployedBytecode": {
			"linkReferences": {},
			"object": "608060405234801561001057600080fd5b506004361061004c5760003560e01c80635c19a95c14610051578063609ff1bd146100955780639e7b8d61146100b9578063b3f98adc146100fd575b600080fd5b6100936004803603602081101561006757600080fd5b81019080803573ffffffffffffffffffffffffffffffffffffffff16906020019092919050505061012e565b005b61009d610481565b604051808260ff1660ff16815260200191505060405180910390f35b6100fb600480360360208110156100cf57600080fd5b81019080803573ffffffffffffffffffffffffffffffffffffffff1690602001909291905050506104f9565b005b61012c6004803603602081101561011357600080fd5b81019080803560ff1690602001909291905050506105f6565b005b6000600160003373ffffffffffffffffffffffffffffffffffffffff1673ffffffffffffffffffffffffffffffffffffffff16815260200190815260200160002090508060010160009054906101000a900460ff161561018e575061047e565b5b600073ffffffffffffffffffffffffffffffffffffffff16600160008473ffffffffffffffffffffffffffffffffffffffff1673ffffffffffffffffffffffffffffffffffffffff16815260200190815260200160002060010160029054906101000a900473ffffffffffffffffffffffffffffffffffffffff1673ffffffffffffffffffffffffffffffffffffffff16141580156102bc57503373ffffffffffffffffffffffffffffffffffffffff16600160008473ffffffffffffffffffffffffffffffffffffffff1673ffffffffffffffffffffffffffffffffffffffff16815260200190815260200160002060010160029054906101000a900473ffffffffffffffffffffffffffffffffffffffff1673ffffffffffffffffffffffffffffffffffffffff1614155b1561032b57600160008373ffffffffffffffffffffffffffffffffffffffff1673ffffffffffffffffffffffffffffffffffffffff16815260200190815260200160002060010160029054906101000a900473ffffffffffffffffffffffffffffffffffffffff16915061018f565b3373ffffffffffffffffffffffffffffffffffffffff168273ffffffffffffffffffffffffffffffffffffffff161415610365575061047e565b60018160010160006101000a81548160ff021916908315150217905550818160010160026101000a81548173ffffffffffffffffffffffffffffffffffffffff021916908373ffffffffffffffffffffffffffffffffffffffff1602179055506000600160008473ffffffffffffffffffffffffffffffffffffffff1673ffffffffffffffffffffffffffffffffffffffff16815260200190815260200160002090508060010160009054906101000a900460ff161561046457816000015460028260010160019054906101000a900460ff1660ff168154811061044557fe5b906000526020600020016000016000828254019250508190555061047b565b816000015481600001600082825401925050819055505b50505b50565b6000806000905060008090505b6002805490508160ff1610156104f4578160028260ff16815481106104af57fe5b906000526020600020016000015411156104e75760028160ff16815481106104d357fe5b906000526020600020016000015491508092505b808060010191505061048e565b505090565b6000809054906101000a900473ffffffffffffffffffffffffffffffffffffffff1673ffffffffffffffffffffffffffffffffffffffff163373ffffffffffffffffffffffffffffffffffffffff161415806105a15750600160008273ffffffffffffffffffffffffffffffffffffffff1673ffffffffffffffffffffffffffffffffffffffff16815260200190815260200160002060010160009054906101000a900460ff165b156105ab576105f3565b60018060008373ffffffffffffffffffffffffffffffffffffffff1673ffffffffffffffffffffffffffffffffffffffff168152602001908152602001600020600001819055505b50565b6000600160003373ffffffffffffffffffffffffffffffffffffffff1673ffffffffffffffffffffffffffffffffffffffff16815260200190815260200160002090508060010160009054906101000a900460ff168061065e57506002805490508260ff1610155b1561066957506106d4565b60018160010160006101000a81548160ff021916908315150217905550818160010160016101000a81548160ff021916908360ff160217905550806000015460028360ff16815481106106b857fe5b9060005260206000200160000160008282540192505081905550505b5056fea265627a7a72315820457d09494a1d1d64ebd9b931a6c692e671dc1f14d4a0c6600f7aa00fed36011064736f6c634300050b0032",
			"opcodes": "PUSH1 0x80 PUSH1 0x40 MSTORE CALLVALUE DUP1 ISZERO PUSH2 0x10 JUMPI PUSH1 0x0 DUP1 REVERT JUMPDEST POP PUSH1 0x4 CALLDATASIZE LT PUSH2 0x4C JUMPI PUSH1 0x0 CALLDATALOAD PUSH1 0xE0 SHR DUP1 PUSH4 0x5C19A95C EQ PUSH2 0x51 JUMPI DUP1 PUSH4 0x609FF1BD EQ PUSH2 0x95 JUMPI DUP1 PUSH4 0x9E7B8D61 EQ PUSH2 0xB9 JUMPI DUP1 PUSH4 0xB3F98ADC EQ PUSH2 0xFD JUMPI JUMPDEST PUSH1 0x0 DUP1 REVERT JUMPDEST PUSH2 0x93 PUSH1 0x4 DUP1 CALLDATASIZE SUB PUSH1 0x20 DUP2 LT ISZERO PUSH2 0x67 JUMPI PUSH1 0x0 DUP1 REVERT JUMPDEST DUP2 ADD SWAP1 DUP1 DUP1 CALLDATALOAD PUSH20 0xFFFFFFFFFFFFFFFFFFFFFFFFFFFFFFFFFFFFFFFF AND SWAP1 PUSH1 0x20 ADD SWAP1 SWAP3 SWAP2 SWAP1 POP POP POP PUSH2 0x12E JUMP JUMPDEST STOP JUMPDEST PUSH2 0x9D PUSH2 0x481 JUMP JUMPDEST PUSH1 0x40 MLOAD DUP1 DUP3 PUSH1 0xFF AND PUSH1 0xFF AND DUP2 MSTORE PUSH1 0x20 ADD SWAP2 POP POP PUSH1 0x40 MLOAD DUP1 SWAP2 SUB SWAP1 RETURN JUMPDEST PUSH2 0xFB PUSH1 0x4 DUP1 CALLDATASIZE SUB PUSH1 0x20 DUP2 LT ISZERO PUSH2 0xCF JUMPI PUSH1 0x0 DUP1 REVERT JUMPDEST DUP2 ADD SWAP1 DUP1 DUP1 CALLDATALOAD PUSH20 0xFFFFFFFFFFFFFFFFFFFFFFFFFFFFFFFFFFFFFFFF AND SWAP1 PUSH1 0x20 ADD SWAP1 SWAP3 SWAP2 SWAP1 POP POP POP PUSH2 0x4F9 JUMP JUMPDEST STOP JUMPDEST PUSH2 0x12C PUSH1 0x4 DUP1 CALLDATASIZE SUB PUSH1 0x20 DUP2 LT ISZERO PUSH2 0x113 JUMPI PUSH1 0x0 DUP1 REVERT JUMPDEST DUP2 ADD SWAP1 DUP1 DUP1 CALLDATALOAD PUSH1 0xFF AND SWAP1 PUSH1 0x20 ADD SWAP1 SWAP3 SWAP2 SWAP1 POP POP POP PUSH2 0x5F6 JUMP JUMPDEST STOP JUMPDEST PUSH1 0x0 PUSH1 0x1 PUSH1 0x0 CALLER PUSH20 0xFFFFFFFFFFFFFFFFFFFFFFFFFFFFFFFFFFFFFFFF AND PUSH20 0xFFFFFFFFFFFFFFFFFFFFFFFFFFFFFFFFFFFFFFFF AND DUP2 MSTORE PUSH1 0x20 ADD SWAP1 DUP2 MSTORE PUSH1 0x20 ADD PUSH1 0x0 KECCAK256 SWAP1 POP DUP1 PUSH1 0x1 ADD PUSH1 0x0 SWAP1 SLOAD SWAP1 PUSH2 0x100 EXP SWAP1 DIV PUSH1 0xFF AND ISZERO PUSH2 0x18E JUMPI POP PUSH2 0x47E JUMP JUMPDEST JUMPDEST PUSH1 0x0 PUSH20 0xFFFFFFFFFFFFFFFFFFFFFFFFFFFFFFFFFFFFFFFF AND PUSH1 0x1 PUSH1 0x0 DUP5 PUSH20 0xFFFFFFFFFFFFFFFFFFFFFFFFFFFFFFFFFFFFFFFF AND PUSH20 0xFFFFFFFFFFFFFFFFFFFFFFFFFFFFFFFFFFFFFFFF AND DUP2 MSTORE PUSH1 0x20 ADD SWAP1 DUP2 MSTORE PUSH1 0x20 ADD PUSH1 0x0 KECCAK256 PUSH1 0x1 ADD PUSH1 0x2 SWAP1 SLOAD SWAP1 PUSH2 0x100 EXP SWAP1 DIV PUSH20 0xFFFFFFFFFFFFFFFFFFFFFFFFFFFFFFFFFFFFFFFF AND PUSH20 0xFFFFFFFFFFFFFFFFFFFFFFFFFFFFFFFFFFFFFFFF AND EQ ISZERO DUP1 ISZERO PUSH2 0x2BC JUMPI POP CALLER PUSH20 0xFFFFFFFFFFFFFFFFFFFFFFFFFFFFFFFFFFFFFFFF AND PUSH1 0x1 PUSH1 0x0 DUP5 PUSH20 0xFFFFFFFFFFFFFFFFFFFFFFFFFFFFFFFFFFFFFFFF AND PUSH20 0xFFFFFFFFFFFFFFFFFFFFFFFFFFFFFFFFFFFFFFFF AND DUP2 MSTORE PUSH1 0x20 ADD SWAP1 DUP2 MSTORE PUSH1 0x20 ADD PUSH1 0x0 KECCAK256 PUSH1 0x1 ADD PUSH1 0x2 SWAP1 SLOAD SWAP1 PUSH2 0x100 EXP SWAP1 DIV PUSH20 0xFFFFFFFFFFFFFFFFFFFFFFFFFFFFFFFFFFFFFFFF AND PUSH20 0xFFFFFFFFFFFFFFFFFFFFFFFFFFFFFFFFFFFFFFFF AND EQ ISZERO JUMPDEST ISZERO PUSH2 0x32B JUMPI PUSH1 0x1 PUSH1 0x0 DUP4 PUSH20 0xFFFFFFFFFFFFFFFFFFFFFFFFFFFFFFFFFFFFFFFF AND PUSH20 0xFFFFFFFFFFFFFFFFFFFFFFFFFFFFFFFFFFFFFFFF AND DUP2 MSTORE PUSH1 0x20 ADD SWAP1 DUP2 MSTORE PUSH1 0x20 ADD PUSH1 0x0 KECCAK256 PUSH1 0x1 ADD PUSH1 0x2 SWAP1 SLOAD SWAP1 PUSH2 0x100 EXP SWAP1 DIV PUSH20 0xFFFFFFFFFFFFFFFFFFFFFFFFFFFFFFFFFFFFFFFF AND SWAP2 POP PUSH2 0x18F JUMP JUMPDEST CALLER PUSH20 0xFFFFFFFFFFFFFFFFFFFFFFFFFFFFFFFFFFFFFFFF AND DUP3 PUSH20 0xFFFFFFFFFFFFFFFFFFFFFFFFFFFFFFFFFFFFFFFF AND EQ ISZERO PUSH2 0x365 JUMPI POP PUSH2 0x47E JUMP JUMPDEST PUSH1 0x1 DUP2 PUSH1 0x1 ADD PUSH1 0x0 PUSH2 0x100 EXP DUP2 SLOAD DUP2 PUSH1 0xFF MUL NOT AND SWAP1 DUP4 ISZERO ISZERO MUL OR SWAP1 SSTORE POP DUP2 DUP2 PUSH1 0x1 ADD PUSH1 0x2 PUSH2 0x100 EXP DUP2 SLOAD DUP2 PUSH20 0xFFFFFFFFFFFFFFFFFFFFFFFFFFFFFFFFFFFFFFFF MUL NOT AND SWAP1 DUP4 PUSH20 0xFFFFFFFFFFFFFFFFFFFFFFFFFFFFFFFFFFFFFFFF AND MUL OR SWAP1 SSTORE POP PUSH1 0x0 PUSH1 0x1 PUSH1 0x0 DUP5 PUSH20 0xFFFFFFFFFFFFFFFFFFFFFFFFFFFFFFFFFFFFFFFF AND PUSH20 0xFFFFFFFFFFFFFFFFFFFFFFFFFFFFFFFFFFFFFFFF AND DUP2 MSTORE PUSH1 0x20 ADD SWAP1 DUP2 MSTORE PUSH1 0x20 ADD PUSH1 0x0 KECCAK256 SWAP1 POP DUP1 PUSH1 0x1 ADD PUSH1 0x0 SWAP1 SLOAD SWAP1 PUSH2 0x100 EXP SWAP1 DIV PUSH1 0xFF AND ISZERO PUSH2 0x464 JUMPI DUP2 PUSH1 0x0 ADD SLOAD PUSH1 0x2 DUP3 PUSH1 0x1 ADD PUSH1 0x1 SWAP1 SLOAD SWAP1 PUSH2 0x100 EXP SWAP1 DIV PUSH1 0xFF AND PUSH1 0xFF AND DUP2 SLOAD DUP2 LT PUSH2 0x445 JUMPI INVALID JUMPDEST SWAP1 PUSH1 0x0 MSTORE PUSH1 0x20 PUSH1 0x0 KECCAK256 ADD PUSH1 0x0 ADD PUSH1 0x0 DUP3 DUP3 SLOAD ADD SWAP3 POP POP DUP2 SWAP1 SSTORE POP PUSH2 0x47B JUMP JUMPDEST DUP2 PUSH1 0x0 ADD SLOAD DUP2 PUSH1 0x0 ADD PUSH1 0x0 DUP3 DUP3 SLOAD ADD SWAP3 POP POP DUP2 SWAP1 SSTORE POP JUMPDEST POP POP JUMPDEST POP JUMP JUMPDEST PUSH1 0x0 DUP1 PUSH1 0x0 SWAP1 POP PUSH1 0x0 DUP1 SWAP1 POP JUMPDEST PUSH1 0x2 DUP1 SLOAD SWAP1 POP DUP2 PUSH1 0xFF AND LT ISZERO PUSH2 0x4F4 JUMPI DUP2 PUSH1 0x2 DUP3 PUSH1 0xFF AND DUP2 SLOAD DUP2 LT PUSH2 0x4AF JUMPI INVALID JUMPDEST SWAP1 PUSH1 0x0 MSTORE PUSH1 0x20 PUSH1 0x0 KECCAK256 ADD PUSH1 0x0 ADD SLOAD GT ISZERO PUSH2 0x4E7 JUMPI PUSH1 0x2 DUP2 PUSH1 0xFF AND DUP2 SLOAD DUP2 LT PUSH2 0x4D3 JUMPI INVALID JUMPDEST SWAP1 PUSH1 0x0 MSTORE PUSH1 0x20 PUSH1 0x0 KECCAK256 ADD PUSH1 0x0 ADD SLOAD SWAP2 POP DUP1 SWAP3 POP JUMPDEST DUP1 DUP1 PUSH1 0x1 ADD SWAP2 POP POP PUSH2 0x48E JUMP JUMPDEST POP POP SWAP1 JUMP JUMPDEST PUSH1 0x0 DUP1 SWAP1 SLOAD SWAP1 PUSH2 0x100 EXP SWAP1 DIV PUSH20 0xFFFFFFFFFFFFFFFFFFFFFFFFFFFFFFFFFFFFFFFF AND PUSH20 0xFFFFFFFFFFFFFFFFFFFFFFFFFFFFFFFFFFFFFFFF AND CALLER PUSH20 0xFFFFFFFFFFFFFFFFFFFFFFFFFFFFFFFFFFFFFFFF AND EQ ISZERO DUP1 PUSH2 0x5A1 JUMPI POP PUSH1 0x1 PUSH1 0x0 DUP3 PUSH20 0xFFFFFFFFFFFFFFFFFFFFFFFFFFFFFFFFFFFFFFFF AND PUSH20 0xFFFFFFFFFFFFFFFFFFFFFFFFFFFFFFFFFFFFFFFF AND DUP2 MSTORE PUSH1 0x20 ADD SWAP1 DUP2 MSTORE PUSH1 0x20 ADD PUSH1 0x0 KECCAK256 PUSH1 0x1 ADD PUSH1 0x0 SWAP1 SLOAD SWAP1 PUSH2 0x100 EXP SWAP1 DIV PUSH1 0xFF AND JUMPDEST ISZERO PUSH2 0x5AB JUMPI PUSH2 0x5F3 JUMP JUMPDEST PUSH1 0x1 DUP1 PUSH1 0x0 DUP4 PUSH20 0xFFFFFFFFFFFFFFFFFFFFFFFFFFFFFFFFFFFFFFFF AND PUSH20 0xFFFFFFFFFFFFFFFFFFFFFFFFFFFFFFFFFFFFFFFF AND DUP2 MSTORE PUSH1 0x20 ADD SWAP1 DUP2 MSTORE PUSH1 0x20 ADD PUSH1 0x0 KECCAK256 PUSH1 0x0 ADD DUP2 SWAP1 SSTORE POP JUMPDEST POP JUMP JUMPDEST PUSH1 0x0 PUSH1 0x1 PUSH1 0x0 CALLER PUSH20 0xFFFFFFFFFFFFFFFFFFFFFFFFFFFFFFFFFFFFFFFF AND PUSH20 0xFFFFFFFFFFFFFFFFFFFFFFFFFFFFFFFFFFFFFFFF AND DUP2 MSTORE PUSH1 0x20 ADD SWAP1 DUP2 MSTORE PUSH1 0x20 ADD PUSH1 0x0 KECCAK256 SWAP1 POP DUP1 PUSH1 0x1 ADD PUSH1 0x0 SWAP1 SLOAD SWAP1 PUSH2 0x100 EXP SWAP1 DIV PUSH1 0xFF AND DUP1 PUSH2 0x65E JUMPI POP PUSH1 0x2 DUP1 SLOAD SWAP1 POP DUP3 PUSH1 0xFF AND LT ISZERO JUMPDEST ISZERO PUSH2 0x669 JUMPI POP PUSH2 0x6D4 JUMP JUMPDEST PUSH1 0x1 DUP2 PUSH1 0x1 ADD PUSH1 0x0 PUSH2 0x100 EXP DUP2 SLOAD DUP2 PUSH1 0xFF MUL NOT AND SWAP1 DUP4 ISZERO ISZERO MUL OR SWAP1 SSTORE POP DUP2 DUP2 PUSH1 0x1 ADD PUSH1 0x1 PUSH2 0x100 EXP DUP2 SLOAD DUP2 PUSH1 0xFF MUL NOT AND SWAP1 DUP4 PUSH1 0xFF AND MUL OR SWAP1 SSTORE POP DUP1 PUSH1 0x0 ADD SLOAD PUSH1 0x2 DUP4 PUSH1 0xFF AND DUP2 SLOAD DUP2 LT PUSH2 0x6B8 JUMPI INVALID JUMPDEST SWAP1 PUSH1 0x0 MSTORE PUSH1 0x20 PUSH1 0x0 KECCAK256 ADD PUSH1 0x0 ADD PUSH1 0x0 DUP3 DUP3 SLOAD ADD SWAP3 POP POP DUP2 SWAP1 SSTORE POP POP JUMPDEST POP JUMP INVALID LOG2 PUSH6 0x627A7A723158 KECCAK256 GASLIMIT PUSH30 0x9494A1D1D64EBD9B931A6C692E671DC1F14D4A0C6600F7AA00FED360110 PUSH5 0x736F6C6343 STOP SDIV SIGNEXTEND STOP ORIGIN ",
			"sourceMap": "33:2130:0:-;;;;8:9:-1;5:2;;;30:1;27;20:12;5:2;33:2130:0;;;;;;;;;;;;;;;;;;;;;;;;;;;;;;;;;;872:577;;;;;;13:2:-1;8:3;5:11;2:2;;;29:1;26;19:12;2:2;872:577:0;;;;;;;;;;;;;;;;;;;:::i;:::-;;1801:360;;;:::i;:::-;;;;;;;;;;;;;;;;;;;;;;;655:164;;;;;;13:2:-1;8:3;5:11;2:2;;;29:1;26;19:12;2:2;655:164:0;;;;;;;;;;;;;;;;;;;:::i;:::-;;1509:286;;;;;;13:2:-1;8:3;5:11;2:2;;;29:1;26;19:12;2:2;1509:286:0;;;;;;;;;;;;;;;;;;;:::i;:::-;;872:577;919:20;942:6;:18;949:10;942:18;;;;;;;;;;;;;;;919:41;;995:6;:12;;;;;;;;;;;;991:25;;;1009:7;;;991:25;1025:115;1063:1;1032:33;;:6;:10;1039:2;1032:10;;;;;;;;;;;;;;;:19;;;;;;;;;;;;:33;;;;:70;;;;;1092:10;1069:33;;:6;:10;1076:2;1069:10;;;;;;;;;;;;;;;:19;;;;;;;;;;;;:33;;;;1032:70;1025:115;;;1121:6;:10;1128:2;1121:10;;;;;;;;;;;;;;;:19;;;;;;;;;;;;1116:24;;1025:115;;;1160:10;1154:16;;:2;:16;;;1150:29;;;1172:7;;;1150:29;1203:4;1188:6;:12;;;:19;;;;;;;;;;;;;;;;;;1235:2;1217:6;:15;;;:20;;;;;;;;;;;;;;;;;;1247:24;1274:6;:10;1281:2;1274:10;;;;;;;;;;;;;;;1247:37;;1298:10;:16;;;;;;;;;;;;1294:148;;;1368:6;:13;;;1328:9;1338:10;:15;;;;;;;;;;;;1328:26;;;;;;;;;;;;;;;;;:36;;;:53;;;;;;;;;;;1294:148;;;1429:6;:13;;;1408:10;:17;;;:34;;;;;;;;;;;1294:148;872:577;;;;:::o;1801:360::-;1849:22;1883:24;1910:1;1883:28;;1926:10;1939:1;1926:14;;1921:234;1949:9;:16;;;;1942:4;:23;;;1921:234;;;2019:16;1991:9;2001:4;1991:15;;;;;;;;;;;;;;;;;:25;;;:44;1987:168;;;2074:9;2084:4;2074:15;;;;;;;;;;;;;;;;;:25;;;2055:44;;2136:4;2117:23;;1987:168;1967:6;;;;;;;1921:234;;;;1801:360;;:::o;655:164::-;732:11;;;;;;;;;;;718:25;;:10;:25;;;;:50;;;;747:6;:15;754:7;747:15;;;;;;;;;;;;;;;:21;;;;;;;;;;;;718:50;714:63;;;770:7;;714:63;811:1;786:6;:15;793:7;786:15;;;;;;;;;;;;;;;:22;;:26;;;;655:164;;:::o;1509:286::-;1558:20;1581:6;:18;1588:10;1581:18;;;;;;;;;;;;;;;1558:41;;1613:6;:12;;;;;;;;;;;;:46;;;;1643:9;:16;;;;1629:10;:30;;;;1613:46;1609:59;;;1661:7;;;1609:59;1692:4;1677:6;:12;;;:19;;;;;;;;;;;;;;;;;;1720:10;1706:6;:11;;;:24;;;;;;;;;;;;;;;;;;1775:6;:13;;;1740:9;1750:10;1740:21;;;;;;;;;;;;;;;;;:31;;;:48;;;;;;;;;;;1509:286;;;:::o"
		},
		"gasEstimates": {
			"creation": {
				"codeDepositCost": "360800",
				"executionCost": "infinite",
				"totalCost": "infinite"
			},
			"external": {
				"delegate(address)": "infinite",
				"giveRightToVote(address)": "20997",
				"vote(uint8)": "62215",
				"winningProposal()": "infinite"
			}
		},
		"methodIdentifiers": {
			"delegate(address)": "5c19a95c",
			"giveRightToVote(address)": "9e7b8d61",
			"vote(uint8)": "b3f98adc",
			"winningProposal()": "609ff1bd"
		}
	},
	"abi": [
		{
			"constant": false,
			"inputs": [
				{
					"internalType": "address",
					"name": "to",
					"type": "address"
				}
			],
			"name": "delegate",
			"outputs": [],
			"payable": false,
			"stateMutability": "nonpayable",
			"type": "function"
		},
		{
			"constant": true,
			"inputs": [],
			"name": "winningProposal",
			"outputs": [
				{
					"internalType": "uint8",
					"name": "_winningProposal",
					"type": "uint8"
				}
			],
			"payable": false,
			"stateMutability": "view",
			"type": "function"
		},
		{
			"constant": false,
			"inputs": [
				{
					"internalType": "address",
					"name": "toVoter",
					"type": "address"
				}
			],
			"name": "giveRightToVote",
			"outputs": [],
			"payable": false,
			"stateMutability": "nonpayable",
			"type": "function"
		},
		{
			"constant": false,
			"inputs": [
				{
					"internalType": "uint8",
					"name": "toProposal",
					"type": "uint8"
				}
			],
			"name": "vote",
			"outputs": [],
			"payable": false,
			"stateMutability": "nonpayable",
			"type": "function"
		},
		{
			"inputs": [
				{
					"internalType": "uint8",
					"name": "_numProposals",
					"type": "uint8"
				}
			],
			"payable": false,
			"stateMutability": "nonpayable",
			"type": "constructor"
		}
	]

}
Creating and Deploying a Contract
This page contains the process of creating a contract, compiling it, deploying and then interacting with it.
A sample contract
This contract is very basic. The goal is to quickly start to create and to interact with a sample contract.
Go to the File Explorer, create a new file, name it and in the editor paste the contract below.
// SPDX-License-Identifier: GPL-3.0

pragma solidity ^0.7.6;

contract testContract {

    uint256 value;

    constructor (uint256 _p) {
        value = _p;
    }

    function setP(uint256 _n) payable public {
        value = _n;
    }

    function setNP(uint256 _n) public {
        value = _n;
    }

    function get () view public returns (uint256) {
        return value;
    }
}
Compile the Contract
With the contract above as the active tab in the Editor, compile the contract.
For More Info see the docs on the (Solidity Compiler).
Deploy the contract
Go to the Deploy & Run Transactions plugin.
There are 3 type of environments Remix can be plugged to:
Javascript VM
Injected Web3
Web3 Provider
(For details see Running transactions)
Both Injected Web3 and Web3 Provider require the use of an external tool.
An external tool for Injected provider is Metamask. Some external tools used with Web3 provider are a Truffle Ganache-CLI, Hardhat node, or an Ethereum node itself.
The JavaScript VM is convenient because it is a blockchain that runs in your browser and you don’t need any other software or Ethereum node to run it.
NOTE: When you are in the Javascript VM and you reload the browser - the Javascript VM will restart to its fresh & default state.
For performance purposes ( which is to say - for testing in an environment that is closest to the mainnet), it can be better to use an external node.
Select the VM environment
Make sure the VM mode is selected. All accounts displayed in ACCOUNT should have 100 ether.
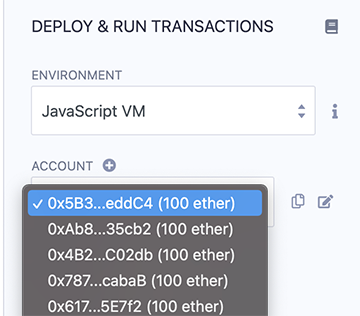
Deploying a contract
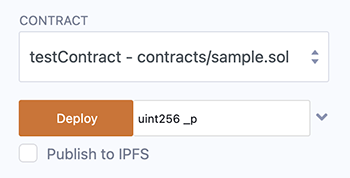
The constructor of testContract needs a parameter (of type uint256).
Input a uint256 and click on Deploy.
The transaction is created which deploys the instance of testContract .
In a “normal” blockchain, you would have to wait for the transaction to be mined. However, because we are using the JavaScript VM, our execution is immediate.
The terminal will give information about the transaction.
The newly created instance is displayed in the Deployed Contracts section.
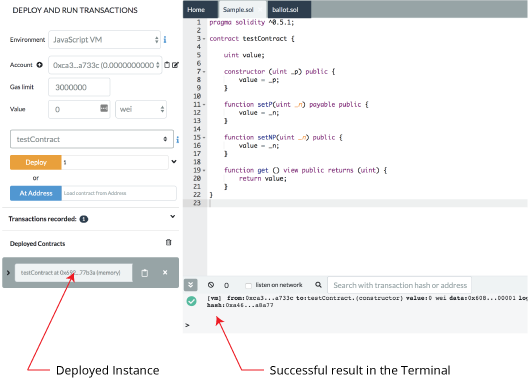
Interacting with an instance
Clicking on the caret to the left of the instance of TESTCONTRACT will open it up so you can see its function.
This new instance contains 3 actions which corresponds to the 3
functions (setP, setPN, get). Clicking on setP or setPN will
create a new transaction.
Note that setP is payable (red button) : it is possible to send
value (Ether) to the contract.
setPN is not payable (orange button - depending on the theme) : it is not possible to send value (Ether) to the contract.
Clicking on get will not execute a transaction (usually its a blue button - depending on the theme). It doesn’t execute a transaction because a get does not modify the state (the variable value) of this instance.
Because get is a view function, you can see the return value just below the
get button.
Debugging Transactions
(also see this page’s companion: the Debugger Tour)
There are two ways to start a debugging session, each one corresponds to a different use case.
Use Case 1: for debugging a transaction made in Remix - click the Debug button in the transaction log in Remix’s Terminal.
Use Case 2: for debugging a transaction where you have a txn hash from verified contract or where you have the txn hash and the compiled source code with the same compilation settings as the deployed contract.
Initiate Debugging from the transaction log in the Terminal
Let’s start with a basic contract ( or replace the contract below with your own )
pragma solidity >=0.5.1 <0.6.0;
contract Donation {
    address owner;
    event fundMoved(address _to, uint _amount);
    modifier onlyowner { if (msg.sender == owner) _; }
    address[] _giver;
    uint[] _values;

    constructor() public {
        owner = msg.sender;
    }

    function donate() public payable {
        addGiver(msg.value);
    }

    function moveFund(address payable _to, uint _amount) onlyowner  public {
        uint balance = address(this).balance;
        uint amount = _amount;
        if (amount <= balance) {
            if (_to.send(balance)) {
                emit fundMoved(_to, amount);
            } else {
               revert();
            }
        } else {
            revert();
        }
    }

    function addGiver(uint _amount) internal {
        _giver.push(msg.sender);
        _values.push(_amount);
    }
}
Make a new file in Remix and copy the code above into it.
Compile the code.
Go to the Run & Deploy module.
For the purpose of this tutorial, we will run the Remix VM.
Deploy the contract:
Click the Deploy button
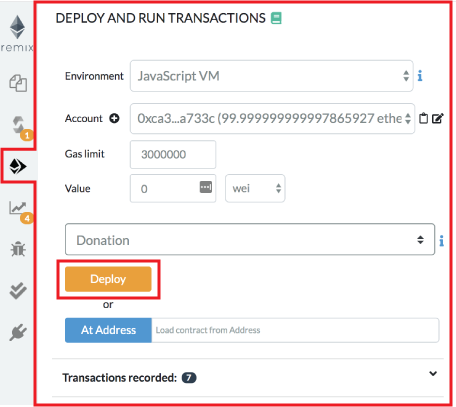
You’ll see the deployed instance (AKA the udapp).
Then open it up (by clicking the caret).
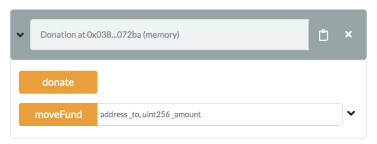
We are going to call the Donate function and will send 2 Ethers.
To do this: in the value input box put in 2 and select Ether as the unit (DO NOT LEAVE THE DEFAULT unit as gwei or the change will be hard to detect).
Then click the Donate button.
This will send the Ether to the function.
Because we are using the Remix VM, everything happens almost instantly. (If we had been using Injected Web 3, then we would have to need to approve the transaction, pay for gas and wait for the transaction to get mined.)
Remix displays information related to each transaction result in the terminal.
Check in the terminal where the transaction you just made is logged.
Click the debug button.
But before we get to the actual debugging tool, the next section shows how to start a debugging session directly from the Debugger.
Initiate Debugging from the Debugger
Click the bug icon in the icon panel to get to the debugger in the side panel.
If you don’t see the bug icon, go to the plugin manager and activate the debugger.
You can start a debug session by providing a transaction hash.
To find a transaction hash:
Go to a transaction in the terminal.
Click a line with a transaction - to expand the log.
The transaction hash is there - copy it.
Then click in the debugger paste the hash and click on the Start debugging button.
Using the debugger
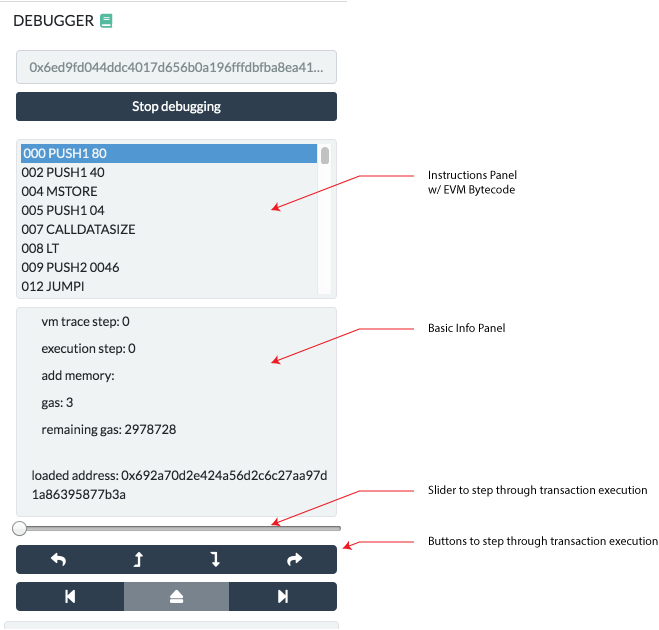
The debugger allows one to see detailed informations about the transaction’s execution. It uses the editor to display the location in the source code where the current execution is.
The navigation part contains a slider and buttons that can be used to step through the transaction execution.
11 panels give detailed information about the execution:
Instructions
The Instructions panel displays the bytecode of the current executing contract- with the current step highlighted.
Important note: When this panel is hidden, the slider will have a coarser granularity and only stop at expression boundaries, even if they are compiled into multiple EVM instructions. When the panel is displayed, it will be possible to step over every instruction, even those that refers to the same expression.
Solidity Locals
The Solidity Locals panel displays local variables associated with the current context.
Solidity State
The Solidity State panel displays state variables of the current executing contract.
Low level panels
These panels display low level informations about the execution:
Stack
Storages Changes
Memory
Call Data
Call Stack
Return Value (only if the current step is a RETURN opcode)
Full Storages Changes (only at the end of the execution & it displays the all the storage changes)
Reverted Transaction
A transaction can be reverted (because of an out of gas exception, a Solidity revert statement or a low level exception).
It is important to be aware of the exception and to locate where the exception is in the source code.
Remix will warn you when the execution throws an exception.
The warning button will jump to the last opcode before the exception happened.
Breakpoints
The two last buttons from the navigation area are used to jump either back to the previous breakpoint or forward to the next breakpoint.
Breakpoints can be added and removed by clicking on the line number in the Editor.
When using a debug session with breakpoints, the execution will jump to the first encountered breakpoint.
Important note: If you add a breakpoint to a line that declares a variable, it might be triggered twice: Once for initializing the variable to zero and a second time for assigning the actual value.
Here’s an example of this issue. If you are debugging the following contract:
pragma solidity >=0.5.1 <0.6.0;

contract ctr {
    function hid() public {
        uint p = 45;
        uint m;
        m = 89;
        uint l = 34;
    }
}
And breakpoints are set for the lines
uint p = 45;
m = 89;
uint l = 34;
then clicking on the Jump to the next breakpoint button will stop at the following
lines in the given order:
uint p = 45;(declaration of p)
uint l = 34;(declaration of l)
uint p = 45;(45 assigned to p)
m = 89;(89 assigned to m)
uint l = 34;(34 assigned to l)
Importing & Loading Source Files in Solidity
There are two main reasons for loading external files into Remix:
to import a library or dependency (for files you will NOT be editing)
to load some files for manipulation, editing and play (for files you might want to edit)
Importing a library or dependency
When importing from NPM, or a URL (like github, a IPFS gateway, or a Swarm gateway) you do not need to do anything more than use the import statement in your contract. The dependencies do not need to be “preloaded” into the File Explorer’s current Workspace before the contract is compiled.
Files loaded from the import statement are placed in the Files Explorer’s current Workspace’s .deps folder.
Under the hood, Remix checks to see if the files are already loaded in the .deps directory. If not, it gets them via unpkg if it is an NPM lib.
Here are some example import statements:
Import from NPM
import "@openzeppelin/contracts/token/ERC20/ERC20.sol";
import "@openzeppelin/contracts@4.2.0/token/ERC20/ERC20.sol";
Note: In the example above, @openzeppelin is the name of the npm library. In the following example the library’s name does not begin with an @ - but Remix will go and check npm for a library of that name.
import "solidity-linked-list/contracts/StructuredLinkedList.sol";
Import from a Github URL
import "https://github.com/OpenZeppelin/openzeppelin-contracts/blob/v2.5.0/contracts/math/SafeMath.sol";
You should specify the release tag (where available), otherwise you will get the latest code in the master branch. For OpenZeppelin Contracts you should only use code published in an official release, the example above imports from OpenZeppelin Contracts v2.5.0.
Import from Swarm
import 'bzz-raw://5766400e5d6d822f2029b827331b354c41e0b61f73440851dd0d06f603dd91e5';
Import from IPFS
import 'ipfs://Qmdyq9ZmWcaryd1mgGZ4PttRNctLGUSAMpPqufsk6uRMKh';
Importing a local file not in .deps
To import a file NOT in the .deps folder, use a relative path (./). For example:
import "./myLovelyLovelyLib.sol";
Note: It is not possible to import across Workspaces.
Importing a file from your computer’s filesystem
This method uses remixd - the remix daemon. Please go to the remixd docs for instructions about how to bridge the divide between the browser and your computers filesystem.
More about the import keyword
For a detailed explanation of the import keyword see the
Solidity documentation
Importing a files for manipulation
When importing from the home tab widgets or with a remix command in the console, the files are placed in the root of the current Workspace inside a folder the shows their source - eg github or gists.
Import buttons on the Remix home tab
The Gist, Github, Swarm, IPFS, & HTTPS buttons are to assist in getting files into Remix so you can explore.
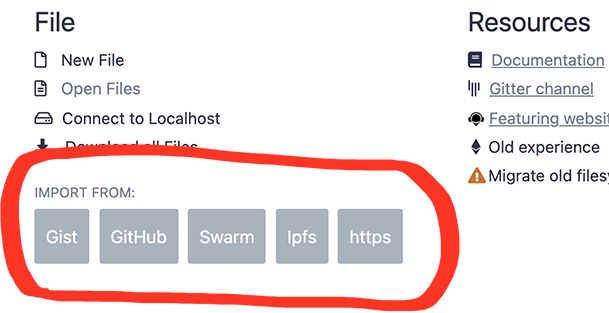
Clicking on any of the Import buttons will bring up a modal like this one:
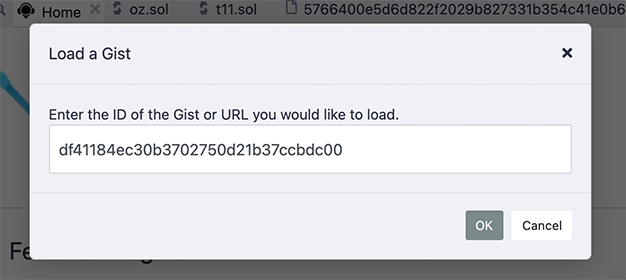
No need to wrap the input in quotes.
Loading with a remix command in the console
The 2 remix commands for loading are:
remix.loadurl(url)
remix.loadgist(id)
remix.loadurl('https://github.com/OpenZeppelin/openzeppelin-contracts/blob/v2.5.0/contracts/math/SafeMath.sol')
remix.loadgist('5362adf2000afa4cbdd2c6d239e06bf5')
Accessing files loaded from the Home tab or from a remix command
When you load from github, a folder named github folder is created in the root of your current workspace. To import a file from the github folder, you would use a command like this:
import "github/OpenZeppelin/openzeppelin-contracts/contracts/math/SafeMath.sol";
Notice that this import statement doesn’t include the version information that was in the remix.load(url) command. So it is recommended that you use the methods described at the top of this page for importing dependencies that you are not intending to edit.
Assume the .sol file that contained the import statement above is in the contracts folder. Notice that this import statement didn’t need to traverse back to the github folder with a relative path like: ../github.
Plugin List
Here is the list of Remix plugins that you will see in the Plugin Manager:
Core Plugins
File Explorer 
The File Explorers is where you can see the files.
profile name: fileManager
Documentation
Remixd (No UI)
Remixd (with an npm package running locally) connects a folder on your filesystem to the Remix website. Please see the docs for instructions.
profile name: remixd
Documentation
Solidity Compiler 
Compiles Solidity & YUL.
profile name: solidity
Documentation
Deploy & Run 
Deploy & interact with smart contracts on the in-browser chain (JSVM), local nodes, and public networks.
profile name: udapp
Documentation
Debugger 
Insert breakpoints, step through a contract, check high level and low level parameters, and fetch & debug a transaction of a verified contract.
profile name: debugger
Documentation
Solidity Unit Testing 
Run unit test written in Solidity.
profile name: solidityUnitTesting
Documentation
Solidity Static Analysis 
Static code analysis is a process to debug the code by examining it and without actually executing the code. This plugin also has integrations with Slither.
profile name: solidityStaticAnalysis
Documentation
Additional Plugins
(sorted alphabetically)
Celo Compiler / Deployer 
Compile & Deploy to the Celo blockchain.
profile name: celo-remix-plugin
Documentation
Make an issue
Contract Deployer 
Deploy a contract to multiple chains (1 at a time) with the same address.
profile name: celo-remix-plugin
Documentation
Make an issue
Debug Tools for Remix 
Not to be confused with the Debugger, this tool is for plugin devs to help test their plugins & their plugin’s API.
profile name: debugPlugin
Documentation
Defi Explorer 
The Defi Explorer loads the Uniswap V2 Protocol into the File Explorers.
profile name: defiexplorer
Documentation
Make an issue
Defi Tutorials (main panel) 
Learn about UMA. This plugin works with the UMA tutorials plugin.
profile name: defiTutorials
Make an issue
DGIT  Version Control
Clone repos from github & create GIT repos & use standard git commands. Also export/import to IPFS.
profile name: dgit
Documentation
Make an issue
EthDoc Documentation Generator 
Creates the documentation of a soldity contract - generated from the Natspec comments in the code. The generated doc is placed in EthDoc viewer - which will be visible in an tab in the editor.
profile name: ethdoc
Documentation
Make an issue
EthDoc Viewer (main panel)
This plugin work with EthDoc Generator. It is automatically activated.
profile name: ethdoc-viewer
Documentation
Make an issue
Etherscan Contract Verifier 
Verify a contract on Etherscan.
profile name: etherscan
Documentation
Make an issue
Flattener 
Flattens compiled contracts
profile name: flattener
Make an issue
Gas Profiler 
Profile gas costs for every transaction you execute. Total execution costs as well as per line costs are displayed.
profile name: gasProfiler
Documentation
Make an issue
Klaytn 
Deploy & interact with smart contracts to the Klaytn public network, local klaytn nodes.
profile name: klaytn-remix-plugin
Documentation
Make an issue
Learneth  Remix & Solidity Tutorials
Tutorials that contain quizes that teach users Solidity and Remix features.
profile name: learnEth
Documentation
Make an issue
Lexon 
Lexon is a language that reads like a legal contract and compile into Solidity (and then bytecode). This plugin allow you to take Lexon code and to
profile name: lexon
Documentation
Make an issue
Moonbeam 
Compile and Deploy to the Moonbeam network
profile name: moonbeam-remix-plugin
Documentation
Make an issue
Mythx Security Verification 
Free version and paid version for Mythx analysis.
profile name: mythx
Documentation
Make an issue
Nahmii compiler
Compile solidity contracts for the Nahmii network
profile name: nahmii-compiler
Make an issue
One Click Dapp 
Makes a basic front end for your contract once it is deployed on a public testnet.
profile name: oneClickDapp
Documentation
Make an issue
Proveable Oracle Services 
An oracle for the Remix VM environment.
profile name: provable
Documentation
Quorum Network 
A Connection to Quorum
profile name: quorum
Documentation
Make an issue
Solhint Linter 
Solidity Linter providing both Security and Style Guide validations.
profile name: solhint
Documentation
Make an issue
Solidity 2 UML 
Generate UML diagrams from a compiled Solidity file
profile name: sol2uml
Documentation
Make an issue
Sourcify 
Verify you contracts and fetch verified contracts
profile name: sourcify
Documentation
Make an issue
Starknet 
Compile contracts written in Cairo to Starknet
profile name: starkNet_compiler
Documentation
Make an issue
Tenderly 
Verify Contracts. Import To Remix From your Tenderly project.
profile name: tenderly
Documentation
Make an issue
UMA Playground (main panel)
Learn about the UMA protocol. This plugin is loaded from the DEFI Tutorial plugin.
profile name: umaPlayground
Make an issue
UMA Tutorials (main panel)
This plugin is activated by the DEFI Tutorials
profile name: umaTutorials
Make an issue
Vyper Compiler 
Compile vyper code using local or remote Vyper compiler.
profile name: vyper
Documentation
Make an issue
Wallet Connect (main panel)
Approve transactions on your mobile device
profile name: walletconnect
Make an issue
YUL++ 
A low level language for Ethereum.
profile name: yulp
Make an issue
Zokrates 
ZoKrates is a toolbox for zkSNARKs on Ethereum.
profile name: ZoKrates
Documentation
Make an issue
Remix Commands
In the console, you can run the commands listed below. Once you start to type a command, there is auto complete. These commands are using the following libraries:
remix: Remix has a number of CLI commands for loading & executing file in a workspace. See the list below.
ethers: Remix IDE enables the use of ethersjs commands. See the Ethers docs for the full list.
web3: Remix IDE enable the use of web3js commands. See the Web3js docs for the full list.
swarmgw: This library can be used to upload/download files to Swarm via https://swarm-gateways.net/.
Remix Commands
remix.execute(filepath): Run the script specified by file path. If filepath is empty, script currently displayed in the editor is executed.
remix.exeCurrent(): Run the script currently displayed in the editor.
remix.getFile(path): Returns the content of the file located at the given path
remix.help(): Display this help message.
remix.loadgist(id): Load a gist in the file explorer.
remix.loadurl(url): Load the given url in the file explorer. The url can be of type github, swarm or ipfs.
A few Ethers JS examples
ethers.providers: A Provider abstracts a connection to the Ethereum blockchain, for issuing queries and sending state changing transactions.
ethers.utils: The utility functions exposed in both the ethers umbrella package and the ethers-utils. eg ethers.utils.formatBytes32String( text )
A few Web3 JS examples
web3.eth.abi: The web3.eth.abi functions let you de- and encode parameters to ABI (Application Binary Interface) for function calls to the EVM (Ethereum Virtual Machine).
web3.providers: Contains the current available providers.
web3.utils: This package provides utility functions for Ethereum dapps and other **web3.js packages.
A few Swarm examples (these will be updated soon)
swarmgw.get(url, cb): Download files from Swarm via https**://swarm-gateways.net/
swarmgw.put(content, cb): Upload files to Swarm via https**://swarm-gateways.net/
Running Scripts
JavaScript (JS) is a lightweight, interpreted, or just-in-time compiled programming language with first-class functions.
Remix IDE supports execution of JS scripts.
Write & Run a script
Create a file with .js extension and put your logic inside it. Once ready, there are two ways to run this script:
Make the script the active file in the editor and run
remix.exeCurrent()from Remix terminalJust right click on the script name in the
Files Explorersplugin and click on the Run option. ShortCut:Ctrl+Shift+Swhen the script is displayed in the editor.
Here is a sample script:
function test() {
  var num=12;
  if(num<10)
    console.log(num + " is less than 10");
  else
    console.log(num + " is not less than 10");
}

test();
Running it using one of options mentioned above will show result in Remix terminal
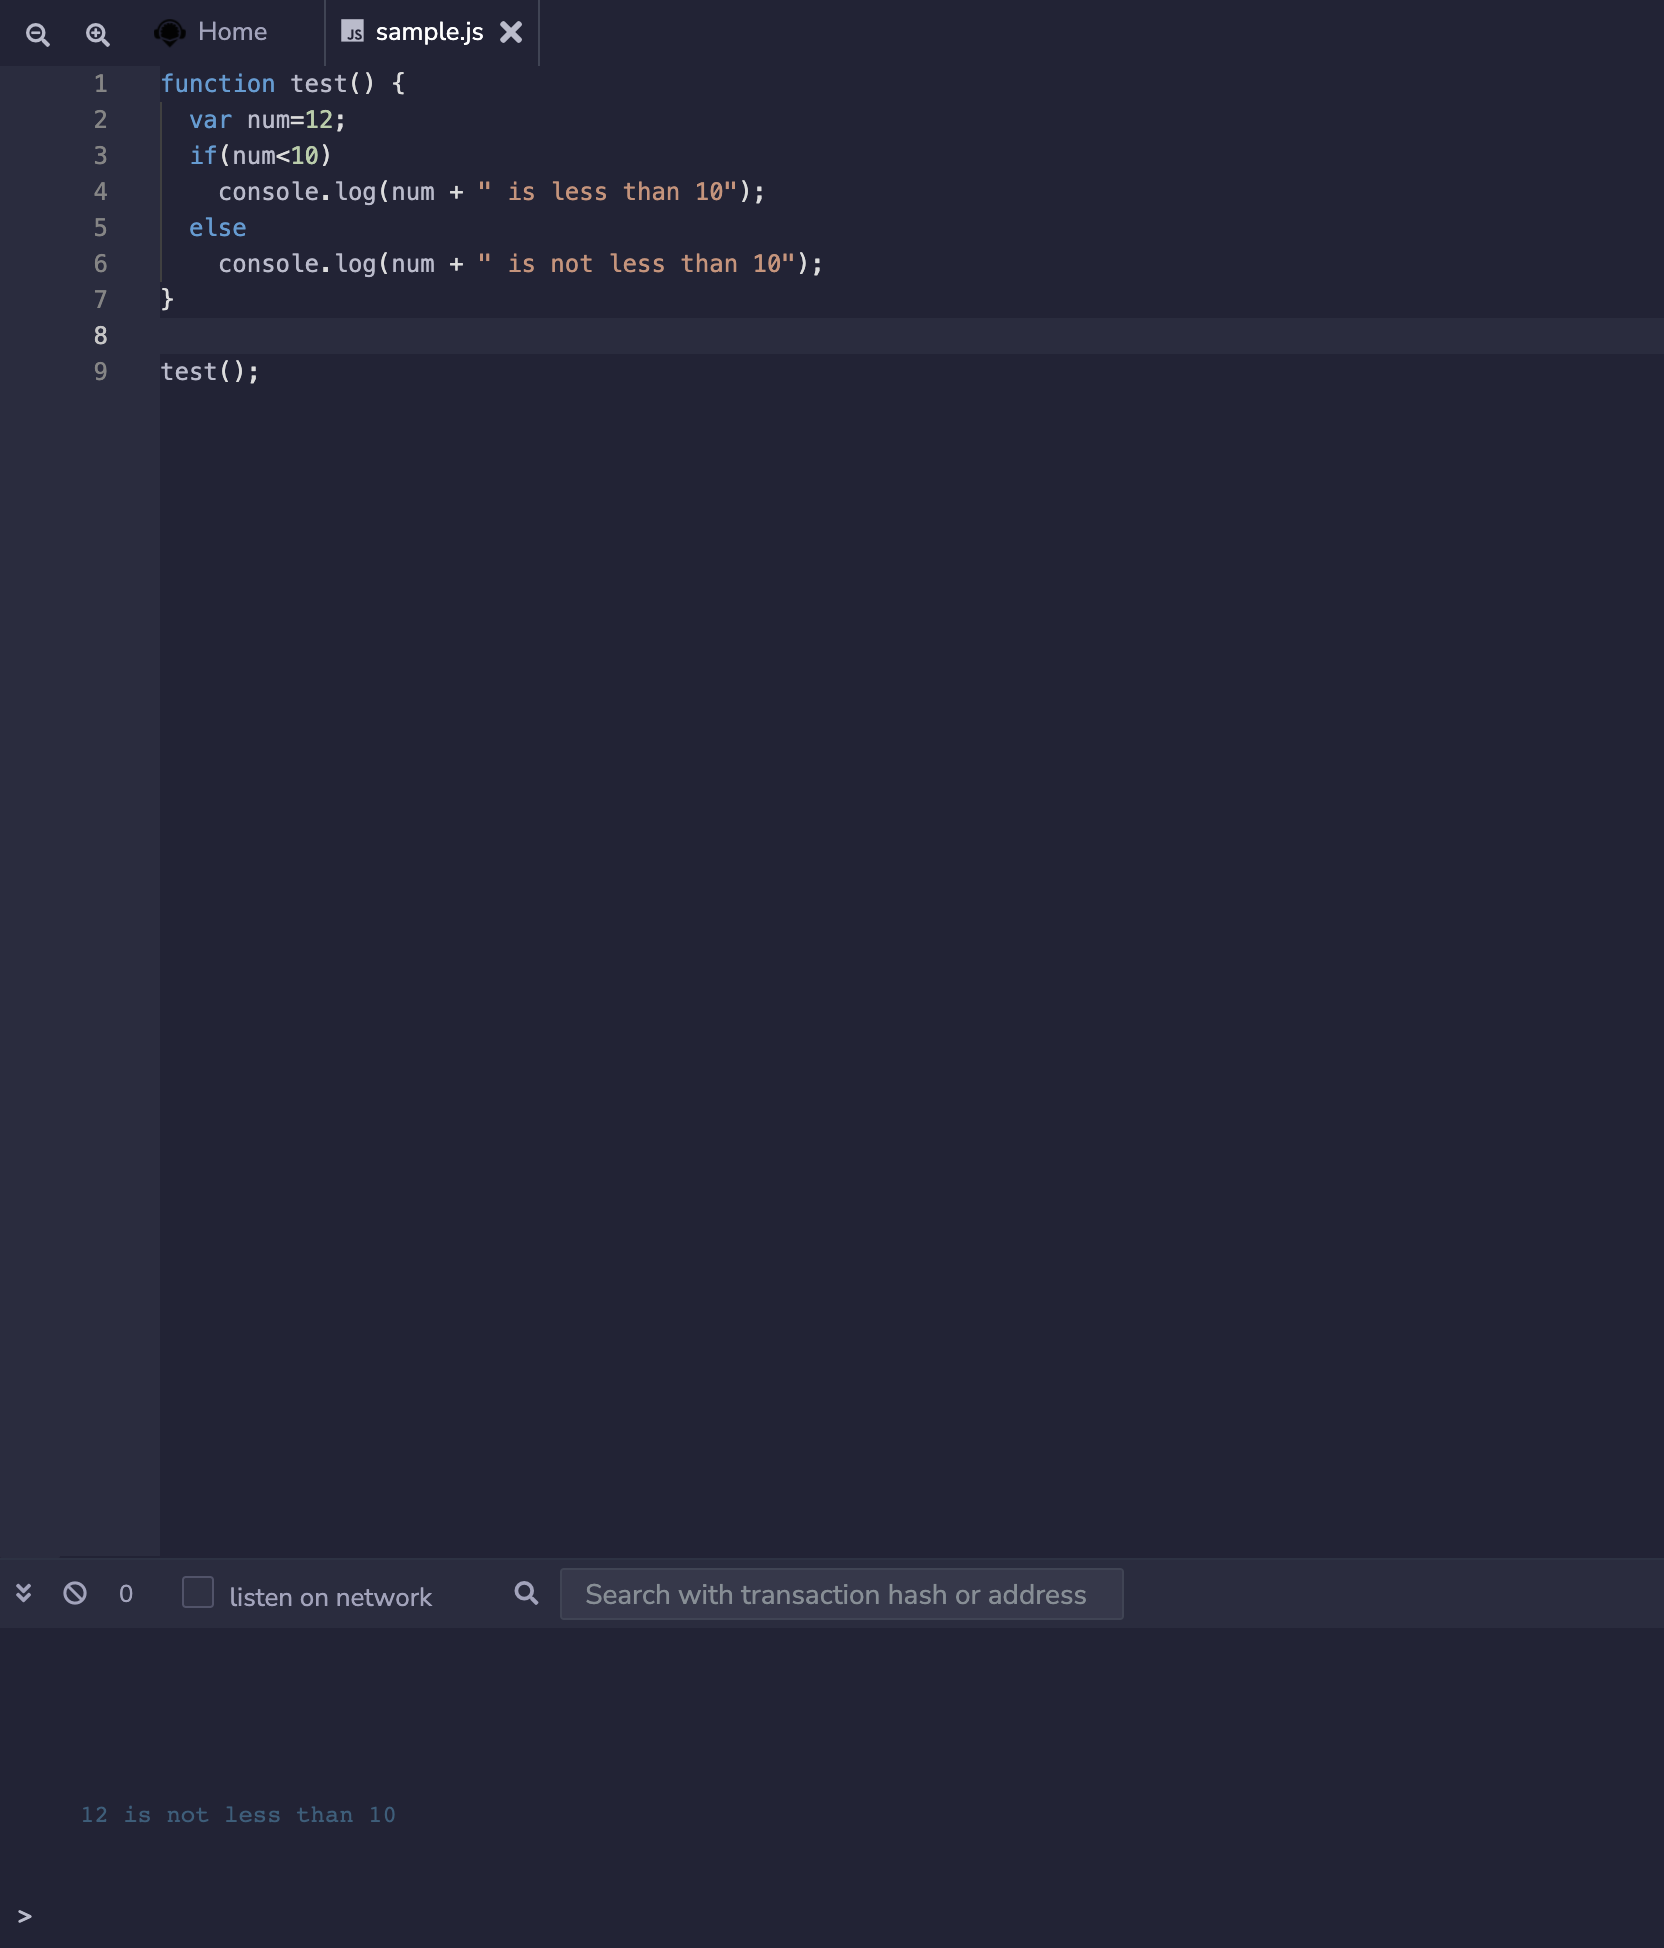
Why run JavaScript Scripts in Remix?
To mimic how the front-end of your dapp will use web3.js or ethers.js
To quickly deploy and interact with a bunch of instances of a contract without going through the Remix GUI.
To run some tests on a previous deployed contract.
Script to deploy a contract
Remix accepts async/await scripts to run web3.js or ethers.js commands. The script needs to be wrapped in a self executing function.
Setup
These scripts will need to access the contract’s ABI. The ABI is located in the contract’s metadata file. Make sure that this metadata file will be created by going to the Settings module and checking that the Generate contract metadata option is indeed checked.
Compile a Solidity file - to generate the contract metadata.
In the Deploy & Run plugin, choose the Environment.
Async/await scripts work on in all of the Environments: the Remix VM, Injected Provider (usually MetaMask), and External HTTP Provider.
JS Scripts in the File Explorers
In the scripts folder of a workspace, there are 2 example files: one using web3.js and the other using ethers.js.
Compile a contract and run a script on the fly
It is often convenient when drafting a contract to run a script just after the compilation succeeded.
That way one can quickly deploy and call several contracts in order to set them in a desired state for testing purpose.
Also if the script contains Mocha tests, those will also be run.
In order to do so, add the NatSpec tag @custom:dev-run-script to the contract followed by the absolute file path, like:
  /**
   * @title ContractName
   * @dev ContractDescription
   * @custom:dev-run-script file_path
   */
  contract ContractName {}
ShortCut: Ctrl+Shift+S , when editing a solidity file, will compile that file and then will run the script. In contrast, Ctrl+S will only start the compiling.
An Example Script
The example below deploys a solidity contract named CustomERC20.sol. This example is using the web3.js library. Ethers.js could also be used.
For more information about this example, please see: running async/await scripts
(async () => {
  try {
    console.log('deploy...')

    // Note that the script needs the ABI which is generated from the compilation artifact.
    const metadata = JSON.parse(await remix.call('fileManager', 'getFile', 'browser/artifacts/CustomERC20.json'))
    const accounts = await web3.eth.getAccounts()

    let contract = new web3.eth.Contract(metadata.abi)

    contract = contract.deploy({
      data: metadata.data.bytecode.object,
      arguments: ["Mask", "N95"]
    })

    newContractInstance = await contract.send({
      from: accounts[0],
      gas: 1500000,
      gasPrice: '30000000000'
    })
    console.log(newContractInstance.options.address)
  } catch (e) {
    console.log(e.message)
  }
})()
For more script examples, please see Frequently Asked Scripts.
require in scripts at Remix
require statement is supported in a limited manner for Remix supported modules with Remix Scripts.
For now, modules supported by Remix are ethers, web3, swarmgw, chai, remix and hardhat only for hardhat.ethers object/plugin.
For unsupported modules, this error <module_name> module require is not supported by Remix IDE will be shown.
Testing using Chai & Mocha
(Supported since Remix IDE v0.22.0)
Remix supports testing of your files in JavaScript using assertion library Chai & test framework Mocha
Chai is a BDD / TDD assertion library for node and the browser that can be delightfully paired with any javascript testing framework.
Mocha is a feature-rich JavaScript test framework running on Node.js and in the browser, making asynchronous testing simple and fun.
Write tests
Create a js file in your project workspace. Better to create it inside scripts folder. Lets name it sample.test.js.
Write your tests in the file. Here is a sample:
const { expect } = require("chai");

describe("Sample", function () {
  it("Sample tests with mocha and chai", async function () {
    var foo = 'bar'
    var beverages = { tea: [ 'chai', 'matcha', 'oolong' ] };
    expect(foo).to.be.a('string');
    expect(foo).to.equal('bar');
    expect(foo).to.have.lengthOf(3);
    expect(beverages).to.have.property('tea').with.lengthOf(3);
  });
});
Run tests
Once done with writing the tests, right click on file name in File Explorers plugin. It will show some options along with option to Run. This Run option is used to run the JS scripts
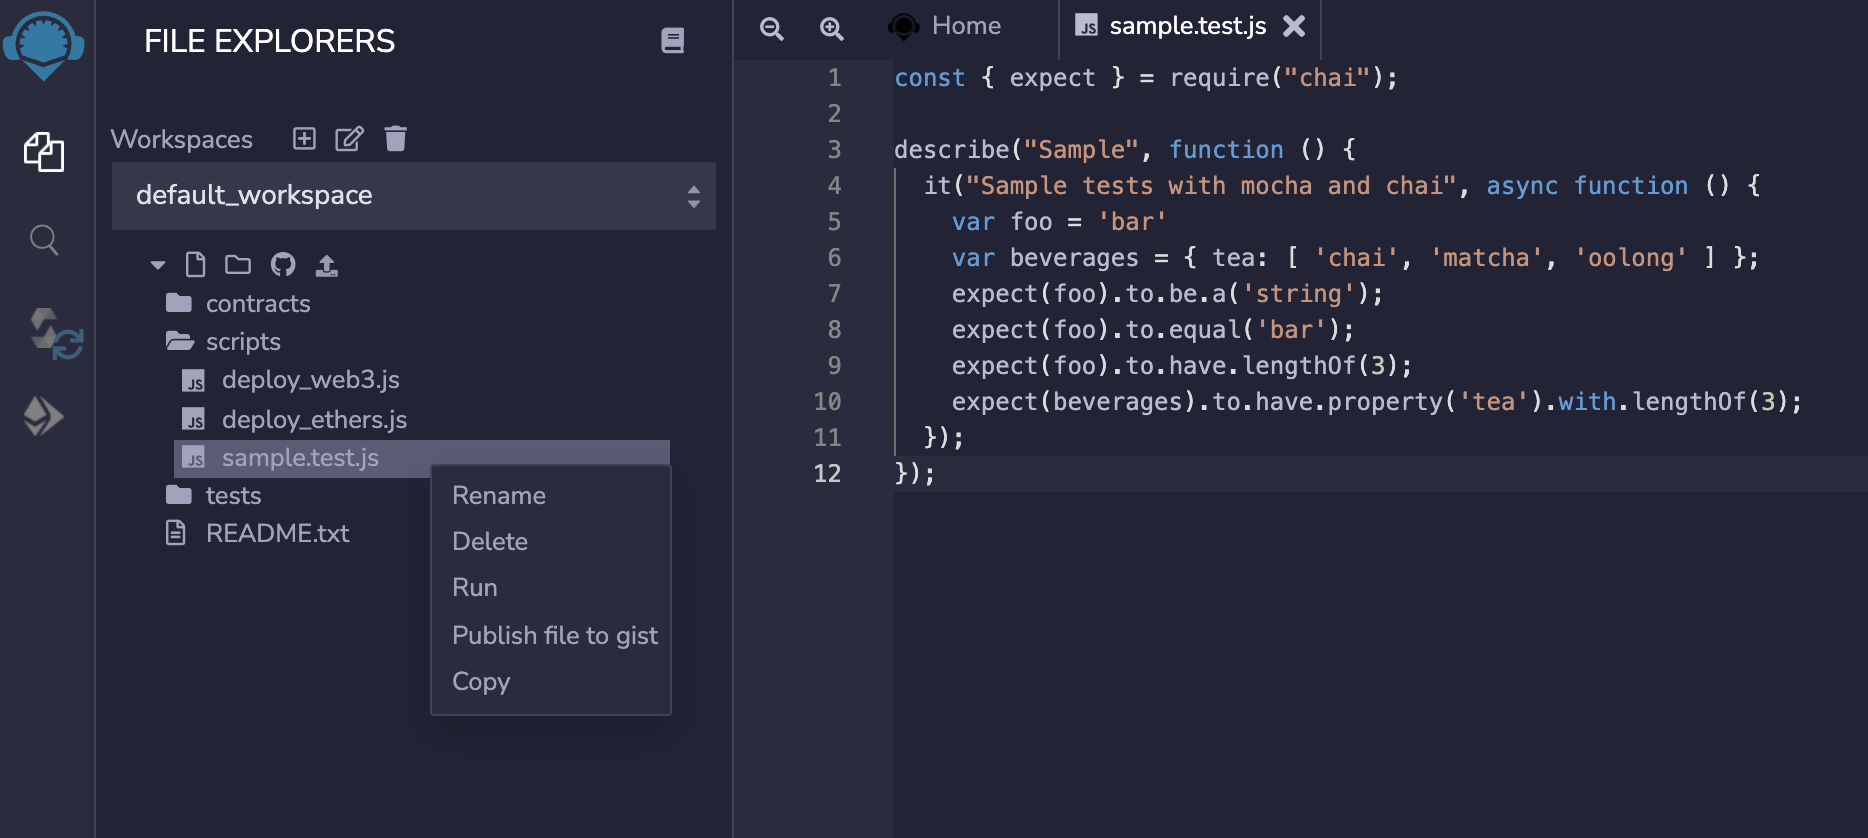
Click on Run, tests will be executed and result will be shown on Terminal.
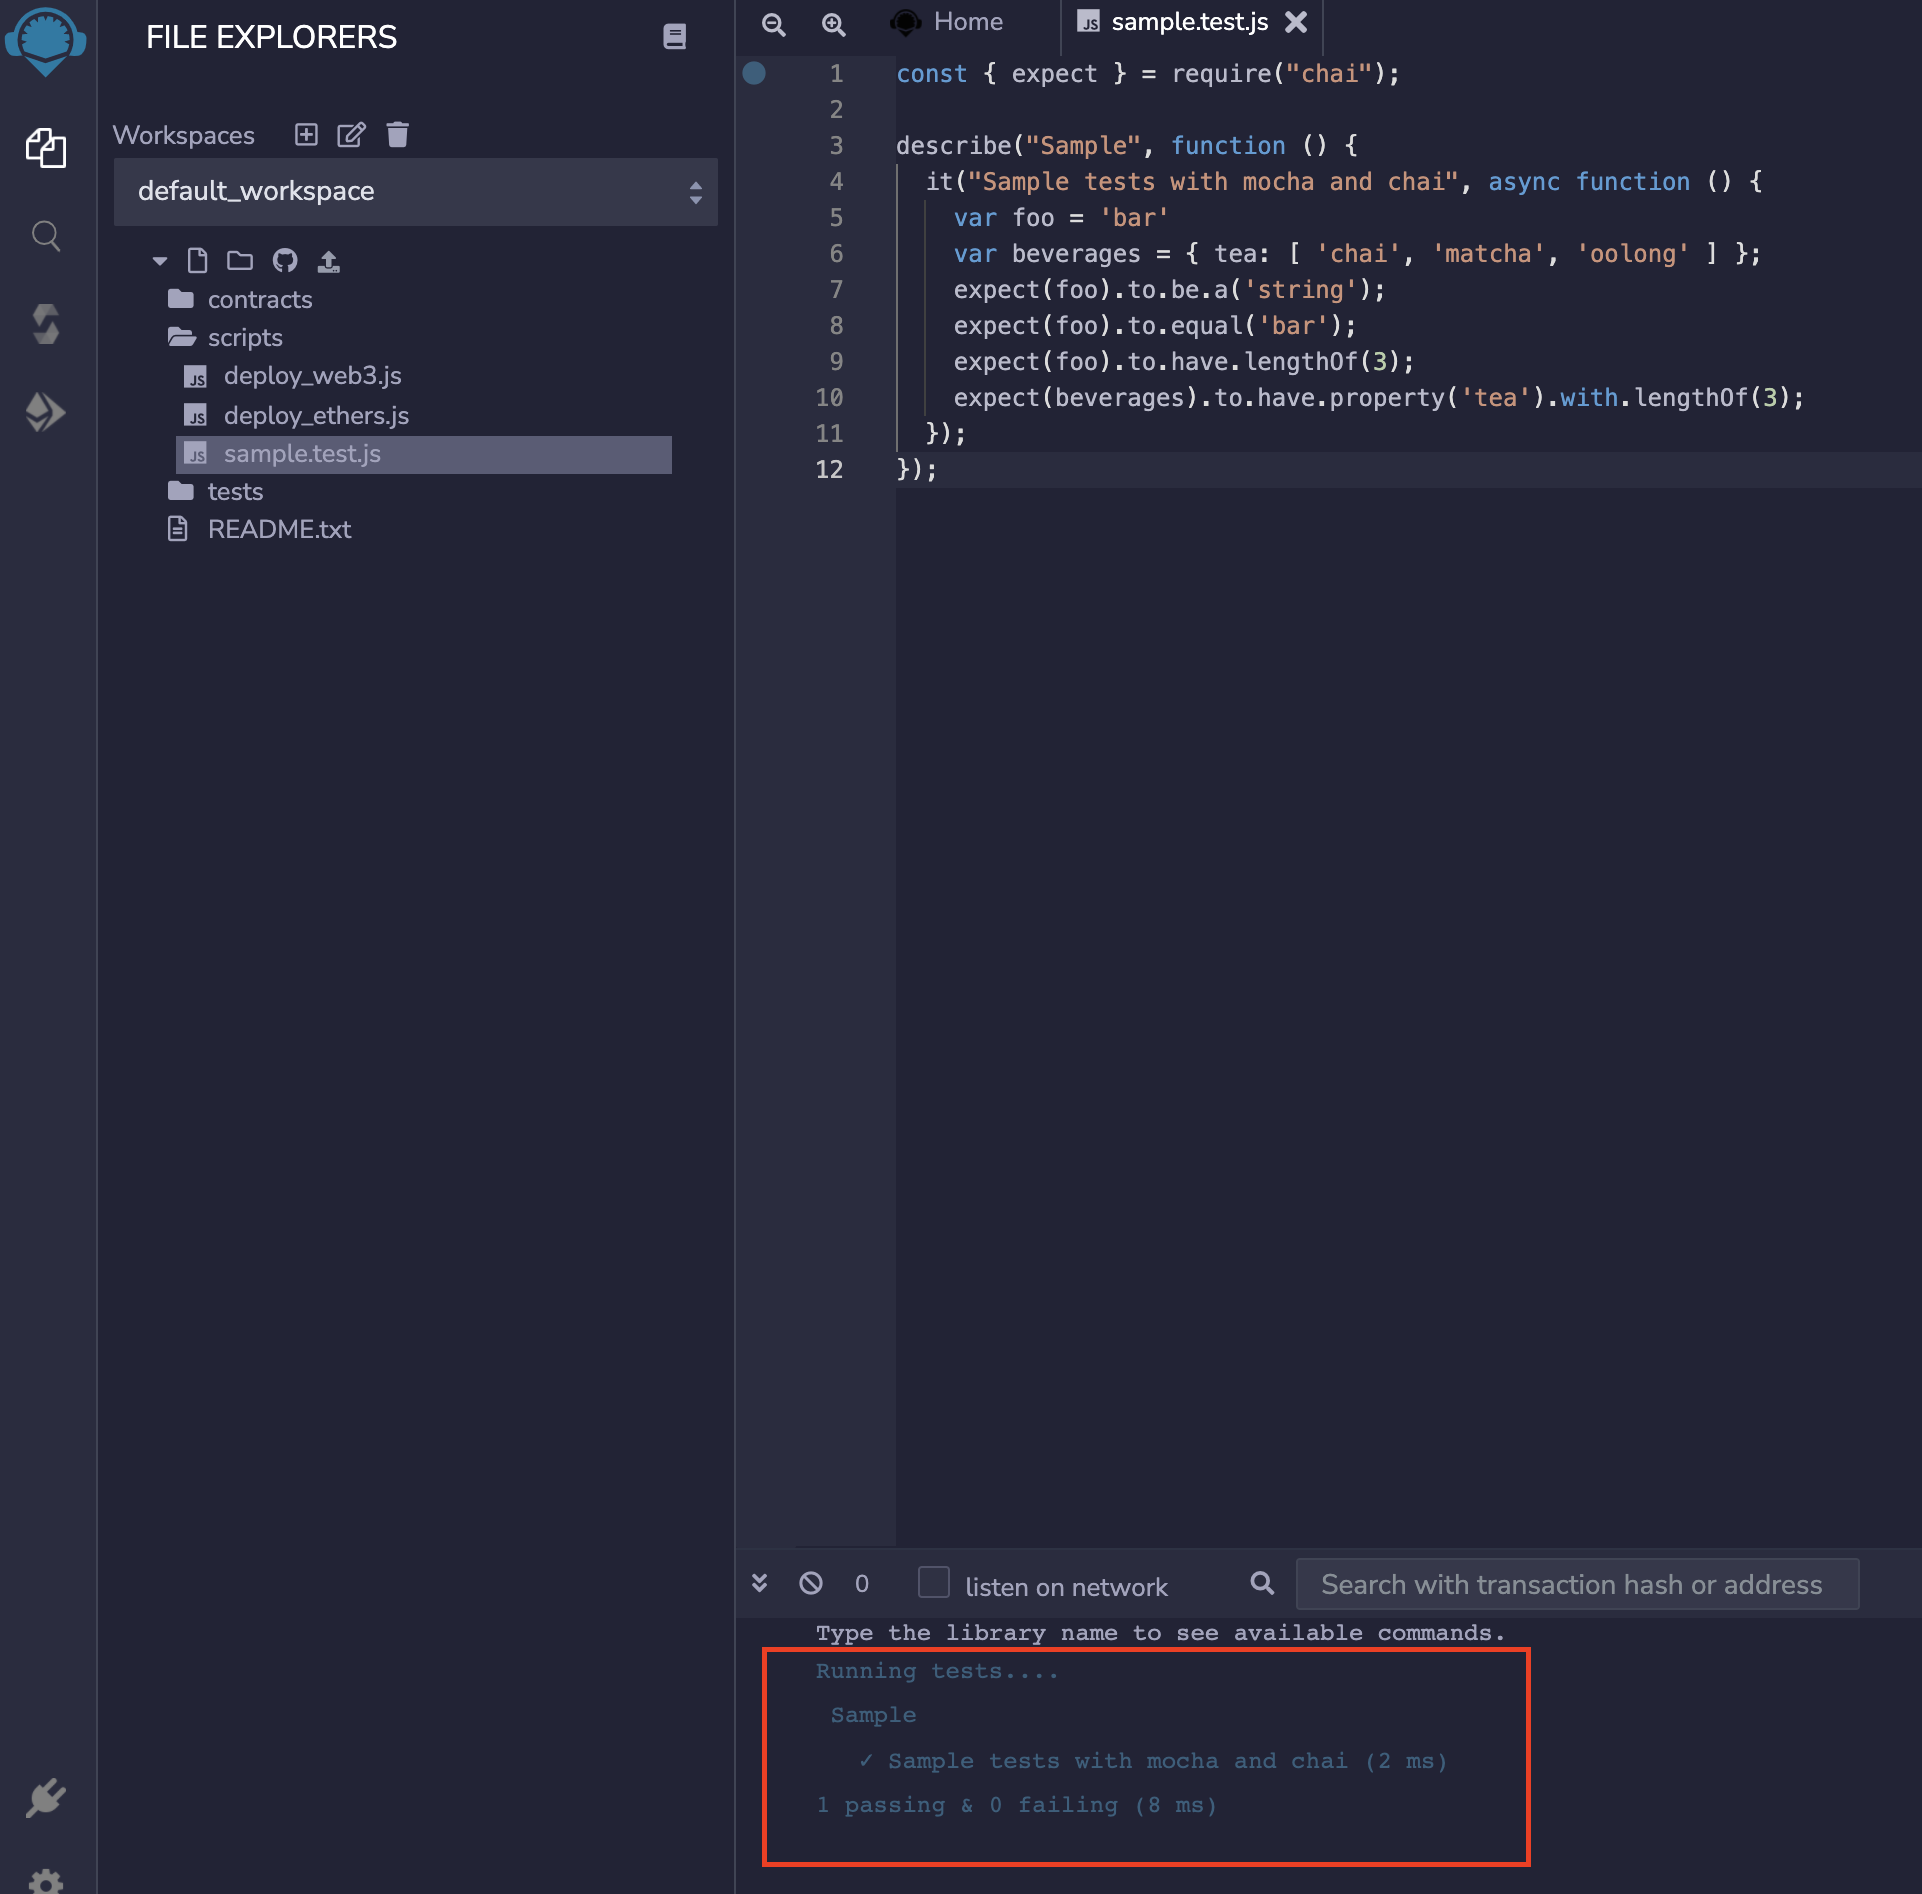
Test a contract
Similarly unit tests can be written to test the functionality of a smart contract. An example to test default 1_Storage.sol contract can be as:
const { expect } = require("chai");

describe("Storage", function () {
  it("test initial value", async function () {
    // Make sure contract is compiled and artifacts are generated
    const metadata = JSON.parse(await remix.call('fileManager', 'getFile', 'contracts/artifacts/Storage.json'))
    const signer = (new ethers.providers.Web3Provider(web3Provider)).getSigner()
    let Storage = new ethers.ContractFactory(metadata.abi, metadata.data.bytecode.object, signer);
    let storage = await Storage.deploy();
    console.log('storage contract Address: ' + storage.address);
    await storage.deployed()
    expect((await storage.retrieve()).toNumber()).to.equal(0);
  });

  it("test updating and retrieving updated value", async function () {
    const metadata = JSON.parse(await remix.call('fileManager', 'getFile', 'contracts/artifacts/Storage.json'))
    const signer = (new ethers.providers.Web3Provider(web3Provider)).getSigner()
    let Storage = new ethers.ContractFactory(metadata.abi, metadata.data.bytecode.object, signer);
    let storage = await Storage.deploy();
    await storage.deployed()
    const setValue = await storage.store(56);
    await setValue.wait();
    expect((await storage.retrieve()).toNumber()).to.equal(56);
  });

  it("fail test updating and retrieving updated value", async function () {
    const metadata = JSON.parse(await remix.call('fileManager', 'getFile', 'contracts/artifacts/Storage.json'))
    const signer = (new ethers.providers.Web3Provider(web3Provider)).getSigner()
    let Storage = new ethers.ContractFactory(metadata.abi, metadata.data.bytecode.object, signer);
    let storage = await Storage.deploy();
    await storage.deployed()
    const setValue = await storage.store(56);
    await setValue.wait();
    expect((await storage.retrieve()).toNumber()).to.equal(55);
  });
});
Result will be as:
Debugging a test transaction
To debug a transaction in one of the tests, print the transaction hash and input that in the Remix Debugger plugin.
Hardhat-ethers support
Remix also supports methods of hardhat-ethers plugin of Hardhat framework. Available methods under this plugin are:
interface Libraries {
  [libraryName: string]: string;
}

interface FactoryOptions {
  signer?: ethers.Signer;
  libraries?: Libraries;
}

function getContractFactory(name: string, signer?: ethers.Signer): Promise<ethers.ContractFactory>;

function getContractFactory(name: string, factoryOptions: FactoryOptions): Promise<ethers.ContractFactory>;

function getContractFactory(abi: any[], bytecode: ethers.utils.BytesLike, signer?: ethers.Signer): Promise<ethers.ContractFactory>;

function getContractAt(name: string, address: string, signer?: ethers.Signer): Promise<ethers.Contract>;

function getContractAt(abi: any[], address: string, signer?: ethers.Signer): Promise<ethers.Contract>;

function getSigners() => Promise<ethers.Signer[]>;

function getSigner(address: string) => Promise<ethers.Signer>;

function getContractFactoryFromArtifact(artifact: Artifact, signer?: ethers.Signer): Promise<ethers.ContractFactory>;

function getContractFactoryFromArtifact(artifact: Artifact, factoryOptions: FactoryOptions): Promise<ethers.ContractFactory>;

function getContractAtFromArtifact(artifact: Artifact, address: string, signer?: ethers.Signer): Promise<ethers.Contract>;
With this, one can run the tests for a hardhat project easily using Remix.
Example to test Storage contract with this plugin methods can be as:
const { expect } = require("chai");
const { ethers } = require("hardhat");

describe("Storage", function () {
  it("test initial value", async function () {
    const Storage = await ethers.getContractFactory("Storage");
    const storage = await Storage.deploy();
    await storage.deployed();
    console.log('storage deployed at:'+ storage.address)
    expect((await storage.retrieve()).toNumber()).to.equal(0);
  });
   it("test updating and retrieving updated value", async function () {
    const Storage = await ethers.getContractFactory("Storage");
    const storage = await Storage.deploy();
    await storage.deployed();
    const storage2 = await ethers.getContractAt("Storage", storage.address);
    const setValue = await storage2.store(56);
    await setValue.wait();
    expect((await storage2.retrieve()).toNumber()).to.equal(56);
  });
});
Result will be as:
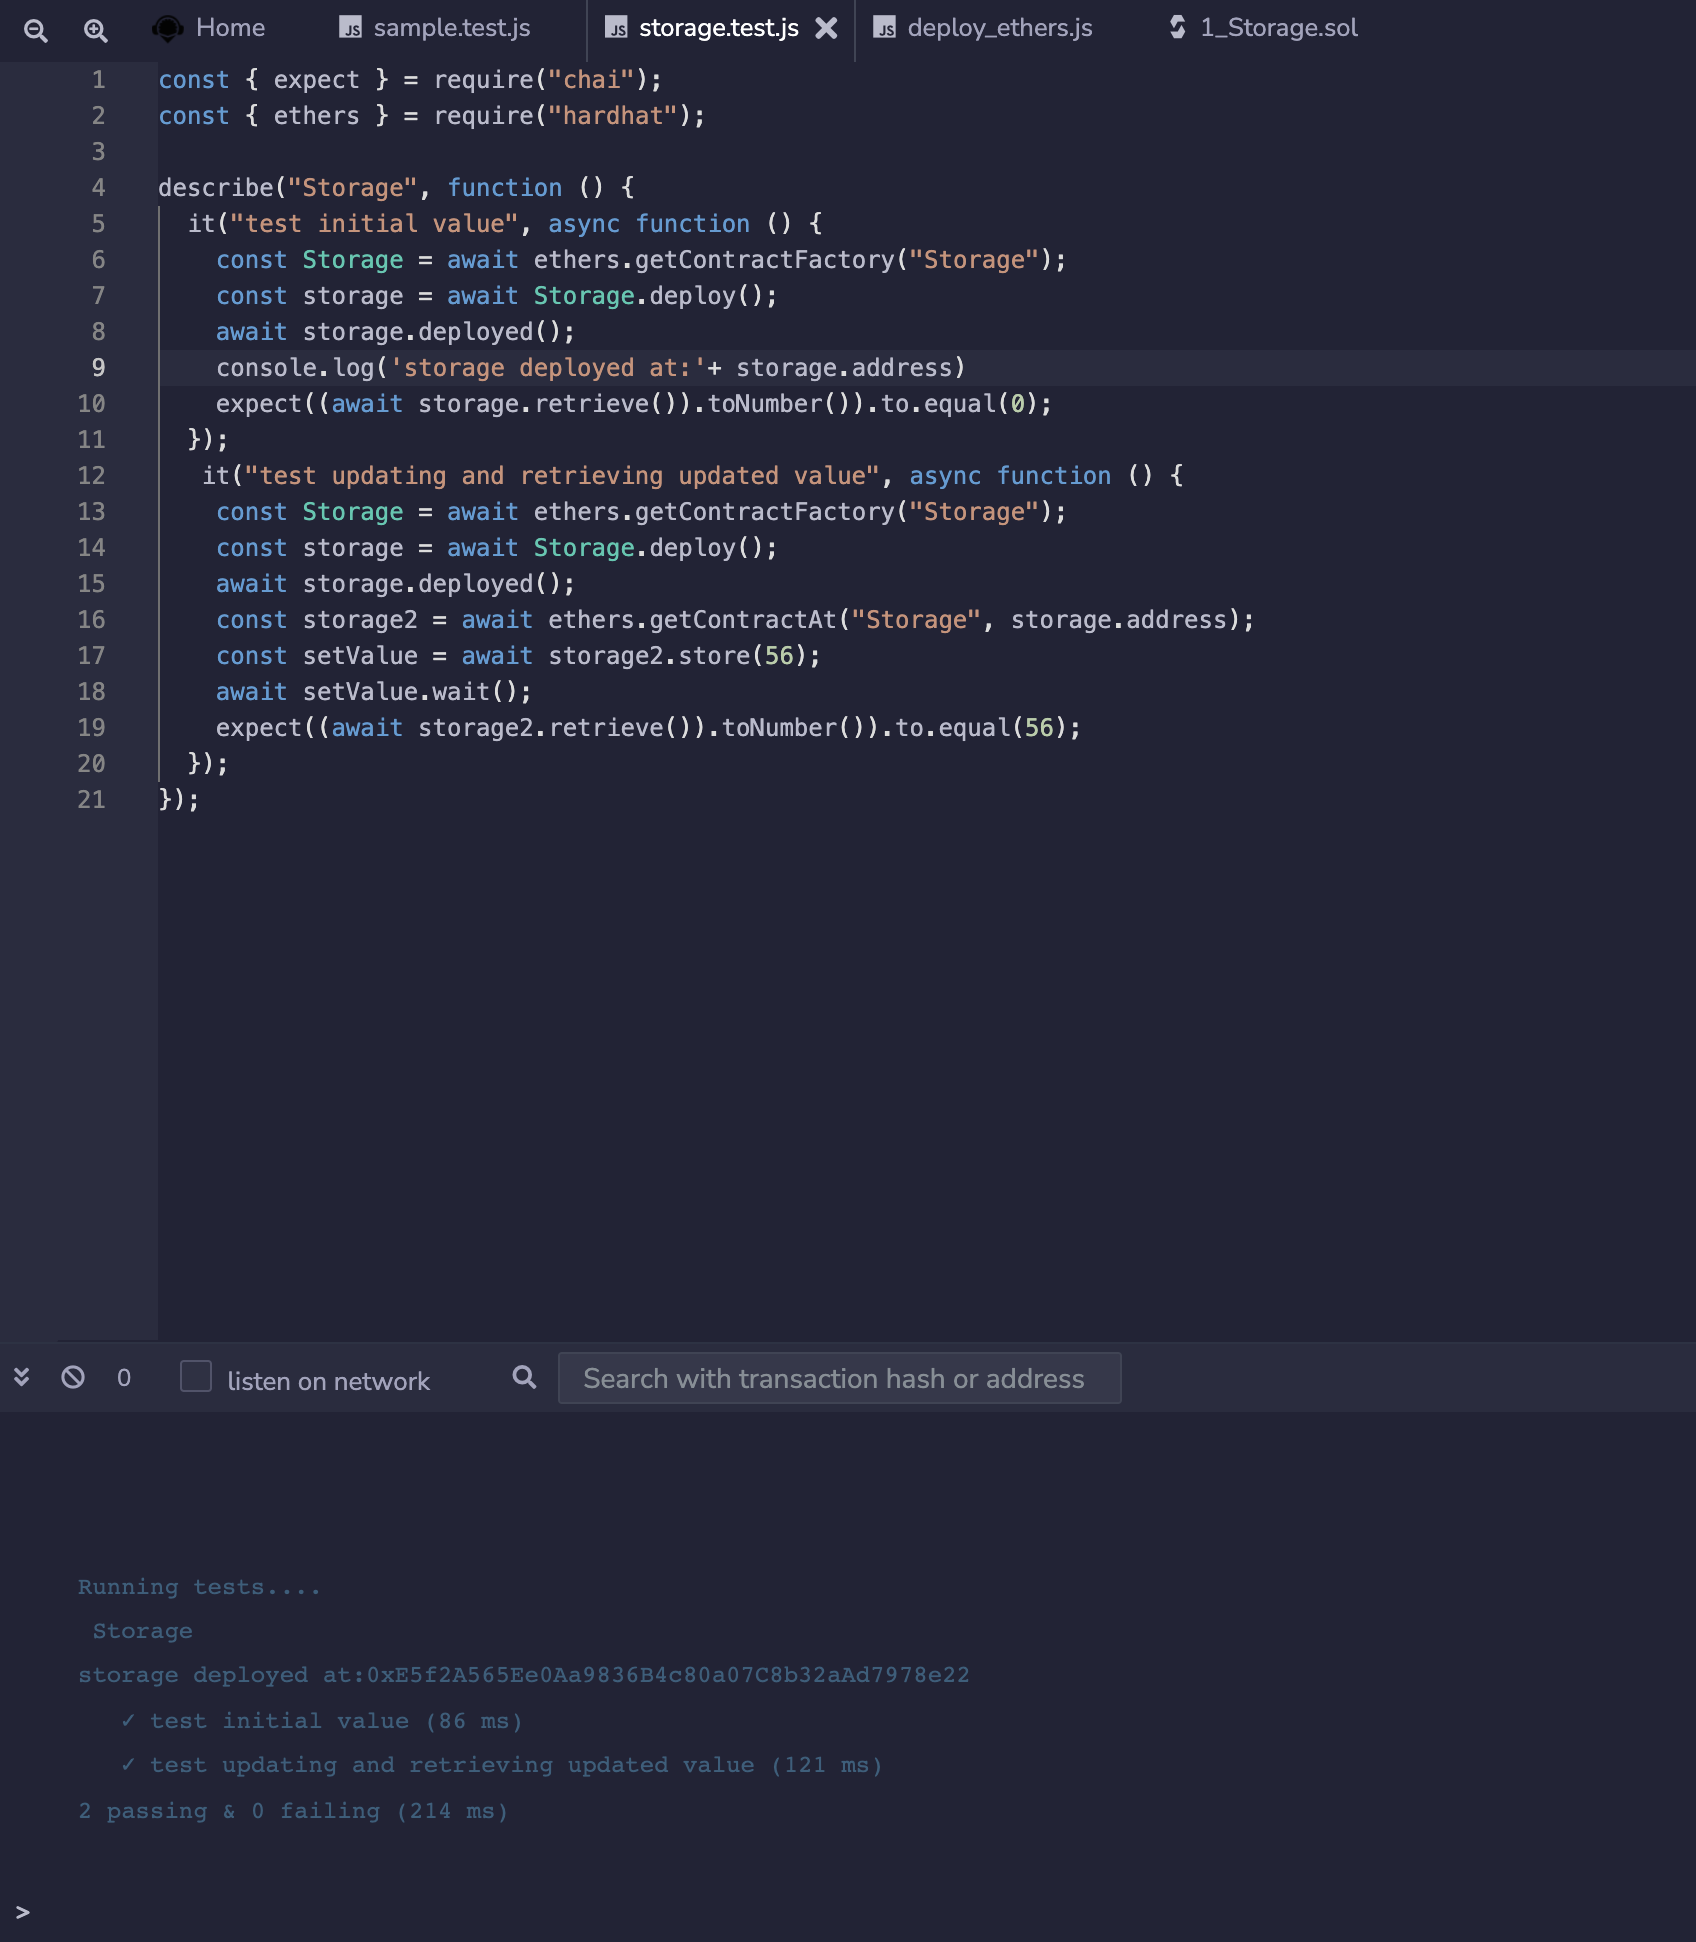
Frequently Asked Scripts
Deploy with web3.js
(async () => {
  try {
    console.log('deploy...')

    // Note that the script needs the ABI which is generated from the compilation artifact.
    const metadata = JSON.parse(await remix.call('fileManager', 'getFile', 'browser/artifacts/CustomERC20.json'))
    const accounts = await web3.eth.getAccounts()

    let contract = new web3.eth.Contract(metadata.abi)

    contract = contract.deploy({
      data: metadata.data.bytecode.object,
      arguments: ["Mask", "N95"]
    })

    newContractInstance = await contract.send({
      from: accounts[0],
      gas: 1500000,
      gasPrice: '30000000000'
    })
    console.log(newContractInstance.options.address)
  } catch (e) {
    console.log(e.message)
  }
})()
Deploy with Ethers
(async function() {
  try {
    const metadata = JSON.parse(await remix.call('fileManager', 'getFile', 'browser/artifacts/CustomERC20.json'))
    // the variable web3Provider is a remix global variable object
    const signer = (new ethers.providers.Web3Provider(web3Provider)).getSigner()
    // Create an instance of a Contract Factory
    let factory = new ethers.ContractFactory(metadata.abi, metadata.data.bytecode.object, signer);
    // Notice we pass the constructor's parameters here
    let contract = await factory.deploy('Mask', 'N95');
    // The address the Contract WILL have once mined
    console.log(contract.address);
    // The transaction that was sent to the network to deploy the Contract
    console.log(contract.deployTransaction.hash);
    // The contract is NOT deployed yet; we must wait until it is mined
    await contract.deployed()
    // Done! The contract is deployed.
    console.log('contract deployed')
  } catch (e) {
    console.log(e.message)
  }
})();
Remixd: Access your Local Filesystem
![]()
To give the Remix IDE (the web app) access to a folder on your computer, you need to use Remixd - the plugin along with remixd - the cli/npm module.
The Remixd plugin can be activated from the plugin manager or in the File Explorer - see the image below. The connect to localhost - will activate the Remixd plugin.
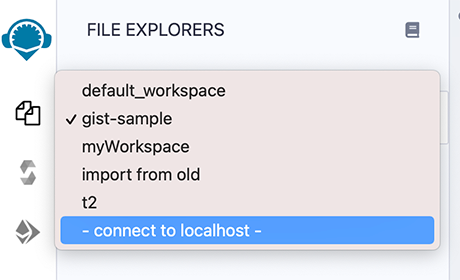
Once you click connect to localhost or activate Remixd from the Plugin Manager, a modal will come up:
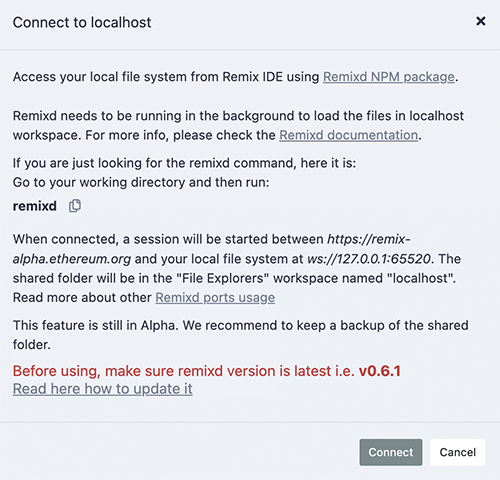
The Remixd plugin is a websocket plugin and it has no UI other than this modal dialog box - so you won’t see a Remixd icon in the icon panel.
Before you hit Connect, you need to install the remixd NPM module and run the remixd command.
The code of remixd is
here .
remixd Installation
remixd is an NPM module and can be globally installed using the following command:
npm install -g @remix-project/remixd
Or just install it in the directory of your choice by removing the -g flag:
npm install @remix-project/remixd
NOTE: When the remixd NPM module is installed, it also installs Slither, solc-select and sets solc to latest version i.e. 0.8.15 currently.
ALSO NOTE: Python3.6+ (pip3) needs to already be installed on the System. (This packaging of Slither with the remixd module is supported since Remixd v0.6.3). In case of any discrepancy, Slither can also installed along with other dependencies using command remixd -i slither
Find your version of remixd
The command: remixd -v or remixd --version will return your version number.
If this command does not work, then you have an outdated version!
Update to the latest remixd
Because remixd creates a bridge from the browser to your local filesystem, it is important that you have the latest version of script.
For users who had installed the version of remixd from the VERY old NPM address or for users who do not know which NPM address they had installed it from, run these 2 steps:
uninstall the old one: npm uninstall -g remixd
install the new: npm install -g @remix-project/remixd
For Most Users who know that they have a remixd version installed from @remix-project/remixd then just run:
npm install -g @remix-project/remixd
remixd command
The remixd command without options uses the terminal’s current directory as the shared directory and the shared Remix domain will be https://remix.ethereum.org, https://remix-alpha.ethereum.org, or https://remix-beta.ethereum.org
The remixd command is:
remixd
If you are using Remix from localhost or you are not running the command from your working directory, you’ll need to use the command with flags.
remixd options
Usage: remixd [options]

Establish a two-way websocket connection between the local computer and Remix IDE for a folder

Options:
  -v, --version               output the version number
  -u, --remix-ide  <url>      URL of remix instance allowed to connect
  -s, --shared-folder <path>  Folder to share with Remix IDE (Default: CWD)
  -i, --install <name>        Module name to install locally (Supported: ["slither"])
  -r, --read-only             Treat shared folder as read-only (experimental)
  -h, --help                  output usage information

Example:

    remixd -s ./shared_project -u http://localhost:8080
NOTE: remixd -i slither can be used to install Slither along with its dependencies
HTTP vs HTTPS in the remixd command
If your browser is on https://remix.ethereum.org (secure http) then use https in the command:
remixd -s <absolute-path-to-the-shared-folder> --remix-ide https://remix.ethereum.org
Or if you are using http in the browser, then use http in the remixd command.
Read/Write permission & Read-only mode
The folder is shared using a websocket connection between Remix IDE
and remixd.
Be sure the user executing remixd has read/write permission on the
folder.
Alternatively, there is an option to run remixd in read-only mode, use --read-only flag.
Ports Usage
remixd functions by making websocket connections with Remix IDE on different ports. Ports are defined according to specific purpose. Port usage details are as:
65520 : For
remixdwebsocket listener, to share local file system with Remix IDE. Shared folder will be loaded in the Remix IDEFile Explorersworkspace namedlocalhost65522 : For
hardhatwebsocket listener, to enable the Hardhat Compilation using Remix IDESolidity Compilerplugin, if shared folder is a Hardhat project.65523 : For
slitherwebsocket listener, to enable the Slither Analysis using Remix IDESolidity Static Analysisplugin65524 : For
trufflewebsocket listener, to enable the Truffle Compilation using Remix IDESolidity Compilerplugin, if shared folder is a Truffle project.
Note: Please make sure your system is secured enough and these ports are not opened nor forwarded.
Warning!
remixdprovides full read and write access to the given folder for any application that can access theTCP port 65520on your local host.To minimize the risk, Remixd can ONLY bridge between your filesystem and the Remix IDE URLS - including:
  https://remix.ethereum.org
  https://remix-alpha.ethereum.org
  https://remix-beta.ethereum.org
  package://a7df6d3c223593f3550b35e90d7b0b1f.mod
  package://6fd22d6fe5549ad4c4d8fd3ca0b7816b.mod
  https://ipfsgw.komputing.org
(the package:// urls in the list above are for remix desktop)
Clicking Connect on the modal.
Clicking on the Connect button on the Remixd modal (see the image above), will attempt to start a session where your browser can access the specified folder on your computer’s filesystem.
If you do not have remixd running in the background - another modal will open up and it will say:
Cannot connect to the remixd daemon.
Please make sure you have the remixd running in the background.
Assuming you don’t get the 2nd modal, your connection to the remixd daemon is successful. The shared folder will be visible in the File Explorer’s workspace under localhost.
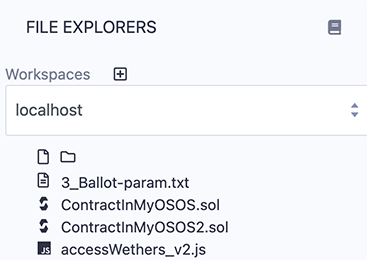
Creating & deleting folders & files
Clicking on the new folder or new file icon under localhost will create a new file or folder in the shared folder. Similarly, if you right click on a file or folder you can rename or delete the file.
Closing a remixd session
In the terminal where remixd is running, typing ctrl-c will close the session. Remix IDE will then put up a modal saying that remixd has stopped running.
Using Remix Safely
It is dangerous to send transactions on contracts you don’t understand (even if it’s a get rich quick scheme that you’ve copied & pasted from a Discord DM or a youtube video and you really really want to get rich).
Check our article on a current scam promoting “liquidity front runner bots”.
Always check that you are loading Remix over HTTPS unless you have a specific reason for accessing it with HTTP (e.g. for using Remix locally or for a connection you trust).
Make sure all your imports include the version number otherwise you don’t know what version of files you are getting and the builds are not reproducible.
So do not use an import like this:
import "@openzeppelin/contracts/token/ERC20/ERC20.sol";
Rather, use one like this:
import "@openzeppelin/contracts@4.7.3/token/ERC20/ERC20.sol";
When connecting a contract to an existing deployment, ensure that the thing you are connecting to is correct AND is the correct version.
Always be sure to address or understand every warning.
Remix is a subdomain of ethereum.org - so the only valid Remix urls are:
remix.ethereum.org
remix-alpha.ethereum.org
remix-beta.ethereum.org
If you are directed to some site that looks like Remix but has a similar but different URL - it is NOT Remix and is likely a scam.
Remix’s ease makes its users a target
Because Remix has no setup, it has a large community of noobies to smart contract development. This is great, but it provides a target audience for scammers exploit. Without Remix, the scammers would first need to instruct victims to set up a local dev environment, which would severely limit the success rate of the scam.
Scams lose their effectiveness when potential victims are educated about scams and about how to read and understand code. Learn Solidity and learn it well!
For Solidity Tutorials in Remix, go to the LearnEth plugin.
FAQ
Supported devices & Browsers
Q: What browsers will Remix work on?
A: We support Firefox, Chrome, and Brave. We do not test or look for errors in Safari, Edge or other browsers.
Q: Will Remix work on a tablet or mobile device?
A: We do not support the use of Remix on tablets or mobile phones.
General
Q: Are there keyboard shortcuts in Remix?
A: Yes - here is the list of keyboard shortcuts:
Ctrl+Shift+F : Opens the File Explorer
Ctrl+Shift+A : Opens the Plugin Manager
Ctrl+S: Compiles the active Solidity file
Ctrl+Shift+S: Compiles a Solidity file and runs a script when the script is displayed in the editor.
(go here more info about this functionality)
Solidity compiler
Q: Error: compiler might be in a non-sane state
error: "Uncaught JavaScript exception: RangeError: Maximum call stack size exceeded.
The compiler might be in a non-sane state, please be careful and do not use further compilation data to deploy to mainnet.
It is heavily recommended to use another browser not affected by this issue (Firefox is known to not be affected)."
A: Old versions of solidity compiler had this problem with chrome. Please change the compiler version in Solidity Plugin to the newer one or use another browser.
Q: I’m getting an issue with Maximum call stack exceed and various other errors, can’t compile.
A: Try a different browser or a newer solidity compiler version.
Q: How to verify a contract that imports other contracts?
A: The verification tool does not recursively go through the import statements in a contract. So can only verify a ‘flattened’ contract.
There is a plugin called Flattener which will stuff all the original code and the imported code into a single file.
Deploy & Run
Q: I am using an Infura endpoint in my app, but when I try to deploy against that endpoint in Remix IDE selecting “External HTTP Provider” and putting my endpoint in, it’s telling me that it can’t connect
A: If the endpoint you are using is http, it won’t work.
Q: Where is deploy button?
A: Its in the Deploy & Run module. If you haven’t activated that module, you should do that by clicking Deploy & Run module in the Plugin Manager. You could also activate everything you need to work with solidity on the landing page ( click the remix logo at the top left for the screen) and click the “Solidity” button in the environment section.
Q: How to pass a tuple to a public function in Remix?
A: Pass it as an array [].
Q: How to input a struct as input to a parameter of a function in the Deploy & Run module?
A: For inputting a struct, just like a tuple, pass it in as an array []. Also you need to put in the line:
pragma experimental ABIEncoderV2; at the top of the solidity file.
For example, here’s a solidity file with a struct is an input parameter.
pragma solidity >=0.4.22 <0.6.0;
pragma experimental ABIEncoderV2;

contract daPeeps {
    struct Peep {uint a; uint b;} // declaration of Peep type
    Peep peep; //declaration of an object of Peep type

    constructor () public
    {
        peep.a = 0; // definition/initialisation of object
        peep.b = 0; //
    }

    function initPeepToPeep(Peep memory i) public payable {
        peep.a = i.a;
        peep.b = i.b;
    }
    function setPeep(uint a, uint b) public payable {
        peep.a = a;
        peep.b = b;
    }

    function getPeep() public view returns(Peep memory)
    {
        return peep;
    }
}
The input of initPeepToPeeps takes a struct. If you input
[1,2] the transaction will go through.
Plugin Developers
Q: Where do plugin developers go with their questions?
A: The Gitter Remix plugin developers room https://gitter.im/ethereum/remix-dev-plugin
Analytics
Q: What information does Remix save when Matomo Analytics is enabled?
A: We want to know:
Which plugins get activated & deactivated
If users check the box to publish a contract’s metadata when deploying
Which themes are used/used most/not used at all
The usage of the links to documentation
On the homepage, which file importing buttons are used
Q: Is it opt-in or opt-out?
A: We use Matomo as an opt-in analytics platform.
Q: Where is the info stored? Is the info shared with 3rd parties?
A: All data collected through Matomo is stored on our own server. No data is given to third parties.
We respect your privacy and do not collect nor store any personally identifiable information (PII).
Q: What does Remix do with this info?
A: Our goal is to understand how many users we have, what plugins people are using, what is not getting used, what is not being used to its full potential.
With this understanding, we can make adjustments to the UI as well as providing more tips and documentation. It’s a way of getting constant anonymous feedback from our users.
Q: After I agree opt-in, can I change my mind?
A: You can turn off or on Matomo in the Settings panel. There are no consequences for not opting-in or opting-out.
Remix URLs & Links with Parameters
Main Remix URLs
Remix IDE Online is located at https://remix.ethereum.org.
The alpha version of remix is located at https://remix-alpha.ethereum.org. This is not a stable version.
Github repo: https://github.com/ethereum/remix-project. The README contains instructions for running Remix-IDE locally.
Remix Desktop is an Electron App. Here is the release page.
Remix has a VSCode extension called Ethereum Remix.
The Remix twitter account is EthereumRemix.
The Remix Project Medium publication is: https://medium.com/remix-ide.
The Remix Project website introduces the different facets of our project.
The Remix Gitter Channel is a forum to post your questions about Remix.
Customize Remix with URL Parameters
There are many ways to customize Remix IDE by using url parameters. Here are some options:
Activate or deactivate a list of plugins to be activated - and specify which plugin gains the “focus”. SEE MORE
Send commands to a plugin - once the plugin loads. SEE MORE
Load a GIST, a file via a url or a base64 encoded string into Remix’s Editor.
Specify the theme (Dark or Light). SEE MORE
Specify which panels should be minimized - useful when embedding Remix in your site. SEE MORE
Select the version of the Solidity compiler, enable/disable the optimizer, turn on auto compile or choose the language for the Solidity compiler. SEE MORE
Load verified contracts from Etherscan using contract address SEE MORE
Activating a list of plugins
The following example contains the url parameter activate followed by a comma separated list of plugins.
The last plugin in the list will gain the focus.
When you use the activate list, all other plugins that a user had loaded will be deactivated. This does not apply to the file explorer, the plugin manager, and the settings modules because these are never deactivated.
https://remix.ethereum.org/?#activate=solidity,solidityUnitTesting,defiexplorer
Note: a plugin is called by its name as specified in its profile. There are 3 types of plugins:
Native Mandatory Plugins that are always loaded (so you don’t need to activate them using the url parameter activate). These include: fileManager, settings, manager (the plugin manager), and udapp (deploy & run).
Native Optional Plugins that are loaded on demand: debugger, hardhat-provider, solidity, solidityStaticAnalysis, solidityUnitTesting, and vyper
External Plugins to get these plugins’ names, please go to https://github.com/ethereum/remix-plugins-directory/tree/master/plugins.
Deactiving a list of plugins
https://remix.ethereum.org/?#deactivate=debugger
Minimizing Remix panels
The following URL will close everything except the main panel & the icon panel (the side and terminal are minimized).
https://remix.ethereum.org/?#embed=true
To minimize just the side panel, use this URL:
https://remix.ethereum.org/?#minimizesidepanel=true
To minimize just the terminal, use this URL:
https://remix.ethereum.org/?#minimizeterminal=true
Specifying a theme
To link to Remix with a theme specified use this url:
**https://remix.ethereum.org/?#theme=Dark**
A URL example combining multiple parameters
To link to Remix with the a list of plugins activated and with:
the Learneth gaining the side panel’s focus (because it is the last in the list)
the Light theme loaded
the terminal minimized
optimize off
use this url:
https://remix.ethereum.org/?#activate=solidity,solidityUnitTesting,LearnEth&theme=Light&minimizeterminal=true&optimize=false&evmVersion=null&version=soljson-v0.6.6+commit.6c089d02.js
Pass commands to a plugin’s API via a url param
The URL parameter to issue a command is call. Following the call is a // (double slash) separated list of arguments.
call=plugin_name//function//parameter1//paremeter2
An example using call
The URL below uses activate & call. It activates a number of plugins and calls the File Explorers to tell it to load one of the default Remix files:
https://remix.ethereum.org/?#activate=defiexplorer,solidity&call=fileManager//open//contracts/3_Ballot.sol
Load a specific tutorial in the LearnEth plugin:
https://remix.ethereum.org/?#activate=solidityUnitTesting,solidity,LearnEth&call=LearnEth//startTutorial//ethereum/remix-workshops//master//proxycontract
Make calls to a number of different plugins’ APIs
Use the calls parameter to call a series of plugins. Use /// to separate the calls.
For example, this command, after activating a list of plugins, calls the LearnEth plugin’s API and then calls the File Explorer’s API.
https://remix.ethereum.org/?#activate=solidityUnitTesting,solidity,LearnEth&calls=LearnEth//startTutorial//ethereum/remix-workshops//master//proxycontract///fileManager//open//contracts/3_Ballot.sol
Load a file via a URL into the Editor
The url parameter takes a URL, loads it into the Editor and saves it into the code-sample workspace of the File Explorer:
https://remix.ethereum.org/#url=https://github.com/ethereum/remix-project/blob/master/apps/remix-ide/contracts/app/solidity/mode.sol
Load an encoded base64 string into a .sol file in the Editor
The code parameter takes an encoded base64 string and loads it into the Editor as a .sol file and saves to the code-sample workspace of the File Explorer:
https://remix.ethereum.org/?#code=Ly8gU1BEWC1MaWNlbnNlLUlkZW50aWZpZXI6IE1JVAoKcHJhZ21hIHNvbGlkaXR5IDAuOC40OwoKLyoqCiAqIEB0aXRsZSBXb25kZXJmdWxDb2RlCiAqIEBkZXYgV2VsY29tZSB0byBSZW1peAogKi8KY29udHJhY3QgWW91IHsKCiAgICBhZGRyZXNzIHByaXZhdGUgb3duZXI7CiAgICAKICAgIC8qKgogICAgICogQGRldiBTZXQgY29udHJhY3QgZGVwbG95ZXIgYXMgeW91QW5kWW91cldvbmRlcmZ1bFNlbGYKICAgICAqLwogICAgY29uc3RydWN0b3IoKSB7CiAgICAgICAgeW91QW5kWW91cldvbmRlcmZ1bFNlbGYgPSBtc2cuc2VuZGVyOwoKICAgIH0KCiAgICAvKioKICAgICAqIEBkZXYgQ2hhbmdlIG1vb2QKICAgICAqIEBwYXJhbSBuZXdPd25lciBhZGRyZXNzIG9mIG5ldyBvd25lcgogICAgICovCiAgICBmdW5jdGlvbiBjaGFuZ2VNb29kKGFkZHJlc3MgbmV3TW9vZEFkZHIpIHB1YmxpYyB7CiAgICAgICAgb3duZXJNb29kID0gbmV3TW9vZEFkZHI7CiAgICB9Cn0=
Load contracts from Etherscan via address
The address parameter takes an address, loads all the verified contracts found for the address on different Ethereum networks and saves them into the etherscan-code-sample workspace of the File Explorer:
https://remix.ethereum.org/#address=0xdac17f958d2ee523a2206206994597c13d831ec7
Load a Solidity contract from Github
With a github url of a Solidity contract like this one:
https://github.com/ethereum/remix-project/blob/master/apps/remix-ide/contracts/app/solidity/mode.sol
Then delete the github part and type in remix.ethereum.org in its place, like this:
https://remix.ethereum.org/ethereum/remix-project/blob/master/apps/remix-ide/contracts/app/solidity/mode.sol
Remix will fetch the Solidity file and open it up in the File Explorer in a Workspace named
code-sample.
Load a GIST
The URL parameter here is gist.
https://remix.ethereum.org/?gist=0fe90e825327ef313c88aedfe66ec142
Load a GIST and have it be visible in the Editor:
Using both gist & call
https://remix.ethereum.org/?#activate=solidity,fileManager&gist=0fe90e825327ef313c88aedfe66ec142&call=fileManager//open//gist-0fe90e825327ef313c88aedfe66ec142/gridMix4.sol
Load a GIST, have it be visible in the Editor & load a list of plugins:
https://remix.ethereum.org/?#activate=solidity,LearnEth&gist=0fe90e825327ef313c88aedfe66ec142&call=fileManager//open//gist-0fe90e825327ef313c88aedfe66ec142/gridMix4.sol
Load a specific version of the Solidity compiler:
https://remix.ethereum.org/?#version=soljson-v0.6.6+commit.6c089d02
Note: you need to specify both the Solidity version and the commit.
Load a custom Solidity compiler:
https://remix.ethereum.org/#version=https://solidity-blog.s3.eu-central-1.amazonaws.com/data/08preview/soljson.js
Turn on autoCompile:
https://remix.ethereum.org/#autoCompile=true
Select the language for the Solidity Compiler
Choose YUL or Solidity with the language parameter.
https://remix.ethereum.org/#language=Yul
Remix as code viewer
Through Etherscan
Verified contracts on Etherscan can be viewed in Remix by making a simple change to the URL. Mostly for a mutiple part contract verification, Remix provides a quick way to load all the contracts.
A typical Etherscan URL for a contract address looks like this:
https://etherscan.io/address/0xdac17f958d2ee523a2206206994597c13d831ec7
In the URL, change etherscan.io to remix.ethereum.org
https://remix.ethereum.org/address/0xdac17f958d2ee523a2206206994597c13d831ec7
and reload. It will fetch the contracts verified on Etherscan.
Contracts verified on Ethereum mainnnet and on other test networks (Ropsten, Rinkeby, Kovan & Goerli) will be loaded in respective directories under etherscan-code-sample workspace.
Tihs works for Etherscan testnet URLs https://ropsten.etherscan.io, https://goerli.etherscan.io/ etc. If they are similarly updated, contracts will be loaded in Remix.
Through GitHub
Solidity files in GitHub can be loaded on Remix with a similar tweak. For a file with URL like:
https://github.com/ethereum/remix-project/blob/master/apps/remix-ide/contracts/app/solidity/mode.sol
change github.com to remix.ethereum.org like:
https://remix.ethereum.org/ethereum/remix-project/blob/master/apps/remix-ide/contracts/app/solidity/mode.sol
and reload. It will open the same file in Remix IDE.
Remix Tutorials with Learneth
Learneth is a tutorial platform integrated into Remix.
Tutorials can contain quizzes for testing students’ work. These quizzes are run by Solidity Unit Tests.
We have a growing set of tutorials on our repo- but anyone can build tutorials on their own repos and have their students load them up!
The tutorials contain .md files for instructions and can also contain example files, Solidity Unit Test files for quizzes, as well as answer files for quizzes.
Opening Learneth & associated links
Learneth is a plugin - so to access it, you need to activate the Learneth plugin in the Plugin Manager. Alternatively - this link will active it: click this link.
https://remix.ethereum.org/?#activate=udapp,solidity,LearnEth
This link will activate Learneth and then will open a specific tutorial - in this case it will load the proxy contract tutorial:
https://remix.ethereum.org/?#activate=udapp,solidity,LearnEth&call=LearnEth//startTutorial//ethereum/remix-workshops//master//proxycontract
NOTE: For other tricks about Remix URLs with parameters, go here: locations.
Learneth Tutorials
Here is the current list of Learneth Tutorials
Beginner
Remix Basics
Intro to Solidity
Intermediate
Basic Use of web3.js
The Recorder
Advanced
All About Proxy Contracts
Deploy with Libraries
Opcodes in the Debugger
Learneth & Tutorial Repos
The code for the Learneth plugin is located here: https://github.com/bunsenstraat/remix-learneth-plugin/blob/master/docs/index.rst
Documentation for creating your own tutorials is located here: https://remix-learneth-plugin.readthedocs.io/en/latest/index.html
Remix maintains and curates this repo of Learneth tutorials: https://github.com/ethereum/remix-workshops
Code Contribution Guide
Remix is an open source tool and we encourage everyone to help us improve it. Please opening issues, give feedback or contribute by a pulling request to our codebase.
The Remix application is built with JavaScript and it doesn’t use any frameworks. We rely on a selected set of npm modules, like yo-yo, csjs-inject and among others. Check out the package.json files in the Remix submodules to learn more about the stack.
To learn more, please visit our GitHub page.
Community Support
We know that blockchain ecosystem is very new and that lots of information is scattered around the web. That is why we created a community support channel where we and other users try to answer your questions if you get stuck using Remix. Please, join the community and ask for help.
For anyone who is interested in developing a custom plugin for Remix or who wants to contribute to the codebase, we opened a contributors’ channel especially for developers working on Remix tools.
We would kindly ask you to respect the space and to use it for getting help with your work and the developers’ channel for discussions related to working on Remix codebase. If you have ideas for collaborations or you want to promote your project, try to find some more appropriate channels to do so. Or you can contact the main contributors directly on Gitter or Twitter.