Scrapy 2.6 documentation
Scrapy is a fast high-level web crawling and web scraping framework, used to crawl websites and extract structured data from their pages. It can be used for a wide range of purposes, from data mining to monitoring and automated testing.
Getting help
Having trouble? We’d like to help!
Try the FAQ – it’s got answers to some common questions.
Looking for specific information? Try the Index or Module Index.
Ask or search questions in StackOverflow using the scrapy tag.
Ask or search questions in the Scrapy subreddit.
Search for questions on the archives of the scrapy-users mailing list.
Ask a question in the #scrapy IRC channel,
Report bugs with Scrapy in our issue tracker.
Join the Discord community Scrapy Discord.
First steps
Scrapy at a glance
Scrapy (/ˈskreɪpaɪ/) is an application framework for crawling web sites and extracting structured data which can be used for a wide range of useful applications, like data mining, information processing or historical archival.
Even though Scrapy was originally designed for web scraping, it can also be used to extract data using APIs (such as Amazon Associates Web Services) or as a general purpose web crawler.
Walk-through of an example spider
In order to show you what Scrapy brings to the table, we’ll walk you through an example of a Scrapy Spider using the simplest way to run a spider.
Here’s the code for a spider that scrapes famous quotes from website https://quotes.toscrape.com, following the pagination:
import scrapy


class QuotesSpider(scrapy.Spider):
    name = 'quotes'
    start_urls = [
        'https://quotes.toscrape.com/tag/humor/',
    ]

    def parse(self, response):
        for quote in response.css('div.quote'):
            yield {
                'author': quote.xpath('span/small/text()').get(),
                'text': quote.css('span.text::text').get(),
            }

        next_page = response.css('li.next a::attr("href")').get()
        if next_page is not None:
            yield response.follow(next_page, self.parse)
Put this in a text file, name it to something like quotes_spider.py
and run the spider using the runspider command:
scrapy runspider quotes_spider.py -o quotes.jl
When this finishes you will have in the quotes.jl file a list of the
quotes in JSON Lines format, containing text and author, looking like this:
{"author": "Jane Austen", "text": "\u201cThe person, be it gentleman or lady, who has not pleasure in a good novel, must be intolerably stupid.\u201d"}
{"author": "Steve Martin", "text": "\u201cA day without sunshine is like, you know, night.\u201d"}
{"author": "Garrison Keillor", "text": "\u201cAnyone who thinks sitting in church can make you a Christian must also think that sitting in a garage can make you a car.\u201d"}
...
What just happened?
When you ran the command scrapy runspider quotes_spider.py, Scrapy looked for a
Spider definition inside it and ran it through its crawler engine.
The crawl started by making requests to the URLs defined in the start_urls
attribute (in this case, only the URL for quotes in humor category)
and called the default callback method parse, passing the response object as
an argument. In the parse callback, we loop through the quote elements
using a CSS Selector, yield a Python dict with the extracted quote text and author,
look for a link to the next page and schedule another request using the same
parse method as callback.
Here you notice one of the main advantages about Scrapy: requests are scheduled and processed asynchronously. This means that Scrapy doesn’t need to wait for a request to be finished and processed, it can send another request or do other things in the meantime. This also means that other requests can keep going even if some request fails or an error happens while handling it.
While this enables you to do very fast crawls (sending multiple concurrent requests at the same time, in a fault-tolerant way) Scrapy also gives you control over the politeness of the crawl through a few settings. You can do things like setting a download delay between each request, limiting amount of concurrent requests per domain or per IP, and even using an auto-throttling extension that tries to figure out these automatically.
Note
This is using feed exports to generate the JSON file, you can easily change the export format (XML or CSV, for example) or the storage backend (FTP or Amazon S3, for example). You can also write an item pipeline to store the items in a database.
What else?
You’ve seen how to extract and store items from a website using Scrapy, but this is just the surface. Scrapy provides a lot of powerful features for making scraping easy and efficient, such as:
Built-in support for selecting and extracting data from HTML/XML sources using extended CSS selectors and XPath expressions, with helper methods to extract using regular expressions.
An interactive shell console (IPython aware) for trying out the CSS and XPath expressions to scrape data, very useful when writing or debugging your spiders.
Built-in support for generating feed exports in multiple formats (JSON, CSV, XML) and storing them in multiple backends (FTP, S3, local filesystem)
Robust encoding support and auto-detection, for dealing with foreign, non-standard and broken encoding declarations.
Strong extensibility support, allowing you to plug in your own functionality using signals and a well-defined API (middlewares, extensions, and pipelines).
Wide range of built-in extensions and middlewares for handling:
cookies and session handling
HTTP features like compression, authentication, caching
user-agent spoofing
robots.txt
crawl depth restriction
and more
A Telnet console for hooking into a Python console running inside your Scrapy process, to introspect and debug your crawler
Plus other goodies like reusable spiders to crawl sites from Sitemaps and XML/CSV feeds, a media pipeline for automatically downloading images (or any other media) associated with the scraped items, a caching DNS resolver, and much more!
What’s next?
The next steps for you are to install Scrapy, follow through the tutorial to learn how to create a full-blown Scrapy project and join the community. Thanks for your interest!
Installation guide
Supported Python versions
Scrapy requires Python 3.6+, either the CPython implementation (default) or the PyPy 7.2.0+ implementation (see Alternate Implementations).
Installing Scrapy
If you’re using Anaconda or Miniconda, you can install the package from the conda-forge channel, which has up-to-date packages for Linux, Windows and macOS.
To install Scrapy using conda, run:
conda install -c conda-forge scrapy
Alternatively, if you’re already familiar with installation of Python packages, you can install Scrapy and its dependencies from PyPI with:
pip install Scrapy
We strongly recommend that you install Scrapy in a dedicated virtualenv, to avoid conflicting with your system packages.
Note that sometimes this may require solving compilation issues for some Scrapy dependencies depending on your operating system, so be sure to check the Platform specific installation notes.
For more detailed and platform specifics instructions, as well as troubleshooting information, read on.
Things that are good to know
Scrapy is written in pure Python and depends on a few key Python packages (among others):
lxml, an efficient XML and HTML parser
parsel, an HTML/XML data extraction library written on top of lxml,
w3lib, a multi-purpose helper for dealing with URLs and web page encodings
twisted, an asynchronous networking framework
cryptography and pyOpenSSL, to deal with various network-level security needs
The minimal versions which Scrapy is tested against are:
Twisted 14.0
lxml 3.4
pyOpenSSL 0.14
Scrapy may work with older versions of these packages but it is not guaranteed it will continue working because it’s not being tested against them.
Some of these packages themselves depends on non-Python packages that might require additional installation steps depending on your platform. Please check platform-specific guides below.
In case of any trouble related to these dependencies, please refer to their respective installation instructions:
Using a virtual environment (recommended)
TL;DR: We recommend installing Scrapy inside a virtual environment on all platforms.
Python packages can be installed either globally (a.k.a system wide), or in user-space. We do not recommend installing Scrapy system wide.
Instead, we recommend that you install Scrapy within a so-called
“virtual environment” (venv).
Virtual environments allow you to not conflict with already-installed Python
system packages (which could break some of your system tools and scripts),
and still install packages normally with pip (without sudo and the likes).
See Virtual Environments and Packages on how to create your virtual environment.
Once you have created a virtual environment, you can install Scrapy inside it with pip,
just like any other Python package.
(See platform-specific guides
below for non-Python dependencies that you may need to install beforehand).
Platform specific installation notes
Windows
Though it’s possible to install Scrapy on Windows using pip, we recommend you to install Anaconda or Miniconda and use the package from the conda-forge channel, which will avoid most installation issues.
Once you’ve installed Anaconda or Miniconda, install Scrapy with:
conda install -c conda-forge scrapy
To install Scrapy on Windows using pip:
Warning
This installation method requires “Microsoft Visual C++” for installing some Scrapy dependencies, which demands significantly more disk space than Anaconda.
Download and execute Microsoft C++ Build Tools to install the Visual Studio Installer.
Run the Visual Studio Installer.
Under the Workloads section, select C++ build tools.
Check the installation details and make sure following packages are selected as optional components:
MSVC (e.g MSVC v142 - VS 2019 C++ x64/x86 build tools (v14.23) )
Windows SDK (e.g Windows 10 SDK (10.0.18362.0))
Install the Visual Studio Build Tools.
Now, you should be able to install Scrapy using pip.
Ubuntu 14.04 or above
Scrapy is currently tested with recent-enough versions of lxml, twisted and pyOpenSSL, and is compatible with recent Ubuntu distributions. But it should support older versions of Ubuntu too, like Ubuntu 14.04, albeit with potential issues with TLS connections.
Don’t use the python-scrapy package provided by Ubuntu, they are
typically too old and slow to catch up with latest Scrapy.
To install Scrapy on Ubuntu (or Ubuntu-based) systems, you need to install these dependencies:
sudo apt-get install python3 python3-dev python3-pip libxml2-dev libxslt1-dev zlib1g-dev libffi-dev libssl-dev
python3-dev,zlib1g-dev,libxml2-devandlibxslt1-devare required forlxmllibssl-devandlibffi-devare required forcryptography
Inside a virtualenv,
you can install Scrapy with pip after that:
pip install scrapy
Note
The same non-Python dependencies can be used to install Scrapy in Debian Jessie (8.0) and above.
macOS
Building Scrapy’s dependencies requires the presence of a C compiler and development headers. On macOS this is typically provided by Apple’s Xcode development tools. To install the Xcode command line tools open a terminal window and run:
xcode-select --install
There’s a known issue that
prevents pip from updating system packages. This has to be addressed to
successfully install Scrapy and its dependencies. Here are some proposed
solutions:
(Recommended) Don’t use system Python. Install a new, updated version that doesn’t conflict with the rest of your system. Here’s how to do it using the homebrew package manager:
Install homebrew following the instructions in https://brew.sh/
Update your
PATHvariable to state that homebrew packages should be used before system packages (Change.bashrcto.zshrcaccordantly if you’re using zsh as default shell):echo "export PATH=/usr/local/bin:/usr/local/sbin:$PATH" >> ~/.bashrc
Reload
.bashrcto ensure the changes have taken place:source ~/.bashrc
Install python:
brew install python
Latest versions of python have
pipbundled with them so you won’t need to install it separately. If this is not the case, upgrade python:brew update; brew upgrade python
(Optional) Install Scrapy inside a Python virtual environment.
This method is a workaround for the above macOS issue, but it’s an overall good practice for managing dependencies and can complement the first method.
After any of these workarounds you should be able to install Scrapy:
pip install Scrapy
PyPy
We recommend using the latest PyPy version. The version tested is 5.9.0. For PyPy3, only Linux installation was tested.
Most Scrapy dependencies now have binary wheels for CPython, but not for PyPy.
This means that these dependencies will be built during installation.
On macOS, you are likely to face an issue with building the Cryptography
dependency. The solution to this problem is described
here,
that is to brew install openssl and then export the flags that this command
recommends (only needed when installing Scrapy). Installing on Linux has no special
issues besides installing build dependencies.
Installing Scrapy with PyPy on Windows is not tested.
You can check that Scrapy is installed correctly by running scrapy bench.
If this command gives errors such as
TypeError: ... got 2 unexpected keyword arguments, this means
that setuptools was unable to pick up one PyPy-specific dependency.
To fix this issue, run pip install 'PyPyDispatcher>=2.1.0'.
Troubleshooting
AttributeError: ‘module’ object has no attribute ‘OP_NO_TLSv1_1’
After you install or upgrade Scrapy, Twisted or pyOpenSSL, you may get an exception with the following traceback:
[…]
  File "[…]/site-packages/twisted/protocols/tls.py", line 63, in <module>
    from twisted.internet._sslverify import _setAcceptableProtocols
  File "[…]/site-packages/twisted/internet/_sslverify.py", line 38, in <module>
    TLSVersion.TLSv1_1: SSL.OP_NO_TLSv1_1,
AttributeError: 'module' object has no attribute 'OP_NO_TLSv1_1'
The reason you get this exception is that your system or virtual environment has a version of pyOpenSSL that your version of Twisted does not support.
To install a version of pyOpenSSL that your version of Twisted supports,
reinstall Twisted with the tls extra option:
pip install twisted[tls]
For details, see Issue #2473.
Scrapy Tutorial
In this tutorial, we’ll assume that Scrapy is already installed on your system. If that’s not the case, see Installation guide.
We are going to scrape quotes.toscrape.com, a website that lists quotes from famous authors.
This tutorial will walk you through these tasks:
Creating a new Scrapy project
Writing a spider to crawl a site and extract data
Exporting the scraped data using the command line
Changing spider to recursively follow links
Using spider arguments
Scrapy is written in Python. If you’re new to the language you might want to start by getting an idea of what the language is like, to get the most out of Scrapy.
If you’re already familiar with other languages, and want to learn Python quickly, the Python Tutorial is a good resource.
If you’re new to programming and want to start with Python, the following books may be useful to you:
You can also take a look at this list of Python resources for non-programmers, as well as the suggested resources in the learnpython-subreddit.
Creating a project
Before you start scraping, you will have to set up a new Scrapy project. Enter a directory where you’d like to store your code and run:
scrapy startproject tutorial
This will create a tutorial directory with the following contents:
tutorial/
    scrapy.cfg            # deploy configuration file

    tutorial/             # project's Python module, you'll import your code from here
        __init__.py

        items.py          # project items definition file

        middlewares.py    # project middlewares file

        pipelines.py      # project pipelines file

        settings.py       # project settings file

        spiders/          # a directory where you'll later put your spiders
            __init__.py
Our first Spider
Spiders are classes that you define and that Scrapy uses to scrape information
from a website (or a group of websites). They must subclass
Spider and define the initial requests to make,
optionally how to follow links in the pages, and how to parse the downloaded
page content to extract data.
This is the code for our first Spider. Save it in a file named
quotes_spider.py under the tutorial/spiders directory in your project:
import scrapy


class QuotesSpider(scrapy.Spider):
    name = "quotes"

    def start_requests(self):
        urls = [
            'https://quotes.toscrape.com/page/1/',
            'https://quotes.toscrape.com/page/2/',
        ]
        for url in urls:
            yield scrapy.Request(url=url, callback=self.parse)

    def parse(self, response):
        page = response.url.split("/")[-2]
        filename = f'quotes-{page}.html'
        with open(filename, 'wb') as f:
            f.write(response.body)
        self.log(f'Saved file {filename}')
As you can see, our Spider subclasses scrapy.Spider
and defines some attributes and methods:
name: identifies the Spider. It must be unique within a project, that is, you can’t set the same name for different Spiders.start_requests(): must return an iterable of Requests (you can return a list of requests or write a generator function) which the Spider will begin to crawl from. Subsequent requests will be generated successively from these initial requests.parse(): a method that will be called to handle the response downloaded for each of the requests made. The response parameter is an instance ofTextResponsethat holds the page content and has further helpful methods to handle it.The
parse()method usually parses the response, extracting the scraped data as dicts and also finding new URLs to follow and creating new requests (Request) from them.
How to run our spider
To put our spider to work, go to the project’s top level directory and run:
scrapy crawl quotes
This command runs the spider with name quotes that we’ve just added, that
will send some requests for the quotes.toscrape.com domain. You will get an output
similar to this:
... (omitted for brevity)
2016-12-16 21:24:05 [scrapy.core.engine] INFO: Spider opened
2016-12-16 21:24:05 [scrapy.extensions.logstats] INFO: Crawled 0 pages (at 0 pages/min), scraped 0 items (at 0 items/min)
2016-12-16 21:24:05 [scrapy.extensions.telnet] DEBUG: Telnet console listening on 127.0.0.1:6023
2016-12-16 21:24:05 [scrapy.core.engine] DEBUG: Crawled (404) <GET https://quotes.toscrape.com/robots.txt> (referer: None)
2016-12-16 21:24:05 [scrapy.core.engine] DEBUG: Crawled (200) <GET https://quotes.toscrape.com/page/1/> (referer: None)
2016-12-16 21:24:05 [scrapy.core.engine] DEBUG: Crawled (200) <GET https://quotes.toscrape.com/page/2/> (referer: None)
2016-12-16 21:24:05 [quotes] DEBUG: Saved file quotes-1.html
2016-12-16 21:24:05 [quotes] DEBUG: Saved file quotes-2.html
2016-12-16 21:24:05 [scrapy.core.engine] INFO: Closing spider (finished)
...
Now, check the files in the current directory. You should notice that two new
files have been created: quotes-1.html and quotes-2.html, with the content
for the respective URLs, as our parse method instructs.
Note
If you are wondering why we haven’t parsed the HTML yet, hold on, we will cover that soon.
What just happened under the hood?
Scrapy schedules the scrapy.Request objects
returned by the start_requests method of the Spider. Upon receiving a
response for each one, it instantiates Response objects
and calls the callback method associated with the request (in this case, the
parse method) passing the response as argument.
A shortcut to the start_requests method
Instead of implementing a start_requests() method
that generates scrapy.Request objects from URLs,
you can just define a start_urls class attribute
with a list of URLs. This list will then be used by the default implementation
of start_requests() to create the initial requests
for your spider:
import scrapy


class QuotesSpider(scrapy.Spider):
    name = "quotes"
    start_urls = [
        'https://quotes.toscrape.com/page/1/',
        'https://quotes.toscrape.com/page/2/',
    ]

    def parse(self, response):
        page = response.url.split("/")[-2]
        filename = f'quotes-{page}.html'
        with open(filename, 'wb') as f:
            f.write(response.body)
The parse() method will be called to handle each
of the requests for those URLs, even though we haven’t explicitly told Scrapy
to do so. This happens because parse() is Scrapy’s
default callback method, which is called for requests without an explicitly
assigned callback.
Extracting data
The best way to learn how to extract data with Scrapy is trying selectors using the Scrapy shell. Run:
scrapy shell 'https://quotes.toscrape.com/page/1/'
Note
Remember to always enclose urls in quotes when running Scrapy shell from
command-line, otherwise urls containing arguments (i.e. & character)
will not work.
On Windows, use double quotes instead:
scrapy shell "https://quotes.toscrape.com/page/1/"
You will see something like:
[ ... Scrapy log here ... ]
2016-09-19 12:09:27 [scrapy.core.engine] DEBUG: Crawled (200) <GET https://quotes.toscrape.com/page/1/> (referer: None)
[s] Available Scrapy objects:
[s]   scrapy     scrapy module (contains scrapy.Request, scrapy.Selector, etc)
[s]   crawler    <scrapy.crawler.Crawler object at 0x7fa91d888c90>
[s]   item       {}
[s]   request    <GET https://quotes.toscrape.com/page/1/>
[s]   response   <200 https://quotes.toscrape.com/page/1/>
[s]   settings   <scrapy.settings.Settings object at 0x7fa91d888c10>
[s]   spider     <DefaultSpider 'default' at 0x7fa91c8af990>
[s] Useful shortcuts:
[s]   shelp()           Shell help (print this help)
[s]   fetch(req_or_url) Fetch request (or URL) and update local objects
[s]   view(response)    View response in a browser
Using the shell, you can try selecting elements using CSS with the response object:
>>> response.css('title')
[<Selector xpath='descendant-or-self::title' data='<title>Quotes to Scrape</title>'>]
The result of running response.css('title') is a list-like object called
SelectorList, which represents a list of
Selector objects that wrap around XML/HTML elements
and allow you to run further queries to fine-grain the selection or extract the
data.
To extract the text from the title above, you can do:
>>> response.css('title::text').getall()
['Quotes to Scrape']
There are two things to note here: one is that we’ve added ::text to the
CSS query, to mean we want to select only the text elements directly inside
<title> element. If we don’t specify ::text, we’d get the full title
element, including its tags:
>>> response.css('title').getall()
['<title>Quotes to Scrape</title>']
The other thing is that the result of calling .getall() is a list: it is
possible that a selector returns more than one result, so we extract them all.
When you know you just want the first result, as in this case, you can do:
>>> response.css('title::text').get()
'Quotes to Scrape'
As an alternative, you could’ve written:
>>> response.css('title::text')[0].get()
'Quotes to Scrape'
Accessing an index on a SelectorList instance will
raise an IndexError exception if there are no results:
>>> response.css('noelement')[0].get()
Traceback (most recent call last):
...
IndexError: list index out of range
You might want to use .get() directly on the
SelectorList instance instead, which returns None
if there are no results:
>>> response.css("noelement").get()
There’s a lesson here: for most scraping code, you want it to be resilient to errors due to things not being found on a page, so that even if some parts fail to be scraped, you can at least get some data.
Besides the getall() and
get() methods, you can also use
the re() method to extract using
regular expressions:
>>> response.css('title::text').re(r'Quotes.*')
['Quotes to Scrape']
>>> response.css('title::text').re(r'Q\w+')
['Quotes']
>>> response.css('title::text').re(r'(\w+) to (\w+)')
['Quotes', 'Scrape']
In order to find the proper CSS selectors to use, you might find useful opening
the response page from the shell in your web browser using view(response).
You can use your browser’s developer tools to inspect the HTML and come up
with a selector (see Using your browser’s Developer Tools for scraping).
Selector Gadget is also a nice tool to quickly find CSS selector for visually selected elements, which works in many browsers.
XPath: a brief intro
Besides CSS, Scrapy selectors also support using XPath expressions:
>>> response.xpath('//title')
[<Selector xpath='//title' data='<title>Quotes to Scrape</title>'>]
>>> response.xpath('//title/text()').get()
'Quotes to Scrape'
XPath expressions are very powerful, and are the foundation of Scrapy Selectors. In fact, CSS selectors are converted to XPath under-the-hood. You can see that if you read closely the text representation of the selector objects in the shell.
While perhaps not as popular as CSS selectors, XPath expressions offer more power because besides navigating the structure, it can also look at the content. Using XPath, you’re able to select things like: select the link that contains the text “Next Page”. This makes XPath very fitting to the task of scraping, and we encourage you to learn XPath even if you already know how to construct CSS selectors, it will make scraping much easier.
We won’t cover much of XPath here, but you can read more about using XPath with Scrapy Selectors here. To learn more about XPath, we recommend this tutorial to learn XPath through examples, and this tutorial to learn “how to think in XPath”.
Extracting data in our spider
Let’s get back to our spider. Until now, it doesn’t extract any data in particular, just saves the whole HTML page to a local file. Let’s integrate the extraction logic above into our spider.
A Scrapy spider typically generates many dictionaries containing the data
extracted from the page. To do that, we use the yield Python keyword
in the callback, as you can see below:
import scrapy


class QuotesSpider(scrapy.Spider):
    name = "quotes"
    start_urls = [
        'https://quotes.toscrape.com/page/1/',
        'https://quotes.toscrape.com/page/2/',
    ]

    def parse(self, response):
        for quote in response.css('div.quote'):
            yield {
                'text': quote.css('span.text::text').get(),
                'author': quote.css('small.author::text').get(),
                'tags': quote.css('div.tags a.tag::text').getall(),
            }
If you run this spider, it will output the extracted data with the log:
2016-09-19 18:57:19 [scrapy.core.scraper] DEBUG: Scraped from <200 https://quotes.toscrape.com/page/1/>
{'tags': ['life', 'love'], 'author': 'André Gide', 'text': '“It is better to be hated for what you are than to be loved for what you are not.”'}
2016-09-19 18:57:19 [scrapy.core.scraper] DEBUG: Scraped from <200 https://quotes.toscrape.com/page/1/>
{'tags': ['edison', 'failure', 'inspirational', 'paraphrased'], 'author': 'Thomas A. Edison', 'text': "“I have not failed. I've just found 10,000 ways that won't work.”"}
Storing the scraped data
The simplest way to store the scraped data is by using Feed exports, with the following command:
scrapy crawl quotes -O quotes.json
That will generate a quotes.json file containing all scraped items,
serialized in JSON.
The -O command-line switch overwrites any existing file; use -o instead
to append new content to any existing file. However, appending to a JSON file
makes the file contents invalid JSON. When appending to a file, consider
using a different serialization format, such as JSON Lines:
scrapy crawl quotes -o quotes.jl
The JSON Lines format is useful because it’s stream-like, you can easily append new records to it. It doesn’t have the same problem of JSON when you run twice. Also, as each record is a separate line, you can process big files without having to fit everything in memory, there are tools like JQ to help doing that at the command-line.
In small projects (like the one in this tutorial), that should be enough.
However, if you want to perform more complex things with the scraped items, you
can write an Item Pipeline. A placeholder file
for Item Pipelines has been set up for you when the project is created, in
tutorial/pipelines.py. Though you don’t need to implement any item
pipelines if you just want to store the scraped items.
Following links
Let’s say, instead of just scraping the stuff from the first two pages from https://quotes.toscrape.com, you want quotes from all the pages in the website.
Now that you know how to extract data from pages, let’s see how to follow links from them.
First thing is to extract the link to the page we want to follow. Examining our page, we can see there is a link to the next page with the following markup:
<ul class="pager">
<li class="next">
<a href="/page/2/">Next <span aria-hidden="true">→</span></a>
</li>
</ul>
We can try extracting it in the shell:
>>> response.css('li.next a').get()
'<a href="/page/2/">Next <span aria-hidden="true">→</span></a>'
This gets the anchor element, but we want the attribute href. For that,
Scrapy supports a CSS extension that lets you select the attribute contents,
like this:
>>> response.css('li.next a::attr(href)').get()
'/page/2/'
There is also an attrib property available
(see Selecting element attributes for more):
>>> response.css('li.next a').attrib['href']
'/page/2/'
Let’s see now our spider modified to recursively follow the link to the next page, extracting data from it:
import scrapy


class QuotesSpider(scrapy.Spider):
    name = "quotes"
    start_urls = [
        'https://quotes.toscrape.com/page/1/',
    ]

    def parse(self, response):
        for quote in response.css('div.quote'):
            yield {
                'text': quote.css('span.text::text').get(),
                'author': quote.css('small.author::text').get(),
                'tags': quote.css('div.tags a.tag::text').getall(),
            }

        next_page = response.css('li.next a::attr(href)').get()
        if next_page is not None:
            next_page = response.urljoin(next_page)
            yield scrapy.Request(next_page, callback=self.parse)
Now, after extracting the data, the parse() method looks for the link to
the next page, builds a full absolute URL using the
urljoin() method (since the links can be
relative) and yields a new request to the next page, registering itself as
callback to handle the data extraction for the next page and to keep the
crawling going through all the pages.
What you see here is Scrapy’s mechanism of following links: when you yield a Request in a callback method, Scrapy will schedule that request to be sent and register a callback method to be executed when that request finishes.
Using this, you can build complex crawlers that follow links according to rules you define, and extract different kinds of data depending on the page it’s visiting.
In our example, it creates a sort of loop, following all the links to the next page until it doesn’t find one – handy for crawling blogs, forums and other sites with pagination.
A shortcut for creating Requests
As a shortcut for creating Request objects you can use
response.follow:
import scrapy


class QuotesSpider(scrapy.Spider):
    name = "quotes"
    start_urls = [
        'https://quotes.toscrape.com/page/1/',
    ]

    def parse(self, response):
        for quote in response.css('div.quote'):
            yield {
                'text': quote.css('span.text::text').get(),
                'author': quote.css('span small::text').get(),
                'tags': quote.css('div.tags a.tag::text').getall(),
            }

        next_page = response.css('li.next a::attr(href)').get()
        if next_page is not None:
            yield response.follow(next_page, callback=self.parse)
Unlike scrapy.Request, response.follow supports relative URLs directly - no
need to call urljoin. Note that response.follow just returns a Request
instance; you still have to yield this Request.
You can also pass a selector to response.follow instead of a string;
this selector should extract necessary attributes:
for href in response.css('ul.pager a::attr(href)'):
    yield response.follow(href, callback=self.parse)
For <a> elements there is a shortcut: response.follow uses their href
attribute automatically. So the code can be shortened further:
for a in response.css('ul.pager a'):
    yield response.follow(a, callback=self.parse)
To create multiple requests from an iterable, you can use
response.follow_all instead:
anchors = response.css('ul.pager a')
yield from response.follow_all(anchors, callback=self.parse)
or, shortening it further:
yield from response.follow_all(css='ul.pager a', callback=self.parse)
More examples and patterns
Here is another spider that illustrates callbacks and following links, this time for scraping author information:
import scrapy


class AuthorSpider(scrapy.Spider):
    name = 'author'

    start_urls = ['https://quotes.toscrape.com/']

    def parse(self, response):
        author_page_links = response.css('.author + a')
        yield from response.follow_all(author_page_links, self.parse_author)

        pagination_links = response.css('li.next a')
        yield from response.follow_all(pagination_links, self.parse)

    def parse_author(self, response):
        def extract_with_css(query):
            return response.css(query).get(default='').strip()

        yield {
            'name': extract_with_css('h3.author-title::text'),
            'birthdate': extract_with_css('.author-born-date::text'),
            'bio': extract_with_css('.author-description::text'),
        }
This spider will start from the main page, it will follow all the links to the
authors pages calling the parse_author callback for each of them, and also
the pagination links with the parse callback as we saw before.
Here we’re passing callbacks to
response.follow_all as positional
arguments to make the code shorter; it also works for
Request.
The parse_author callback defines a helper function to extract and cleanup the
data from a CSS query and yields the Python dict with the author data.
Another interesting thing this spider demonstrates is that, even if there are
many quotes from the same author, we don’t need to worry about visiting the
same author page multiple times. By default, Scrapy filters out duplicated
requests to URLs already visited, avoiding the problem of hitting servers too
much because of a programming mistake. This can be configured by the setting
DUPEFILTER_CLASS.
Hopefully by now you have a good understanding of how to use the mechanism of following links and callbacks with Scrapy.
As yet another example spider that leverages the mechanism of following links,
check out the CrawlSpider class for a generic
spider that implements a small rules engine that you can use to write your
crawlers on top of it.
Also, a common pattern is to build an item with data from more than one page, using a trick to pass additional data to the callbacks.
Using spider arguments
You can provide command line arguments to your spiders by using the -a
option when running them:
scrapy crawl quotes -O quotes-humor.json -a tag=humor
These arguments are passed to the Spider’s __init__ method and become
spider attributes by default.
In this example, the value provided for the tag argument will be available
via self.tag. You can use this to make your spider fetch only quotes
with a specific tag, building the URL based on the argument:
import scrapy


class QuotesSpider(scrapy.Spider):
    name = "quotes"

    def start_requests(self):
        url = 'https://quotes.toscrape.com/'
        tag = getattr(self, 'tag', None)
        if tag is not None:
            url = url + 'tag/' + tag
        yield scrapy.Request(url, self.parse)

    def parse(self, response):
        for quote in response.css('div.quote'):
            yield {
                'text': quote.css('span.text::text').get(),
                'author': quote.css('small.author::text').get(),
            }

        next_page = response.css('li.next a::attr(href)').get()
        if next_page is not None:
            yield response.follow(next_page, self.parse)
If you pass the tag=humor argument to this spider, you’ll notice that it
will only visit URLs from the humor tag, such as
https://quotes.toscrape.com/tag/humor.
Next steps
This tutorial covered only the basics of Scrapy, but there’s a lot of other features not mentioned here. Check the What else? section in Scrapy at a glance chapter for a quick overview of the most important ones.
You can continue from the section Basic concepts to know more about the command-line tool, spiders, selectors and other things the tutorial hasn’t covered like modeling the scraped data. If you prefer to play with an example project, check the Examples section.
Examples
The best way to learn is with examples, and Scrapy is no exception. For this reason, there is an example Scrapy project named quotesbot, that you can use to play and learn more about Scrapy. It contains two spiders for https://quotes.toscrape.com, one using CSS selectors and another one using XPath expressions.
The quotesbot project is available at: https://github.com/scrapy/quotesbot. You can find more information about it in the project’s README.
If you’re familiar with git, you can checkout the code. Otherwise you can download the project as a zip file by clicking here.
- Scrapy at a glance
Understand what Scrapy is and how it can help you.
- Installation guide
Get Scrapy installed on your computer.
- Scrapy Tutorial
Write your first Scrapy project.
- Examples
Learn more by playing with a pre-made Scrapy project.
Basic concepts
Command line tool
Scrapy is controlled through the scrapy command-line tool, to be referred
here as the “Scrapy tool” to differentiate it from the sub-commands, which we
just call “commands” or “Scrapy commands”.
The Scrapy tool provides several commands, for multiple purposes, and each one accepts a different set of arguments and options.
(The scrapy deploy command has been removed in 1.0 in favor of the
standalone scrapyd-deploy. See Deploying your project.)
Configuration settings
Scrapy will look for configuration parameters in ini-style scrapy.cfg files
in standard locations:
/etc/scrapy.cfgorc:\scrapy\scrapy.cfg(system-wide),~/.config/scrapy.cfg($XDG_CONFIG_HOME) and~/.scrapy.cfg($HOME) for global (user-wide) settings, andscrapy.cfginside a Scrapy project’s root (see next section).
Settings from these files are merged in the listed order of preference: user-defined values have higher priority than system-wide defaults and project-wide settings will override all others, when defined.
Scrapy also understands, and can be configured through, a number of environment variables. Currently these are:
SCRAPY_SETTINGS_MODULE(see Designating the settings)SCRAPY_PROJECT(see Sharing the root directory between projects)SCRAPY_PYTHON_SHELL(see Scrapy shell)
Default structure of Scrapy projects
Before delving into the command-line tool and its sub-commands, let’s first understand the directory structure of a Scrapy project.
Though it can be modified, all Scrapy projects have the same file structure by default, similar to this:
scrapy.cfg
myproject/
    __init__.py
    items.py
    middlewares.py
    pipelines.py
    settings.py
    spiders/
        __init__.py
        spider1.py
        spider2.py
        ...
The directory where the scrapy.cfg file resides is known as the project
root directory. That file contains the name of the python module that defines
the project settings. Here is an example:
[settings]
default = myproject.settings
Using the scrapy tool
You can start by running the Scrapy tool with no arguments and it will print some usage help and the available commands:
Scrapy X.Y - no active project

Usage:
  scrapy <command> [options] [args]

Available commands:
  crawl         Run a spider
  fetch         Fetch a URL using the Scrapy downloader
[...]
The first line will print the currently active project if you’re inside a Scrapy project. In this example it was run from outside a project. If run from inside a project it would have printed something like this:
Scrapy X.Y - project: myproject

Usage:
  scrapy <command> [options] [args]

[...]
Creating projects
The first thing you typically do with the scrapy tool is create your Scrapy
project:
scrapy startproject myproject [project_dir]
That will create a Scrapy project under the project_dir directory.
If project_dir wasn’t specified, project_dir will be the same as myproject.
Next, you go inside the new project directory:
cd project_dir
And you’re ready to use the scrapy command to manage and control your
project from there.
Controlling projects
You use the scrapy tool from inside your projects to control and manage
them.
For example, to create a new spider:
scrapy genspider mydomain mydomain.com
Some Scrapy commands (like crawl) must be run from inside a Scrapy
project. See the commands reference below for more
information on which commands must be run from inside projects, and which not.
Also keep in mind that some commands may have slightly different behaviours
when running them from inside projects. For example, the fetch command will use
spider-overridden behaviours (such as the user_agent attribute to override
the user-agent) if the url being fetched is associated with some specific
spider. This is intentional, as the fetch command is meant to be used to
check how spiders are downloading pages.
Available tool commands
This section contains a list of the available built-in commands with a description and some usage examples. Remember, you can always get more info about each command by running:
scrapy <command> -h
And you can see all available commands with:
scrapy -h
There are two kinds of commands, those that only work from inside a Scrapy project (Project-specific commands) and those that also work without an active Scrapy project (Global commands), though they may behave slightly different when running from inside a project (as they would use the project overridden settings).
Global commands:
Project-only commands:
startproject
Syntax:
scrapy startproject <project_name> [project_dir]Requires project: no
Creates a new Scrapy project named project_name, under the project_dir
directory.
If project_dir wasn’t specified, project_dir will be the same as project_name.
Usage example:
$ scrapy startproject myproject
genspider
Syntax:
scrapy genspider [-t template] <name> <domain or URL>Requires project: no
New in version 2.6.0: The ability to pass a URL instead of a domain.
Create a new spider in the current folder or in the current project’s spiders folder, if called from inside a project. The <name> parameter is set as the spider’s name, while <domain or URL> is used to generate the allowed_domains and start_urls spider’s attributes.
Note
Even if an HTTPS URL is specified, the protocol used in
start_urls is always HTTP. This is a known issue: issue 3553.
Usage example:
$ scrapy genspider -l
Available templates:
  basic
  crawl
  csvfeed
  xmlfeed

$ scrapy genspider example example.com
Created spider 'example' using template 'basic'

$ scrapy genspider -t crawl scrapyorg scrapy.org
Created spider 'scrapyorg' using template 'crawl'
This is just a convenience shortcut command for creating spiders based on pre-defined templates, but certainly not the only way to create spiders. You can just create the spider source code files yourself, instead of using this command.
crawl
Syntax:
scrapy crawl <spider>Requires project: yes
Start crawling using a spider.
Usage examples:
$ scrapy crawl myspider
[ ... myspider starts crawling ... ]
check
Syntax:
scrapy check [-l] <spider>Requires project: yes
Run contract checks.
Usage examples:
$ scrapy check -l
first_spider
  * parse
  * parse_item
second_spider
  * parse
  * parse_item

$ scrapy check
[FAILED] first_spider:parse_item
>>> 'RetailPricex' field is missing

[FAILED] first_spider:parse
>>> Returned 92 requests, expected 0..4
list
Syntax:
scrapy listRequires project: yes
List all available spiders in the current project. The output is one spider per line.
Usage example:
$ scrapy list
spider1
spider2
edit
Syntax:
scrapy edit <spider>Requires project: yes
Edit the given spider using the editor defined in the EDITOR environment
variable or (if unset) the EDITOR setting.
This command is provided only as a convenience shortcut for the most common case, the developer is of course free to choose any tool or IDE to write and debug spiders.
Usage example:
$ scrapy edit spider1
fetch
Syntax:
scrapy fetch <url>Requires project: no
Downloads the given URL using the Scrapy downloader and writes the contents to standard output.
The interesting thing about this command is that it fetches the page how the
spider would download it. For example, if the spider has a USER_AGENT
attribute which overrides the User Agent, it will use that one.
So this command can be used to “see” how your spider would fetch a certain page.
If used outside a project, no particular per-spider behaviour would be applied and it will just use the default Scrapy downloader settings.
Supported options:
--spider=SPIDER: bypass spider autodetection and force use of specific spider--headers: print the response’s HTTP headers instead of the response’s body--no-redirect: do not follow HTTP 3xx redirects (default is to follow them)
Usage examples:
$ scrapy fetch --nolog http://www.example.com/some/page.html
[ ... html content here ... ]

$ scrapy fetch --nolog --headers http://www.example.com/
{'Accept-Ranges': ['bytes'],
 'Age': ['1263   '],
 'Connection': ['close     '],
 'Content-Length': ['596'],
 'Content-Type': ['text/html; charset=UTF-8'],
 'Date': ['Wed, 18 Aug 2010 23:59:46 GMT'],
 'Etag': ['"573c1-254-48c9c87349680"'],
 'Last-Modified': ['Fri, 30 Jul 2010 15:30:18 GMT'],
 'Server': ['Apache/2.2.3 (CentOS)']}
view
Syntax:
scrapy view <url>Requires project: no
Opens the given URL in a browser, as your Scrapy spider would “see” it. Sometimes spiders see pages differently from regular users, so this can be used to check what the spider “sees” and confirm it’s what you expect.
Supported options:
--spider=SPIDER: bypass spider autodetection and force use of specific spider--no-redirect: do not follow HTTP 3xx redirects (default is to follow them)
Usage example:
$ scrapy view http://www.example.com/some/page.html
[ ... browser starts ... ]
shell
Syntax:
scrapy shell [url]Requires project: no
Starts the Scrapy shell for the given URL (if given) or empty if no URL is
given. Also supports UNIX-style local file paths, either relative with
./ or ../ prefixes or absolute file paths.
See Scrapy shell for more info.
Supported options:
--spider=SPIDER: bypass spider autodetection and force use of specific spider-c code: evaluate the code in the shell, print the result and exit--no-redirect: do not follow HTTP 3xx redirects (default is to follow them); this only affects the URL you may pass as argument on the command line; once you are inside the shell,fetch(url)will still follow HTTP redirects by default.
Usage example:
$ scrapy shell http://www.example.com/some/page.html
[ ... scrapy shell starts ... ]

$ scrapy shell --nolog http://www.example.com/ -c '(response.status, response.url)'
(200, 'http://www.example.com/')

# shell follows HTTP redirects by default
$ scrapy shell --nolog http://httpbin.org/redirect-to?url=http%3A%2F%2Fexample.com%2F -c '(response.status, response.url)'
(200, 'http://example.com/')

# you can disable this with --no-redirect
# (only for the URL passed as command line argument)
$ scrapy shell --no-redirect --nolog http://httpbin.org/redirect-to?url=http%3A%2F%2Fexample.com%2F -c '(response.status, response.url)'
(302, 'http://httpbin.org/redirect-to?url=http%3A%2F%2Fexample.com%2F')
parse
Syntax:
scrapy parse <url> [options]Requires project: yes
Fetches the given URL and parses it with the spider that handles it, using the
method passed with the --callback option, or parse if not given.
Supported options:
--spider=SPIDER: bypass spider autodetection and force use of specific spider--a NAME=VALUE: set spider argument (may be repeated)--callbackor-c: spider method to use as callback for parsing the response--metaor-m: additional request meta that will be passed to the callback request. This must be a valid json string. Example: –meta=’{“foo” : “bar”}’--cbkwargs: additional keyword arguments that will be passed to the callback. This must be a valid json string. Example: –cbkwargs=’{“foo” : “bar”}’--pipelines: process items through pipelines--rulesor-r: useCrawlSpiderrules to discover the callback (i.e. spider method) to use for parsing the response--noitems: don’t show scraped items--nolinks: don’t show extracted links--nocolour: avoid using pygments to colorize the output--depthor-d: depth level for which the requests should be followed recursively (default: 1)--verboseor-v: display information for each depth level--outputor-o: dump scraped items to a fileNew in version 2.3.
Usage example:
$ scrapy parse http://www.example.com/ -c parse_item
[ ... scrapy log lines crawling example.com spider ... ]

>>> STATUS DEPTH LEVEL 1 <<<
# Scraped Items  ------------------------------------------------------------
[{'name': 'Example item',
 'category': 'Furniture',
 'length': '12 cm'}]

# Requests  -----------------------------------------------------------------
[]
settings
Syntax:
scrapy settings [options]Requires project: no
Get the value of a Scrapy setting.
If used inside a project it’ll show the project setting value, otherwise it’ll show the default Scrapy value for that setting.
Example usage:
$ scrapy settings --get BOT_NAME
scrapybot
$ scrapy settings --get DOWNLOAD_DELAY
0
runspider
Syntax:
scrapy runspider <spider_file.py>Requires project: no
Run a spider self-contained in a Python file, without having to create a project.
Example usage:
$ scrapy runspider myspider.py
[ ... spider starts crawling ... ]
version
Syntax:
scrapy version [-v]Requires project: no
Prints the Scrapy version. If used with -v it also prints Python, Twisted
and Platform info, which is useful for bug reports.
bench
Syntax:
scrapy benchRequires project: no
Run a quick benchmark test. Benchmarking.
Custom project commands
You can also add your custom project commands by using the
COMMANDS_MODULE setting. See the Scrapy commands in
scrapy/commands for examples on how to implement your commands.
COMMANDS_MODULE
Default: '' (empty string)
A module to use for looking up custom Scrapy commands. This is used to add custom commands for your Scrapy project.
Example:
COMMANDS_MODULE = 'mybot.commands'
Register commands via setup.py entry points
You can also add Scrapy commands from an external library by adding a
scrapy.commands section in the entry points of the library setup.py
file.
The following example adds my_command command:
from setuptools import setup, find_packages

setup(name='scrapy-mymodule',
  entry_points={
    'scrapy.commands': [
      'my_command=my_scrapy_module.commands:MyCommand',
    ],
  },
 )
Spiders
Spiders are classes which define how a certain site (or a group of sites) will be scraped, including how to perform the crawl (i.e. follow links) and how to extract structured data from their pages (i.e. scraping items). In other words, Spiders are the place where you define the custom behaviour for crawling and parsing pages for a particular site (or, in some cases, a group of sites).
For spiders, the scraping cycle goes through something like this:
You start by generating the initial Requests to crawl the first URLs, and specify a callback function to be called with the response downloaded from those requests.
The first requests to perform are obtained by calling the
start_requests()method which (by default) generatesRequestfor the URLs specified in thestart_urlsand theparsemethod as callback function for the Requests.In the callback function, you parse the response (web page) and return item objects,
Requestobjects, or an iterable of these objects. Those Requests will also contain a callback (maybe the same) and will then be downloaded by Scrapy and then their response handled by the specified callback.In callback functions, you parse the page contents, typically using Selectors (but you can also use BeautifulSoup, lxml or whatever mechanism you prefer) and generate items with the parsed data.
Finally, the items returned from the spider will be typically persisted to a database (in some Item Pipeline) or written to a file using Feed exports.
Even though this cycle applies (more or less) to any kind of spider, there are different kinds of default spiders bundled into Scrapy for different purposes. We will talk about those types here.
scrapy.Spider
- class scrapy.spiders.Spider
- class scrapy.Spider
This is the simplest spider, and the one from which every other spider must inherit (including spiders that come bundled with Scrapy, as well as spiders that you write yourself). It doesn’t provide any special functionality. It just provides a default
start_requests()implementation which sends requests from thestart_urlsspider attribute and calls the spider’s methodparsefor each of the resulting responses.- name
A string which defines the name for this spider. The spider name is how the spider is located (and instantiated) by Scrapy, so it must be unique. However, nothing prevents you from instantiating more than one instance of the same spider. This is the most important spider attribute and it’s required.
If the spider scrapes a single domain, a common practice is to name the spider after the domain, with or without the TLD. So, for example, a spider that crawls
mywebsite.comwould often be calledmywebsite.
- allowed_domains
An optional list of strings containing domains that this spider is allowed to crawl. Requests for URLs not belonging to the domain names specified in this list (or their subdomains) won’t be followed if
OffsiteMiddlewareis enabled.Let’s say your target url is
https://www.example.com/1.html, then add'example.com'to the list.
- start_urls
A list of URLs where the spider will begin to crawl from, when no particular URLs are specified. So, the first pages downloaded will be those listed here. The subsequent
Requestwill be generated successively from data contained in the start URLs.
- custom_settings
A dictionary of settings that will be overridden from the project wide configuration when running this spider. It must be defined as a class attribute since the settings are updated before instantiation.
For a list of available built-in settings see: Built-in settings reference.
- crawler
This attribute is set by the
from_crawler()class method after initializating the class, and links to theCrawlerobject to which this spider instance is bound.Crawlers encapsulate a lot of components in the project for their single entry access (such as extensions, middlewares, signals managers, etc). See Crawler API to know more about them.
- settings
Configuration for running this spider. This is a
Settingsinstance, see the Settings topic for a detailed introduction on this subject.
- logger
Python logger created with the Spider’s
name. You can use it to send log messages through it as described on Logging from Spiders.
- state
A dict you can use to persist some spider state between batches. See Keeping persistent state between batches to know more about it.
- from_crawler(crawler, *args, **kwargs)
This is the class method used by Scrapy to create your spiders.
You probably won’t need to override this directly because the default implementation acts as a proxy to the
__init__()method, calling it with the given argumentsargsand named argumentskwargs.Nonetheless, this method sets the
crawlerandsettingsattributes in the new instance so they can be accessed later inside the spider’s code.- Parameters
crawler (
Crawlerinstance) – crawler to which the spider will be boundargs (list) – arguments passed to the
__init__()methodkwargs (dict) – keyword arguments passed to the
__init__()method
- start_requests()
This method must return an iterable with the first Requests to crawl for this spider. It is called by Scrapy when the spider is opened for scraping. Scrapy calls it only once, so it is safe to implement
start_requests()as a generator.The default implementation generates
Request(url, dont_filter=True)for each url instart_urls.If you want to change the Requests used to start scraping a domain, this is the method to override. For example, if you need to start by logging in using a POST request, you could do:
class MySpider(scrapy.Spider):
    name = 'myspider'

    def start_requests(self):
        return [scrapy.FormRequest("http://www.example.com/login",
                                   formdata={'user': 'john', 'pass': 'secret'},
                                   callback=self.logged_in)]

    def logged_in(self, response):
        # here you would extract links to follow and return Requests for
        # each of them, with another callback
        pass
- parse(response)
This is the default callback used by Scrapy to process downloaded responses, when their requests don’t specify a callback.
The
parsemethod is in charge of processing the response and returning scraped data and/or more URLs to follow. Other Requests callbacks have the same requirements as theSpiderclass.This method, as well as any other Request callback, must return an iterable of
Requestand/or item objects.- Parameters
response (
Response) – the response to parse
- log(message[, level, component])
Wrapper that sends a log message through the Spider’s
logger, kept for backward compatibility. For more information see Logging from Spiders.
- closed(reason)
Called when the spider closes. This method provides a shortcut to signals.connect() for the
spider_closedsignal.
Let’s see an example:
import scrapy


class MySpider(scrapy.Spider):
    name = 'example.com'
    allowed_domains = ['example.com']
    start_urls = [
        'http://www.example.com/1.html',
        'http://www.example.com/2.html',
        'http://www.example.com/3.html',
    ]

    def parse(self, response):
        self.logger.info('A response from %s just arrived!', response.url)
Return multiple Requests and items from a single callback:
import scrapy

class MySpider(scrapy.Spider):
    name = 'example.com'
    allowed_domains = ['example.com']
    start_urls = [
        'http://www.example.com/1.html',
        'http://www.example.com/2.html',
        'http://www.example.com/3.html',
    ]

    def parse(self, response):
        for h3 in response.xpath('//h3').getall():
            yield {"title": h3}

        for href in response.xpath('//a/@href').getall():
            yield scrapy.Request(response.urljoin(href), self.parse)
Instead of start_urls you can use start_requests() directly;
to give data more structure you can use Item objects:
import scrapy
from myproject.items import MyItem

class MySpider(scrapy.Spider):
    name = 'example.com'
    allowed_domains = ['example.com']

    def start_requests(self):
        yield scrapy.Request('http://www.example.com/1.html', self.parse)
        yield scrapy.Request('http://www.example.com/2.html', self.parse)
        yield scrapy.Request('http://www.example.com/3.html', self.parse)

    def parse(self, response):
        for h3 in response.xpath('//h3').getall():
            yield MyItem(title=h3)

        for href in response.xpath('//a/@href').getall():
            yield scrapy.Request(response.urljoin(href), self.parse)
Spider arguments
Spiders can receive arguments that modify their behaviour. Some common uses for spider arguments are to define the start URLs or to restrict the crawl to certain sections of the site, but they can be used to configure any functionality of the spider.
Spider arguments are passed through the crawl command using the
-a option. For example:
scrapy crawl myspider -a category=electronics
Spiders can access arguments in their __init__ methods:
import scrapy

class MySpider(scrapy.Spider):
    name = 'myspider'

    def __init__(self, category=None, *args, **kwargs):
        super(MySpider, self).__init__(*args, **kwargs)
        self.start_urls = [f'http://www.example.com/categories/{category}']
        # ...
The default __init__ method will take any spider arguments and copy them to the spider as attributes. The above example can also be written as follows:
import scrapy

class MySpider(scrapy.Spider):
    name = 'myspider'

    def start_requests(self):
        yield scrapy.Request(f'http://www.example.com/categories/{self.category}')
If you are running Scrapy from a script, you can
specify spider arguments when calling
CrawlerProcess.crawl or
CrawlerRunner.crawl:
process = CrawlerProcess()
process.crawl(MySpider, category="electronics")
Keep in mind that spider arguments are only strings.
The spider will not do any parsing on its own.
If you were to set the start_urls attribute from the command line,
you would have to parse it on your own into a list
using something like ast.literal_eval() or json.loads()
and then set it as an attribute.
Otherwise, you would cause iteration over a start_urls string
(a very common python pitfall)
resulting in each character being seen as a separate url.
A valid use case is to set the http auth credentials
used by HttpAuthMiddleware
or the user agent
used by UserAgentMiddleware:
scrapy crawl myspider -a http_user=myuser -a http_pass=mypassword -a user_agent=mybot
Spider arguments can also be passed through the Scrapyd schedule.json API.
See Scrapyd documentation.
Generic Spiders
Scrapy comes with some useful generic spiders that you can use to subclass your spiders from. Their aim is to provide convenient functionality for a few common scraping cases, like following all links on a site based on certain rules, crawling from Sitemaps, or parsing an XML/CSV feed.
For the examples used in the following spiders, we’ll assume you have a project
with a TestItem declared in a myproject.items module:
import scrapy

class TestItem(scrapy.Item):
    id = scrapy.Field()
    name = scrapy.Field()
    description = scrapy.Field()
CrawlSpider
- class scrapy.spiders.CrawlSpider[source]
This is the most commonly used spider for crawling regular websites, as it provides a convenient mechanism for following links by defining a set of rules. It may not be the best suited for your particular web sites or project, but it’s generic enough for several cases, so you can start from it and override it as needed for more custom functionality, or just implement your own spider.
Apart from the attributes inherited from Spider (that you must specify), this class supports a new attribute:
- rules
Which is a list of one (or more)
Ruleobjects. EachRuledefines a certain behaviour for crawling the site. Rules objects are described below. If multiple rules match the same link, the first one will be used, according to the order they’re defined in this attribute.
This spider also exposes an overridable method:
- parse_start_url(response, **kwargs)[source]
This method is called for each response produced for the URLs in the spider’s
start_urlsattribute. It allows to parse the initial responses and must return either an item object, aRequestobject, or an iterable containing any of them.
Crawling rules
- class scrapy.spiders.Rule(link_extractor=None, callback=None, cb_kwargs=None, follow=None, process_links=None, process_request=None, errback=None)[source]
link_extractoris a Link Extractor object which defines how links will be extracted from each crawled page. Each produced link will be used to generate aRequestobject, which will contain the link’s text in itsmetadictionary (under thelink_textkey). If omitted, a default link extractor created with no arguments will be used, resulting in all links being extracted.callbackis a callable or a string (in which case a method from the spider object with that name will be used) to be called for each link extracted with the specified link extractor. This callback receives aResponseas its first argument and must return either a single instance or an iterable of item objects and/orRequestobjects (or any subclass of them). As mentioned above, the receivedResponseobject will contain the text of the link that produced theRequestin itsmetadictionary (under thelink_textkey)cb_kwargsis a dict containing the keyword arguments to be passed to the callback function.followis a boolean which specifies if links should be followed from each response extracted with this rule. Ifcallbackis Nonefollowdefaults toTrue, otherwise it defaults toFalse.process_linksis a callable, or a string (in which case a method from the spider object with that name will be used) which will be called for each list of links extracted from each response using the specifiedlink_extractor. This is mainly used for filtering purposes.process_requestis a callable (or a string, in which case a method from the spider object with that name will be used) which will be called for everyRequestextracted by this rule. This callable should take said request as first argument and theResponsefrom which the request originated as second argument. It must return aRequestobject orNone(to filter out the request).errbackis a callable or a string (in which case a method from the spider object with that name will be used) to be called if any exception is raised while processing a request generated by the rule. It receives aTwisted Failureinstance as first parameter.Warning
Because of its internal implementation, you must explicitly set callbacks for new requests when writing
CrawlSpider-based spiders; unexpected behaviour can occur otherwise.New in version 2.0: The errback parameter.
CrawlSpider example
Let’s now take a look at an example CrawlSpider with rules:
import scrapy
from scrapy.spiders import CrawlSpider, Rule
from scrapy.linkextractors import LinkExtractor

class MySpider(CrawlSpider):
    name = 'example.com'
    allowed_domains = ['example.com']
    start_urls = ['http://www.example.com']

    rules = (
        # Extract links matching 'category.php' (but not matching 'subsection.php')
        # and follow links from them (since no callback means follow=True by default).
        Rule(LinkExtractor(allow=('category\.php', ), deny=('subsection\.php', ))),

        # Extract links matching 'item.php' and parse them with the spider's method parse_item
        Rule(LinkExtractor(allow=('item\.php', )), callback='parse_item'),
    )

    def parse_item(self, response):
        self.logger.info('Hi, this is an item page! %s', response.url)
        item = scrapy.Item()
        item['id'] = response.xpath('//td[@id="item_id"]/text()').re(r'ID: (\d+)')
        item['name'] = response.xpath('//td[@id="item_name"]/text()').get()
        item['description'] = response.xpath('//td[@id="item_description"]/text()').get()
        item['link_text'] = response.meta['link_text']
        url = response.xpath('//td[@id="additional_data"]/@href').get()
        return response.follow(url, self.parse_additional_page, cb_kwargs=dict(item=item))

    def parse_additional_page(self, response, item):
        item['additional_data'] = response.xpath('//p[@id="additional_data"]/text()').get()
        return item
This spider would start crawling example.com’s home page, collecting category
links, and item links, parsing the latter with the parse_item method. For
each item response, some data will be extracted from the HTML using XPath, and
an Item will be filled with it.
XMLFeedSpider
- class scrapy.spiders.XMLFeedSpider[source]
XMLFeedSpider is designed for parsing XML feeds by iterating through them by a certain node name. The iterator can be chosen from:
iternodes,xml, andhtml. It’s recommended to use theiternodesiterator for performance reasons, since thexmlandhtmliterators generate the whole DOM at once in order to parse it. However, usinghtmlas the iterator may be useful when parsing XML with bad markup.To set the iterator and the tag name, you must define the following class attributes:
- iterator
A string which defines the iterator to use. It can be either:
'iternodes'- a fast iterator based on regular expressions'html'- an iterator which usesSelector. Keep in mind this uses DOM parsing and must load all DOM in memory which could be a problem for big feeds'xml'- an iterator which usesSelector. Keep in mind this uses DOM parsing and must load all DOM in memory which could be a problem for big feeds
It defaults to:
'iternodes'.
- itertag
A string with the name of the node (or element) to iterate in. Example:
itertag = 'product'
- namespaces
A list of
(prefix, uri)tuples which define the namespaces available in that document that will be processed with this spider. Theprefixanduriwill be used to automatically register namespaces using theregister_namespace()method.You can then specify nodes with namespaces in the
itertagattribute.Example:
class YourSpider(XMLFeedSpider):

    namespaces = [('n', 'http://www.sitemaps.org/schemas/sitemap/0.9')]
    itertag = 'n:url'
    # ...
Apart from these new attributes, this spider has the following overridable methods too:
- adapt_response(response)[source]
A method that receives the response as soon as it arrives from the spider middleware, before the spider starts parsing it. It can be used to modify the response body before parsing it. This method receives a response and also returns a response (it could be the same or another one).
- parse_node(response, selector)[source]
This method is called for the nodes matching the provided tag name (
itertag). Receives the response and anSelectorfor each node. Overriding this method is mandatory. Otherwise, you spider won’t work. This method must return an item object, aRequestobject, or an iterable containing any of them.
- process_results(response, results)[source]
This method is called for each result (item or request) returned by the spider, and it’s intended to perform any last time processing required before returning the results to the framework core, for example setting the item IDs. It receives a list of results and the response which originated those results. It must return a list of results (items or requests).
Warning
Because of its internal implementation, you must explicitly set callbacks for new requests when writing
XMLFeedSpider-based spiders; unexpected behaviour can occur otherwise.
XMLFeedSpider example
These spiders are pretty easy to use, let’s have a look at one example:
from scrapy.spiders import XMLFeedSpider
from myproject.items import TestItem

class MySpider(XMLFeedSpider):
    name = 'example.com'
    allowed_domains = ['example.com']
    start_urls = ['http://www.example.com/feed.xml']
    iterator = 'iternodes'  # This is actually unnecessary, since it's the default value
    itertag = 'item'

    def parse_node(self, response, node):
        self.logger.info('Hi, this is a <%s> node!: %s', self.itertag, ''.join(node.getall()))

        item = TestItem()
        item['id'] = node.xpath('@id').get()
        item['name'] = node.xpath('name').get()
        item['description'] = node.xpath('description').get()
        return item
Basically what we did up there was to create a spider that downloads a feed from
the given start_urls, and then iterates through each of its item tags,
prints them out, and stores some random data in an Item.
CSVFeedSpider
- class scrapy.spiders.CSVFeedSpider[source]
This spider is very similar to the XMLFeedSpider, except that it iterates over rows, instead of nodes. The method that gets called in each iteration is
parse_row().- delimiter
A string with the separator character for each field in the CSV file Defaults to
','(comma).
- quotechar
A string with the enclosure character for each field in the CSV file Defaults to
'"'(quotation mark).
- headers
A list of the column names in the CSV file.
CSVFeedSpider example
Let’s see an example similar to the previous one, but using a
CSVFeedSpider:
from scrapy.spiders import CSVFeedSpider
from myproject.items import TestItem

class MySpider(CSVFeedSpider):
    name = 'example.com'
    allowed_domains = ['example.com']
    start_urls = ['http://www.example.com/feed.csv']
    delimiter = ';'
    quotechar = "'"
    headers = ['id', 'name', 'description']

    def parse_row(self, response, row):
        self.logger.info('Hi, this is a row!: %r', row)

        item = TestItem()
        item['id'] = row['id']
        item['name'] = row['name']
        item['description'] = row['description']
        return item
SitemapSpider
- class scrapy.spiders.SitemapSpider[source]
SitemapSpider allows you to crawl a site by discovering the URLs using Sitemaps.
It supports nested sitemaps and discovering sitemap urls from robots.txt.
- sitemap_urls
A list of urls pointing to the sitemaps whose urls you want to crawl.
You can also point to a robots.txt and it will be parsed to extract sitemap urls from it.
- sitemap_rules
A list of tuples
(regex, callback)where:regexis a regular expression to match urls extracted from sitemaps.regexcan be either a str or a compiled regex object.callback is the callback to use for processing the urls that match the regular expression.
callbackcan be a string (indicating the name of a spider method) or a callable.
For example:
sitemap_rules = [('/product/', 'parse_product')]
Rules are applied in order, and only the first one that matches will be used.
If you omit this attribute, all urls found in sitemaps will be processed with the
parsecallback.
- sitemap_follow
A list of regexes of sitemap that should be followed. This is only for sites that use Sitemap index files that point to other sitemap files.
By default, all sitemaps are followed.
- sitemap_alternate_links
Specifies if alternate links for one
urlshould be followed. These are links for the same website in another language passed within the sameurlblock.For example:
<url>
    <loc>http://example.com/</loc>
    <xhtml:link rel="alternate" hreflang="de" href="http://example.com/de"/>
</url>
With
sitemap_alternate_linksset, this would retrieve both URLs. Withsitemap_alternate_linksdisabled, onlyhttp://example.com/would be retrieved.Default is
sitemap_alternate_linksdisabled.
- sitemap_filter(entries)[source]
This is a filter function that could be overridden to select sitemap entries based on their attributes.
For example:
<url>
    <loc>http://example.com/</loc>
    <lastmod>2005-01-01</lastmod>
</url>
We can define a
sitemap_filterfunction to filterentriesby date:from datetime import datetime from scrapy.spiders import SitemapSpider class FilteredSitemapSpider(SitemapSpider): name = 'filtered_sitemap_spider' allowed_domains = ['example.com'] sitemap_urls = ['http://example.com/sitemap.xml'] def sitemap_filter(self, entries): for entry in entries: date_time = datetime.strptime(entry['lastmod'], '%Y-%m-%d') if date_time.year >= 2005: yield entry
This would retrieve only
entriesmodified on 2005 and the following years.Entries are dict objects extracted from the sitemap document. Usually, the key is the tag name and the value is the text inside it.
It’s important to notice that:
as the loc attribute is required, entries without this tag are discarded
alternate links are stored in a list with the key
alternate(seesitemap_alternate_links)namespaces are removed, so lxml tags named as
{namespace}tagnamebecome onlytagname
If you omit this method, all entries found in sitemaps will be processed, observing other attributes and their settings.
SitemapSpider examples
Simplest example: process all urls discovered through sitemaps using the
parse callback:
from scrapy.spiders import SitemapSpider

class MySpider(SitemapSpider):
    sitemap_urls = ['http://www.example.com/sitemap.xml']

    def parse(self, response):
        pass # ... scrape item here ...
Process some urls with certain callback and other urls with a different callback:
from scrapy.spiders import SitemapSpider

class MySpider(SitemapSpider):
    sitemap_urls = ['http://www.example.com/sitemap.xml']
    sitemap_rules = [
        ('/product/', 'parse_product'),
        ('/category/', 'parse_category'),
    ]

    def parse_product(self, response):
        pass # ... scrape product ...

    def parse_category(self, response):
        pass # ... scrape category ...
Follow sitemaps defined in the robots.txt file and only follow sitemaps
whose url contains /sitemap_shop:
from scrapy.spiders import SitemapSpider

class MySpider(SitemapSpider):
    sitemap_urls = ['http://www.example.com/robots.txt']
    sitemap_rules = [
        ('/shop/', 'parse_shop'),
    ]
    sitemap_follow = ['/sitemap_shops']

    def parse_shop(self, response):
        pass # ... scrape shop here ...
Combine SitemapSpider with other sources of urls:
from scrapy.spiders import SitemapSpider

class MySpider(SitemapSpider):
    sitemap_urls = ['http://www.example.com/robots.txt']
    sitemap_rules = [
        ('/shop/', 'parse_shop'),
    ]

    other_urls = ['http://www.example.com/about']

    def start_requests(self):
        requests = list(super(MySpider, self).start_requests())
        requests += [scrapy.Request(x, self.parse_other) for x in self.other_urls]
        return requests

    def parse_shop(self, response):
        pass # ... scrape shop here ...

    def parse_other(self, response):
        pass # ... scrape other here ...
Selectors
When you’re scraping web pages, the most common task you need to perform is to extract data from the HTML source. There are several libraries available to achieve this, such as:
BeautifulSoup is a very popular web scraping library among Python programmers which constructs a Python object based on the structure of the HTML code and also deals with bad markup reasonably well, but it has one drawback: it’s slow.
lxml is an XML parsing library (which also parses HTML) with a pythonic API based on
ElementTree. (lxml is not part of the Python standard library.)
Scrapy comes with its own mechanism for extracting data. They’re called selectors because they “select” certain parts of the HTML document specified either by XPath or CSS expressions.
XPath is a language for selecting nodes in XML documents, which can also be used with HTML. CSS is a language for applying styles to HTML documents. It defines selectors to associate those styles with specific HTML elements.
Note
Scrapy Selectors is a thin wrapper around parsel library; the purpose of this wrapper is to provide better integration with Scrapy Response objects.
parsel is a stand-alone web scraping library which can be used without Scrapy. It uses lxml library under the hood, and implements an easy API on top of lxml API. It means Scrapy selectors are very similar in speed and parsing accuracy to lxml.
Using selectors
Constructing selectors
Response objects expose a Selector instance
on .selector attribute:
>>> response.selector.xpath('//span/text()').get()
'good'
Querying responses using XPath and CSS is so common that responses include two
more shortcuts: response.xpath() and response.css():
>>> response.xpath('//span/text()').get()
'good'
>>> response.css('span::text').get()
'good'
Scrapy selectors are instances of Selector class
constructed by passing either TextResponse object or
markup as a string (in text argument).
Usually there is no need to construct Scrapy selectors manually:
response object is available in Spider callbacks, so in most cases
it is more convenient to use response.css() and response.xpath()
shortcuts. By using response.selector or one of these shortcuts
you can also ensure the response body is parsed only once.
But if required, it is possible to use Selector directly.
Constructing from text:
>>> from scrapy.selector import Selector
>>> body = '<html><body><span>good</span></body></html>'
>>> Selector(text=body).xpath('//span/text()').get()
'good'
Constructing from response - HtmlResponse is one of
TextResponse subclasses:
>>> from scrapy.selector import Selector
>>> from scrapy.http import HtmlResponse
>>> response = HtmlResponse(url='http://example.com', body=body)
>>> Selector(response=response).xpath('//span/text()').get()
'good'
Selector automatically chooses the best parsing rules
(XML vs HTML) based on input type.
Using selectors
To explain how to use the selectors we’ll use the Scrapy shell (which
provides interactive testing) and an example page located in the Scrapy
documentation server:
For the sake of completeness, here’s its full HTML code:
<html>
 <head>
  <base href='http://example.com/' />
  <title>Example website</title>
 </head>
 <body>
  <div id='images'>
   <a href='image1.html'>Name: My image 1 <br /><img src='image1_thumb.jpg' /></a>
   <a href='image2.html'>Name: My image 2 <br /><img src='image2_thumb.jpg' /></a>
   <a href='image3.html'>Name: My image 3 <br /><img src='image3_thumb.jpg' /></a>
   <a href='image4.html'>Name: My image 4 <br /><img src='image4_thumb.jpg' /></a>
   <a href='image5.html'>Name: My image 5 <br /><img src='image5_thumb.jpg' /></a>
  </div>
 </body>
</html>
First, let’s open the shell:
scrapy shell https://docs.scrapy.org/en/latest/_static/selectors-sample1.html
Then, after the shell loads, you’ll have the response available as response
shell variable, and its attached selector in response.selector attribute.
Since we’re dealing with HTML, the selector will automatically use an HTML parser.
So, by looking at the HTML code of that page, let’s construct an XPath for selecting the text inside the title tag:
>>> response.xpath('//title/text()')
[<Selector xpath='//title/text()' data='Example website'>]
To actually extract the textual data, you must call the selector .get()
or .getall() methods, as follows:
>>> response.xpath('//title/text()').getall()
['Example website']
>>> response.xpath('//title/text()').get()
'Example website'
.get() always returns a single result; if there are several matches,
content of a first match is returned; if there are no matches, None
is returned. .getall() returns a list with all results.
Notice that CSS selectors can select text or attribute nodes using CSS3 pseudo-elements:
>>> response.css('title::text').get()
'Example website'
As you can see, .xpath() and .css() methods return a
SelectorList instance, which is a list of new
selectors. This API can be used for quickly selecting nested data:
>>> response.css('img').xpath('@src').getall()
['image1_thumb.jpg',
 'image2_thumb.jpg',
 'image3_thumb.jpg',
 'image4_thumb.jpg',
 'image5_thumb.jpg']
If you want to extract only the first matched element, you can call the
selector .get() (or its alias .extract_first() commonly used in
previous Scrapy versions):
>>> response.xpath('//div[@id="images"]/a/text()').get()
'Name: My image 1 '
It returns None if no element was found:
>>> response.xpath('//div[@id="not-exists"]/text()').get() is None
True
A default return value can be provided as an argument, to be used instead
of None:
>>> response.xpath('//div[@id="not-exists"]/text()').get(default='not-found')
'not-found'
Instead of using e.g. '@src' XPath it is possible to query for attributes
using .attrib property of a Selector:
>>> [img.attrib['src'] for img in response.css('img')]
['image1_thumb.jpg',
 'image2_thumb.jpg',
 'image3_thumb.jpg',
 'image4_thumb.jpg',
 'image5_thumb.jpg']
As a shortcut, .attrib is also available on SelectorList directly;
it returns attributes for the first matching element:
>>> response.css('img').attrib['src']
'image1_thumb.jpg'
This is most useful when only a single result is expected, e.g. when selecting by id, or selecting unique elements on a web page:
>>> response.css('base').attrib['href']
'http://example.com/'
Now we’re going to get the base URL and some image links:
>>> response.xpath('//base/@href').get()
'http://example.com/'
>>> response.css('base::attr(href)').get()
'http://example.com/'
>>> response.css('base').attrib['href']
'http://example.com/'
>>> response.xpath('//a[contains(@href, "image")]/@href').getall()
['image1.html',
 'image2.html',
 'image3.html',
 'image4.html',
 'image5.html']
>>> response.css('a[href*=image]::attr(href)').getall()
['image1.html',
 'image2.html',
 'image3.html',
 'image4.html',
 'image5.html']
>>> response.xpath('//a[contains(@href, "image")]/img/@src').getall()
['image1_thumb.jpg',
 'image2_thumb.jpg',
 'image3_thumb.jpg',
 'image4_thumb.jpg',
 'image5_thumb.jpg']
>>> response.css('a[href*=image] img::attr(src)').getall()
['image1_thumb.jpg',
 'image2_thumb.jpg',
 'image3_thumb.jpg',
 'image4_thumb.jpg',
 'image5_thumb.jpg']
Extensions to CSS Selectors
Per W3C standards, CSS selectors do not support selecting text nodes or attribute values. But selecting these is so essential in a web scraping context that Scrapy (parsel) implements a couple of non-standard pseudo-elements:
to select text nodes, use
::textto select attribute values, use
::attr(name)where name is the name of the attribute that you want the value of
Warning
These pseudo-elements are Scrapy-/Parsel-specific. They will most probably not work with other libraries like lxml or PyQuery.
Examples:
title::textselects children text nodes of a descendant<title>element:
>>> response.css('title::text').get()
'Example website'
*::textselects all descendant text nodes of the current selector context:
>>> response.css('#images *::text').getall()
['\n   ',
 'Name: My image 1 ',
 '\n   ',
 'Name: My image 2 ',
 '\n   ',
 'Name: My image 3 ',
 '\n   ',
 'Name: My image 4 ',
 '\n   ',
 'Name: My image 5 ',
 '\n  ']
foo::textreturns no results iffooelement exists, but contains no text (i.e. text is empty):
>>> response.css('img::text').getall()
[]
This means
.css('foo::text').get()could return None even if an element exists. Usedefault=''if you always want a string:
>>> response.css('img::text').get()
>>> response.css('img::text').get(default='')
''
a::attr(href)selects the href attribute value of descendant links:
>>> response.css('a::attr(href)').getall()
['image1.html',
 'image2.html',
 'image3.html',
 'image4.html',
 'image5.html']
Note
See also: Selecting element attributes.
Note
You cannot chain these pseudo-elements. But in practice it would not make much sense: text nodes do not have attributes, and attribute values are string values already and do not have children nodes.
Nesting selectors
The selection methods (.xpath() or .css()) return a list of selectors
of the same type, so you can call the selection methods for those selectors
too. Here’s an example:
>>> links = response.xpath('//a[contains(@href, "image")]')
>>> links.getall()
['<a href="image1.html">Name: My image 1 <br><img src="image1_thumb.jpg"></a>',
 '<a href="image2.html">Name: My image 2 <br><img src="image2_thumb.jpg"></a>',
 '<a href="image3.html">Name: My image 3 <br><img src="image3_thumb.jpg"></a>',
 '<a href="image4.html">Name: My image 4 <br><img src="image4_thumb.jpg"></a>',
 '<a href="image5.html">Name: My image 5 <br><img src="image5_thumb.jpg"></a>']
>>> for index, link in enumerate(links):
...     href_xpath = link.xpath('@href').get()
...     img_xpath = link.xpath('img/@src').get()
...     print(f'Link number {index} points to url {href_xpath!r} and image {img_xpath!r}')
Link number 0 points to url 'image1.html' and image 'image1_thumb.jpg'
Link number 1 points to url 'image2.html' and image 'image2_thumb.jpg'
Link number 2 points to url 'image3.html' and image 'image3_thumb.jpg'
Link number 3 points to url 'image4.html' and image 'image4_thumb.jpg'
Link number 4 points to url 'image5.html' and image 'image5_thumb.jpg'
Selecting element attributes
There are several ways to get a value of an attribute. First, one can use XPath syntax:
>>> response.xpath("//a/@href").getall()
['image1.html', 'image2.html', 'image3.html', 'image4.html', 'image5.html']
XPath syntax has a few advantages: it is a standard XPath feature, and
@attributes can be used in other parts of an XPath expression - e.g.
it is possible to filter by attribute value.
Scrapy also provides an extension to CSS selectors (::attr(...))
which allows to get attribute values:
>>> response.css('a::attr(href)').getall()
['image1.html', 'image2.html', 'image3.html', 'image4.html', 'image5.html']
In addition to that, there is a .attrib property of Selector.
You can use it if you prefer to lookup attributes in Python
code, without using XPaths or CSS extensions:
>>> [a.attrib['href'] for a in response.css('a')]
['image1.html', 'image2.html', 'image3.html', 'image4.html', 'image5.html']
This property is also available on SelectorList; it returns a dictionary with attributes of a first matching element. It is convenient to use when a selector is expected to give a single result (e.g. when selecting by element ID, or when selecting an unique element on a page):
>>> response.css('base').attrib
{'href': 'http://example.com/'}
>>> response.css('base').attrib['href']
'http://example.com/'
.attrib property of an empty SelectorList is empty:
>>> response.css('foo').attrib
{}
Using selectors with regular expressions
Selector also has a .re() method for extracting
data using regular expressions. However, unlike using .xpath() or
.css() methods, .re() returns a list of strings. So you
can’t construct nested .re() calls.
Here’s an example used to extract image names from the HTML code above:
>>> response.xpath('//a[contains(@href, "image")]/text()').re(r'Name:\s*(.*)')
['My image 1',
 'My image 2',
 'My image 3',
 'My image 4',
 'My image 5']
There’s an additional helper reciprocating .get() (and its
alias .extract_first()) for .re(), named .re_first().
Use it to extract just the first matching string:
>>> response.xpath('//a[contains(@href, "image")]/text()').re_first(r'Name:\s*(.*)')
'My image 1'
extract() and extract_first()
If you’re a long-time Scrapy user, you’re probably familiar
with .extract() and .extract_first() selector methods. Many blog posts
and tutorials are using them as well. These methods are still supported
by Scrapy, there are no plans to deprecate them.
However, Scrapy usage docs are now written using .get() and
.getall() methods. We feel that these new methods result in a more concise
and readable code.
The following examples show how these methods map to each other.
SelectorList.get()is the same asSelectorList.extract_first():>>> response.css('a::attr(href)').get() 'image1.html' >>> response.css('a::attr(href)').extract_first() 'image1.html'
SelectorList.getall()is the same asSelectorList.extract():>>> response.css('a::attr(href)').getall() ['image1.html', 'image2.html', 'image3.html', 'image4.html', 'image5.html'] >>> response.css('a::attr(href)').extract() ['image1.html', 'image2.html', 'image3.html', 'image4.html', 'image5.html']
Selector.get()is the same asSelector.extract():>>> response.css('a::attr(href)')[0].get() 'image1.html' >>> response.css('a::attr(href)')[0].extract() 'image1.html'
For consistency, there is also
Selector.getall(), which returns a list:>>> response.css('a::attr(href)')[0].getall() ['image1.html']
So, the main difference is that output of .get() and .getall() methods
is more predictable: .get() always returns a single result, .getall()
always returns a list of all extracted results. With .extract() method
it was not always obvious if a result is a list or not; to get a single
result either .extract() or .extract_first() should be called.
Working with XPaths
Here are some tips which may help you to use XPath with Scrapy selectors effectively. If you are not much familiar with XPath yet, you may want to take a look first at this XPath tutorial.
Note
Some of the tips are based on this post from Zyte’s blog.
Working with relative XPaths
Keep in mind that if you are nesting selectors and use an XPath that starts
with /, that XPath will be absolute to the document and not relative to the
Selector you’re calling it from.
For example, suppose you want to extract all <p> elements inside <div>
elements. First, you would get all <div> elements:
>>> divs = response.xpath('//div')
At first, you may be tempted to use the following approach, which is wrong, as
it actually extracts all <p> elements from the document, not only those
inside <div> elements:
>>> for p in divs.xpath('//p'):  # this is wrong - gets all <p> from the whole document
...     print(p.get())
This is the proper way to do it (note the dot prefixing the .//p XPath):
>>> for p in divs.xpath('.//p'):  # extracts all <p> inside
...     print(p.get())
Another common case would be to extract all direct <p> children:
>>> for p in divs.xpath('p'):
...     print(p.get())
For more details about relative XPaths see the Location Paths section in the XPath specification.
When querying by class, consider using CSS
Because an element can contain multiple CSS classes, the XPath way to select elements by class is the rather verbose:
*[contains(concat(' ', normalize-space(@class), ' '), ' someclass ')]
If you use @class='someclass' you may end up missing elements that have
other classes, and if you just use contains(@class, 'someclass') to make up
for that you may end up with more elements that you want, if they have a different
class name that shares the string someclass.
As it turns out, Scrapy selectors allow you to chain selectors, so most of the time you can just select by class using CSS and then switch to XPath when needed:
>>> from scrapy import Selector
>>> sel = Selector(text='<div class="hero shout"><time datetime="2014-07-23 19:00">Special date</time></div>')
>>> sel.css('.shout').xpath('./time/@datetime').getall()
['2014-07-23 19:00']
This is cleaner than using the verbose XPath trick shown above. Just remember
to use the . in the XPath expressions that will follow.
Beware of the difference between //node[1] and (//node)[1]
//node[1] selects all the nodes occurring first under their respective parents.
(//node)[1] selects all the nodes in the document, and then gets only the first of them.
Example:
>>> from scrapy import Selector
>>> sel = Selector(text="""
....:     <ul class="list">
....:         <li>1</li>
....:         <li>2</li>
....:         <li>3</li>
....:     </ul>
....:     <ul class="list">
....:         <li>4</li>
....:         <li>5</li>
....:         <li>6</li>
....:     </ul>""")
>>> xp = lambda x: sel.xpath(x).getall()
This gets all first <li> elements under whatever it is its parent:
>>> xp("//li[1]")
['<li>1</li>', '<li>4</li>']
And this gets the first <li> element in the whole document:
>>> xp("(//li)[1]")
['<li>1</li>']
This gets all first <li> elements under an <ul> parent:
>>> xp("//ul/li[1]")
['<li>1</li>', '<li>4</li>']
And this gets the first <li> element under an <ul> parent in the whole document:
>>> xp("(//ul/li)[1]")
['<li>1</li>']
Using text nodes in a condition
When you need to use the text content as argument to an XPath string function,
avoid using .//text() and use just . instead.
This is because the expression .//text() yields a collection of text elements – a node-set.
And when a node-set is converted to a string, which happens when it is passed as argument to
a string function like contains() or starts-with(), it results in the text for the first element only.
Example:
>>> from scrapy import Selector
>>> sel = Selector(text='<a href="#">Click here to go to the <strong>Next Page</strong></a>')
Converting a node-set to string:
>>> sel.xpath('//a//text()').getall() # take a peek at the node-set
['Click here to go to the ', 'Next Page']
>>> sel.xpath("string(//a[1]//text())").getall() # convert it to string
['Click here to go to the ']
A node converted to a string, however, puts together the text of itself plus of all its descendants:
>>> sel.xpath("//a[1]").getall() # select the first node
['<a href="#">Click here to go to the <strong>Next Page</strong></a>']
>>> sel.xpath("string(//a[1])").getall() # convert it to string
['Click here to go to the Next Page']
So, using the .//text() node-set won’t select anything in this case:
>>> sel.xpath("//a[contains(.//text(), 'Next Page')]").getall()
[]
But using the . to mean the node, works:
>>> sel.xpath("//a[contains(., 'Next Page')]").getall()
['<a href="#">Click here to go to the <strong>Next Page</strong></a>']
Variables in XPath expressions
XPath allows you to reference variables in your XPath expressions, using
the $somevariable syntax. This is somewhat similar to parameterized
queries or prepared statements in the SQL world where you replace
some arguments in your queries with placeholders like ?,
which are then substituted with values passed with the query.
Here’s an example to match an element based on its “id” attribute value, without hard-coding it (that was shown previously):
>>> # `$val` used in the expression, a `val` argument needs to be passed
>>> response.xpath('//div[@id=$val]/a/text()', val='images').get()
'Name: My image 1 '
Here’s another example, to find the “id” attribute of a <div> tag containing
five <a> children (here we pass the value 5 as an integer):
>>> response.xpath('//div[count(a)=$cnt]/@id', cnt=5).get()
'images'
All variable references must have a binding value when calling .xpath()
(otherwise you’ll get a ValueError: XPath error: exception).
This is done by passing as many named arguments as necessary.
parsel, the library powering Scrapy selectors, has more details and examples on XPath variables.
Removing namespaces
When dealing with scraping projects, it is often quite convenient to get rid of
namespaces altogether and just work with element names, to write more
simple/convenient XPaths. You can use the
Selector.remove_namespaces() method for that.
Let’s show an example that illustrates this with the Python Insider blog atom feed.
First, we open the shell with the url we want to scrape:
$ scrapy shell https://feeds.feedburner.com/PythonInsider
This is how the file starts:
<?xml version="1.0" encoding="UTF-8"?>
<?xml-stylesheet ...
<feed xmlns="http://www.w3.org/2005/Atom"
      xmlns:openSearch="http://a9.com/-/spec/opensearchrss/1.0/"
      xmlns:blogger="http://schemas.google.com/blogger/2008"
      xmlns:georss="http://www.georss.org/georss"
      xmlns:gd="http://schemas.google.com/g/2005"
      xmlns:thr="http://purl.org/syndication/thread/1.0"
      xmlns:feedburner="http://rssnamespace.org/feedburner/ext/1.0">
  ...
You can see several namespace declarations including a default “http://www.w3.org/2005/Atom” and another one using the “gd:” prefix for “http://schemas.google.com/g/2005”.
Once in the shell we can try selecting all <link> objects and see that it
doesn’t work (because the Atom XML namespace is obfuscating those nodes):
>>> response.xpath("//link")
[]
But once we call the Selector.remove_namespaces() method, all
nodes can be accessed directly by their names:
>>> response.selector.remove_namespaces()
>>> response.xpath("//link")
[<Selector xpath='//link' data='<link rel="alternate" type="text/html" h'>,
    <Selector xpath='//link' data='<link rel="next" type="application/atom+'>,
    ...
If you wonder why the namespace removal procedure isn’t always called by default instead of having to call it manually, this is because of two reasons, which, in order of relevance, are:
Removing namespaces requires to iterate and modify all nodes in the document, which is a reasonably expensive operation to perform by default for all documents crawled by Scrapy
There could be some cases where using namespaces is actually required, in case some element names clash between namespaces. These cases are very rare though.
Using EXSLT extensions
Being built atop lxml, Scrapy selectors support some EXSLT extensions and come with these pre-registered namespaces to use in XPath expressions:
prefix |
namespace |
usage |
|---|---|---|
re |
http://exslt.org/regular-expressions |
|
set |
http://exslt.org/sets |
Regular expressions
The test() function, for example, can prove quite useful when XPath’s
starts-with() or contains() are not sufficient.
Example selecting links in list item with a “class” attribute ending with a digit:
>>> from scrapy import Selector
>>> doc = """
... <div>
...     <ul>
...         <li class="item-0"><a href="link1.html">first item</a></li>
...         <li class="item-1"><a href="link2.html">second item</a></li>
...         <li class="item-inactive"><a href="link3.html">third item</a></li>
...         <li class="item-1"><a href="link4.html">fourth item</a></li>
...         <li class="item-0"><a href="link5.html">fifth item</a></li>
...     </ul>
... </div>
... """
>>> sel = Selector(text=doc, type="html")
>>> sel.xpath('//li//@href').getall()
['link1.html', 'link2.html', 'link3.html', 'link4.html', 'link5.html']
>>> sel.xpath('//li[re:test(@class, "item-\d$")]//@href').getall()
['link1.html', 'link2.html', 'link4.html', 'link5.html']
Warning
C library libxslt doesn’t natively support EXSLT regular
expressions so lxml’s implementation uses hooks to Python’s re module.
Thus, using regexp functions in your XPath expressions may add a small
performance penalty.
Set operations
These can be handy for excluding parts of a document tree before extracting text elements for example.
Example extracting microdata (sample content taken from https://schema.org/Product) with groups of itemscopes and corresponding itemprops:
>>> doc = """
... <div itemscope itemtype="http://schema.org/Product">
...   <span itemprop="name">Kenmore White 17" Microwave</span>
...   <img src="kenmore-microwave-17in.jpg" alt='Kenmore 17" Microwave' />
...   <div itemprop="aggregateRating"
...     itemscope itemtype="http://schema.org/AggregateRating">
...    Rated <span itemprop="ratingValue">3.5</span>/5
...    based on <span itemprop="reviewCount">11</span> customer reviews
...   </div>
...
...   <div itemprop="offers" itemscope itemtype="http://schema.org/Offer">
...     <span itemprop="price">$55.00</span>
...     <link itemprop="availability" href="http://schema.org/InStock" />In stock
...   </div>
...
...   Product description:
...   <span itemprop="description">0.7 cubic feet countertop microwave.
...   Has six preset cooking categories and convenience features like
...   Add-A-Minute and Child Lock.</span>
...
...   Customer reviews:
...
...   <div itemprop="review" itemscope itemtype="http://schema.org/Review">
...     <span itemprop="name">Not a happy camper</span> -
...     by <span itemprop="author">Ellie</span>,
...     <meta itemprop="datePublished" content="2011-04-01">April 1, 2011
...     <div itemprop="reviewRating" itemscope itemtype="http://schema.org/Rating">
...       <meta itemprop="worstRating" content = "1">
...       <span itemprop="ratingValue">1</span>/
...       <span itemprop="bestRating">5</span>stars
...     </div>
...     <span itemprop="description">The lamp burned out and now I have to replace
...     it. </span>
...   </div>
...
...   <div itemprop="review" itemscope itemtype="http://schema.org/Review">
...     <span itemprop="name">Value purchase</span> -
...     by <span itemprop="author">Lucas</span>,
...     <meta itemprop="datePublished" content="2011-03-25">March 25, 2011
...     <div itemprop="reviewRating" itemscope itemtype="http://schema.org/Rating">
...       <meta itemprop="worstRating" content = "1"/>
...       <span itemprop="ratingValue">4</span>/
...       <span itemprop="bestRating">5</span>stars
...     </div>
...     <span itemprop="description">Great microwave for the price. It is small and
...     fits in my apartment.</span>
...   </div>
...   ...
... </div>
... """
>>> sel = Selector(text=doc, type="html")
>>> for scope in sel.xpath('//div[@itemscope]'):
...     print("current scope:", scope.xpath('@itemtype').getall())
...     props = scope.xpath('''
...                 set:difference(./descendant::*/@itemprop,
...                                .//*[@itemscope]/*/@itemprop)''')
...     print(f"    properties: {props.getall()}")
...     print("")

current scope: ['http://schema.org/Product']
    properties: ['name', 'aggregateRating', 'offers', 'description', 'review', 'review']

current scope: ['http://schema.org/AggregateRating']
    properties: ['ratingValue', 'reviewCount']

current scope: ['http://schema.org/Offer']
    properties: ['price', 'availability']

current scope: ['http://schema.org/Review']
    properties: ['name', 'author', 'datePublished', 'reviewRating', 'description']

current scope: ['http://schema.org/Rating']
    properties: ['worstRating', 'ratingValue', 'bestRating']

current scope: ['http://schema.org/Review']
    properties: ['name', 'author', 'datePublished', 'reviewRating', 'description']

current scope: ['http://schema.org/Rating']
    properties: ['worstRating', 'ratingValue', 'bestRating']
Here we first iterate over itemscope elements, and for each one,
we look for all itemprops elements and exclude those that are themselves
inside another itemscope.
Other XPath extensions
Scrapy selectors also provide a sorely missed XPath extension function
has-class that returns True for nodes that have all of the specified
HTML classes.
For the following HTML:
<p class="foo bar-baz">First</p>
<p class="foo">Second</p>
<p class="bar">Third</p>
<p>Fourth</p>
You can use it like this:
>>> response.xpath('//p[has-class("foo")]')
[<Selector xpath='//p[has-class("foo")]' data='<p class="foo bar-baz">First</p>'>,
 <Selector xpath='//p[has-class("foo")]' data='<p class="foo">Second</p>'>]
>>> response.xpath('//p[has-class("foo", "bar-baz")]')
[<Selector xpath='//p[has-class("foo", "bar-baz")]' data='<p class="foo bar-baz">First</p>'>]
>>> response.xpath('//p[has-class("foo", "bar")]')
[]
So XPath //p[has-class("foo", "bar-baz")] is roughly equivalent to CSS
p.foo.bar-baz. Please note, that it is slower in most of the cases,
because it’s a pure-Python function that’s invoked for every node in question
whereas the CSS lookup is translated into XPath and thus runs more efficiently,
so performance-wise its uses are limited to situations that are not easily
described with CSS selectors.
Parsel also simplifies adding your own XPath extensions.
- parsel.xpathfuncs.set_xpathfunc(fname, func)[source]
Register a custom extension function to use in XPath expressions.
The function
funcregistered underfnameidentifier will be called for every matching node, being passed acontextparameter as well as any parameters passed from the corresponding XPath expression.If
funcisNone, the extension function will be removed.See more in lxml documentation.
Built-in Selectors reference
Selector objects
- class scrapy.selector.Selector(*args, **kwargs)[source]
An instance of
Selectoris a wrapper over response to select certain parts of its content.responseis anHtmlResponseor anXmlResponseobject that will be used for selecting and extracting data.textis a unicode string or utf-8 encoded text for cases when aresponseisn’t available. Usingtextandresponsetogether is undefined behavior.typedefines the selector type, it can be"html","xml"orNone(default).If
typeisNone, the selector automatically chooses the best type based onresponsetype (see below), or defaults to"html"in case it is used together withtext.If
typeisNoneand aresponseis passed, the selector type is inferred from the response type as follows:"html"forHtmlResponsetype"xml"forXmlResponsetype"html"for anything else
Otherwise, if
typeis set, the selector type will be forced and no detection will occur.- xpath(query, namespaces=None, **kwargs)[source]
Find nodes matching the xpath
queryand return the result as aSelectorListinstance with all elements flattened. List elements implementSelectorinterface too.queryis a string containing the XPATH query to apply.namespacesis an optionalprefix: namespace-urimapping (dict) for additional prefixes to those registered withregister_namespace(prefix, uri). Contrary toregister_namespace(), these prefixes are not saved for future calls.Any additional named arguments can be used to pass values for XPath variables in the XPath expression, e.g.:
selector.xpath('//a[href=$url]', url="http://www.example.com")
Note
For convenience, this method can be called as
response.xpath()
- css(query)[source]
Apply the given CSS selector and return a
SelectorListinstance.queryis a string containing the CSS selector to apply.In the background, CSS queries are translated into XPath queries using cssselect library and run
.xpath()method.Note
For convenience, this method can be called as
response.css()
- get()[source]
Serialize and return the matched nodes in a single unicode string. Percent encoded content is unquoted.
See also: extract() and extract_first()
- attrib
Return the attributes dictionary for underlying element.
See also: Selecting element attributes.
- re(regex, replace_entities=True)[source]
Apply the given regex and return a list of unicode strings with the matches.
regexcan be either a compiled regular expression or a string which will be compiled to a regular expression usingre.compile(regex).By default, character entity references are replaced by their corresponding character (except for
&and<). Passingreplace_entitiesasFalseswitches off these replacements.
- re_first(regex, default=None, replace_entities=True)[source]
Apply the given regex and return the first unicode string which matches. If there is no match, return the default value (
Noneif the argument is not provided).By default, character entity references are replaced by their corresponding character (except for
&and<). Passingreplace_entitiesasFalseswitches off these replacements.
- register_namespace(prefix, uri)[source]
Register the given namespace to be used in this
Selector. Without registering namespaces you can’t select or extract data from non-standard namespaces. See Selector examples on XML response.
- remove_namespaces()[source]
Remove all namespaces, allowing to traverse the document using namespace-less xpaths. See Removing namespaces.
- __bool__()[source]
Return
Trueif there is any real content selected orFalseotherwise. In other words, the boolean value of aSelectoris given by the contents it selects.
- getall()[source]
Serialize and return the matched node in a 1-element list of unicode strings.
This method is added to Selector for consistency; it is more useful with SelectorList. See also: extract() and extract_first()
SelectorList objects
- class scrapy.selector.SelectorList(iterable=(), /)[source]
The
SelectorListclass is a subclass of the builtinlistclass, which provides a few additional methods.- xpath(xpath, namespaces=None, **kwargs)[source]
Call the
.xpath()method for each element in this list and return their results flattened as anotherSelectorList.queryis the same argument as the one inSelector.xpath()namespacesis an optionalprefix: namespace-urimapping (dict) for additional prefixes to those registered withregister_namespace(prefix, uri). Contrary toregister_namespace(), these prefixes are not saved for future calls.Any additional named arguments can be used to pass values for XPath variables in the XPath expression, e.g.:
selector.xpath('//a[href=$url]', url="http://www.example.com")
- css(query)[source]
Call the
.css()method for each element in this list and return their results flattened as anotherSelectorList.queryis the same argument as the one inSelector.css()
- getall()[source]
Call the
.get()method for each element is this list and return their results flattened, as a list of unicode strings.See also: extract() and extract_first()
- get(default=None)[source]
Return the result of
.get()for the first element in this list. If the list is empty, return the default value.See also: extract() and extract_first()
- re(regex, replace_entities=True)[source]
Call the
.re()method for each element in this list and return their results flattened, as a list of unicode strings.By default, character entity references are replaced by their corresponding character (except for
&and<. Passingreplace_entitiesasFalseswitches off these replacements.
- re_first(regex, default=None, replace_entities=True)[source]
Call the
.re()method for the first element in this list and return the result in an unicode string. If the list is empty or the regex doesn’t match anything, return the default value (Noneif the argument is not provided).By default, character entity references are replaced by their corresponding character (except for
&and<. Passingreplace_entitiesasFalseswitches off these replacements.
- attrib
Return the attributes dictionary for the first element. If the list is empty, return an empty dict.
See also: Selecting element attributes.
Examples
Selector examples on HTML response
Here are some Selector examples to illustrate several concepts.
In all cases, we assume there is already a Selector instantiated with
a HtmlResponse object like this:
sel = Selector(html_response)
Select all
<h1>elements from an HTML response body, returning a list ofSelectorobjects (i.e. aSelectorListobject):sel.xpath("//h1")
Extract the text of all
<h1>elements from an HTML response body, returning a list of strings:sel.xpath("//h1").getall() # this includes the h1 tag sel.xpath("//h1/text()").getall() # this excludes the h1 tag
Iterate over all
<p>tags and print their class attribute:for node in sel.xpath("//p"): print(node.attrib['class'])
Selector examples on XML response
Here are some examples to illustrate concepts for Selector objects
instantiated with an XmlResponse object:
sel = Selector(xml_response)
Select all
<product>elements from an XML response body, returning a list ofSelectorobjects (i.e. aSelectorListobject):sel.xpath("//product")
Extract all prices from a Google Base XML feed which requires registering a namespace:
sel.register_namespace("g", "http://base.google.com/ns/1.0")
sel.xpath("//g:price").getall()
Items
The main goal in scraping is to extract structured data from unstructured sources, typically, web pages. Spiders may return the extracted data as items, Python objects that define key-value pairs.
Scrapy supports multiple types of items. When you create an item, you may use whichever type of item you want. When you write code that receives an item, your code should work for any item type.
Item Types
Scrapy supports the following types of items, via the itemadapter library: dictionaries, Item objects, dataclass objects, and attrs objects.
Dictionaries
As an item type, dict is convenient and familiar.
Item objects
Item provides a dict-like API plus additional features that
make it the most feature-complete item type:
- class scrapy.item.Item([arg])
- class scrapy.Item([arg])
Itemobjects replicate the standarddictAPI, including its__init__method.Itemallows defining field names, so that:KeyErroris raised when using undefined field names (i.e. prevents typos going unnoticed)Item exporters can export all fields by default even if the first scraped object does not have values for all of them
Itemalso allows defining field metadata, which can be used to customize serialization.trackreftracksItemobjects to help find memory leaks (see Debugging memory leaks with trackref).Itemobjects also provide the following additional API members:- Item.copy()
- Item.deepcopy()
Return a
deepcopy()of this item.
- fields
A dictionary containing all declared fields for this Item, not only those populated. The keys are the field names and the values are the
Fieldobjects used in the Item declaration.
Example:
from scrapy.item import Item, Field

class CustomItem(Item):
    one_field = Field()
    another_field = Field()
Dataclass objects
New in version 2.2.
dataclass() allows defining item classes with field names,
so that item exporters can export all fields by
default even if the first scraped object does not have values for all of them.
Additionally, dataclass items also allow to:
define the type and default value of each defined field.
define custom field metadata through
dataclasses.field(), which can be used to customize serialization.
They work natively in Python 3.7 or later, or using the dataclasses backport in Python 3.6.
Example:
from dataclasses import dataclass

@dataclass
class CustomItem:
    one_field: str
    another_field: int
Note
Field types are not enforced at run time.
attr.s objects
New in version 2.2.
attr.s() allows defining item classes with field names,
so that item exporters can export all fields by
default even if the first scraped object does not have values for all of them.
Additionally, attr.s items also allow to:
define the type and default value of each defined field.
define custom field metadata, which can be used to customize serialization.
In order to use this type, the attrs package needs to be installed.
Example:
import attr

@attr.s
class CustomItem:
    one_field = attr.ib()
    another_field = attr.ib()
Working with Item objects
Declaring Item subclasses
Item subclasses are declared using a simple class definition syntax and
Field objects. Here is an example:
import scrapy

class Product(scrapy.Item):
    name = scrapy.Field()
    price = scrapy.Field()
    stock = scrapy.Field()
    tags = scrapy.Field()
    last_updated = scrapy.Field(serializer=str)
Note
Those familiar with Django will notice that Scrapy Items are declared similar to Django Models, except that Scrapy Items are much simpler as there is no concept of different field types.
Declaring fields
Field objects are used to specify metadata for each field. For
example, the serializer function for the last_updated field illustrated in
the example above.
You can specify any kind of metadata for each field. There is no restriction on
the values accepted by Field objects. For this same
reason, there is no reference list of all available metadata keys. Each key
defined in Field objects could be used by a different component, and
only those components know about it. You can also define and use any other
Field key in your project too, for your own needs. The main goal of
Field objects is to provide a way to define all field metadata in one
place. Typically, those components whose behaviour depends on each field use
certain field keys to configure that behaviour. You must refer to their
documentation to see which metadata keys are used by each component.
It’s important to note that the Field objects used to declare the item
do not stay assigned as class attributes. Instead, they can be accessed through
the Item.fields attribute.
- class scrapy.item.Field([arg])
- class scrapy.Field([arg])
The
Fieldclass is just an alias to the built-indictclass and doesn’t provide any extra functionality or attributes. In other words,Fieldobjects are plain-old Python dicts. A separate class is used to support the item declaration syntax based on class attributes.
Note
Field metadata can also be declared for dataclass and attrs
items. Please refer to the documentation for dataclasses.field and
attr.ib for additional information.
Working with Item objects
Here are some examples of common tasks performed with items, using the
Product item declared above. You will
notice the API is very similar to the dict API.
Creating items
>>> product = Product(name='Desktop PC', price=1000)
>>> print(product)
Product(name='Desktop PC', price=1000)
Getting field values
>>> product['name']
Desktop PC
>>> product.get('name')
Desktop PC
>>> product['price']
1000
>>> product['last_updated']
Traceback (most recent call last):
    ...
KeyError: 'last_updated'
>>> product.get('last_updated', 'not set')
not set
>>> product['lala'] # getting unknown field
Traceback (most recent call last):
    ...
KeyError: 'lala'
>>> product.get('lala', 'unknown field')
'unknown field'
>>> 'name' in product  # is name field populated?
True
>>> 'last_updated' in product  # is last_updated populated?
False
>>> 'last_updated' in product.fields  # is last_updated a declared field?
True
>>> 'lala' in product.fields  # is lala a declared field?
False
Setting field values
>>> product['last_updated'] = 'today'
>>> product['last_updated']
today
>>> product['lala'] = 'test' # setting unknown field
Traceback (most recent call last):
    ...
KeyError: 'Product does not support field: lala'
Accessing all populated values
To access all populated values, just use the typical dict API:
>>> product.keys()
['price', 'name']
>>> product.items()
[('price', 1000), ('name', 'Desktop PC')]
Copying items
To copy an item, you must first decide whether you want a shallow copy or a deep copy.
If your item contains mutable values like lists or dictionaries, a shallow copy will keep references to the same mutable values across all different copies.
For example, if you have an item with a list of tags, and you create a shallow copy of that item, both the original item and the copy have the same list of tags. Adding a tag to the list of one of the items will add the tag to the other item as well.
If that is not the desired behavior, use a deep copy instead.
See copy for more information.
To create a shallow copy of an item, you can either call
copy() on an existing item
(product2 = product.copy()) or instantiate your item class from an existing
item (product2 = Product(product)).
To create a deep copy, call deepcopy() instead
(product2 = product.deepcopy()).
Other common tasks
Creating dicts from items:
>>> dict(product) # create a dict from all populated values
{'price': 1000, 'name': 'Desktop PC'}
Creating items from dicts:
>>> Product({'name': 'Laptop PC', 'price': 1500})
Product(price=1500, name='Laptop PC')
>>> Product({'name': 'Laptop PC', 'lala': 1500}) # warning: unknown field in dict
Traceback (most recent call last):
    ...
KeyError: 'Product does not support field: lala'
Extending Item subclasses
You can extend Items (to add more fields or to change some metadata for some fields) by declaring a subclass of your original Item.
For example:
class DiscountedProduct(Product):
    discount_percent = scrapy.Field(serializer=str)
    discount_expiration_date = scrapy.Field()
You can also extend field metadata by using the previous field metadata and appending more values, or changing existing values, like this:
class SpecificProduct(Product):
    name = scrapy.Field(Product.fields['name'], serializer=my_serializer)
That adds (or replaces) the serializer metadata key for the name field,
keeping all the previously existing metadata values.
Supporting All Item Types
In code that receives an item, such as methods of item pipelines or spider middlewares, it is a good practice to use the
ItemAdapter class and the
is_item() function to write code that works for
any supported item type:
Item Loaders
Item Loaders provide a convenient mechanism for populating scraped items. Even though items can be populated directly, Item Loaders provide a much more convenient API for populating them from a scraping process, by automating some common tasks like parsing the raw extracted data before assigning it.
In other words, items provide the container of scraped data, while Item Loaders provide the mechanism for populating that container.
Item Loaders are designed to provide a flexible, efficient and easy mechanism for extending and overriding different field parsing rules, either by spider, or by source format (HTML, XML, etc) without becoming a nightmare to maintain.
Note
Item Loaders are an extension of the itemloaders library that make it easier to work with Scrapy by adding support for responses.
Using Item Loaders to populate items
To use an Item Loader, you must first instantiate it. You can either
instantiate it with an item object or without one, in which
case an item object is automatically created in the
Item Loader __init__ method using the item class
specified in the ItemLoader.default_item_class attribute.
Then, you start collecting values into the Item Loader, typically using Selectors. You can add more than one value to the same item field; the Item Loader will know how to “join” those values later using a proper processing function.
Note
Collected data is internally stored as lists,
allowing to add several values to the same field.
If an item argument is passed when creating a loader,
each of the item’s values will be stored as-is if it’s already
an iterable, or wrapped with a list if it’s a single value.
Here is a typical Item Loader usage in a Spider, using the Product item declared in the Items chapter:
from scrapy.loader import ItemLoader
from myproject.items import Product

def parse(self, response):
    l = ItemLoader(item=Product(), response=response)
    l.add_xpath('name', '//div[@class="product_name"]')
    l.add_xpath('name', '//div[@class="product_title"]')
    l.add_xpath('price', '//p[@id="price"]')
    l.add_css('stock', 'p#stock')
    l.add_value('last_updated', 'today') # you can also use literal values
    return l.load_item()
By quickly looking at that code, we can see the name field is being
extracted from two different XPath locations in the page:
//div[@class="product_name"]//div[@class="product_title"]
In other words, data is being collected by extracting it from two XPath
locations, using the add_xpath() method. This is the
data that will be assigned to the name field later.
Afterwards, similar calls are used for price and stock fields
(the latter using a CSS selector with the add_css() method),
and finally the last_update field is populated directly with a literal value
(today) using a different method: add_value().
Finally, when all data is collected, the ItemLoader.load_item() method is
called which actually returns the item populated with the data
previously extracted and collected with the add_xpath(),
add_css(), and add_value() calls.
Working with dataclass items
By default, dataclass items require all fields to be
passed when created. This could be an issue when using dataclass items with
item loaders: unless a pre-populated item is passed to the loader, fields
will be populated incrementally using the loader’s add_xpath(),
add_css() and add_value() methods.
One approach to overcome this is to define items using the
field() function, with a default argument:
from dataclasses import dataclass, field
from typing import Optional

@dataclass
class InventoryItem:
    name: Optional[str] = field(default=None)
    price: Optional[float] = field(default=None)
    stock: Optional[int] = field(default=None)
Input and Output processors
An Item Loader contains one input processor and one output processor for each
(item) field. The input processor processes the extracted data as soon as it’s
received (through the add_xpath(), add_css() or
add_value() methods) and the result of the input processor is
collected and kept inside the ItemLoader. After collecting all data, the
ItemLoader.load_item() method is called to populate and get the populated
item object. That’s when the output processor is
called with the data previously collected (and processed using the input
processor). The result of the output processor is the final value that gets
assigned to the item.
Let’s see an example to illustrate how the input and output processors are called for a particular field (the same applies for any other field):
l = ItemLoader(Product(), some_selector)
l.add_xpath('name', xpath1) # (1)
l.add_xpath('name', xpath2) # (2)
l.add_css('name', css) # (3)
l.add_value('name', 'test') # (4)
return l.load_item() # (5)
So what happens is:
Data from
xpath1is extracted, and passed through the input processor of thenamefield. The result of the input processor is collected and kept in the Item Loader (but not yet assigned to the item).Data from
xpath2is extracted, and passed through the same input processor used in (1). The result of the input processor is appended to the data collected in (1) (if any).This case is similar to the previous ones, except that the data is extracted from the
cssCSS selector, and passed through the same input processor used in (1) and (2). The result of the input processor is appended to the data collected in (1) and (2) (if any).This case is also similar to the previous ones, except that the value to be collected is assigned directly, instead of being extracted from a XPath expression or a CSS selector. However, the value is still passed through the input processors. In this case, since the value is not iterable it is converted to an iterable of a single element before passing it to the input processor, because input processor always receive iterables.
The data collected in steps (1), (2), (3) and (4) is passed through the output processor of the
namefield. The result of the output processor is the value assigned to thenamefield in the item.
It’s worth noticing that processors are just callable objects, which are called with the data to be parsed, and return a parsed value. So you can use any function as input or output processor. The only requirement is that they must accept one (and only one) positional argument, which will be an iterable.
Changed in version 2.0: Processors no longer need to be methods.
Note
Both input and output processors must receive an iterable as their first argument. The output of those functions can be anything. The result of input processors will be appended to an internal list (in the Loader) containing the collected values (for that field). The result of the output processors is the value that will be finally assigned to the item.
The other thing you need to keep in mind is that the values returned by input processors are collected internally (in lists) and then passed to output processors to populate the fields.
Last, but not least, itemloaders comes with some commonly used processors built-in for convenience.
Declaring Item Loaders
Item Loaders are declared using a class definition syntax. Here is an example:
from itemloaders.processors import TakeFirst, MapCompose, Join
from scrapy.loader import ItemLoader

class ProductLoader(ItemLoader):

    default_output_processor = TakeFirst()

    name_in = MapCompose(str.title)
    name_out = Join()

    price_in = MapCompose(str.strip)

    # ...
As you can see, input processors are declared using the _in suffix while
output processors are declared using the _out suffix. And you can also
declare a default input/output processors using the
ItemLoader.default_input_processor and
ItemLoader.default_output_processor attributes.
Declaring Input and Output Processors
As seen in the previous section, input and output processors can be declared in the Item Loader definition, and it’s very common to declare input processors this way. However, there is one more place where you can specify the input and output processors to use: in the Item Field metadata. Here is an example:
import scrapy
from itemloaders.processors import Join, MapCompose, TakeFirst
from w3lib.html import remove_tags

def filter_price(value):
    if value.isdigit():
        return value

class Product(scrapy.Item):
    name = scrapy.Field(
        input_processor=MapCompose(remove_tags),
        output_processor=Join(),
    )
    price = scrapy.Field(
        input_processor=MapCompose(remove_tags, filter_price),
        output_processor=TakeFirst(),
    )
>>> from scrapy.loader import ItemLoader
>>> il = ItemLoader(item=Product())
>>> il.add_value('name', ['Welcome to my', '<strong>website</strong>'])
>>> il.add_value('price', ['€', '<span>1000</span>'])
>>> il.load_item()
{'name': 'Welcome to my website', 'price': '1000'}
The precedence order, for both input and output processors, is as follows:
Item Loader field-specific attributes:
field_inandfield_out(most precedence)Field metadata (
input_processorandoutput_processorkey)Item Loader defaults:
ItemLoader.default_input_processor()andItemLoader.default_output_processor()(least precedence)
See also: Reusing and extending Item Loaders.
Item Loader Context
The Item Loader Context is a dict of arbitrary key/values which is shared among all input and output processors in the Item Loader. It can be passed when declaring, instantiating or using Item Loader. They are used to modify the behaviour of the input/output processors.
For example, suppose you have a function parse_length which receives a text
value and extracts a length from it:
def parse_length(text, loader_context):
    unit = loader_context.get('unit', 'm')
    # ... length parsing code goes here ...
    return parsed_length
By accepting a loader_context argument the function is explicitly telling
the Item Loader that it’s able to receive an Item Loader context, so the Item
Loader passes the currently active context when calling it, and the processor
function (parse_length in this case) can thus use them.
There are several ways to modify Item Loader context values:
By modifying the currently active Item Loader context (
contextattribute):loader = ItemLoader(product) loader.context['unit'] = 'cm'
On Item Loader instantiation (the keyword arguments of Item Loader
__init__method are stored in the Item Loader context):loader = ItemLoader(product, unit='cm')
On Item Loader declaration, for those input/output processors that support instantiating them with an Item Loader context.
MapComposeis one of them:class ProductLoader(ItemLoader): length_out = MapCompose(parse_length, unit='cm')
ItemLoader objects
- class scrapy.loader.ItemLoader(item=None, selector=None, response=None, parent=None, **context)[source]
A user-friendly abstraction to populate an item with data by applying field processors to scraped data. When instantiated with a
selectoror aresponseit supports data extraction from web pages using selectors.- Parameters
item (scrapy.item.Item) – The item instance to populate using subsequent calls to
add_xpath(),add_css(), oradd_value().selector (
Selectorobject) – The selector to extract data from, when using theadd_xpath(),add_css(),replace_xpath(), orreplace_css()method.response (
Responseobject) – The response used to construct the selector using thedefault_selector_class, unless the selector argument is given, in which case this argument is ignored.
If no item is given, one is instantiated automatically using the class in
default_item_class.The item, selector, response and remaining keyword arguments are assigned to the Loader context (accessible through the
contextattribute).- item
The item object being parsed by this Item Loader. This is mostly used as a property so, when attempting to override this value, you may want to check out
default_item_classfirst.
- default_item_class
An item class (or factory), used to instantiate items when not given in the
__init__method.
- default_input_processor
The default input processor to use for those fields which don’t specify one.
- default_output_processor
The default output processor to use for those fields which don’t specify one.
- default_selector_class
The class used to construct the
selectorof thisItemLoader, if only a response is given in the__init__method. If a selector is given in the__init__method this attribute is ignored. This attribute is sometimes overridden in subclasses.
- selector
The
Selectorobject to extract data from. It’s either the selector given in the__init__method or one created from the response given in the__init__method using thedefault_selector_class. This attribute is meant to be read-only.
- add_css(field_name, css, *processors, **kw)[source]
Similar to
ItemLoader.add_value()but receives a CSS selector instead of a value, which is used to extract a list of unicode strings from the selector associated with thisItemLoader.See
get_css()forkwargs.- Parameters
css (str) – the CSS selector to extract data from
Examples:
# HTML snippet: <p class="product-name">Color TV</p>
loader.add_css('name', 'p.product-name')
# HTML snippet: <p id="price">the price is $1200</p>
loader.add_css('price', 'p#price', re='the price is (.*)')
- add_value(field_name, value, *processors, **kw)[source]
Process and then add the given
valuefor the given field.The value is first passed through
get_value()by giving theprocessorsandkwargs, and then passed through the field input processor and its result appended to the data collected for that field. If the field already contains collected data, the new data is added.The given
field_namecan beNone, in which case values for multiple fields may be added. And the processed value should be a dict with field_name mapped to values.Examples:
loader.add_value('name', 'Color TV')
loader.add_value('colours', ['white', 'blue'])
loader.add_value('length', '100')
loader.add_value('name', 'name: foo', TakeFirst(), re='name: (.+)')
loader.add_value(None, {'name': 'foo', 'sex': 'male'})
- add_xpath(field_name, xpath, *processors, **kw)[source]
Similar to
ItemLoader.add_value()but receives an XPath instead of a value, which is used to extract a list of strings from the selector associated with thisItemLoader.See
get_xpath()forkwargs.- Parameters
xpath (str) – the XPath to extract data from
Examples:
# HTML snippet: <p class="product-name">Color TV</p>
loader.add_xpath('name', '//p[@class="product-name"]')
# HTML snippet: <p id="price">the price is $1200</p>
loader.add_xpath('price', '//p[@id="price"]', re='the price is (.*)')
- get_css(css, *processors, **kw)[source]
Similar to
ItemLoader.get_value()but receives a CSS selector instead of a value, which is used to extract a list of unicode strings from the selector associated with thisItemLoader.- Parameters
Examples:
# HTML snippet: <p class="product-name">Color TV</p>
loader.get_css('p.product-name')
# HTML snippet: <p id="price">the price is $1200</p>
loader.get_css('p#price', TakeFirst(), re='the price is (.*)')
- get_output_value(field_name)[source]
Return the collected values parsed using the output processor, for the given field. This method doesn’t populate or modify the item at all.
- get_value(value, *processors, **kw)[source]
Process the given
valueby the givenprocessorsand keyword arguments.Available keyword arguments:
- Parameters
re (str or Pattern) – a regular expression to use for extracting data from the given value using
extract_regex()method, applied before processors
Examples:
>>> from itemloaders import ItemLoader
>>> from itemloaders.processors import TakeFirst
>>> loader = ItemLoader()
>>> loader.get_value('name: foo', TakeFirst(), str.upper, re='name: (.+)')
'FOO'
- get_xpath(xpath, *processors, **kw)[source]
Similar to
ItemLoader.get_value()but receives an XPath instead of a value, which is used to extract a list of unicode strings from the selector associated with thisItemLoader.- Parameters
Examples:
# HTML snippet: <p class="product-name">Color TV</p>
loader.get_xpath('//p[@class="product-name"]')
# HTML snippet: <p id="price">the price is $1200</p>
loader.get_xpath('//p[@id="price"]', TakeFirst(), re='the price is (.*)')
- load_item()[source]
Populate the item with the data collected so far, and return it. The data collected is first passed through the output processors to get the final value to assign to each item field.
- nested_css(css, **context)[source]
Create a nested loader with a css selector. The supplied selector is applied relative to selector associated with this
ItemLoader. The nested loader shares the item with the parentItemLoaderso calls toadd_xpath(),add_value(),replace_value(), etc. will behave as expected.
- nested_xpath(xpath, **context)[source]
Create a nested loader with an xpath selector. The supplied selector is applied relative to selector associated with this
ItemLoader. The nested loader shares the item with the parentItemLoaderso calls toadd_xpath(),add_value(),replace_value(), etc. will behave as expected.
- replace_css(field_name, css, *processors, **kw)[source]
Similar to
add_css()but replaces collected data instead of adding it.
- replace_value(field_name, value, *processors, **kw)[source]
Similar to
add_value()but replaces the collected data with the new value instead of adding it.
- replace_xpath(field_name, xpath, *processors, **kw)[source]
Similar to
add_xpath()but replaces collected data instead of adding it.
Nested Loaders
When parsing related values from a subsection of a document, it can be useful to create nested loaders. Imagine you’re extracting details from a footer of a page that looks something like:
Example:
<footer>
    <a class="social" href="https://facebook.com/whatever">Like Us</a>
    <a class="social" href="https://twitter.com/whatever">Follow Us</a>
    <a class="email" href="mailto:whatever@example.com">Email Us</a>
</footer>
Without nested loaders, you need to specify the full xpath (or css) for each value that you wish to extract.
Example:
loader = ItemLoader(item=Item())
# load stuff not in the footer
loader.add_xpath('social', '//footer/a[@class = "social"]/@href')
loader.add_xpath('email', '//footer/a[@class = "email"]/@href')
loader.load_item()
Instead, you can create a nested loader with the footer selector and add values relative to the footer. The functionality is the same but you avoid repeating the footer selector.
Example:
loader = ItemLoader(item=Item())
# load stuff not in the footer
footer_loader = loader.nested_xpath('//footer')
footer_loader.add_xpath('social', 'a[@class = "social"]/@href')
footer_loader.add_xpath('email', 'a[@class = "email"]/@href')
# no need to call footer_loader.load_item()
loader.load_item()
You can nest loaders arbitrarily and they work with either xpath or css selectors. As a general guideline, use nested loaders when they make your code simpler but do not go overboard with nesting or your parser can become difficult to read.
Reusing and extending Item Loaders
As your project grows bigger and acquires more and more spiders, maintenance becomes a fundamental problem, especially when you have to deal with many different parsing rules for each spider, having a lot of exceptions, but also wanting to reuse the common processors.
Item Loaders are designed to ease the maintenance burden of parsing rules, without losing flexibility and, at the same time, providing a convenient mechanism for extending and overriding them. For this reason Item Loaders support traditional Python class inheritance for dealing with differences of specific spiders (or groups of spiders).
Suppose, for example, that some particular site encloses their product names in
three dashes (e.g. ---Plasma TV---) and you don’t want to end up scraping
those dashes in the final product names.
Here’s how you can remove those dashes by reusing and extending the default
Product Item Loader (ProductLoader):
from itemloaders.processors import MapCompose
from myproject.ItemLoaders import ProductLoader

def strip_dashes(x):
    return x.strip('-')

class SiteSpecificLoader(ProductLoader):
    name_in = MapCompose(strip_dashes, ProductLoader.name_in)
Another case where extending Item Loaders can be very helpful is when you have
multiple source formats, for example XML and HTML. In the XML version you may
want to remove CDATA occurrences. Here’s an example of how to do it:
from itemloaders.processors import MapCompose
from myproject.ItemLoaders import ProductLoader
from myproject.utils.xml import remove_cdata

class XmlProductLoader(ProductLoader):
    name_in = MapCompose(remove_cdata, ProductLoader.name_in)
And that’s how you typically extend input processors.
As for output processors, it is more common to declare them in the field metadata, as they usually depend only on the field and not on each specific site parsing rule (as input processors do). See also: Declaring Input and Output Processors.
There are many other possible ways to extend, inherit and override your Item Loaders, and different Item Loaders hierarchies may fit better for different projects. Scrapy only provides the mechanism; it doesn’t impose any specific organization of your Loaders collection - that’s up to you and your project’s needs.
Scrapy shell
The Scrapy shell is an interactive shell where you can try and debug your scraping code very quickly, without having to run the spider. It’s meant to be used for testing data extraction code, but you can actually use it for testing any kind of code as it is also a regular Python shell.
The shell is used for testing XPath or CSS expressions and see how they work and what data they extract from the web pages you’re trying to scrape. It allows you to interactively test your expressions while you’re writing your spider, without having to run the spider to test every change.
Once you get familiarized with the Scrapy shell, you’ll see that it’s an invaluable tool for developing and debugging your spiders.
Configuring the shell
If you have IPython installed, the Scrapy shell will use it (instead of the standard Python console). The IPython console is much more powerful and provides smart auto-completion and colorized output, among other things.
We highly recommend you install IPython, specially if you’re working on Unix systems (where IPython excels). See the IPython installation guide for more info.
Scrapy also has support for bpython, and will try to use it where IPython is unavailable.
Through Scrapy’s settings you can configure it to use any one of
ipython, bpython or the standard python shell, regardless of which
are installed. This is done by setting the SCRAPY_PYTHON_SHELL environment
variable; or by defining it in your scrapy.cfg:
[settings]
shell = bpython
Launch the shell
To launch the Scrapy shell you can use the shell command like
this:
scrapy shell <url>
Where the <url> is the URL you want to scrape.
shell also works for local files. This can be handy if you want
to play around with a local copy of a web page. shell understands
the following syntaxes for local files:
# UNIX-style
scrapy shell ./path/to/file.html
scrapy shell ../other/path/to/file.html
scrapy shell /absolute/path/to/file.html

# File URI
scrapy shell file:///absolute/path/to/file.html
Note
When using relative file paths, be explicit and prepend them
with ./ (or ../ when relevant).
scrapy shell index.html will not work as one might expect (and
this is by design, not a bug).
Because shell favors HTTP URLs over File URIs,
and index.html being syntactically similar to example.com,
shell will treat index.html as a domain name and trigger
a DNS lookup error:
$ scrapy shell index.html
[ ... scrapy shell starts ... ]
[ ... traceback ... ]
twisted.internet.error.DNSLookupError: DNS lookup failed:
address 'index.html' not found: [Errno -5] No address associated with hostname.
shell will not test beforehand if a file called index.html
exists in the current directory. Again, be explicit.
Using the shell
The Scrapy shell is just a regular Python console (or IPython console if you have it available) which provides some additional shortcut functions for convenience.
Available Shortcuts
shelp()- print a help with the list of available objects and shortcutsfetch(url[, redirect=True])- fetch a new response from the given URL and update all related objects accordingly. You can optionally ask for HTTP 3xx redirections to not be followed by passingredirect=Falsefetch(request)- fetch a new response from the given request and update all related objects accordingly.view(response)- open the given response in your local web browser, for inspection. This will add a <base> tag to the response body in order for external links (such as images and style sheets) to display properly. Note, however, that this will create a temporary file in your computer, which won’t be removed automatically.
Available Scrapy objects
The Scrapy shell automatically creates some convenient objects from the
downloaded page, like the Response object and the
Selector objects (for both HTML and XML
content).
Those objects are:
crawler- the currentCrawlerobject.spider- the Spider which is known to handle the URL, or aSpiderobject if there is no spider found for the current URLrequest- aRequestobject of the last fetched page. You can modify this request usingreplace()or fetch a new request (without leaving the shell) using thefetchshortcut.response- aResponseobject containing the last fetched pagesettings- the current Scrapy settings
Example of shell session
Here’s an example of a typical shell session where we start by scraping the https://scrapy.org page, and then proceed to scrape the https://old.reddit.com/ page. Finally, we modify the (Reddit) request method to POST and re-fetch it getting an error. We end the session by typing Ctrl-D (in Unix systems) or Ctrl-Z in Windows.
Keep in mind that the data extracted here may not be the same when you try it, as those pages are not static and could have changed by the time you test this. The only purpose of this example is to get you familiarized with how the Scrapy shell works.
First, we launch the shell:
scrapy shell 'https://scrapy.org' --nolog
Note
Remember to always enclose URLs in quotes when running the Scrapy shell from
the command line, otherwise URLs containing arguments (i.e. the & character)
will not work.
On Windows, use double quotes instead:
scrapy shell "https://scrapy.org" --nolog
Then, the shell fetches the URL (using the Scrapy downloader) and prints the
list of available objects and useful shortcuts (you’ll notice that these lines
all start with the [s] prefix):
[s] Available Scrapy objects:
[s]   scrapy     scrapy module (contains scrapy.Request, scrapy.Selector, etc)
[s]   crawler    <scrapy.crawler.Crawler object at 0x7f07395dd690>
[s]   item       {}
[s]   request    <GET https://scrapy.org>
[s]   response   <200 https://scrapy.org/>
[s]   settings   <scrapy.settings.Settings object at 0x7f07395dd710>
[s]   spider     <DefaultSpider 'default' at 0x7f0735891690>
[s] Useful shortcuts:
[s]   fetch(url[, redirect=True]) Fetch URL and update local objects (by default, redirects are followed)
[s]   fetch(req)                  Fetch a scrapy.Request and update local objects
[s]   shelp()           Shell help (print this help)
[s]   view(response)    View response in a browser

>>>
After that, we can start playing with the objects:
>>> response.xpath('//title/text()').get()
'Scrapy | A Fast and Powerful Scraping and Web Crawling Framework'
>>> fetch("https://old.reddit.com/")
>>> response.xpath('//title/text()').get()
'reddit: the front page of the internet'
>>> request = request.replace(method="POST")
>>> fetch(request)
>>> response.status
404
>>> from pprint import pprint
>>> pprint(response.headers)
{'Accept-Ranges': ['bytes'],
 'Cache-Control': ['max-age=0, must-revalidate'],
 'Content-Type': ['text/html; charset=UTF-8'],
 'Date': ['Thu, 08 Dec 2016 16:21:19 GMT'],
 'Server': ['snooserv'],
 'Set-Cookie': ['loid=KqNLou0V9SKMX4qb4n; Domain=reddit.com; Max-Age=63071999; Path=/; expires=Sat, 08-Dec-2018 16:21:19 GMT; secure',
                'loidcreated=2016-12-08T16%3A21%3A19.445Z; Domain=reddit.com; Max-Age=63071999; Path=/; expires=Sat, 08-Dec-2018 16:21:19 GMT; secure',
                'loid=vi0ZVe4NkxNWdlH7r7; Domain=reddit.com; Max-Age=63071999; Path=/; expires=Sat, 08-Dec-2018 16:21:19 GMT; secure',
                'loidcreated=2016-12-08T16%3A21%3A19.459Z; Domain=reddit.com; Max-Age=63071999; Path=/; expires=Sat, 08-Dec-2018 16:21:19 GMT; secure'],
 'Vary': ['accept-encoding'],
 'Via': ['1.1 varnish'],
 'X-Cache': ['MISS'],
 'X-Cache-Hits': ['0'],
 'X-Content-Type-Options': ['nosniff'],
 'X-Frame-Options': ['SAMEORIGIN'],
 'X-Moose': ['majestic'],
 'X-Served-By': ['cache-cdg8730-CDG'],
 'X-Timer': ['S1481214079.394283,VS0,VE159'],
 'X-Ua-Compatible': ['IE=edge'],
 'X-Xss-Protection': ['1; mode=block']}
Invoking the shell from spiders to inspect responses
Sometimes you want to inspect the responses that are being processed in a certain point of your spider, if only to check that response you expect is getting there.
This can be achieved by using the scrapy.shell.inspect_response function.
Here’s an example of how you would call it from your spider:
import scrapy


class MySpider(scrapy.Spider):
    name = "myspider"
    start_urls = [
        "http://example.com",
        "http://example.org",
        "http://example.net",
    ]

    def parse(self, response):
        # We want to inspect one specific response.
        if ".org" in response.url:
            from scrapy.shell import inspect_response
            inspect_response(response, self)

        # Rest of parsing code.
When you run the spider, you will get something similar to this:
2014-01-23 17:48:31-0400 [scrapy.core.engine] DEBUG: Crawled (200) <GET http://example.com> (referer: None)
2014-01-23 17:48:31-0400 [scrapy.core.engine] DEBUG: Crawled (200) <GET http://example.org> (referer: None)
[s] Available Scrapy objects:
[s]   crawler    <scrapy.crawler.Crawler object at 0x1e16b50>
...

>>> response.url
'http://example.org'
Then, you can check if the extraction code is working:
>>> response.xpath('//h1[@class="fn"]')
[]
Nope, it doesn’t. So you can open the response in your web browser and see if it’s the response you were expecting:
>>> view(response)
True
Finally you hit Ctrl-D (or Ctrl-Z in Windows) to exit the shell and resume the crawling:
>>> ^D
2014-01-23 17:50:03-0400 [scrapy.core.engine] DEBUG: Crawled (200) <GET http://example.net> (referer: None)
...
Note that you can’t use the fetch shortcut here since the Scrapy engine is
blocked by the shell. However, after you leave the shell, the spider will
continue crawling where it stopped, as shown above.
Item Pipeline
After an item has been scraped by a spider, it is sent to the Item Pipeline which processes it through several components that are executed sequentially.
Each item pipeline component (sometimes referred as just “Item Pipeline”) is a Python class that implements a simple method. They receive an item and perform an action over it, also deciding if the item should continue through the pipeline or be dropped and no longer processed.
Typical uses of item pipelines are:
cleansing HTML data
validating scraped data (checking that the items contain certain fields)
checking for duplicates (and dropping them)
storing the scraped item in a database
Writing your own item pipeline
Each item pipeline component is a Python class that must implement the following method:
- process_item(self, item, spider)
This method is called for every item pipeline component.
item is an item object, see Supporting All Item Types.
process_item()must either: return an item object, return aDeferredor raise aDropItemexception.Dropped items are no longer processed by further pipeline components.
- Parameters
item (item object) – the scraped item
spider (
Spiderobject) – the spider which scraped the item
Additionally, they may also implement the following methods:
- open_spider(self, spider)
This method is called when the spider is opened.
- Parameters
spider (
Spiderobject) – the spider which was opened
- close_spider(self, spider)
This method is called when the spider is closed.
- Parameters
spider (
Spiderobject) – the spider which was closed
- from_crawler(cls, crawler)
If present, this classmethod is called to create a pipeline instance from a
Crawler. It must return a new instance of the pipeline. Crawler object provides access to all Scrapy core components like settings and signals; it is a way for pipeline to access them and hook its functionality into Scrapy.- Parameters
crawler (
Crawlerobject) – crawler that uses this pipeline
Item pipeline example
Price validation and dropping items with no prices
Let’s take a look at the following hypothetical pipeline that adjusts the
price attribute for those items that do not include VAT
(price_excludes_vat attribute), and drops those items which don’t
contain a price:
from itemadapter import ItemAdapter
from scrapy.exceptions import DropItem
class PricePipeline:

    vat_factor = 1.15

    def process_item(self, item, spider):
        adapter = ItemAdapter(item)
        if adapter.get('price'):
            if adapter.get('price_excludes_vat'):
                adapter['price'] = adapter['price'] * self.vat_factor
            return item
        else:
            raise DropItem(f"Missing price in {item}")
Write items to a JSON file
The following pipeline stores all scraped items (from all spiders) into a
single items.jl file, containing one item per line serialized in JSON
format:
import json

from itemadapter import ItemAdapter

class JsonWriterPipeline:

    def open_spider(self, spider):
        self.file = open('items.jl', 'w')

    def close_spider(self, spider):
        self.file.close()

    def process_item(self, item, spider):
        line = json.dumps(ItemAdapter(item).asdict()) + "\n"
        self.file.write(line)
        return item
Note
The purpose of JsonWriterPipeline is just to introduce how to write item pipelines. If you really want to store all scraped items into a JSON file you should use the Feed exports.
Write items to MongoDB
In this example we’ll write items to MongoDB using pymongo. MongoDB address and database name are specified in Scrapy settings; MongoDB collection is named after item class.
The main point of this example is to show how to use from_crawler()
method and how to clean up the resources properly.:
import pymongo
from itemadapter import ItemAdapter

class MongoPipeline:

    collection_name = 'scrapy_items'

    def __init__(self, mongo_uri, mongo_db):
        self.mongo_uri = mongo_uri
        self.mongo_db = mongo_db

    @classmethod
    def from_crawler(cls, crawler):
        return cls(
            mongo_uri=crawler.settings.get('MONGO_URI'),
            mongo_db=crawler.settings.get('MONGO_DATABASE', 'items')
        )

    def open_spider(self, spider):
        self.client = pymongo.MongoClient(self.mongo_uri)
        self.db = self.client[self.mongo_db]

    def close_spider(self, spider):
        self.client.close()

    def process_item(self, item, spider):
        self.db[self.collection_name].insert_one(ItemAdapter(item).asdict())
        return item
Take screenshot of item
This example demonstrates how to use coroutine syntax in
the process_item() method.
This item pipeline makes a request to a locally-running instance of Splash to render a screenshot of the item URL. After the request response is downloaded, the item pipeline saves the screenshot to a file and adds the filename to the item.
import hashlib
from urllib.parse import quote

import scrapy
from itemadapter import ItemAdapter
from scrapy.utils.defer import maybe_deferred_to_future


class ScreenshotPipeline:
    """Pipeline that uses Splash to render screenshot of
    every Scrapy item."""

    SPLASH_URL = "http://localhost:8050/render.png?url={}"

    async def process_item(self, item, spider):
        adapter = ItemAdapter(item)
        encoded_item_url = quote(adapter["url"])
        screenshot_url = self.SPLASH_URL.format(encoded_item_url)
        request = scrapy.Request(screenshot_url)
        response = await maybe_deferred_to_future(spider.crawler.engine.download(request, spider))

        if response.status != 200:
            # Error happened, return item.
            return item

        # Save screenshot to file, filename will be hash of url.
        url = adapter["url"]
        url_hash = hashlib.md5(url.encode("utf8")).hexdigest()
        filename = f"{url_hash}.png"
        with open(filename, "wb") as f:
            f.write(response.body)

        # Store filename in item.
        adapter["screenshot_filename"] = filename
        return item
Duplicates filter
A filter that looks for duplicate items, and drops those items that were already processed. Let’s say that our items have a unique id, but our spider returns multiples items with the same id:
from itemadapter import ItemAdapter
from scrapy.exceptions import DropItem

class DuplicatesPipeline:

    def __init__(self):
        self.ids_seen = set()

    def process_item(self, item, spider):
        adapter = ItemAdapter(item)
        if adapter['id'] in self.ids_seen:
            raise DropItem(f"Duplicate item found: {item!r}")
        else:
            self.ids_seen.add(adapter['id'])
            return item
Activating an Item Pipeline component
To activate an Item Pipeline component you must add its class to the
ITEM_PIPELINES setting, like in the following example:
ITEM_PIPELINES = {
    'myproject.pipelines.PricePipeline': 300,
    'myproject.pipelines.JsonWriterPipeline': 800,
}
The integer values you assign to classes in this setting determine the order in which they run: items go through from lower valued to higher valued classes. It’s customary to define these numbers in the 0-1000 range.
Feed exports
One of the most frequently required features when implementing scrapers is being able to store the scraped data properly and, quite often, that means generating an “export file” with the scraped data (commonly called “export feed”) to be consumed by other systems.
Scrapy provides this functionality out of the box with the Feed Exports, which allows you to generate feeds with the scraped items, using multiple serialization formats and storage backends.
Serialization formats
For serializing the scraped data, the feed exports use the Item exporters. These formats are supported out of the box:
But you can also extend the supported format through the
FEED_EXPORTERS setting.
JSON
Value for the
formatkey in theFEEDSsetting:jsonExporter used:
JsonItemExporterSee this warning if you’re using JSON with large feeds.
JSON lines
Value for the
formatkey in theFEEDSsetting:jsonlinesExporter used:
JsonLinesItemExporter
CSV
Value for the
formatkey in theFEEDSsetting:csvExporter used:
CsvItemExporterTo specify columns to export and their order use
FEED_EXPORT_FIELDS. Other feed exporters can also use this option, but it is important for CSV because unlike many other export formats CSV uses a fixed header.
XML
Value for the
formatkey in theFEEDSsetting:xmlExporter used:
XmlItemExporter
Pickle
Value for the
formatkey in theFEEDSsetting:pickleExporter used:
PickleItemExporter
Marshal
Value for the
formatkey in theFEEDSsetting:marshalExporter used:
MarshalItemExporter
Storages
When using the feed exports you define where to store the feed using one or multiple URIs
(through the FEEDS setting). The feed exports supports multiple
storage backend types which are defined by the URI scheme.
The storages backends supported out of the box are:
Google Cloud Storage (GCS) (requires google-cloud-storage)
Some storage backends may be unavailable if the required external libraries are not available. For example, the S3 backend is only available if the botocore library is installed.
Storage URI parameters
The storage URI can also contain parameters that get replaced when the feed is being created. These parameters are:
%(time)s- gets replaced by a timestamp when the feed is being created%(name)s- gets replaced by the spider name
Any other named parameter gets replaced by the spider attribute of the same
name. For example, %(site_id)s would get replaced by the spider.site_id
attribute the moment the feed is being created.
Here are some examples to illustrate:
Store in FTP using one directory per spider:
ftp://user:password@ftp.example.com/scraping/feeds/%(name)s/%(time)s.json
Store in S3 using one directory per spider:
s3://mybucket/scraping/feeds/%(name)s/%(time)s.json
Note
Spider arguments become spider attributes, hence they can also be used as storage URI parameters.
Storage backends
Local filesystem
The feeds are stored in the local filesystem.
URI scheme:
fileExample URI:
file:///tmp/export.csvRequired external libraries: none
Note that for the local filesystem storage (only) you can omit the scheme if
you specify an absolute path like /tmp/export.csv. This only works on Unix
systems though.
FTP
The feeds are stored in a FTP server.
URI scheme:
ftpExample URI:
ftp://user:pass@ftp.example.com/path/to/export.csvRequired external libraries: none
FTP supports two different connection modes: active or passive. Scrapy uses the passive connection
mode by default. To use the active connection mode instead, set the
FEED_STORAGE_FTP_ACTIVE setting to True.
This storage backend uses delayed file delivery.
S3
The feeds are stored on Amazon S3.
URI scheme:
s3Example URIs:
s3://mybucket/path/to/export.csvs3://aws_key:aws_secret@mybucket/path/to/export.csv
Required external libraries: botocore >= 1.4.87
The AWS credentials can be passed as user/password in the URI, or they can be passed through the following settings:
AWS_SESSION_TOKEN(only needed for temporary security credentials)
You can also define a custom ACL and custom endpoint for exported feeds using this setting:
This storage backend uses delayed file delivery.
Google Cloud Storage (GCS)
New in version 2.3.
The feeds are stored on Google Cloud Storage.
URI scheme:
gsExample URIs:
gs://mybucket/path/to/export.csv
Required external libraries: google-cloud-storage.
For more information about authentication, please refer to Google Cloud documentation.
You can set a Project ID and Access Control List (ACL) through the following settings:
This storage backend uses delayed file delivery.
Standard output
The feeds are written to the standard output of the Scrapy process.
URI scheme:
stdoutExample URI:
stdout:Required external libraries: none
Delayed file delivery
As indicated above, some of the described storage backends use delayed file delivery.
These storage backends do not upload items to the feed URI as those items are scraped. Instead, Scrapy writes items into a temporary local file, and only once all the file contents have been written (i.e. at the end of the crawl) is that file uploaded to the feed URI.
If you want item delivery to start earlier when using one of these storage
backends, use FEED_EXPORT_BATCH_ITEM_COUNT to split the output items
in multiple files, with the specified maximum item count per file. That way, as
soon as a file reaches the maximum item count, that file is delivered to the
feed URI, allowing item delivery to start way before the end of the crawl.
Item filtering
New in version 2.6.0.
You can filter items that you want to allow for a particular feed by using the
item_classes option in feeds options. Only items of
the specified types will be added to the feed.
The item_classes option is implemented by the ItemFilter
class, which is the default value of the item_filter feed option.
You can create your own custom filtering class by implementing ItemFilter’s
method accepts and taking feed_options as an argument.
For instance:
class MyCustomFilter:

    def __init__(self, feed_options):
        self.feed_options = feed_options

    def accepts(self, item):
        if "field1" in item and item["field1"] == "expected_data":
            return True
        return False
You can assign your custom filtering class to the item_filter option of a feed.
See FEEDS for examples.
ItemFilter
Post-Processing
New in version 2.6.0.
Scrapy provides an option to activate plugins to post-process feeds before they are exported to feed storages. In addition to using builtin plugins, you can create your own plugins.
These plugins can be activated through the postprocessing option of a feed.
The option must be passed a list of post-processing plugins in the order you want
the feed to be processed. These plugins can be declared either as an import string
or with the imported class of the plugin. Parameters to plugins can be passed
through the feed options. See feed options for examples.
Built-in Plugins
- class scrapy.extensions.postprocessing.GzipPlugin(file: BinaryIO, feed_options: Dict[str, Any])[source]
Compresses received data using gzip.
Accepted
feed_optionsparameters:gzip_compresslevel
gzip_mtime
gzip_filename
See
gzip.GzipFilefor more info about parameters.
- class scrapy.extensions.postprocessing.LZMAPlugin(file: BinaryIO, feed_options: Dict[str, Any])[source]
Compresses received data using lzma.
Accepted
feed_optionsparameters:lzma_format
lzma_check
lzma_preset
lzma_filters
Note
lzma_filterscannot be used in pypy version 7.3.1 and older.See
lzma.LZMAFilefor more info about parameters.
Custom Plugins
Each plugin is a class that must implement the following methods:
- __init__(self, file, feed_options)
Initialize the plugin.
- write(self, data)
Process and write data (
bytesormemoryview) into the plugin’s target file. It must return number of bytes written.
- close(self)
Close the target file object.
To pass a parameter to your plugin, use feed options. You
can then access those parameters from the __init__ method of your plugin.
Settings
These are the settings used for configuring the feed exports:
FEEDS(mandatory)
FEEDS
New in version 2.1.
Default: {}
A dictionary in which every key is a feed URI (or a pathlib.Path
object) and each value is a nested dictionary containing configuration
parameters for the specific feed.
This setting is required for enabling the feed export feature.
See Storage backends for supported URI schemes.
For instance:
{
'items.json': {
'format': 'json',
'encoding': 'utf8',
'store_empty': False,
'item_classes': [MyItemClass1, 'myproject.items.MyItemClass2'],
'fields': None,
'indent': 4,
'item_export_kwargs': {
'export_empty_fields': True,
},
},
'/home/user/documents/items.xml': {
'format': 'xml',
'fields': ['name', 'price'],
'item_filter': MyCustomFilter1,
'encoding': 'latin1',
'indent': 8,
},
pathlib.Path('items.csv.gz'): {
'format': 'csv',
'fields': ['price', 'name'],
'item_filter': 'myproject.filters.MyCustomFilter2',
'postprocessing': [MyPlugin1, 'scrapy.extensions.postprocessing.GzipPlugin'],
'gzip_compresslevel': 5,
},
}
The following is a list of the accepted keys and the setting that is used as a fallback value if that key is not provided for a specific feed definition:
format: the serialization format.This setting is mandatory, there is no fallback value.
batch_item_count: falls back toFEED_EXPORT_BATCH_ITEM_COUNT.New in version 2.3.0.
encoding: falls back toFEED_EXPORT_ENCODING.fields: falls back toFEED_EXPORT_FIELDS.item_classes: list of item classes to export.If undefined or empty, all items are exported.
New in version 2.6.0.
item_filter: a filter class to filter items to export.ItemFilteris used be default.New in version 2.6.0.
indent: falls back toFEED_EXPORT_INDENT.item_export_kwargs:dictwith keyword arguments for the corresponding item exporter class.New in version 2.4.0.
overwrite: whether to overwrite the file if it already exists (True) or append to its content (False).The default value depends on the storage backend:
Local filesystem:
FalseFTP:
TrueNote
Some FTP servers may not support appending to files (the
APPEFTP command).S3:
True(appending is not supported)Standard output:
False(overwriting is not supported)
New in version 2.4.0.
store_empty: falls back toFEED_STORE_EMPTY.uri_params: falls back toFEED_URI_PARAMS.postprocessing: list of plugins to use for post-processing.The plugins will be used in the order of the list passed.
New in version 2.6.0.
FEED_EXPORT_ENCODING
Default: None
The encoding to be used for the feed.
If unset or set to None (default) it uses UTF-8 for everything except JSON output,
which uses safe numeric encoding (\uXXXX sequences) for historic reasons.
Use utf-8 if you want UTF-8 for JSON too.
FEED_EXPORT_FIELDS
Default: None
A list of fields to export, optional.
Example: FEED_EXPORT_FIELDS = ["foo", "bar", "baz"].
Use FEED_EXPORT_FIELDS option to define fields to export and their order.
When FEED_EXPORT_FIELDS is empty or None (default), Scrapy uses the fields defined in item objects yielded by your spider.
If an exporter requires a fixed set of fields (this is the case for CSV export format) and FEED_EXPORT_FIELDS is empty or None, then Scrapy tries to infer field names from the exported data - currently it uses field names from the first item.
FEED_EXPORT_INDENT
Default: 0
Amount of spaces used to indent the output on each level. If FEED_EXPORT_INDENT
is a non-negative integer, then array elements and object members will be pretty-printed
with that indent level. An indent level of 0 (the default), or negative,
will put each item on a new line. None selects the most compact representation.
Currently implemented only by JsonItemExporter
and XmlItemExporter, i.e. when you are exporting
to .json or .xml.
FEED_STORE_EMPTY
Default: False
Whether to export empty feeds (i.e. feeds with no items).
FEED_STORAGES
Default: {}
A dict containing additional feed storage backends supported by your project. The keys are URI schemes and the values are paths to storage classes.
FEED_STORAGE_FTP_ACTIVE
Default: False
Whether to use the active connection mode when exporting feeds to an FTP server
(True) or use the passive connection mode instead (False, default).
For information about FTP connection modes, see What is the difference between active and passive FTP?.
FEED_STORAGE_S3_ACL
Default: '' (empty string)
A string containing a custom ACL for feeds exported to Amazon S3 by your project.
For a complete list of available values, access the Canned ACL section on Amazon S3 docs.
FEED_STORAGES_BASE
Default:
{
'': 'scrapy.extensions.feedexport.FileFeedStorage',
'file': 'scrapy.extensions.feedexport.FileFeedStorage',
'stdout': 'scrapy.extensions.feedexport.StdoutFeedStorage',
's3': 'scrapy.extensions.feedexport.S3FeedStorage',
'ftp': 'scrapy.extensions.feedexport.FTPFeedStorage',
}
A dict containing the built-in feed storage backends supported by Scrapy. You
can disable any of these backends by assigning None to their URI scheme in
FEED_STORAGES. E.g., to disable the built-in FTP storage backend
(without replacement), place this in your settings.py:
FEED_STORAGES = {
'ftp': None,
}
FEED_EXPORTERS
Default: {}
A dict containing additional exporters supported by your project. The keys are serialization formats and the values are paths to Item exporter classes.
FEED_EXPORTERS_BASE
Default:
{
'json': 'scrapy.exporters.JsonItemExporter',
'jsonlines': 'scrapy.exporters.JsonLinesItemExporter',
'jl': 'scrapy.exporters.JsonLinesItemExporter',
'csv': 'scrapy.exporters.CsvItemExporter',
'xml': 'scrapy.exporters.XmlItemExporter',
'marshal': 'scrapy.exporters.MarshalItemExporter',
'pickle': 'scrapy.exporters.PickleItemExporter',
}
A dict containing the built-in feed exporters supported by Scrapy. You can
disable any of these exporters by assigning None to their serialization
format in FEED_EXPORTERS. E.g., to disable the built-in CSV exporter
(without replacement), place this in your settings.py:
FEED_EXPORTERS = {
'csv': None,
}
FEED_EXPORT_BATCH_ITEM_COUNT
New in version 2.3.0.
Default: 0
If assigned an integer number higher than 0, Scrapy generates multiple output files
storing up to the specified number of items in each output file.
When generating multiple output files, you must use at least one of the following placeholders in the feed URI to indicate how the different output file names are generated:
%(batch_time)s- gets replaced by a timestamp when the feed is being created (e.g.2020-03-28T14-45-08.237134)%(batch_id)d- gets replaced by the 1-based sequence number of the batch.Use printf-style string formatting to alter the number format. For example, to make the batch ID a 5-digit number by introducing leading zeroes as needed, use
%(batch_id)05d(e.g.3becomes00003,123becomes00123).
For instance, if your settings include:
FEED_EXPORT_BATCH_ITEM_COUNT = 100
And your crawl command line is:
scrapy crawl spidername -o "dirname/%(batch_id)d-filename%(batch_time)s.json"
The command line above can generate a directory tree like:
->projectname
-->dirname
--->1-filename2020-03-28T14-45-08.237134.json
--->2-filename2020-03-28T14-45-09.148903.json
--->3-filename2020-03-28T14-45-10.046092.json
Where the first and second files contain exactly 100 items. The last one contains 100 items or fewer.
FEED_URI_PARAMS
Default: None
A string with the import path of a function to set the parameters to apply with printf-style string formatting to the feed URI.
The function signature should be as follows:
- scrapy.extensions.feedexport.uri_params(params, spider)
Return a
dictof key-value pairs to apply to the feed URI using printf-style string formatting.- Parameters
params (dict) –
default key-value pairs
Specifically:
batch_id: ID of the file batch. SeeFEED_EXPORT_BATCH_ITEM_COUNT.If
FEED_EXPORT_BATCH_ITEM_COUNTis0,batch_idis always1.New in version 2.3.0.
batch_time: UTC date and time, in ISO format with:replaced with-.See
FEED_EXPORT_BATCH_ITEM_COUNT.New in version 2.3.0.
time:batch_time, with microseconds set to0.
spider (scrapy.Spider) – source spider of the feed items
Caution
The function should return a new dictionary, modifying the received
paramsin-place is deprecated.
For example, to include the name of the
source spider in the feed URI:
Define the following function somewhere in your project:
# myproject/utils.py def uri_params(params, spider): return {**params, 'spider_name': spider.name}
Point
FEED_URI_PARAMSto that function in your settings:# myproject/settings.py FEED_URI_PARAMS = 'myproject.utils.uri_params'
Use
%(spider_name)sin your feed URI:scrapy crawl <spider_name> -o "%(spider_name)s.jl"
Requests and Responses
Scrapy uses Request and Response objects for crawling web
sites.
Typically, Request objects are generated in the spiders and pass
across the system until they reach the Downloader, which executes the request
and returns a Response object which travels back to the spider that
issued the request.
Both Request and Response classes have subclasses which add
functionality not required in the base classes. These are described
below in Request subclasses and
Response subclasses.
Request objects
- class scrapy.http.Request(*args, **kwargs)[source]
Represents an HTTP request, which is usually generated in a Spider and executed by the Downloader, thus generating a
Response.- Parameters
url (str) –
the URL of this request
If the URL is invalid, a
ValueErrorexception is raised.callback (collections.abc.Callable) – the function that will be called with the response of this request (once it’s downloaded) as its first parameter. For more information see Passing additional data to callback functions below. If a Request doesn’t specify a callback, the spider’s
parse()method will be used. Note that if exceptions are raised during processing, errback is called instead.method (str) – the HTTP method of this request. Defaults to
'GET'.meta (dict) – the initial values for the
Request.metaattribute. If given, the dict passed in this parameter will be shallow copied.body (bytes or str) – the request body. If a string is passed, then it’s encoded as bytes using the
encodingpassed (which defaults toutf-8). Ifbodyis not given, an empty bytes object is stored. Regardless of the type of this argument, the final value stored will be a bytes object (never a string orNone).headers (dict) –
the headers of this request. The dict values can be strings (for single valued headers) or lists (for multi-valued headers). If
Noneis passed as value, the HTTP header will not be sent at all.Caution
Cookies set via the
Cookieheader are not considered by the CookiesMiddleware. If you need to set cookies for a request, use theRequest.cookiesparameter. This is a known current limitation that is being worked on.the request cookies. These can be sent in two forms.
Using a dict:
request_with_cookies = Request(url="http://www.example.com", cookies={'currency': 'USD', 'country': 'UY'})
Using a list of dicts:
request_with_cookies = Request(url="http://www.example.com", cookies=[{'name': 'currency', 'value': 'USD', 'domain': 'example.com', 'path': '/currency'}])
The latter form allows for customizing the
domainandpathattributes of the cookie. This is only useful if the cookies are saved for later requests.When some site returns cookies (in a response) those are stored in the cookies for that domain and will be sent again in future requests. That’s the typical behaviour of any regular web browser.
To create a request that does not send stored cookies and does not store received cookies, set the
dont_merge_cookieskey toTrueinrequest.meta.Example of a request that sends manually-defined cookies and ignores cookie storage:
Request( url="http://www.example.com", cookies={'currency': 'USD', 'country': 'UY'}, meta={'dont_merge_cookies': True}, )
For more info see CookiesMiddleware.
Caution
Cookies set via the
Cookieheader are not considered by the CookiesMiddleware. If you need to set cookies for a request, use theRequest.cookiesparameter. This is a known current limitation that is being worked on.encoding (str) – the encoding of this request (defaults to
'utf-8'). This encoding will be used to percent-encode the URL and to convert the body to bytes (if given as a string).priority (int) – the priority of this request (defaults to
0). The priority is used by the scheduler to define the order used to process requests. Requests with a higher priority value will execute earlier. Negative values are allowed in order to indicate relatively low-priority.dont_filter (bool) – indicates that this request should not be filtered by the scheduler. This is used when you want to perform an identical request multiple times, to ignore the duplicates filter. Use it with care, or you will get into crawling loops. Default to
False.errback (collections.abc.Callable) –
a function that will be called if any exception was raised while processing the request. This includes pages that failed with 404 HTTP errors and such. It receives a
Failureas first parameter. For more information, see Using errbacks to catch exceptions in request processing below.Changed in version 2.0: The callback parameter is no longer required when the errback parameter is specified.
flags (list) – Flags sent to the request, can be used for logging or similar purposes.
cb_kwargs (dict) – A dict with arbitrary data that will be passed as keyword arguments to the Request’s callback.
- url
A string containing the URL of this request. Keep in mind that this attribute contains the escaped URL, so it can differ from the URL passed in the
__init__method.This attribute is read-only. To change the URL of a Request use
replace().
- method
A string representing the HTTP method in the request. This is guaranteed to be uppercase. Example:
"GET","POST","PUT", etc
- headers
A dictionary-like object which contains the request headers.
- body
The request body as bytes.
This attribute is read-only. To change the body of a Request use
replace().
- meta
A dict that contains arbitrary metadata for this request. This dict is empty for new Requests, and is usually populated by different Scrapy components (extensions, middlewares, etc). So the data contained in this dict depends on the extensions you have enabled.
See Request.meta special keys for a list of special meta keys recognized by Scrapy.
This dict is shallow copied when the request is cloned using the
copy()orreplace()methods, and can also be accessed, in your spider, from theresponse.metaattribute.
- cb_kwargs
A dictionary that contains arbitrary metadata for this request. Its contents will be passed to the Request’s callback as keyword arguments. It is empty for new Requests, which means by default callbacks only get a
Responseobject as argument.This dict is shallow copied when the request is cloned using the
copy()orreplace()methods, and can also be accessed, in your spider, from theresponse.cb_kwargsattribute.In case of a failure to process the request, this dict can be accessed as
failure.request.cb_kwargsin the request’s errback. For more information, see Accessing additional data in errback functions.
- attributes: Tuple[str, ...] = ('url', 'callback', 'method', 'headers', 'body', 'cookies', 'meta', 'encoding', 'priority', 'dont_filter', 'errback', 'flags', 'cb_kwargs')
A tuple of
strobjects containing the name of all public attributes of the class that are also keyword parameters of the__init__method.Currently used by
Request.replace(),Request.to_dict()andrequest_from_dict().
- copy()[source]
Return a new Request which is a copy of this Request. See also: Passing additional data to callback functions.
- replace([url, method, headers, body, cookies, meta, flags, encoding, priority, dont_filter, callback, errback, cb_kwargs])[source]
Return a Request object with the same members, except for those members given new values by whichever keyword arguments are specified. The
Request.cb_kwargsandRequest.metaattributes are shallow copied by default (unless new values are given as arguments). See also Passing additional data to callback functions.
- classmethod from_curl(curl_command: str, ignore_unknown_options: bool = True, **kwargs) scrapy.http.request.RequestTypeVar[source]
Create a Request object from a string containing a cURL command. It populates the HTTP method, the URL, the headers, the cookies and the body. It accepts the same arguments as the
Requestclass, taking preference and overriding the values of the same arguments contained in the cURL command.Unrecognized options are ignored by default. To raise an error when finding unknown options call this method by passing
ignore_unknown_options=False.Caution
Using
from_curl()fromRequestsubclasses, such asJSONRequest, orXmlRpcRequest, as well as having downloader middlewares and spider middlewares enabled, such asDefaultHeadersMiddleware,UserAgentMiddleware, orHttpCompressionMiddleware, may modify theRequestobject.To translate a cURL command into a Scrapy request, you may use curl2scrapy.
- to_dict(*, spider: Optional[scrapy.spiders.Spider] = None) dict[source]
Return a dictionary containing the Request’s data.
Use
request_from_dict()to convert back into aRequestobject.If a spider is given, this method will try to find out the name of the spider methods used as callback and errback and include them in the output dict, raising an exception if they cannot be found.
Passing additional data to callback functions
The callback of a request is a function that will be called when the response
of that request is downloaded. The callback function will be called with the
downloaded Response object as its first argument.
Example:
def parse_page1(self, response):
return scrapy.Request("http://www.example.com/some_page.html",
callback=self.parse_page2)
def parse_page2(self, response):
# this would log http://www.example.com/some_page.html
self.logger.info("Visited %s", response.url)
In some cases you may be interested in passing arguments to those callback
functions so you can receive the arguments later, in the second callback.
The following example shows how to achieve this by using the
Request.cb_kwargs attribute:
def parse(self, response):
request = scrapy.Request('http://www.example.com/index.html',
callback=self.parse_page2,
cb_kwargs=dict(main_url=response.url))
request.cb_kwargs['foo'] = 'bar' # add more arguments for the callback
yield request
def parse_page2(self, response, main_url, foo):
yield dict(
main_url=main_url,
other_url=response.url,
foo=foo,
)
Caution
Request.cb_kwargs was introduced in version 1.7.
Prior to that, using Request.meta was recommended for passing
information around callbacks. After 1.7, Request.cb_kwargs
became the preferred way for handling user information, leaving Request.meta
for communication with components like middlewares and extensions.
Using errbacks to catch exceptions in request processing
The errback of a request is a function that will be called when an exception is raise while processing it.
It receives a Failure as first parameter and can
be used to track connection establishment timeouts, DNS errors etc.
Here’s an example spider logging all errors and catching some specific errors if needed:
import scrapy
from scrapy.spidermiddlewares.httperror import HttpError
from twisted.internet.error import DNSLookupError
from twisted.internet.error import TimeoutError, TCPTimedOutError
class ErrbackSpider(scrapy.Spider):
name = "errback_example"
start_urls = [
"http://www.httpbin.org/", # HTTP 200 expected
"http://www.httpbin.org/status/404", # Not found error
"http://www.httpbin.org/status/500", # server issue
"http://www.httpbin.org:12345/", # non-responding host, timeout expected
"https://example.invalid/", # DNS error expected
]
def start_requests(self):
for u in self.start_urls:
yield scrapy.Request(u, callback=self.parse_httpbin,
errback=self.errback_httpbin,
dont_filter=True)
def parse_httpbin(self, response):
self.logger.info('Got successful response from {}'.format(response.url))
# do something useful here...
def errback_httpbin(self, failure):
# log all failures
self.logger.error(repr(failure))
# in case you want to do something special for some errors,
# you may need the failure's type:
if failure.check(HttpError):
# these exceptions come from HttpError spider middleware
# you can get the non-200 response
response = failure.value.response
self.logger.error('HttpError on %s', response.url)
elif failure.check(DNSLookupError):
# this is the original request
request = failure.request
self.logger.error('DNSLookupError on %s', request.url)
elif failure.check(TimeoutError, TCPTimedOutError):
request = failure.request
self.logger.error('TimeoutError on %s', request.url)
Accessing additional data in errback functions
In case of a failure to process the request, you may be interested in
accessing arguments to the callback functions so you can process further
based on the arguments in the errback. The following example shows how to
achieve this by using Failure.request.cb_kwargs:
def parse(self, response):
request = scrapy.Request('http://www.example.com/index.html',
callback=self.parse_page2,
errback=self.errback_page2,
cb_kwargs=dict(main_url=response.url))
yield request
def parse_page2(self, response, main_url):
pass
def errback_page2(self, failure):
yield dict(
main_url=failure.request.cb_kwargs['main_url'],
)
Request.meta special keys
The Request.meta attribute can contain any arbitrary data, but there
are some special keys recognized by Scrapy and its built-in extensions.
Those are:
ftp_password(SeeFTP_PASSWORDfor more info)ftp_user(SeeFTP_USERfor more info)
bindaddress
The IP of the outgoing IP address to use for the performing the request.
download_timeout
The amount of time (in secs) that the downloader will wait before timing out.
See also: DOWNLOAD_TIMEOUT.
download_latency
The amount of time spent to fetch the response, since the request has been started, i.e. HTTP message sent over the network. This meta key only becomes available when the response has been downloaded. While most other meta keys are used to control Scrapy behavior, this one is supposed to be read-only.
download_fail_on_dataloss
Whether or not to fail on broken responses. See:
DOWNLOAD_FAIL_ON_DATALOSS.
max_retry_times
The meta key is used set retry times per request. When initialized, the
max_retry_times meta key takes higher precedence over the
RETRY_TIMES setting.
Stopping the download of a Response
Raising a StopDownload exception from a handler for the
bytes_received or headers_received
signals will stop the download of a given response. See the following example:
import scrapy
class StopSpider(scrapy.Spider):
name = "stop"
start_urls = ["https://docs.scrapy.org/en/latest/"]
@classmethod
def from_crawler(cls, crawler):
spider = super().from_crawler(crawler)
crawler.signals.connect(spider.on_bytes_received, signal=scrapy.signals.bytes_received)
return spider
def parse(self, response):
# 'last_chars' show that the full response was not downloaded
yield {"len": len(response.text), "last_chars": response.text[-40:]}
def on_bytes_received(self, data, request, spider):
raise scrapy.exceptions.StopDownload(fail=False)
which produces the following output:
2020-05-19 17:26:12 [scrapy.core.engine] INFO: Spider opened
2020-05-19 17:26:12 [scrapy.extensions.logstats] INFO: Crawled 0 pages (at 0 pages/min), scraped 0 items (at 0 items/min)
2020-05-19 17:26:13 [scrapy.core.downloader.handlers.http11] DEBUG: Download stopped for <GET https://docs.scrapy.org/en/latest/> from signal handler StopSpider.on_bytes_received
2020-05-19 17:26:13 [scrapy.core.engine] DEBUG: Crawled (200) <GET https://docs.scrapy.org/en/latest/> (referer: None) ['download_stopped']
2020-05-19 17:26:13 [scrapy.core.scraper] DEBUG: Scraped from <200 https://docs.scrapy.org/en/latest/>
{'len': 279, 'last_chars': 'dth, initial-scale=1.0">\n \n <title>Scr'}
2020-05-19 17:26:13 [scrapy.core.engine] INFO: Closing spider (finished)
By default, resulting responses are handled by their corresponding errbacks. To
call their callback instead, like in this example, pass fail=False to the
StopDownload exception.
Request subclasses
Here is the list of built-in Request subclasses. You can also subclass
it to implement your own custom functionality.
FormRequest objects
The FormRequest class extends the base Request with functionality for
dealing with HTML forms. It uses lxml.html forms to pre-populate form
fields with form data from Response objects.
- class scrapy.http.request.form.FormRequest
- class scrapy.http.FormRequest
- class scrapy.FormRequest(url[, formdata, ...])
The
FormRequestclass adds a new keyword parameter to the__init__method. The remaining arguments are the same as for theRequestclass and are not documented here.- Parameters
formdata (dict or collections.abc.Iterable) – is a dictionary (or iterable of (key, value) tuples) containing HTML Form data which will be url-encoded and assigned to the body of the request.
The
FormRequestobjects support the following class method in addition to the standardRequestmethods:- classmethod FormRequest.from_response(response[, formname=None, formid=None, formnumber=0, formdata=None, formxpath=None, formcss=None, clickdata=None, dont_click=False, ...])
Returns a new
FormRequestobject with its form field values pre-populated with those found in the HTML<form>element contained in the given response. For an example see Using FormRequest.from_response() to simulate a user login.The policy is to automatically simulate a click, by default, on any form control that looks clickable, like a
<input type="submit">. Even though this is quite convenient, and often the desired behaviour, sometimes it can cause problems which could be hard to debug. For example, when working with forms that are filled and/or submitted using javascript, the defaultfrom_response()behaviour may not be the most appropriate. To disable this behaviour you can set thedont_clickargument toTrue. Also, if you want to change the control clicked (instead of disabling it) you can also use theclickdataargument.Caution
Using this method with select elements which have leading or trailing whitespace in the option values will not work due to a bug in lxml, which should be fixed in lxml 3.8 and above.
- Parameters
response (
Responseobject) – the response containing a HTML form which will be used to pre-populate the form fieldsformname (str) – if given, the form with name attribute set to this value will be used.
formid (str) – if given, the form with id attribute set to this value will be used.
formxpath (str) – if given, the first form that matches the xpath will be used.
formcss (str) – if given, the first form that matches the css selector will be used.
formnumber (int) – the number of form to use, when the response contains multiple forms. The first one (and also the default) is
0.formdata (dict) – fields to override in the form data. If a field was already present in the response
<form>element, its value is overridden by the one passed in this parameter. If a value passed in this parameter isNone, the field will not be included in the request, even if it was present in the response<form>element.clickdata (dict) – attributes to lookup the control clicked. If it’s not given, the form data will be submitted simulating a click on the first clickable element. In addition to html attributes, the control can be identified by its zero-based index relative to other submittable inputs inside the form, via the
nrattribute.dont_click (bool) – If True, the form data will be submitted without clicking in any element.
The other parameters of this class method are passed directly to the
FormRequest__init__method.
Request usage examples
Using FormRequest to send data via HTTP POST
If you want to simulate a HTML Form POST in your spider and send a couple of
key-value fields, you can return a FormRequest object (from your
spider) like this:
return [FormRequest(url="http://www.example.com/post/action",
formdata={'name': 'John Doe', 'age': '27'},
callback=self.after_post)]
Using FormRequest.from_response() to simulate a user login
It is usual for web sites to provide pre-populated form fields through <input
type="hidden"> elements, such as session related data or authentication
tokens (for login pages). When scraping, you’ll want these fields to be
automatically pre-populated and only override a couple of them, such as the
user name and password. You can use the FormRequest.from_response()
method for this job. Here’s an example spider which uses it:
import scrapy
def authentication_failed(response):
# TODO: Check the contents of the response and return True if it failed
# or False if it succeeded.
pass
class LoginSpider(scrapy.Spider):
name = 'example.com'
start_urls = ['http://www.example.com/users/login.php']
def parse(self, response):
return scrapy.FormRequest.from_response(
response,
formdata={'username': 'john', 'password': 'secret'},
callback=self.after_login
)
def after_login(self, response):
if authentication_failed(response):
self.logger.error("Login failed")
return
# continue scraping with authenticated session...
JsonRequest
The JsonRequest class extends the base Request class with functionality for
dealing with JSON requests.
- class scrapy.http.JsonRequest(url[, ... data, dumps_kwargs])[source]
The
JsonRequestclass adds two new keyword parameters to the__init__method. The remaining arguments are the same as for theRequestclass and are not documented here.Using the
JsonRequestwill set theContent-Typeheader toapplication/jsonandAcceptheader toapplication/json, text/javascript, */*; q=0.01- Parameters
data (object) – is any JSON serializable object that needs to be JSON encoded and assigned to body. if
Request.bodyargument is provided this parameter will be ignored. ifRequest.bodyargument is not provided and data argument is providedRequest.methodwill be set to'POST'automatically.dumps_kwargs (dict) – Parameters that will be passed to underlying
json.dumps()method which is used to serialize data into JSON format.
- attributes: Tuple[str, ...] = ('url', 'callback', 'method', 'headers', 'body', 'cookies', 'meta', 'encoding', 'priority', 'dont_filter', 'errback', 'flags', 'cb_kwargs', 'dumps_kwargs')
A tuple of
strobjects containing the name of all public attributes of the class that are also keyword parameters of the__init__method.Currently used by
Request.replace(),Request.to_dict()andrequest_from_dict().
JsonRequest usage example
Sending a JSON POST request with a JSON payload:
data = {
'name1': 'value1',
'name2': 'value2',
}
yield JsonRequest(url='http://www.example.com/post/action', data=data)
Response objects
- class scrapy.http.Response(*args, **kwargs)[source]
An object that represents an HTTP response, which is usually downloaded (by the Downloader) and fed to the Spiders for processing.
- Parameters
url (str) – the URL of this response
status (int) – the HTTP status of the response. Defaults to
200.headers (dict) – the headers of this response. The dict values can be strings (for single valued headers) or lists (for multi-valued headers).
body (bytes) – the response body. To access the decoded text as a string, use
response.textfrom an encoding-aware Response subclass, such asTextResponse.flags (list) – is a list containing the initial values for the
Response.flagsattribute. If given, the list will be shallow copied.request (scrapy.Request) – the initial value of the
Response.requestattribute. This represents theRequestthat generated this response.certificate (twisted.internet.ssl.Certificate) – an object representing the server’s SSL certificate.
ip_address (
ipaddress.IPv4Addressoripaddress.IPv6Address) – The IP address of the server from which the Response originated.protocol (
str) – The protocol that was used to download the response. For instance: “HTTP/1.0”, “HTTP/1.1”, “h2”
New in version 2.0.0: The
certificateparameter.New in version 2.1.0: The
ip_addressparameter.New in version 2.5.0: The
protocolparameter.- url
A string containing the URL of the response.
This attribute is read-only. To change the URL of a Response use
replace().
- status
An integer representing the HTTP status of the response. Example:
200,404.
- headers
A dictionary-like object which contains the response headers. Values can be accessed using
get()to return the first header value with the specified name orgetlist()to return all header values with the specified name. For example, this call will give you all cookies in the headers:response.headers.getlist('Set-Cookie')
- body
The response body as bytes.
If you want the body as a string, use
TextResponse.text(only available inTextResponseand subclasses).This attribute is read-only. To change the body of a Response use
replace().
- request
The
Requestobject that generated this response. This attribute is assigned in the Scrapy engine, after the response and the request have passed through all Downloader Middlewares. In particular, this means that:HTTP redirections will cause the original request (to the URL before redirection) to be assigned to the redirected response (with the final URL after redirection).
Response.request.url doesn’t always equal Response.url
This attribute is only available in the spider code, and in the Spider Middlewares, but not in Downloader Middlewares (although you have the Request available there by other means) and handlers of the
response_downloadedsignal.
- meta
A shortcut to the
Request.metaattribute of theResponse.requestobject (i.e.self.request.meta).Unlike the
Response.requestattribute, theResponse.metaattribute is propagated along redirects and retries, so you will get the originalRequest.metasent from your spider.See also
Request.metaattribute
- cb_kwargs
New in version 2.0.
A shortcut to the
Request.cb_kwargsattribute of theResponse.requestobject (i.e.self.request.cb_kwargs).Unlike the
Response.requestattribute, theResponse.cb_kwargsattribute is propagated along redirects and retries, so you will get the originalRequest.cb_kwargssent from your spider.See also
Request.cb_kwargsattribute
- flags
A list that contains flags for this response. Flags are labels used for tagging Responses. For example:
'cached','redirected’, etc. And they’re shown on the string representation of the Response (__str__ method) which is used by the engine for logging.
- certificate
New in version 2.0.0.
A
twisted.internet.ssl.Certificateobject representing the server’s SSL certificate.Only populated for
httpsresponses,Noneotherwise.
- ip_address
New in version 2.1.0.
The IP address of the server from which the Response originated.
This attribute is currently only populated by the HTTP 1.1 download handler, i.e. for
http(s)responses. For other handlers,ip_addressis alwaysNone.
- protocol
New in version 2.5.0.
The protocol that was used to download the response. For instance: “HTTP/1.0”, “HTTP/1.1”
This attribute is currently only populated by the HTTP download handlers, i.e. for
http(s)responses. For other handlers,protocolis alwaysNone.
- attributes: Tuple[str, ...] = ('url', 'status', 'headers', 'body', 'flags', 'request', 'certificate', 'ip_address', 'protocol')
A tuple of
strobjects containing the name of all public attributes of the class that are also keyword parameters of the__init__method.Currently used by
Response.replace().
- replace([url, status, headers, body, request, flags, cls])[source]
Returns a Response object with the same members, except for those members given new values by whichever keyword arguments are specified. The attribute
Response.metais copied by default.
- urljoin(url)[source]
Constructs an absolute url by combining the Response’s
urlwith a possible relative url.This is a wrapper over
urljoin(), it’s merely an alias for making this call:urllib.parse.urljoin(response.url, url)
- follow(url, callback=None, method='GET', headers=None, body=None, cookies=None, meta=None, encoding='utf-8', priority=0, dont_filter=False, errback=None, cb_kwargs=None, flags=None) scrapy.http.request.Request[source]
Return a
Requestinstance to follow a linkurl. It accepts the same arguments asRequest.__init__method, buturlcan be a relative URL or ascrapy.link.Linkobject, not only an absolute URL.TextResponseprovides afollow()method which supports selectors in addition to absolute/relative URLs and Link objects.New in version 2.0: The flags parameter.
- follow_all(urls, callback=None, method='GET', headers=None, body=None, cookies=None, meta=None, encoding='utf-8', priority=0, dont_filter=False, errback=None, cb_kwargs=None, flags=None) Generator[scrapy.http.request.Request, None, None][source]
New in version 2.0.
Return an iterable of
Requestinstances to follow all links inurls. It accepts the same arguments asRequest.__init__method, but elements ofurlscan be relative URLs orLinkobjects, not only absolute URLs.TextResponseprovides afollow_all()method which supports selectors in addition to absolute/relative URLs and Link objects.
Response subclasses
Here is the list of available built-in Response subclasses. You can also subclass the Response class to implement your own functionality.
TextResponse objects
- class scrapy.http.TextResponse(url[, encoding[, ...]])[source]
TextResponseobjects adds encoding capabilities to the baseResponseclass, which is meant to be used only for binary data, such as images, sounds or any media file.TextResponseobjects support a new__init__method argument, in addition to the baseResponseobjects. The remaining functionality is the same as for theResponseclass and is not documented here.- Parameters
encoding (str) – is a string which contains the encoding to use for this response. If you create a
TextResponseobject with a string as body, it will be converted to bytes encoded using this encoding. If encoding isNone(default), the encoding will be looked up in the response headers and body instead.
TextResponseobjects support the following attributes in addition to the standardResponseones:- text
Response body, as a string.
The same as
response.body.decode(response.encoding), but the result is cached after the first call, so you can accessresponse.textmultiple times without extra overhead.Note
str(response.body)is not a correct way to convert the response body into a string:>>> str(b'body') "b'body'"
- encoding
A string with the encoding of this response. The encoding is resolved by trying the following mechanisms, in order:
the encoding passed in the
__init__methodencodingargumentthe encoding declared in the Content-Type HTTP header. If this encoding is not valid (i.e. unknown), it is ignored and the next resolution mechanism is tried.
the encoding declared in the response body. The TextResponse class doesn’t provide any special functionality for this. However, the
HtmlResponseandXmlResponseclasses do.the encoding inferred by looking at the response body. This is the more fragile method but also the last one tried.
- selector
A
Selectorinstance using the response as target. The selector is lazily instantiated on first access.
- attributes: Tuple[str, ...] = ('url', 'status', 'headers', 'body', 'flags', 'request', 'certificate', 'ip_address', 'protocol', 'encoding')
A tuple of
strobjects containing the name of all public attributes of the class that are also keyword parameters of the__init__method.Currently used by
Response.replace().
TextResponseobjects support the following methods in addition to the standardResponseones:- follow(url, callback=None, method='GET', headers=None, body=None, cookies=None, meta=None, encoding=None, priority=0, dont_filter=False, errback=None, cb_kwargs=None, flags=None) scrapy.http.request.Request[source]
Return a
Requestinstance to follow a linkurl. It accepts the same arguments asRequest.__init__method, buturlcan be not only an absolute URL, but alsoa relative URL
a
Linkobject, e.g. the result of Link Extractorsa
Selectorobject for a<link>or<a>element, e.g.response.css('a.my_link')[0]an attribute
Selector(not SelectorList), e.g.response.css('a::attr(href)')[0]orresponse.xpath('//img/@src')[0]
See A shortcut for creating Requests for usage examples.
- follow_all(urls=None, callback=None, method='GET', headers=None, body=None, cookies=None, meta=None, encoding=None, priority=0, dont_filter=False, errback=None, cb_kwargs=None, flags=None, css=None, xpath=None) Generator[scrapy.http.request.Request, None, None][source]
A generator that produces
Requestinstances to follow all links inurls. It accepts the same arguments as theRequest’s__init__method, except that eachurlselement does not need to be an absolute URL, it can be any of the following:a relative URL
a
Linkobject, e.g. the result of Link Extractorsa
Selectorobject for a<link>or<a>element, e.g.response.css('a.my_link')[0]an attribute
Selector(not SelectorList), e.g.response.css('a::attr(href)')[0]orresponse.xpath('//img/@src')[0]
In addition,
cssandxpatharguments are accepted to perform the link extraction within thefollow_allmethod (only one ofurls,cssandxpathis accepted).Note that when passing a
SelectorListas argument for theurlsparameter or using thecssorxpathparameters, this method will not produce requests for selectors from which links cannot be obtained (for instance, anchor tags without anhrefattribute)
HtmlResponse objects
- class scrapy.http.HtmlResponse(url[, ...])[source]
The
HtmlResponseclass is a subclass ofTextResponsewhich adds encoding auto-discovering support by looking into the HTML meta http-equiv attribute. SeeTextResponse.encoding.
XmlResponse objects
- class scrapy.http.XmlResponse(url[, ...])[source]
The
XmlResponseclass is a subclass ofTextResponsewhich adds encoding auto-discovering support by looking into the XML declaration line. SeeTextResponse.encoding.
Link Extractors
A link extractor is an object that extracts links from responses.
The __init__ method of
LxmlLinkExtractor takes settings that
determine which links may be extracted. LxmlLinkExtractor.extract_links returns a
list of matching Link objects from a
Response object.
Link extractors are used in CrawlSpider spiders
through a set of Rule objects.
You can also use link extractors in regular spiders. For example, you can instantiate
LinkExtractor into a class
variable in your spider, and use it from your spider callbacks:
def parse(self, response):
for link in self.link_extractor.extract_links(response):
yield Request(link.url, callback=self.parse)
Link extractor reference
The link extractor class is
scrapy.linkextractors.lxmlhtml.LxmlLinkExtractor. For convenience it
can also be imported as scrapy.linkextractors.LinkExtractor:
from scrapy.linkextractors import LinkExtractor
LxmlLinkExtractor
- class scrapy.linkextractors.lxmlhtml.LxmlLinkExtractor(allow=(), deny=(), allow_domains=(), deny_domains=(), deny_extensions=None, restrict_xpaths=(), restrict_css=(), tags=('a', 'area'), attrs=('href',), canonicalize=False, unique=True, process_value=None, strip=True)[source]
LxmlLinkExtractor is the recommended link extractor with handy filtering options. It is implemented using lxml’s robust HTMLParser.
- Parameters
allow (str or list) – a single regular expression (or list of regular expressions) that the (absolute) urls must match in order to be extracted. If not given (or empty), it will match all links.
deny (str or list) – a single regular expression (or list of regular expressions) that the (absolute) urls must match in order to be excluded (i.e. not extracted). It has precedence over the
allowparameter. If not given (or empty) it won’t exclude any links.allow_domains (str or list) – a single value or a list of string containing domains which will be considered for extracting the links
deny_domains (str or list) – a single value or a list of strings containing domains which won’t be considered for extracting the links
deny_extensions (list) –
a single value or list of strings containing extensions that should be ignored when extracting links. If not given, it will default to
scrapy.linkextractors.IGNORED_EXTENSIONS.Changed in version 2.0:
IGNORED_EXTENSIONSnow includes7z,7zip,apk,bz2,cdr,dmg,ico,iso,tar,tar.gz,webm, andxz.restrict_xpaths (str or list) – is an XPath (or list of XPath’s) which defines regions inside the response where links should be extracted from. If given, only the text selected by those XPath will be scanned for links. See examples below.
restrict_css (str or list) – a CSS selector (or list of selectors) which defines regions inside the response where links should be extracted from. Has the same behaviour as
restrict_xpaths.restrict_text (str or list) – a single regular expression (or list of regular expressions) that the link’s text must match in order to be extracted. If not given (or empty), it will match all links. If a list of regular expressions is given, the link will be extracted if it matches at least one.
tags (str or list) – a tag or a list of tags to consider when extracting links. Defaults to
('a', 'area').attrs (list) – an attribute or list of attributes which should be considered when looking for links to extract (only for those tags specified in the
tagsparameter). Defaults to('href',)canonicalize (bool) – canonicalize each extracted url (using w3lib.url.canonicalize_url). Defaults to
False. Note that canonicalize_url is meant for duplicate checking; it can change the URL visible at server side, so the response can be different for requests with canonicalized and raw URLs. If you’re using LinkExtractor to follow links it is more robust to keep the defaultcanonicalize=False.unique (bool) – whether duplicate filtering should be applied to extracted links.
process_value (collections.abc.Callable) –
a function which receives each value extracted from the tag and attributes scanned and can modify the value and return a new one, or return
Noneto ignore the link altogether. If not given,process_valuedefaults tolambda x: x.For example, to extract links from this code:
<a href="javascript:goToPage('../other/page.html'); return false">Link text</a>
You can use the following function in
process_value:def process_value(value): m = re.search("javascript:goToPage\('(.*?)'", value) if m: return m.group(1)
strip (bool) – whether to strip whitespaces from extracted attributes. According to HTML5 standard, leading and trailing whitespaces must be stripped from
hrefattributes of<a>,<area>and many other elements,srcattribute of<img>,<iframe>elements, etc., so LinkExtractor strips space chars by default. Setstrip=Falseto turn it off (e.g. if you’re extracting urls from elements or attributes which allow leading/trailing whitespaces).
Link
- class scrapy.link.Link(url, text='', fragment='', nofollow=False)[source]
Link objects represent an extracted link by the LinkExtractor.
Using the anchor tag sample below to illustrate the parameters:
<a href="https://example.com/nofollow.html#foo" rel="nofollow">Dont follow this one</a>
- Parameters
url – the absolute url being linked to in the anchor tag. From the sample, this is
https://example.com/nofollow.html.text – the text in the anchor tag. From the sample, this is
Dont follow this one.fragment – the part of the url after the hash symbol. From the sample, this is
foo.nofollow – an indication of the presence or absence of a nofollow value in the
relattribute of the anchor tag.
Settings
The Scrapy settings allows you to customize the behaviour of all Scrapy components, including the core, extensions, pipelines and spiders themselves.
The infrastructure of the settings provides a global namespace of key-value mappings that the code can use to pull configuration values from. The settings can be populated through different mechanisms, which are described below.
The settings are also the mechanism for selecting the currently active Scrapy project (in case you have many).
For a list of available built-in settings see: Built-in settings reference.
Designating the settings
When you use Scrapy, you have to tell it which settings you’re using. You can
do this by using an environment variable, SCRAPY_SETTINGS_MODULE.
The value of SCRAPY_SETTINGS_MODULE should be in Python path syntax, e.g.
myproject.settings. Note that the settings module should be on the
Python import search path.
Populating the settings
Settings can be populated using different mechanisms, each of which having a different precedence. Here is the list of them in decreasing order of precedence:
Command line options (most precedence)
Settings per-spider
Project settings module
Default settings per-command
Default global settings (less precedence)
The population of these settings sources is taken care of internally, but a manual handling is possible using API calls. See the Settings API topic for reference.
These mechanisms are described in more detail below.
1. Command line options
Arguments provided by the command line are the ones that take most precedence,
overriding any other options. You can explicitly override one (or more)
settings using the -s (or --set) command line option.
Example:
scrapy crawl myspider -s LOG_FILE=scrapy.log
2. Settings per-spider
Spiders (See the Spiders chapter for reference) can define their
own settings that will take precedence and override the project ones. They can
do so by setting their custom_settings attribute:
class MySpider(scrapy.Spider):
name = 'myspider'
custom_settings = {
'SOME_SETTING': 'some value',
}
3. Project settings module
The project settings module is the standard configuration file for your Scrapy
project, it’s where most of your custom settings will be populated. For a
standard Scrapy project, this means you’ll be adding or changing the settings
in the settings.py file created for your project.
4. Default settings per-command
Each Scrapy tool command can have its own default
settings, which override the global default settings. Those custom command
settings are specified in the default_settings attribute of the command
class.
5. Default global settings
The global defaults are located in the scrapy.settings.default_settings
module and documented in the Built-in settings reference section.
Import paths and classes
New in version 2.4.0.
When a setting references a callable object to be imported by Scrapy, such as a class or a function, there are two different ways you can specify that object:
As a string containing the import path of that object
As the object itself
For example:
from mybot.pipelines.validate import ValidateMyItem
ITEM_PIPELINES = {
# passing the classname...
ValidateMyItem: 300,
# ...equals passing the class path
'mybot.pipelines.validate.ValidateMyItem': 300,
}
Note
Passing non-callable objects is not supported.
How to access settings
In a spider, the settings are available through self.settings:
class MySpider(scrapy.Spider):
name = 'myspider'
start_urls = ['http://example.com']
def parse(self, response):
print(f"Existing settings: {self.settings.attributes.keys()}")
Note
The settings attribute is set in the base Spider class after the spider
is initialized. If you want to use the settings before the initialization
(e.g., in your spider’s __init__() method), you’ll need to override the
from_crawler() method.
Settings can be accessed through the scrapy.crawler.Crawler.settings
attribute of the Crawler that is passed to from_crawler method in
extensions, middlewares and item pipelines:
class MyExtension:
def __init__(self, log_is_enabled=False):
if log_is_enabled:
print("log is enabled!")
@classmethod
def from_crawler(cls, crawler):
settings = crawler.settings
return cls(settings.getbool('LOG_ENABLED'))
The settings object can be used like a dict (e.g.,
settings['LOG_ENABLED']), but it’s usually preferred to extract the setting
in the format you need it to avoid type errors, using one of the methods
provided by the Settings API.
Rationale for setting names
Setting names are usually prefixed with the component that they configure. For
example, proper setting names for a fictional robots.txt extension would be
ROBOTSTXT_ENABLED, ROBOTSTXT_OBEY, ROBOTSTXT_CACHEDIR, etc.
Built-in settings reference
Here’s a list of all available Scrapy settings, in alphabetical order, along with their default values and the scope where they apply.
The scope, where available, shows where the setting is being used, if it’s tied to any particular component. In that case the module of that component will be shown, typically an extension, middleware or pipeline. It also means that the component must be enabled in order for the setting to have any effect.
AWS_ACCESS_KEY_ID
Default: None
The AWS access key used by code that requires access to Amazon Web services, such as the S3 feed storage backend.
AWS_SECRET_ACCESS_KEY
Default: None
The AWS secret key used by code that requires access to Amazon Web services, such as the S3 feed storage backend.
AWS_SESSION_TOKEN
Default: None
The AWS security token used by code that requires access to Amazon Web services, such as the S3 feed storage backend, when using temporary security credentials.
AWS_ENDPOINT_URL
Default: None
Endpoint URL used for S3-like storage, for example Minio or s3.scality.
AWS_USE_SSL
Default: None
Use this option if you want to disable SSL connection for communication with S3 or S3-like storage. By default SSL will be used.
AWS_VERIFY
Default: None
Verify SSL connection between Scrapy and S3 or S3-like storage. By default SSL verification will occur.
AWS_REGION_NAME
Default: None
The name of the region associated with the AWS client.
ASYNCIO_EVENT_LOOP
Default: None
Import path of a given asyncio event loop class.
If the asyncio reactor is enabled (see TWISTED_REACTOR) this setting can be used to specify the
asyncio event loop to be used with it. Set the setting to the import path of the
desired asyncio event loop class. If the setting is set to None the default asyncio
event loop will be used.
If you are installing the asyncio reactor manually using the install_reactor()
function, you can use the event_loop_path parameter to indicate the import path of the event loop
class to be used.
Note that the event loop class must inherit from asyncio.AbstractEventLoop.
Caution
Please be aware that, when using a non-default event loop
(either defined via ASYNCIO_EVENT_LOOP or installed with
install_reactor()), Scrapy will call
asyncio.set_event_loop(), which will set the specified event loop
as the current loop for the current OS thread.
BOT_NAME
Default: 'scrapybot'
The name of the bot implemented by this Scrapy project (also known as the project name). This name will be used for the logging too.
It’s automatically populated with your project name when you create your
project with the startproject command.
CONCURRENT_ITEMS
Default: 100
Maximum number of concurrent items (per response) to process in parallel in item pipelines.
CONCURRENT_REQUESTS
Default: 16
The maximum number of concurrent (i.e. simultaneous) requests that will be performed by the Scrapy downloader.
CONCURRENT_REQUESTS_PER_DOMAIN
Default: 8
The maximum number of concurrent (i.e. simultaneous) requests that will be performed to any single domain.
See also: AutoThrottle extension and its
AUTOTHROTTLE_TARGET_CONCURRENCY option.
CONCURRENT_REQUESTS_PER_IP
Default: 0
The maximum number of concurrent (i.e. simultaneous) requests that will be
performed to any single IP. If non-zero, the
CONCURRENT_REQUESTS_PER_DOMAIN setting is ignored, and this one is
used instead. In other words, concurrency limits will be applied per IP, not
per domain.
This setting also affects DOWNLOAD_DELAY and
AutoThrottle extension: if CONCURRENT_REQUESTS_PER_IP
is non-zero, download delay is enforced per IP, not per domain.
DEFAULT_ITEM_CLASS
Default: 'scrapy.Item'
The default class that will be used for instantiating items in the the Scrapy shell.
DEFAULT_REQUEST_HEADERS
Default:
{
'Accept': 'text/html,application/xhtml+xml,application/xml;q=0.9,*/*;q=0.8',
'Accept-Language': 'en',
}
The default headers used for Scrapy HTTP Requests. They’re populated in the
DefaultHeadersMiddleware.
Caution
Cookies set via the Cookie header are not considered by the
CookiesMiddleware. If you need to set cookies for a request, use the
Request.cookies parameter. This is a known
current limitation that is being worked on.
DEPTH_LIMIT
Default: 0
Scope: scrapy.spidermiddlewares.depth.DepthMiddleware
The maximum depth that will be allowed to crawl for any site. If zero, no limit will be imposed.
DEPTH_PRIORITY
Default: 0
Scope: scrapy.spidermiddlewares.depth.DepthMiddleware
An integer that is used to adjust the priority of
a Request based on its depth.
The priority of a request is adjusted as follows:
request.priority = request.priority - ( depth * DEPTH_PRIORITY )
As depth increases, positive values of DEPTH_PRIORITY decrease request
priority (BFO), while negative values increase request priority (DFO). See
also Does Scrapy crawl in breadth-first or depth-first order?.
Note
This setting adjusts priority in the opposite way compared to
other priority settings REDIRECT_PRIORITY_ADJUST
and RETRY_PRIORITY_ADJUST.
DEPTH_STATS_VERBOSE
Default: False
Scope: scrapy.spidermiddlewares.depth.DepthMiddleware
Whether to collect verbose depth stats. If this is enabled, the number of requests for each depth is collected in the stats.
DNSCACHE_ENABLED
Default: True
Whether to enable DNS in-memory cache.
DNSCACHE_SIZE
Default: 10000
DNS in-memory cache size.
DNS_RESOLVER
New in version 2.0.
Default: 'scrapy.resolver.CachingThreadedResolver'
The class to be used to resolve DNS names. The default scrapy.resolver.CachingThreadedResolver
supports specifying a timeout for DNS requests via the DNS_TIMEOUT setting,
but works only with IPv4 addresses. Scrapy provides an alternative resolver,
scrapy.resolver.CachingHostnameResolver, which supports IPv4/IPv6 addresses but does not
take the DNS_TIMEOUT setting into account.
DNS_TIMEOUT
Default: 60
Timeout for processing of DNS queries in seconds. Float is supported.
DOWNLOADER
Default: 'scrapy.core.downloader.Downloader'
The downloader to use for crawling.
DOWNLOADER_HTTPCLIENTFACTORY
Default: 'scrapy.core.downloader.webclient.ScrapyHTTPClientFactory'
Defines a Twisted protocol.ClientFactory class to use for HTTP/1.0
connections (for HTTP10DownloadHandler).
Note
HTTP/1.0 is rarely used nowadays so you can safely ignore this setting,
unless you really want to use HTTP/1.0 and override
DOWNLOAD_HANDLERS for http(s) scheme accordingly,
i.e. to 'scrapy.core.downloader.handlers.http.HTTP10DownloadHandler'.
DOWNLOADER_CLIENTCONTEXTFACTORY
Default: 'scrapy.core.downloader.contextfactory.ScrapyClientContextFactory'
Represents the classpath to the ContextFactory to use.
Here, “ContextFactory” is a Twisted term for SSL/TLS contexts, defining the TLS/SSL protocol version to use, whether to do certificate verification, or even enable client-side authentication (and various other things).
Note
Scrapy default context factory does NOT perform remote server certificate verification. This is usually fine for web scraping.
If you do need remote server certificate verification enabled,
Scrapy also has another context factory class that you can set,
'scrapy.core.downloader.contextfactory.BrowserLikeContextFactory',
which uses the platform’s certificates to validate remote endpoints.
If you do use a custom ContextFactory, make sure its __init__ method
accepts a method parameter (this is the OpenSSL.SSL method mapping
DOWNLOADER_CLIENT_TLS_METHOD), a tls_verbose_logging
parameter (bool) and a tls_ciphers parameter (see
DOWNLOADER_CLIENT_TLS_CIPHERS).
DOWNLOADER_CLIENT_TLS_CIPHERS
Default: 'DEFAULT'
Use this setting to customize the TLS/SSL ciphers used by the default HTTP/1.1 downloader.
The setting should contain a string in the OpenSSL cipher list format,
these ciphers will be used as client ciphers. Changing this setting may be
necessary to access certain HTTPS websites: for example, you may need to use
'DEFAULT:!DH' for a website with weak DH parameters or enable a
specific cipher that is not included in DEFAULT if a website requires it.
DOWNLOADER_CLIENT_TLS_METHOD
Default: 'TLS'
Use this setting to customize the TLS/SSL method used by the default HTTP/1.1 downloader.
This setting must be one of these string values:
'TLS': maps to OpenSSL’sTLS_method()(a.k.aSSLv23_method()), which allows protocol negotiation, starting from the highest supported by the platform; default, recommended'TLSv1.0': this value forces HTTPS connections to use TLS version 1.0 ; set this if you want the behavior of Scrapy<1.1'TLSv1.1': forces TLS version 1.1'TLSv1.2': forces TLS version 1.2'SSLv3': forces SSL version 3 (not recommended)
DOWNLOADER_CLIENT_TLS_VERBOSE_LOGGING
Default: False
Setting this to True will enable DEBUG level messages about TLS connection
parameters after establishing HTTPS connections. The kind of information logged
depends on the versions of OpenSSL and pyOpenSSL.
This setting is only used for the default
DOWNLOADER_CLIENTCONTEXTFACTORY.
DOWNLOADER_MIDDLEWARES
Default:: {}
A dict containing the downloader middlewares enabled in your project, and their orders. For more info see Activating a downloader middleware.
DOWNLOADER_MIDDLEWARES_BASE
Default:
{
'scrapy.downloadermiddlewares.robotstxt.RobotsTxtMiddleware': 100,
'scrapy.downloadermiddlewares.httpauth.HttpAuthMiddleware': 300,
'scrapy.downloadermiddlewares.downloadtimeout.DownloadTimeoutMiddleware': 350,
'scrapy.downloadermiddlewares.defaultheaders.DefaultHeadersMiddleware': 400,
'scrapy.downloadermiddlewares.useragent.UserAgentMiddleware': 500,
'scrapy.downloadermiddlewares.retry.RetryMiddleware': 550,
'scrapy.downloadermiddlewares.ajaxcrawl.AjaxCrawlMiddleware': 560,
'scrapy.downloadermiddlewares.redirect.MetaRefreshMiddleware': 580,
'scrapy.downloadermiddlewares.httpcompression.HttpCompressionMiddleware': 590,
'scrapy.downloadermiddlewares.redirect.RedirectMiddleware': 600,
'scrapy.downloadermiddlewares.cookies.CookiesMiddleware': 700,
'scrapy.downloadermiddlewares.httpproxy.HttpProxyMiddleware': 750,
'scrapy.downloadermiddlewares.stats.DownloaderStats': 850,
'scrapy.downloadermiddlewares.httpcache.HttpCacheMiddleware': 900,
}
A dict containing the downloader middlewares enabled by default in Scrapy. Low
orders are closer to the engine, high orders are closer to the downloader. You
should never modify this setting in your project, modify
DOWNLOADER_MIDDLEWARES instead. For more info see
Activating a downloader middleware.
DOWNLOADER_STATS
Default: True
Whether to enable downloader stats collection.
DOWNLOAD_DELAY
Default: 0
The amount of time (in secs) that the downloader should wait before downloading consecutive pages from the same website. This can be used to throttle the crawling speed to avoid hitting servers too hard. Decimal numbers are supported. Example:
DOWNLOAD_DELAY = 0.25 # 250 ms of delay
This setting is also affected by the RANDOMIZE_DOWNLOAD_DELAY
setting (which is enabled by default). By default, Scrapy doesn’t wait a fixed
amount of time between requests, but uses a random interval between 0.5 * DOWNLOAD_DELAY and 1.5 * DOWNLOAD_DELAY.
When CONCURRENT_REQUESTS_PER_IP is non-zero, delays are enforced
per ip address instead of per domain.
You can also change this setting per spider by setting download_delay
spider attribute.
DOWNLOAD_HANDLERS
Default: {}
A dict containing the request downloader handlers enabled in your project.
See DOWNLOAD_HANDLERS_BASE for example format.
DOWNLOAD_HANDLERS_BASE
Default:
{
'data': 'scrapy.core.downloader.handlers.datauri.DataURIDownloadHandler',
'file': 'scrapy.core.downloader.handlers.file.FileDownloadHandler',
'http': 'scrapy.core.downloader.handlers.http.HTTPDownloadHandler',
'https': 'scrapy.core.downloader.handlers.http.HTTPDownloadHandler',
's3': 'scrapy.core.downloader.handlers.s3.S3DownloadHandler',
'ftp': 'scrapy.core.downloader.handlers.ftp.FTPDownloadHandler',
}
A dict containing the request download handlers enabled by default in Scrapy.
You should never modify this setting in your project, modify
DOWNLOAD_HANDLERS instead.
You can disable any of these download handlers by assigning None to their
URI scheme in DOWNLOAD_HANDLERS. E.g., to disable the built-in FTP
handler (without replacement), place this in your settings.py:
DOWNLOAD_HANDLERS = {
'ftp': None,
}
The default HTTPS handler uses HTTP/1.1. To use HTTP/2:
Install
Twisted[http2]>=17.9.0to install the packages required to enable HTTP/2 support in Twisted.Update
DOWNLOAD_HANDLERSas follows:DOWNLOAD_HANDLERS = { 'https': 'scrapy.core.downloader.handlers.http2.H2DownloadHandler', }
Warning
HTTP/2 support in Scrapy is experimental, and not yet recommended for production environments. Future Scrapy versions may introduce related changes without a deprecation period or warning.
Note
Known limitations of the current HTTP/2 implementation of Scrapy include:
No support for HTTP/2 Cleartext (h2c), since no major browser supports HTTP/2 unencrypted (refer http2 faq).
No setting to specify a maximum frame size larger than the default value, 16384. Connections to servers that send a larger frame will fail.
No support for server pushes, which are ignored.
No support for the
bytes_receivedandheaders_receivedsignals.
DOWNLOAD_TIMEOUT
Default: 180
The amount of time (in secs) that the downloader will wait before timing out.
Note
This timeout can be set per spider using download_timeout
spider attribute and per-request using download_timeout
Request.meta key.
DOWNLOAD_MAXSIZE
Default: 1073741824 (1024MB)
The maximum response size (in bytes) that downloader will download.
If you want to disable it set to 0.
Note
This size can be set per spider using download_maxsize
spider attribute and per-request using download_maxsize
Request.meta key.
DOWNLOAD_WARNSIZE
Default: 33554432 (32MB)
The response size (in bytes) that downloader will start to warn.
If you want to disable it set to 0.
Note
This size can be set per spider using download_warnsize
spider attribute and per-request using download_warnsize
Request.meta key.
DOWNLOAD_FAIL_ON_DATALOSS
Default: True
Whether or not to fail on broken responses, that is, declared
Content-Length does not match content sent by the server or chunked
response was not properly finish. If True, these responses raise a
ResponseFailed([_DataLoss]) error. If False, these responses
are passed through and the flag dataloss is added to the response, i.e.:
'dataloss' in response.flags is True.
Optionally, this can be set per-request basis by using the
download_fail_on_dataloss Request.meta key to False.
Note
A broken response, or data loss error, may happen under several
circumstances, from server misconfiguration to network errors to data
corruption. It is up to the user to decide if it makes sense to process
broken responses considering they may contain partial or incomplete content.
If RETRY_ENABLED is True and this setting is set to True,
the ResponseFailed([_DataLoss]) failure will be retried as usual.
Warning
This setting is ignored by the
H2DownloadHandler
download handler (see DOWNLOAD_HANDLERS). In case of a data loss
error, the corresponding HTTP/2 connection may be corrupted, affecting other
requests that use the same connection; hence, a ResponseFailed([InvalidBodyLengthError])
failure is always raised for every request that was using that connection.
DUPEFILTER_CLASS
Default: 'scrapy.dupefilters.RFPDupeFilter'
The class used to detect and filter duplicate requests.
The default (RFPDupeFilter) filters based on request fingerprint using
the scrapy.utils.request.request_fingerprint function. In order to change
the way duplicates are checked you could subclass RFPDupeFilter and
override its request_fingerprint method. This method should accept
scrapy Request object and return its fingerprint
(a string).
You can disable filtering of duplicate requests by setting
DUPEFILTER_CLASS to 'scrapy.dupefilters.BaseDupeFilter'.
Be very careful about this however, because you can get into crawling loops.
It’s usually a better idea to set the dont_filter parameter to
True on the specific Request that should not be
filtered.
DUPEFILTER_DEBUG
Default: False
By default, RFPDupeFilter only logs the first duplicate request.
Setting DUPEFILTER_DEBUG to True will make it log all duplicate requests.
EDITOR
Default: vi (on Unix systems) or the IDLE editor (on Windows)
The editor to use for editing spiders with the edit command.
Additionally, if the EDITOR environment variable is set, the edit
command will prefer it over the default setting.
EXTENSIONS
Default:: {}
A dict containing the extensions enabled in your project, and their orders.
EXTENSIONS_BASE
Default:
{
'scrapy.extensions.corestats.CoreStats': 0,
'scrapy.extensions.telnet.TelnetConsole': 0,
'scrapy.extensions.memusage.MemoryUsage': 0,
'scrapy.extensions.memdebug.MemoryDebugger': 0,
'scrapy.extensions.closespider.CloseSpider': 0,
'scrapy.extensions.feedexport.FeedExporter': 0,
'scrapy.extensions.logstats.LogStats': 0,
'scrapy.extensions.spiderstate.SpiderState': 0,
'scrapy.extensions.throttle.AutoThrottle': 0,
}
A dict containing the extensions available by default in Scrapy, and their orders. This setting contains all stable built-in extensions. Keep in mind that some of them need to be enabled through a setting.
For more information See the extensions user guide and the list of available extensions.
FEED_TEMPDIR
The Feed Temp dir allows you to set a custom folder to save crawler temporary files before uploading with FTP feed storage and Amazon S3.
FEED_STORAGE_GCS_ACL
The Access Control List (ACL) used when storing items to Google Cloud Storage. For more information on how to set this value, please refer to the column JSON API in Google Cloud documentation.
FTP_PASSIVE_MODE
Default: True
Whether or not to use passive mode when initiating FTP transfers.
FTP_PASSWORD
Default: "guest"
The password to use for FTP connections when there is no "ftp_password"
in Request meta.
Note
Paraphrasing RFC 1635, although it is common to use either the password “guest” or one’s e-mail address for anonymous FTP, some FTP servers explicitly ask for the user’s e-mail address and will not allow login with the “guest” password.
FTP_USER
Default: "anonymous"
The username to use for FTP connections when there is no "ftp_user"
in Request meta.
GCS_PROJECT_ID
Default: None
The Project ID that will be used when storing data on Google Cloud Storage.
ITEM_PIPELINES
Default: {}
A dict containing the item pipelines to use, and their orders. Order values are arbitrary, but it is customary to define them in the 0-1000 range. Lower orders process before higher orders.
Example:
ITEM_PIPELINES = {
'mybot.pipelines.validate.ValidateMyItem': 300,
'mybot.pipelines.validate.StoreMyItem': 800,
}
ITEM_PIPELINES_BASE
Default: {}
A dict containing the pipelines enabled by default in Scrapy. You should never
modify this setting in your project, modify ITEM_PIPELINES instead.
JOBDIR
Default: ''
A string indicating the directory for storing the state of a crawl when pausing and resuming crawls.
LOG_ENABLED
Default: True
Whether to enable logging.
LOG_ENCODING
Default: 'utf-8'
The encoding to use for logging.
LOG_FILE
Default: None
File name to use for logging output. If None, standard error will be used.
LOG_FILE_APPEND
Default: True
If False, the log file specified with LOG_FILE will be
overwritten (discarding the output from previous runs, if any).
LOG_FORMAT
Default: '%(asctime)s [%(name)s] %(levelname)s: %(message)s'
String for formatting log messages. Refer to the Python logging documentation for the qwhole list of available placeholders.
LOG_DATEFORMAT
Default: '%Y-%m-%d %H:%M:%S'
String for formatting date/time, expansion of the %(asctime)s placeholder
in LOG_FORMAT. Refer to the
Python datetime documentation for the
whole list of available directives.
LOG_FORMATTER
Default: scrapy.logformatter.LogFormatter
The class to use for formatting log messages for different actions.
LOG_LEVEL
Default: 'DEBUG'
Minimum level to log. Available levels are: CRITICAL, ERROR, WARNING, INFO, DEBUG. For more info see Logging.
LOG_STDOUT
Default: False
If True, all standard output (and error) of your process will be redirected
to the log. For example if you print('hello') it will appear in the Scrapy
log.
LOG_SHORT_NAMES
Default: False
If True, the logs will just contain the root path. If it is set to False
then it displays the component responsible for the log output
LOGSTATS_INTERVAL
Default: 60.0
The interval (in seconds) between each logging printout of the stats
by LogStats.
MEMDEBUG_ENABLED
Default: False
Whether to enable memory debugging.
MEMDEBUG_NOTIFY
Default: []
When memory debugging is enabled a memory report will be sent to the specified addresses if this setting is not empty, otherwise the report will be written to the log.
Example:
MEMDEBUG_NOTIFY = ['user@example.com']
MEMUSAGE_ENABLED
Default: True
Scope: scrapy.extensions.memusage
Whether to enable the memory usage extension. This extension keeps track of
a peak memory used by the process (it writes it to stats). It can also
optionally shutdown the Scrapy process when it exceeds a memory limit
(see MEMUSAGE_LIMIT_MB), and notify by email when that happened
(see MEMUSAGE_NOTIFY_MAIL).
MEMUSAGE_LIMIT_MB
Default: 0
Scope: scrapy.extensions.memusage
The maximum amount of memory to allow (in megabytes) before shutting down Scrapy (if MEMUSAGE_ENABLED is True). If zero, no check will be performed.
MEMUSAGE_CHECK_INTERVAL_SECONDS
Default: 60.0
Scope: scrapy.extensions.memusage
The Memory usage extension
checks the current memory usage, versus the limits set by
MEMUSAGE_LIMIT_MB and MEMUSAGE_WARNING_MB,
at fixed time intervals.
This sets the length of these intervals, in seconds.
MEMUSAGE_NOTIFY_MAIL
Default: False
Scope: scrapy.extensions.memusage
A list of emails to notify if the memory limit has been reached.
Example:
MEMUSAGE_NOTIFY_MAIL = ['user@example.com']
MEMUSAGE_WARNING_MB
Default: 0
Scope: scrapy.extensions.memusage
The maximum amount of memory to allow (in megabytes) before sending a warning email notifying about it. If zero, no warning will be produced.
NEWSPIDER_MODULE
Default: ''
Module where to create new spiders using the genspider command.
Example:
NEWSPIDER_MODULE = 'mybot.spiders_dev'
RANDOMIZE_DOWNLOAD_DELAY
Default: True
If enabled, Scrapy will wait a random amount of time (between 0.5 * DOWNLOAD_DELAY and 1.5 * DOWNLOAD_DELAY) while fetching requests from the same
website.
This randomization decreases the chance of the crawler being detected (and subsequently blocked) by sites which analyze requests looking for statistically significant similarities in the time between their requests.
The randomization policy is the same used by wget --random-wait option.
If DOWNLOAD_DELAY is zero (default) this option has no effect.
REACTOR_THREADPOOL_MAXSIZE
Default: 10
The maximum limit for Twisted Reactor thread pool size. This is common multi-purpose thread pool used by various Scrapy components. Threaded DNS Resolver, BlockingFeedStorage, S3FilesStore just to name a few. Increase this value if you’re experiencing problems with insufficient blocking IO.
REDIRECT_PRIORITY_ADJUST
Default: +2
Scope: scrapy.downloadermiddlewares.redirect.RedirectMiddleware
Adjust redirect request priority relative to original request:
a positive priority adjust (default) means higher priority.
a negative priority adjust means lower priority.
ROBOTSTXT_OBEY
Default: False
Scope: scrapy.downloadermiddlewares.robotstxt
If enabled, Scrapy will respect robots.txt policies. For more information see RobotsTxtMiddleware.
Note
While the default value is False for historical reasons,
this option is enabled by default in settings.py file generated
by scrapy startproject command.
ROBOTSTXT_PARSER
Default: 'scrapy.robotstxt.ProtegoRobotParser'
The parser backend to use for parsing robots.txt files. For more information see
RobotsTxtMiddleware.
ROBOTSTXT_USER_AGENT
Default: None
The user agent string to use for matching in the robots.txt file. If None,
the User-Agent header you are sending with the request or the
USER_AGENT setting (in that order) will be used for determining
the user agent to use in the robots.txt file.
SCHEDULER
Default: 'scrapy.core.scheduler.Scheduler'
The scheduler class to be used for crawling. See the Scheduler topic for details.
SCHEDULER_DEBUG
Default: False
Setting to True will log debug information about the requests scheduler.
This currently logs (only once) if the requests cannot be serialized to disk.
Stats counter (scheduler/unserializable) tracks the number of times this happens.
Example entry in logs:
1956-01-31 00:00:00+0800 [scrapy.core.scheduler] ERROR: Unable to serialize request:
<GET http://example.com> - reason: cannot serialize <Request at 0x9a7c7ec>
(type Request)> - no more unserializable requests will be logged
(see 'scheduler/unserializable' stats counter)
SCHEDULER_DISK_QUEUE
Default: 'scrapy.squeues.PickleLifoDiskQueue'
Type of disk queue that will be used by scheduler. Other available types are
scrapy.squeues.PickleFifoDiskQueue, scrapy.squeues.MarshalFifoDiskQueue,
scrapy.squeues.MarshalLifoDiskQueue.
SCHEDULER_MEMORY_QUEUE
Default: 'scrapy.squeues.LifoMemoryQueue'
Type of in-memory queue used by scheduler. Other available type is:
scrapy.squeues.FifoMemoryQueue.
SCHEDULER_PRIORITY_QUEUE
Default: 'scrapy.pqueues.ScrapyPriorityQueue'
Type of priority queue used by the scheduler. Another available type is
scrapy.pqueues.DownloaderAwarePriorityQueue.
scrapy.pqueues.DownloaderAwarePriorityQueue works better than
scrapy.pqueues.ScrapyPriorityQueue when you crawl many different
domains in parallel. But currently scrapy.pqueues.DownloaderAwarePriorityQueue
does not work together with CONCURRENT_REQUESTS_PER_IP.
SCRAPER_SLOT_MAX_ACTIVE_SIZE
New in version 2.0.
Default: 5_000_000
Soft limit (in bytes) for response data being processed.
While the sum of the sizes of all responses being processed is above this value, Scrapy does not process new requests.
SPIDER_CONTRACTS
Default:: {}
A dict containing the spider contracts enabled in your project, used for testing spiders. For more info see Spiders Contracts.
SPIDER_CONTRACTS_BASE
Default:
{
'scrapy.contracts.default.UrlContract' : 1,
'scrapy.contracts.default.ReturnsContract': 2,
'scrapy.contracts.default.ScrapesContract': 3,
}
A dict containing the Scrapy contracts enabled by default in Scrapy. You should
never modify this setting in your project, modify SPIDER_CONTRACTS
instead. For more info see Spiders Contracts.
You can disable any of these contracts by assigning None to their class
path in SPIDER_CONTRACTS. E.g., to disable the built-in
ScrapesContract, place this in your settings.py:
SPIDER_CONTRACTS = {
'scrapy.contracts.default.ScrapesContract': None,
}
SPIDER_LOADER_CLASS
Default: 'scrapy.spiderloader.SpiderLoader'
The class that will be used for loading spiders, which must implement the SpiderLoader API.
SPIDER_LOADER_WARN_ONLY
Default: False
By default, when Scrapy tries to import spider classes from SPIDER_MODULES,
it will fail loudly if there is any ImportError exception.
But you can choose to silence this exception and turn it into a simple
warning by setting SPIDER_LOADER_WARN_ONLY = True.
Note
Some scrapy commands run with this setting to True
already (i.e. they will only issue a warning and will not fail)
since they do not actually need to load spider classes to work:
scrapy runspider,
scrapy settings,
scrapy startproject,
scrapy version.
SPIDER_MIDDLEWARES
Default:: {}
A dict containing the spider middlewares enabled in your project, and their orders. For more info see Activating a spider middleware.
SPIDER_MIDDLEWARES_BASE
Default:
{
'scrapy.spidermiddlewares.httperror.HttpErrorMiddleware': 50,
'scrapy.spidermiddlewares.offsite.OffsiteMiddleware': 500,
'scrapy.spidermiddlewares.referer.RefererMiddleware': 700,
'scrapy.spidermiddlewares.urllength.UrlLengthMiddleware': 800,
'scrapy.spidermiddlewares.depth.DepthMiddleware': 900,
}
A dict containing the spider middlewares enabled by default in Scrapy, and their orders. Low orders are closer to the engine, high orders are closer to the spider. For more info see Activating a spider middleware.
SPIDER_MODULES
Default: []
A list of modules where Scrapy will look for spiders.
Example:
SPIDER_MODULES = ['mybot.spiders_prod', 'mybot.spiders_dev']
STATS_CLASS
Default: 'scrapy.statscollectors.MemoryStatsCollector'
The class to use for collecting stats, who must implement the Stats Collector API.
STATS_DUMP
Default: True
Dump the Scrapy stats (to the Scrapy log) once the spider finishes.
For more info see: Stats Collection.
STATSMAILER_RCPTS
Default: [] (empty list)
Send Scrapy stats after spiders finish scraping. See
StatsMailer for more info.
TELNETCONSOLE_ENABLED
Default: True
A boolean which specifies if the telnet console will be enabled (provided its extension is also enabled).
TEMPLATES_DIR
Default: templates dir inside scrapy module
The directory where to look for templates when creating new projects with
startproject command and new spiders with genspider
command.
The project name must not conflict with the name of custom files or directories
in the project subdirectory.
TWISTED_REACTOR
New in version 2.0.
Default: None
Import path of a given reactor.
Scrapy will install this reactor if no other reactor is installed yet, such as
when the scrapy CLI program is invoked or when using the
CrawlerProcess class.
If you are using the CrawlerRunner class, you also
need to install the correct reactor manually. You can do that using
install_reactor():
- scrapy.utils.reactor.install_reactor(reactor_path, event_loop_path=None)[source]
Installs the
reactorwith the specified import path. Also installs the asyncio event loop with the specified import path if the asyncio reactor is enabled
If a reactor is already installed,
install_reactor() has no effect.
CrawlerRunner.__init__ raises
Exception if the installed reactor does not match the
TWISTED_REACTOR setting; therefore, having top-level
reactor imports in project files and imported
third-party libraries will make Scrapy raise Exception when
it checks which reactor is installed.
In order to use the reactor installed by Scrapy:
import scrapy
from twisted.internet import reactor
class QuotesSpider(scrapy.Spider):
name = 'quotes'
def __init__(self, *args, **kwargs):
self.timeout = int(kwargs.pop('timeout', '60'))
super(QuotesSpider, self).__init__(*args, **kwargs)
def start_requests(self):
reactor.callLater(self.timeout, self.stop)
urls = ['https://quotes.toscrape.com/page/1']
for url in urls:
yield scrapy.Request(url=url, callback=self.parse)
def parse(self, response):
for quote in response.css('div.quote'):
yield {'text': quote.css('span.text::text').get()}
def stop(self):
self.crawler.engine.close_spider(self, 'timeout')
which raises Exception, becomes:
import scrapy
class QuotesSpider(scrapy.Spider):
name = 'quotes'
def __init__(self, *args, **kwargs):
self.timeout = int(kwargs.pop('timeout', '60'))
super(QuotesSpider, self).__init__(*args, **kwargs)
def start_requests(self):
from twisted.internet import reactor
reactor.callLater(self.timeout, self.stop)
urls = ['https://quotes.toscrape.com/page/1']
for url in urls:
yield scrapy.Request(url=url, callback=self.parse)
def parse(self, response):
for quote in response.css('div.quote'):
yield {'text': quote.css('span.text::text').get()}
def stop(self):
self.crawler.engine.close_spider(self, 'timeout')
The default value of the TWISTED_REACTOR setting is None, which
means that Scrapy will install the default reactor defined by Twisted for the
current platform. This is to maintain backward compatibility and avoid possible
problems caused by using a non-default reactor.
For additional information, see Choosing a Reactor and GUI Toolkit Integration.
URLLENGTH_LIMIT
Default: 2083
Scope: spidermiddlewares.urllength
The maximum URL length to allow for crawled URLs.
This setting can act as a stopping condition in case of URLs of ever-increasing
length, which may be caused for example by a programming error either in the
target server or in your code. See also REDIRECT_MAX_TIMES and
DEPTH_LIMIT.
Use 0 to allow URLs of any length.
The default value is copied from the Microsoft Internet Explorer maximum URL length, even though this setting exists for different reasons.
USER_AGENT
Default: "Scrapy/VERSION (+https://scrapy.org)"
The default User-Agent to use when crawling, unless overridden. This user agent is
also used by RobotsTxtMiddleware
if ROBOTSTXT_USER_AGENT setting is None and
there is no overriding User-Agent header specified for the request.
Settings documented elsewhere:
The following settings are documented elsewhere, please check each specific case to see how to enable and use them.
Exceptions
Built-in Exceptions reference
Here’s a list of all exceptions included in Scrapy and their usage.
CloseSpider
- exception scrapy.exceptions.CloseSpider(reason='cancelled')[source]
This exception can be raised from a spider callback to request the spider to be closed/stopped. Supported arguments:
- Parameters
reason (str) – the reason for closing
For example:
def parse_page(self, response):
if 'Bandwidth exceeded' in response.body:
raise CloseSpider('bandwidth_exceeded')
DontCloseSpider
This exception can be raised in a spider_idle signal handler to
prevent the spider from being closed.
DropItem
The exception that must be raised by item pipeline stages to stop processing an Item. For more information see Item Pipeline.
IgnoreRequest
This exception can be raised by the Scheduler or any downloader middleware to indicate that the request should be ignored.
NotConfigured
This exception can be raised by some components to indicate that they will remain disabled. Those components include:
Extensions
Item pipelines
Downloader middlewares
Spider middlewares
The exception must be raised in the component’s __init__ method.
NotSupported
This exception is raised to indicate an unsupported feature.
StopDownload
New in version 2.2.
Raised from a bytes_received or headers_received
signal handler to indicate that no further bytes should be downloaded for a response.
The fail boolean parameter controls which method will handle the resulting
response:
If
fail=True(default), the request errback is called. The response object is available as theresponseattribute of theStopDownloadexception, which is in turn stored as thevalueattribute of the receivedFailureobject. This means that in an errback defined asdef errback(self, failure), the response can be accessed thoughfailure.value.response.If
fail=False, the request callback is called instead.
In both cases, the response could have its body truncated: the body contains
all bytes received up until the exception is raised, including the bytes
received in the signal handler that raises the exception. Also, the response
object is marked with "download_stopped" in its Response.flags
attribute.
Note
fail is a keyword-only parameter, i.e. raising
StopDownload(False) or StopDownload(True) will raise
a TypeError.
See the documentation for the bytes_received and
headers_received signals
and the Stopping the download of a Response topic for additional information and examples.
- Command line tool
Learn about the command-line tool used to manage your Scrapy project.
- Spiders
Write the rules to crawl your websites.
- Selectors
Extract the data from web pages using XPath.
- Scrapy shell
Test your extraction code in an interactive environment.
- Items
Define the data you want to scrape.
- Item Loaders
Populate your items with the extracted data.
- Item Pipeline
Post-process and store your scraped data.
- Feed exports
Output your scraped data using different formats and storages.
- Requests and Responses
Understand the classes used to represent HTTP requests and responses.
- Link Extractors
Convenient classes to extract links to follow from pages.
- Settings
Learn how to configure Scrapy and see all available settings.
- Exceptions
See all available exceptions and their meaning.
Built-in services
Logging
Note
scrapy.log has been deprecated alongside its functions in favor of
explicit calls to the Python standard logging. Keep reading to learn more
about the new logging system.
Scrapy uses logging for event logging. We’ll
provide some simple examples to get you started, but for more advanced
use-cases it’s strongly suggested to read thoroughly its documentation.
Logging works out of the box, and can be configured to some extent with the Scrapy settings listed in Logging settings.
Scrapy calls scrapy.utils.log.configure_logging() to set some reasonable
defaults and handle those settings in Logging settings when
running commands, so it’s recommended to manually call it if you’re running
Scrapy from scripts as described in Run Scrapy from a script.
Log levels
Python’s builtin logging defines 5 different levels to indicate the severity of a given log message. Here are the standard ones, listed in decreasing order:
logging.CRITICAL- for critical errors (highest severity)logging.ERROR- for regular errorslogging.WARNING- for warning messageslogging.INFO- for informational messageslogging.DEBUG- for debugging messages (lowest severity)
How to log messages
Here’s a quick example of how to log a message using the logging.WARNING
level:
import logging
logging.warning("This is a warning")
There are shortcuts for issuing log messages on any of the standard 5 levels,
and there’s also a general logging.log method which takes a given level as
argument. If needed, the last example could be rewritten as:
import logging
logging.log(logging.WARNING, "This is a warning")
On top of that, you can create different “loggers” to encapsulate messages. (For example, a common practice is to create different loggers for every module). These loggers can be configured independently, and they allow hierarchical constructions.
The previous examples use the root logger behind the scenes, which is a top level
logger where all messages are propagated to (unless otherwise specified). Using
logging helpers is merely a shortcut for getting the root logger
explicitly, so this is also an equivalent of the last snippets:
import logging
logger = logging.getLogger()
logger.warning("This is a warning")
You can use a different logger just by getting its name with the
logging.getLogger function:
import logging
logger = logging.getLogger('mycustomlogger')
logger.warning("This is a warning")
Finally, you can ensure having a custom logger for any module you’re working on
by using the __name__ variable, which is populated with current module’s
path:
import logging
logger = logging.getLogger(__name__)
logger.warning("This is a warning")
Logging from Spiders
Scrapy provides a logger within each Spider
instance, which can be accessed and used like this:
import scrapy
class MySpider(scrapy.Spider):
name = 'myspider'
start_urls = ['https://scrapy.org']
def parse(self, response):
self.logger.info('Parse function called on %s', response.url)
That logger is created using the Spider’s name, but you can use any custom Python logger you want. For example:
import logging
import scrapy
logger = logging.getLogger('mycustomlogger')
class MySpider(scrapy.Spider):
name = 'myspider'
start_urls = ['https://scrapy.org']
def parse(self, response):
logger.info('Parse function called on %s', response.url)
Logging configuration
Loggers on their own don’t manage how messages sent through them are displayed. For this task, different “handlers” can be attached to any logger instance and they will redirect those messages to appropriate destinations, such as the standard output, files, emails, etc.
By default, Scrapy sets and configures a handler for the root logger, based on the settings below.
Logging settings
These settings can be used to configure the logging:
The first couple of settings define a destination for log messages. If
LOG_FILE is set, messages sent through the root logger will be
redirected to a file named LOG_FILE with encoding
LOG_ENCODING. If unset and LOG_ENABLED is True, log
messages will be displayed on the standard error. If LOG_FILE is set
and LOG_FILE_APPEND is False, the file will be overwritten
(discarding the output from previous runs, if any). Lastly, if
LOG_ENABLED is False, there won’t be any visible log output.
LOG_LEVEL determines the minimum level of severity to display, those
messages with lower severity will be filtered out. It ranges through the
possible levels listed in Log levels.
LOG_FORMAT and LOG_DATEFORMAT specify formatting strings
used as layouts for all messages. Those strings can contain any placeholders
listed in logging’s logrecord attributes docs and
datetime’s strftime and strptime directives
respectively.
If LOG_SHORT_NAMES is set, then the logs will not display the Scrapy
component that prints the log. It is unset by default, hence logs contain the
Scrapy component responsible for that log output.
Command-line options
There are command-line arguments, available for all commands, that you can use to override some of the Scrapy settings regarding logging.
--logfile FILEOverrides
LOG_FILE
--loglevel/-L LEVELOverrides
LOG_LEVEL
--nologSets
LOG_ENABLEDtoFalse
See also
- Module
logging.handlers Further documentation on available handlers
Custom Log Formats
A custom log format can be set for different actions by extending
LogFormatter class and making
LOG_FORMATTER point to your new class.
- class scrapy.logformatter.LogFormatter[source]
Class for generating log messages for different actions.
All methods must return a dictionary listing the parameters
level,msgandargswhich are going to be used for constructing the log message when callinglogging.log.Dictionary keys for the method outputs:
levelis the log level for that action, you can use those from the python logging library :logging.DEBUG,logging.INFO,logging.WARNING,logging.ERRORandlogging.CRITICAL.msgshould be a string that can contain different formatting placeholders. This string, formatted with the providedargs, is going to be the long message for that action.argsshould be a tuple or dict with the formatting placeholders formsg. The final log message is computed asmsg % args.
Users can define their own
LogFormatterclass if they want to customize how each action is logged or if they want to omit it entirely. In order to omit logging an action the method must returnNone.Here is an example on how to create a custom log formatter to lower the severity level of the log message when an item is dropped from the pipeline:
class PoliteLogFormatter(logformatter.LogFormatter): def dropped(self, item, exception, response, spider): return { 'level': logging.INFO, # lowering the level from logging.WARNING 'msg': "Dropped: %(exception)s" + os.linesep + "%(item)s", 'args': { 'exception': exception, 'item': item, } }
- download_error(failure, request, spider, errmsg=None)[source]
Logs a download error message from a spider (typically coming from the engine).
New in version 2.0.
- dropped(item, exception, response, spider)[source]
Logs a message when an item is dropped while it is passing through the item pipeline.
Advanced customization
Because Scrapy uses stdlib logging module, you can customize logging using all features of stdlib logging.
For example, let’s say you’re scraping a website which returns many HTTP 404 and 500 responses, and you want to hide all messages like this:
2016-12-16 22:00:06 [scrapy.spidermiddlewares.httperror] INFO: Ignoring
response <500 https://quotes.toscrape.com/page/1-34/>: HTTP status code
is not handled or not allowed
The first thing to note is a logger name - it is in brackets:
[scrapy.spidermiddlewares.httperror]. If you get just [scrapy] then
LOG_SHORT_NAMES is likely set to True; set it to False and re-run
the crawl.
Next, we can see that the message has INFO level. To hide it
we should set logging level for scrapy.spidermiddlewares.httperror
higher than INFO; next level after INFO is WARNING. It could be done
e.g. in the spider’s __init__ method:
import logging
import scrapy
class MySpider(scrapy.Spider):
# ...
def __init__(self, *args, **kwargs):
logger = logging.getLogger('scrapy.spidermiddlewares.httperror')
logger.setLevel(logging.WARNING)
super().__init__(*args, **kwargs)
If you run this spider again then INFO messages from
scrapy.spidermiddlewares.httperror logger will be gone.
You can also filter log records by LogRecord data. For
example, you can filter log records by message content using a substring or
a regular expression. Create a logging.Filter subclass
and equip it with a regular expression pattern to
filter out unwanted messages:
import logging
import re
class ContentFilter(logging.Filter):
def filter(self, record):
match = re.search(r'\d{3} [Ee]rror, retrying', record.message)
if match:
return False
A project-level filter may be attached to the root handler created by Scrapy, this is a wieldy way to filter all loggers in different parts of the project (middlewares, spider, etc.):
import logging
import scrapy
class MySpider(scrapy.Spider):
# ...
def __init__(self, *args, **kwargs):
for handler in logging.root.handlers:
handler.addFilter(ContentFilter())
Alternatively, you may choose a specific logger and hide it without affecting other loggers:
import logging
import scrapy
class MySpider(scrapy.Spider):
# ...
def __init__(self, *args, **kwargs):
logger = logging.getLogger('my_logger')
logger.addFilter(ContentFilter())
scrapy.utils.log module
- scrapy.utils.log.configure_logging(settings=None, install_root_handler=True)[source]
Initialize logging defaults for Scrapy.
- Parameters
This function does:
Route warnings and twisted logging through Python standard logging
Assign DEBUG and ERROR level to Scrapy and Twisted loggers respectively
Route stdout to log if LOG_STDOUT setting is True
When
install_root_handleris True (default), this function also creates a handler for the root logger according to given settings (see Logging settings). You can override default options usingsettingsargument. Whensettingsis empty or None, defaults are used.configure_loggingis automatically called when using Scrapy commands orCrawlerProcess, but needs to be called explicitly when running custom scripts usingCrawlerRunner. In that case, its usage is not required but it’s recommended.Another option when running custom scripts is to manually configure the logging. To do this you can use
logging.basicConfig()to set a basic root handler.Note that
CrawlerProcessautomatically callsconfigure_logging, so it is recommended to only uselogging.basicConfig()together withCrawlerRunner.This is an example on how to redirect
INFOor higher messages to a file:import logging logging.basicConfig( filename='log.txt', format='%(levelname)s: %(message)s', level=logging.INFO )
Refer to Run Scrapy from a script for more details about using Scrapy this way.
Stats Collection
Scrapy provides a convenient facility for collecting stats in the form of
key/values, where values are often counters. The facility is called the Stats
Collector, and can be accessed through the stats
attribute of the Crawler API, as illustrated by the examples in
the Common Stats Collector uses section below.
However, the Stats Collector is always available, so you can always import it in your module and use its API (to increment or set new stat keys), regardless of whether the stats collection is enabled or not. If it’s disabled, the API will still work but it won’t collect anything. This is aimed at simplifying the stats collector usage: you should spend no more than one line of code for collecting stats in your spider, Scrapy extension, or whatever code you’re using the Stats Collector from.
Another feature of the Stats Collector is that it’s very efficient (when enabled) and extremely efficient (almost unnoticeable) when disabled.
The Stats Collector keeps a stats table per open spider which is automatically opened when the spider is opened, and closed when the spider is closed.
Common Stats Collector uses
Access the stats collector through the stats
attribute. Here is an example of an extension that access stats:
class ExtensionThatAccessStats:
def __init__(self, stats):
self.stats = stats
@classmethod
def from_crawler(cls, crawler):
return cls(crawler.stats)
Set stat value:
stats.set_value('hostname', socket.gethostname())
Increment stat value:
stats.inc_value('custom_count')
Set stat value only if greater than previous:
stats.max_value('max_items_scraped', value)
Set stat value only if lower than previous:
stats.min_value('min_free_memory_percent', value)
Get stat value:
>>> stats.get_value('custom_count')
1
Get all stats:
>>> stats.get_stats()
{'custom_count': 1, 'start_time': datetime.datetime(2009, 7, 14, 21, 47, 28, 977139)}
Available Stats Collectors
Besides the basic StatsCollector there are other Stats Collectors
available in Scrapy which extend the basic Stats Collector. You can select
which Stats Collector to use through the STATS_CLASS setting. The
default Stats Collector used is the MemoryStatsCollector.
MemoryStatsCollector
- class scrapy.statscollectors.MemoryStatsCollector[source]
A simple stats collector that keeps the stats of the last scraping run (for each spider) in memory, after they’re closed. The stats can be accessed through the
spider_statsattribute, which is a dict keyed by spider domain name.This is the default Stats Collector used in Scrapy.
- spider_stats
A dict of dicts (keyed by spider name) containing the stats of the last scraping run for each spider.
DummyStatsCollector
- class scrapy.statscollectors.DummyStatsCollector[source]
A Stats collector which does nothing but is very efficient (because it does nothing). This stats collector can be set via the
STATS_CLASSsetting, to disable stats collect in order to improve performance. However, the performance penalty of stats collection is usually marginal compared to other Scrapy workload like parsing pages.
Sending e-mail
Although Python makes sending e-mails relatively easy via the smtplib
library, Scrapy provides its own facility for sending e-mails which is very
easy to use and it’s implemented using Twisted non-blocking IO, to avoid interfering with the non-blocking
IO of the crawler. It also provides a simple API for sending attachments and
it’s very easy to configure, with a few settings.
Quick example
There are two ways to instantiate the mail sender. You can instantiate it using
the standard __init__ method:
from scrapy.mail import MailSender
mailer = MailSender()
Or you can instantiate it passing a Scrapy settings object, which will respect the settings:
mailer = MailSender.from_settings(settings)
And here is how to use it to send an e-mail (without attachments):
mailer.send(to=["someone@example.com"], subject="Some subject", body="Some body", cc=["another@example.com"])
MailSender class reference
MailSender is the preferred class to use for sending emails from Scrapy, as it uses Twisted non-blocking IO, like the rest of the framework.
- class scrapy.mail.MailSender(smtphost=None, mailfrom=None, smtpuser=None, smtppass=None, smtpport=None)[source]
- Parameters
smtphost (str or bytes) – the SMTP host to use for sending the emails. If omitted, the
MAIL_HOSTsetting will be used.mailfrom (str) – the address used to send emails (in the
From:header). If omitted, theMAIL_FROMsetting will be used.smtpuser – the SMTP user. If omitted, the
MAIL_USERsetting will be used. If not given, no SMTP authentication will be performed.smtpport (int) – the SMTP port to connect to
smtptls (bool) – enforce using SMTP STARTTLS
smtpssl (bool) – enforce using a secure SSL connection
- classmethod from_settings(settings)[source]
Instantiate using a Scrapy settings object, which will respect these Scrapy settings.
- Parameters
settings (
scrapy.settings.Settingsobject) – the e-mail recipients
- send(to, subject, body, cc=None, attachs=(), mimetype='text/plain', charset=None)[source]
Send email to the given recipients.
- Parameters
to (str or list) – the e-mail recipients as a string or as a list of strings
subject (str) – the subject of the e-mail
cc (str or list) – the e-mails to CC as a string or as a list of strings
body (str) – the e-mail body
attachs (collections.abc.Iterable) – an iterable of tuples
(attach_name, mimetype, file_object)whereattach_nameis a string with the name that will appear on the e-mail’s attachment,mimetypeis the mimetype of the attachment andfile_objectis a readable file object with the contents of the attachmentmimetype (str) – the MIME type of the e-mail
charset (str) – the character encoding to use for the e-mail contents
Mail settings
These settings define the default __init__ method values of the MailSender
class, and can be used to configure e-mail notifications in your project without
writing any code (for those extensions and code that uses MailSender).
MAIL_FROM
Default: 'scrapy@localhost'
Sender email to use (From: header) for sending emails.
MAIL_HOST
Default: 'localhost'
SMTP host to use for sending emails.
MAIL_PORT
Default: 25
SMTP port to use for sending emails.
MAIL_USER
Default: None
User to use for SMTP authentication. If disabled no SMTP authentication will be performed.
MAIL_PASS
Default: None
Password to use for SMTP authentication, along with MAIL_USER.
MAIL_TLS
Default: False
Enforce using STARTTLS. STARTTLS is a way to take an existing insecure connection, and upgrade it to a secure connection using SSL/TLS.
MAIL_SSL
Default: False
Enforce connecting using an SSL encrypted connection
Telnet Console
Scrapy comes with a built-in telnet console for inspecting and controlling a Scrapy running process. The telnet console is just a regular python shell running inside the Scrapy process, so you can do literally anything from it.
The telnet console is a built-in Scrapy extension which comes enabled by default, but you can also disable it if you want. For more information about the extension itself see Telnet console extension.
Warning
It is not secure to use telnet console via public networks, as telnet doesn’t provide any transport-layer security. Having username/password authentication doesn’t change that.
Intended usage is connecting to a running Scrapy spider locally
(spider process and telnet client are on the same machine)
or over a secure connection (VPN, SSH tunnel).
Please avoid using telnet console over insecure connections,
or disable it completely using TELNETCONSOLE_ENABLED option.
How to access the telnet console
The telnet console listens in the TCP port defined in the
TELNETCONSOLE_PORT setting, which defaults to 6023. To access
the console you need to type:
telnet localhost 6023
Trying localhost...
Connected to localhost.
Escape character is '^]'.
Username:
Password:
>>>
By default Username is scrapy and Password is autogenerated. The
autogenerated Password can be seen on Scrapy logs like the example below:
2018-10-16 14:35:21 [scrapy.extensions.telnet] INFO: Telnet Password: 16f92501e8a59326
Default Username and Password can be overridden by the settings
TELNETCONSOLE_USERNAME and TELNETCONSOLE_PASSWORD.
Warning
Username and password provide only a limited protection, as telnet is not using secure transport - by default traffic is not encrypted even if username and password are set.
You need the telnet program which comes installed by default in Windows, and most Linux distros.
Available variables in the telnet console
The telnet console is like a regular Python shell running inside the Scrapy process, so you can do anything from it including importing new modules, etc.
However, the telnet console comes with some default variables defined for convenience:
Shortcut |
Description |
|---|---|
|
the Scrapy Crawler ( |
|
Crawler.engine attribute |
|
the active spider |
|
the engine slot |
|
the Extension Manager (Crawler.extensions attribute) |
|
the Stats Collector (Crawler.stats attribute) |
|
the Scrapy settings object (Crawler.settings attribute) |
|
print a report of the engine status |
|
for memory debugging (see Debugging memory leaks) |
|
a shortcut to the |
|
for memory debugging (see Debugging memory leaks) |
Telnet console usage examples
Here are some example tasks you can do with the telnet console:
View engine status
You can use the est() method of the Scrapy engine to quickly show its state
using the telnet console:
telnet localhost 6023
>>> est()
Execution engine status
time()-engine.start_time : 8.62972998619
len(engine.downloader.active) : 16
engine.scraper.is_idle() : False
engine.spider.name : followall
engine.spider_is_idle() : False
engine.slot.closing : False
len(engine.slot.inprogress) : 16
len(engine.slot.scheduler.dqs or []) : 0
len(engine.slot.scheduler.mqs) : 92
len(engine.scraper.slot.queue) : 0
len(engine.scraper.slot.active) : 0
engine.scraper.slot.active_size : 0
engine.scraper.slot.itemproc_size : 0
engine.scraper.slot.needs_backout() : False
Pause, resume and stop the Scrapy engine
To pause:
telnet localhost 6023
>>> engine.pause()
>>>
To resume:
telnet localhost 6023
>>> engine.unpause()
>>>
To stop:
telnet localhost 6023
>>> engine.stop()
Connection closed by foreign host.
Telnet Console signals
- scrapy.extensions.telnet.update_telnet_vars(telnet_vars)
Sent just before the telnet console is opened. You can hook up to this signal to add, remove or update the variables that will be available in the telnet local namespace. In order to do that, you need to update the
telnet_varsdict in your handler.- Parameters
telnet_vars (dict) – the dict of telnet variables
Telnet settings
These are the settings that control the telnet console’s behaviour:
TELNETCONSOLE_PORT
Default: [6023, 6073]
The port range to use for the telnet console. If set to None or 0, a
dynamically assigned port is used.
TELNETCONSOLE_HOST
Default: '127.0.0.1'
The interface the telnet console should listen on
TELNETCONSOLE_USERNAME
Default: 'scrapy'
The username used for the telnet console
TELNETCONSOLE_PASSWORD
Default: None
The password used for the telnet console, default behaviour is to have it autogenerated
Web Service
webservice has been moved into a separate project.
It is hosted at:
- Logging
Learn how to use Python’s builtin logging on Scrapy.
- Stats Collection
Collect statistics about your scraping crawler.
- Sending e-mail
Send email notifications when certain events occur.
- Telnet Console
Inspect a running crawler using a built-in Python console.
- Web Service
Monitor and control a crawler using a web service.
Solving specific problems
Frequently Asked Questions
How does Scrapy compare to BeautifulSoup or lxml?
BeautifulSoup and lxml are libraries for parsing HTML and XML. Scrapy is an application framework for writing web spiders that crawl web sites and extract data from them.
Scrapy provides a built-in mechanism for extracting data (called selectors) but you can easily use BeautifulSoup (or lxml) instead, if you feel more comfortable working with them. After all, they’re just parsing libraries which can be imported and used from any Python code.
In other words, comparing BeautifulSoup (or lxml) to Scrapy is like comparing jinja2 to Django.
Can I use Scrapy with BeautifulSoup?
Yes, you can.
As mentioned above, BeautifulSoup can be used
for parsing HTML responses in Scrapy callbacks.
You just have to feed the response’s body into a BeautifulSoup object
and extract whatever data you need from it.
Here’s an example spider using BeautifulSoup API, with lxml as the HTML parser:
from bs4 import BeautifulSoup
import scrapy
class ExampleSpider(scrapy.Spider):
name = "example"
allowed_domains = ["example.com"]
start_urls = (
'http://www.example.com/',
)
def parse(self, response):
# use lxml to get decent HTML parsing speed
soup = BeautifulSoup(response.text, 'lxml')
yield {
"url": response.url,
"title": soup.h1.string
}
Note
BeautifulSoup supports several HTML/XML parsers.
See BeautifulSoup’s official documentation on which ones are available.
Did Scrapy “steal” X from Django?
Probably, but we don’t like that word. We think Django is a great open source project and an example to follow, so we’ve used it as an inspiration for Scrapy.
We believe that, if something is already done well, there’s no need to reinvent it. This concept, besides being one of the foundations for open source and free software, not only applies to software but also to documentation, procedures, policies, etc. So, instead of going through each problem ourselves, we choose to copy ideas from those projects that have already solved them properly, and focus on the real problems we need to solve.
We’d be proud if Scrapy serves as an inspiration for other projects. Feel free to steal from us!
Does Scrapy work with HTTP proxies?
Yes. Support for HTTP proxies is provided (since Scrapy 0.8) through the HTTP
Proxy downloader middleware. See
HttpProxyMiddleware.
How can I scrape an item with attributes in different pages?
Scrapy crashes with: ImportError: No module named win32api
You need to install pywin32 because of this Twisted bug.
How can I simulate a user login in my spider?
See Using FormRequest.from_response() to simulate a user login.
Does Scrapy crawl in breadth-first or depth-first order?
By default, Scrapy uses a LIFO queue for storing pending requests, which basically means that it crawls in DFO order. This order is more convenient in most cases.
If you do want to crawl in true BFO order, you can do it by setting the following settings:
DEPTH_PRIORITY = 1
SCHEDULER_DISK_QUEUE = 'scrapy.squeues.PickleFifoDiskQueue'
SCHEDULER_MEMORY_QUEUE = 'scrapy.squeues.FifoMemoryQueue'
While pending requests are below the configured values of
CONCURRENT_REQUESTS, CONCURRENT_REQUESTS_PER_DOMAIN or
CONCURRENT_REQUESTS_PER_IP, those requests are sent
concurrently. As a result, the first few requests of a crawl rarely follow the
desired order. Lowering those settings to 1 enforces the desired order, but
it significantly slows down the crawl as a whole.
My Scrapy crawler has memory leaks. What can I do?
Also, Python has a builtin memory leak issue which is described in Leaks without leaks.
How can I make Scrapy consume less memory?
See previous question.
How can I prevent memory errors due to many allowed domains?
If you have a spider with a long list of
allowed_domains (e.g. 50,000+), consider
replacing the default
OffsiteMiddleware spider middleware
with a custom spider middleware that requires
less memory. For example:
If your domain names are similar enough, use your own regular expression instead joining the strings in
allowed_domainsinto a complex regular expression.If you can meet the installation requirements, use pyre2 instead of Python’s re to compile your URL-filtering regular expression. See issue 1908.
See also other suggestions at StackOverflow.
Note
Remember to disable
scrapy.spidermiddlewares.offsite.OffsiteMiddleware when you enable
your custom implementation:
SPIDER_MIDDLEWARES = {
'scrapy.spidermiddlewares.offsite.OffsiteMiddleware': None,
'myproject.middlewares.CustomOffsiteMiddleware': 500,
}
Can I use Basic HTTP Authentication in my spiders?
Yes, see HttpAuthMiddleware.
Why does Scrapy download pages in English instead of my native language?
Try changing the default Accept-Language request header by overriding the
DEFAULT_REQUEST_HEADERS setting.
Where can I find some example Scrapy projects?
See Examples.
Can I run a spider without creating a project?
Yes. You can use the runspider command. For example, if you have a
spider written in a my_spider.py file you can run it with:
scrapy runspider my_spider.py
See runspider command for more info.
I get “Filtered offsite request” messages. How can I fix them?
Those messages (logged with DEBUG level) don’t necessarily mean there is a
problem, so you may not need to fix them.
Those messages are thrown by the Offsite Spider Middleware, which is a spider middleware (enabled by default) whose purpose is to filter out requests to domains outside the ones covered by the spider.
For more info see:
OffsiteMiddleware.
What is the recommended way to deploy a Scrapy crawler in production?
See Deploying Spiders.
Can I use JSON for large exports?
It’ll depend on how large your output is. See this warning in JsonItemExporter
documentation.
Can I return (Twisted) deferreds from signal handlers?
Some signals support returning deferreds from their handlers, others don’t. See the Built-in signals reference to know which ones.
What does the response status code 999 means?
999 is a custom response status code used by Yahoo sites to throttle requests.
Try slowing down the crawling speed by using a download delay of 2 (or
higher) in your spider:
class MySpider(CrawlSpider):
name = 'myspider'
download_delay = 2
# [ ... rest of the spider code ... ]
Or by setting a global download delay in your project with the
DOWNLOAD_DELAY setting.
Can I call pdb.set_trace() from my spiders to debug them?
Yes, but you can also use the Scrapy shell which allows you to quickly analyze
(and even modify) the response being processed by your spider, which is, quite
often, more useful than plain old pdb.set_trace().
For more info see Invoking the shell from spiders to inspect responses.
Simplest way to dump all my scraped items into a JSON/CSV/XML file?
To dump into a JSON file:
scrapy crawl myspider -O items.json
To dump into a CSV file:
scrapy crawl myspider -O items.csv
To dump into a XML file:
scrapy crawl myspider -O items.xml
For more information see Feed exports
What’s this huge cryptic __VIEWSTATE parameter used in some forms?
The __VIEWSTATE parameter is used in sites built with ASP.NET/VB.NET. For
more info on how it works see this page. Also, here’s an example spider
which scrapes one of these sites.
What’s the best way to parse big XML/CSV data feeds?
Parsing big feeds with XPath selectors can be problematic since they need to build the DOM of the entire feed in memory, and this can be quite slow and consume a lot of memory.
In order to avoid parsing all the entire feed at once in memory, you can use
the functions xmliter and csviter from scrapy.utils.iterators
module. In fact, this is what the feed spiders (see Spiders) use
under the cover.
How can I instruct a spider to stop itself?
Raise the CloseSpider exception from a callback. For
more info see: CloseSpider.
How can I prevent my Scrapy bot from getting banned?
Should I use spider arguments or settings to configure my spider?
Both spider arguments and settings can be used to configure your spider. There is no strict rule that mandates to use one or the other, but settings are more suited for parameters that, once set, don’t change much, while spider arguments are meant to change more often, even on each spider run and sometimes are required for the spider to run at all (for example, to set the start url of a spider).
To illustrate with an example, assuming you have a spider that needs to log into a site to scrape data, and you only want to scrape data from a certain section of the site (which varies each time). In that case, the credentials to log in would be settings, while the url of the section to scrape would be a spider argument.
I’m scraping a XML document and my XPath selector doesn’t return any items
You may need to remove namespaces. See Removing namespaces.
How to split an item into multiple items in an item pipeline?
Item pipelines cannot yield multiple items per
input item. Create a spider middleware
instead, and use its
process_spider_output()
method for this purpose. For example:
from copy import deepcopy
from itemadapter import is_item, ItemAdapter
class MultiplyItemsMiddleware:
def process_spider_output(self, response, result, spider):
for item in result:
if is_item(item):
adapter = ItemAdapter(item)
for _ in range(adapter['multiply_by']):
yield deepcopy(item)
Does Scrapy support IPv6 addresses?
Yes, by setting DNS_RESOLVER to scrapy.resolver.CachingHostnameResolver.
Note that by doing so, you lose the ability to set a specific timeout for DNS requests
(the value of the DNS_TIMEOUT setting is ignored).
How to deal with <class 'ValueError'>: filedescriptor out of range in select() exceptions?
This issue has been reported to appear when running broad crawls in macOS, where the default
Twisted reactor is twisted.internet.selectreactor.SelectReactor. Switching to a
different reactor is possible by using the TWISTED_REACTOR setting.
How can I cancel the download of a given response?
In some situations, it might be useful to stop the download of a certain response.
For instance, sometimes you can determine whether or not you need the full contents
of a response by inspecting its headers or the first bytes of its body. In that case,
you could save resources by attaching a handler to the bytes_received
or headers_received signals and raising a
StopDownload exception. Please refer to the
Stopping the download of a Response topic for additional information and examples.
Running runspider I get error: No spider found in file: <filename>
This may happen if your Scrapy project has a spider module with a name that
conflicts with the name of one of the Python standard library modules, such
as csv.py or os.py, or any Python package that you have installed.
See issue 2680.
Debugging Spiders
This document explains the most common techniques for debugging spiders. Consider the following Scrapy spider below:
import scrapy
from myproject.items import MyItem
class MySpider(scrapy.Spider):
name = 'myspider'
start_urls = (
'http://example.com/page1',
'http://example.com/page2',
)
def parse(self, response):
# <processing code not shown>
# collect `item_urls`
for item_url in item_urls:
yield scrapy.Request(item_url, self.parse_item)
def parse_item(self, response):
# <processing code not shown>
item = MyItem()
# populate `item` fields
# and extract item_details_url
yield scrapy.Request(item_details_url, self.parse_details, cb_kwargs={'item': item})
def parse_details(self, response, item):
# populate more `item` fields
return item
Basically this is a simple spider which parses two pages of items (the
start_urls). Items also have a details page with additional information, so we
use the cb_kwargs functionality of Request to pass a
partially populated item.
Parse Command
The most basic way of checking the output of your spider is to use the
parse command. It allows to check the behaviour of different parts
of the spider at the method level. It has the advantage of being flexible and
simple to use, but does not allow debugging code inside a method.
In order to see the item scraped from a specific url:
$ scrapy parse --spider=myspider -c parse_item -d 2 <item_url>
[ ... scrapy log lines crawling example.com spider ... ]
>>> STATUS DEPTH LEVEL 2 <<<
# Scraped Items ------------------------------------------------------------
[{'url': <item_url>}]
# Requests -----------------------------------------------------------------
[]
Using the --verbose or -v option we can see the status at each depth level:
$ scrapy parse --spider=myspider -c parse_item -d 2 -v <item_url>
[ ... scrapy log lines crawling example.com spider ... ]
>>> DEPTH LEVEL: 1 <<<
# Scraped Items ------------------------------------------------------------
[]
# Requests -----------------------------------------------------------------
[<GET item_details_url>]
>>> DEPTH LEVEL: 2 <<<
# Scraped Items ------------------------------------------------------------
[{'url': <item_url>}]
# Requests -----------------------------------------------------------------
[]
Checking items scraped from a single start_url, can also be easily achieved using:
$ scrapy parse --spider=myspider -d 3 'http://example.com/page1'
Scrapy Shell
While the parse command is very useful for checking behaviour of a
spider, it is of little help to check what happens inside a callback, besides
showing the response received and the output. How to debug the situation when
parse_details sometimes receives no item?
Fortunately, the shell is your bread and butter in this case (see
Invoking the shell from spiders to inspect responses):
from scrapy.shell import inspect_response
def parse_details(self, response, item=None):
if item:
# populate more `item` fields
return item
else:
inspect_response(response, self)
See also: Invoking the shell from spiders to inspect responses.
Open in browser
Sometimes you just want to see how a certain response looks in a browser, you
can use the open_in_browser function for that. Here is an example of how
you would use it:
from scrapy.utils.response import open_in_browser
def parse_details(self, response):
if "item name" not in response.body:
open_in_browser(response)
open_in_browser will open a browser with the response received by Scrapy at
that point, adjusting the base tag so that images and styles are displayed
properly.
Logging
Logging is another useful option for getting information about your spider run. Although not as convenient, it comes with the advantage that the logs will be available in all future runs should they be necessary again:
def parse_details(self, response, item=None):
if item:
# populate more `item` fields
return item
else:
self.logger.warning('No item received for %s', response.url)
For more information, check the Logging section.
Spiders Contracts
Testing spiders can get particularly annoying and while nothing prevents you from writing unit tests the task gets cumbersome quickly. Scrapy offers an integrated way of testing your spiders by the means of contracts.
This allows you to test each callback of your spider by hardcoding a sample url
and check various constraints for how the callback processes the response. Each
contract is prefixed with an @ and included in the docstring. See the
following example:
def parse(self, response):
""" This function parses a sample response. Some contracts are mingled
with this docstring.
@url http://www.amazon.com/s?field-keywords=selfish+gene
@returns items 1 16
@returns requests 0 0
@scrapes Title Author Year Price
"""
This callback is tested using three built-in contracts:
- class scrapy.contracts.default.UrlContract[source]
This contract (
@url) sets the sample URL used when checking other contract conditions for this spider. This contract is mandatory. All callbacks lacking this contract are ignored when running the checks:@url url
- class scrapy.contracts.default.CallbackKeywordArgumentsContract[source]
This contract (
@cb_kwargs) sets thecb_kwargsattribute for the sample request. It must be a valid JSON dictionary.@cb_kwargs {"arg1": "value1", "arg2": "value2", ...}
- class scrapy.contracts.default.ReturnsContract[source]
This contract (
@returns) sets lower and upper bounds for the items and requests returned by the spider. The upper bound is optional:@returns item(s)|request(s) [min [max]]
- class scrapy.contracts.default.ScrapesContract[source]
This contract (
@scrapes) checks that all the items returned by the callback have the specified fields:@scrapes field_1 field_2 ...
Use the check command to run the contract checks.
Custom Contracts
If you find you need more power than the built-in Scrapy contracts you can
create and load your own contracts in the project by using the
SPIDER_CONTRACTS setting:
SPIDER_CONTRACTS = {
'myproject.contracts.ResponseCheck': 10,
'myproject.contracts.ItemValidate': 10,
}
Each contract must inherit from Contract and can
override three methods:
- class scrapy.contracts.Contract(method, *args)[source]
- Parameters
method (collections.abc.Callable) – callback function to which the contract is associated
args (list) – list of arguments passed into the docstring (whitespace separated)
- adjust_request_args(args)[source]
This receives a
dictas an argument containing default arguments for request object.Requestis used by default, but this can be changed with therequest_clsattribute. If multiple contracts in chain have this attribute defined, the last one is used.Must return the same or a modified version of it.
- pre_process(response)
This allows hooking in various checks on the response received from the sample request, before it’s being passed to the callback.
- post_process(output)
This allows processing the output of the callback. Iterators are converted listified before being passed to this hook.
Raise ContractFail from
pre_process or
post_process if expectations are not met:
Here is a demo contract which checks the presence of a custom header in the response received:
from scrapy.contracts import Contract
from scrapy.exceptions import ContractFail
class HasHeaderContract(Contract):
""" Demo contract which checks the presence of a custom header
@has_header X-CustomHeader
"""
name = 'has_header'
def pre_process(self, response):
for header in self.args:
if header not in response.headers:
raise ContractFail('X-CustomHeader not present')
Detecting check runs
When scrapy check is running, the SCRAPY_CHECK environment variable is
set to the true string. You can use os.environ to perform any change to
your spiders or your settings when scrapy check is used:
import os
import scrapy
class ExampleSpider(scrapy.Spider):
name = 'example'
def __init__(self):
if os.environ.get('SCRAPY_CHECK'):
pass # Do some scraper adjustments when a check is running
Common Practices
This section documents common practices when using Scrapy. These are things that cover many topics and don’t often fall into any other specific section.
Run Scrapy from a script
You can use the API to run Scrapy from a script, instead of
the typical way of running Scrapy via scrapy crawl.
Remember that Scrapy is built on top of the Twisted asynchronous networking library, so you need to run it inside the Twisted reactor.
The first utility you can use to run your spiders is
scrapy.crawler.CrawlerProcess. This class will start a Twisted reactor
for you, configuring the logging and setting shutdown handlers. This class is
the one used by all Scrapy commands.
Here’s an example showing how to run a single spider with it.
import scrapy
from scrapy.crawler import CrawlerProcess
class MySpider(scrapy.Spider):
# Your spider definition
...
process = CrawlerProcess(settings={
"FEEDS": {
"items.json": {"format": "json"},
},
})
process.crawl(MySpider)
process.start() # the script will block here until the crawling is finished
Define settings within dictionary in CrawlerProcess. Make sure to check CrawlerProcess
documentation to get acquainted with its usage details.
If you are inside a Scrapy project there are some additional helpers you can
use to import those components within the project. You can automatically import
your spiders passing their name to CrawlerProcess, and
use get_project_settings to get a Settings
instance with your project settings.
What follows is a working example of how to do that, using the testspiders project as example.
from scrapy.crawler import CrawlerProcess
from scrapy.utils.project import get_project_settings
process = CrawlerProcess(get_project_settings())
# 'followall' is the name of one of the spiders of the project.
process.crawl('followall', domain='scrapy.org')
process.start() # the script will block here until the crawling is finished
There’s another Scrapy utility that provides more control over the crawling
process: scrapy.crawler.CrawlerRunner. This class is a thin wrapper
that encapsulates some simple helpers to run multiple crawlers, but it won’t
start or interfere with existing reactors in any way.
Using this class the reactor should be explicitly run after scheduling your
spiders. It’s recommended you use CrawlerRunner
instead of CrawlerProcess if your application is
already using Twisted and you want to run Scrapy in the same reactor.
Note that you will also have to shutdown the Twisted reactor yourself after the
spider is finished. This can be achieved by adding callbacks to the deferred
returned by the CrawlerRunner.crawl method.
Here’s an example of its usage, along with a callback to manually stop the
reactor after MySpider has finished running.
from twisted.internet import reactor
import scrapy
from scrapy.crawler import CrawlerRunner
from scrapy.utils.log import configure_logging
class MySpider(scrapy.Spider):
# Your spider definition
...
configure_logging({'LOG_FORMAT': '%(levelname)s: %(message)s'})
runner = CrawlerRunner()
d = runner.crawl(MySpider)
d.addBoth(lambda _: reactor.stop())
reactor.run() # the script will block here until the crawling is finished
See also
Running multiple spiders in the same process
By default, Scrapy runs a single spider per process when you run scrapy
crawl. However, Scrapy supports running multiple spiders per process using
the internal API.
Here is an example that runs multiple spiders simultaneously:
import scrapy
from scrapy.crawler import CrawlerProcess
from scrapy.utils.project import get_project_settings
class MySpider1(scrapy.Spider):
# Your first spider definition
...
class MySpider2(scrapy.Spider):
# Your second spider definition
...
settings = get_project_settings()
process = CrawlerProcess(settings)
process.crawl(MySpider1)
process.crawl(MySpider2)
process.start() # the script will block here until all crawling jobs are finished
Same example using CrawlerRunner:
import scrapy
from twisted.internet import reactor
from scrapy.crawler import CrawlerRunner
from scrapy.utils.log import configure_logging
from scrapy.utils.project import get_project_settings
class MySpider1(scrapy.Spider):
# Your first spider definition
...
class MySpider2(scrapy.Spider):
# Your second spider definition
...
configure_logging()
settings = get_project_settings()
runner = CrawlerRunner(settings)
runner.crawl(MySpider1)
runner.crawl(MySpider2)
d = runner.join()
d.addBoth(lambda _: reactor.stop())
reactor.run() # the script will block here until all crawling jobs are finished
Same example but running the spiders sequentially by chaining the deferreds:
from twisted.internet import reactor, defer
from scrapy.crawler import CrawlerRunner
from scrapy.utils.log import configure_logging
from scrapy.utils.project import get_project_settings
class MySpider1(scrapy.Spider):
# Your first spider definition
...
class MySpider2(scrapy.Spider):
# Your second spider definition
...
configure_logging()
settings = get_project_settings()
runner = CrawlerRunner(settings)
@defer.inlineCallbacks
def crawl():
yield runner.crawl(MySpider1)
yield runner.crawl(MySpider2)
reactor.stop()
crawl()
reactor.run() # the script will block here until the last crawl call is finished
Different spiders can set different values for the same setting, but when they run in the same process it may be impossible, by design or because of some limitations, to use these different values. What happens in practice is different for different settings:
SPIDER_LOADER_CLASSand the ones used by its value (SPIDER_MODULES,SPIDER_LOADER_WARN_ONLYfor the default one) cannot be read from the per-spider settings. These are applied when theCrawlerRunnerorCrawlerProcessobject is created.For
TWISTED_REACTORandASYNCIO_EVENT_LOOPthe first available value is used, and if a spider requests a different reactor an exception will be raised. These are applied when the reactor is installed.For
REACTOR_THREADPOOL_MAXSIZE,DNS_RESOLVERand the ones used by the resolver (DNSCACHE_ENABLED,DNSCACHE_SIZE,DNS_TIMEOUTfor ones included in Scrapy) the first available value is used. These are applied when the reactor is started.
See also
Distributed crawls
Scrapy doesn’t provide any built-in facility for running crawls in a distribute (multi-server) manner. However, there are some ways to distribute crawls, which vary depending on how you plan to distribute them.
If you have many spiders, the obvious way to distribute the load is to setup many Scrapyd instances and distribute spider runs among those.
If you instead want to run a single (big) spider through many machines, what you usually do is partition the urls to crawl and send them to each separate spider. Here is a concrete example:
First, you prepare the list of urls to crawl and put them into separate files/urls:
http://somedomain.com/urls-to-crawl/spider1/part1.list
http://somedomain.com/urls-to-crawl/spider1/part2.list
http://somedomain.com/urls-to-crawl/spider1/part3.list
Then you fire a spider run on 3 different Scrapyd servers. The spider would
receive a (spider) argument part with the number of the partition to
crawl:
curl http://scrapy1.mycompany.com:6800/schedule.json -d project=myproject -d spider=spider1 -d part=1
curl http://scrapy2.mycompany.com:6800/schedule.json -d project=myproject -d spider=spider1 -d part=2
curl http://scrapy3.mycompany.com:6800/schedule.json -d project=myproject -d spider=spider1 -d part=3
Avoiding getting banned
Some websites implement certain measures to prevent bots from crawling them, with varying degrees of sophistication. Getting around those measures can be difficult and tricky, and may sometimes require special infrastructure. Please consider contacting commercial support if in doubt.
Here are some tips to keep in mind when dealing with these kinds of sites:
rotate your user agent from a pool of well-known ones from browsers (google around to get a list of them)
disable cookies (see
COOKIES_ENABLED) as some sites may use cookies to spot bot behaviouruse download delays (2 or higher). See
DOWNLOAD_DELAYsetting.if possible, use Google cache to fetch pages, instead of hitting the sites directly
use a pool of rotating IPs. For example, the free Tor project or paid services like ProxyMesh. An open source alternative is scrapoxy, a super proxy that you can attach your own proxies to.
use a highly distributed downloader that circumvents bans internally, so you can just focus on parsing clean pages. One example of such downloaders is Zyte Smart Proxy Manager
If you are still unable to prevent your bot getting banned, consider contacting commercial support.
Broad Crawls
Scrapy defaults are optimized for crawling specific sites. These sites are often handled by a single Scrapy spider, although this is not necessary or required (for example, there are generic spiders that handle any given site thrown at them).
In addition to this “focused crawl”, there is another common type of crawling which covers a large (potentially unlimited) number of domains, and is only limited by time or other arbitrary constraint, rather than stopping when the domain was crawled to completion or when there are no more requests to perform. These are called “broad crawls” and is the typical crawlers employed by search engines.
These are some common properties often found in broad crawls:
they crawl many domains (often, unbounded) instead of a specific set of sites
they don’t necessarily crawl domains to completion, because it would be impractical (or impossible) to do so, and instead limit the crawl by time or number of pages crawled
they are simpler in logic (as opposed to very complex spiders with many extraction rules) because data is often post-processed in a separate stage
they crawl many domains concurrently, which allows them to achieve faster crawl speeds by not being limited by any particular site constraint (each site is crawled slowly to respect politeness, but many sites are crawled in parallel)
As said above, Scrapy default settings are optimized for focused crawls, not broad crawls. However, due to its asynchronous architecture, Scrapy is very well suited for performing fast broad crawls. This page summarizes some things you need to keep in mind when using Scrapy for doing broad crawls, along with concrete suggestions of Scrapy settings to tune in order to achieve an efficient broad crawl.
Use the right SCHEDULER_PRIORITY_QUEUE
Scrapy’s default scheduler priority queue is 'scrapy.pqueues.ScrapyPriorityQueue'.
It works best during single-domain crawl. It does not work well with crawling
many different domains in parallel
To apply the recommended priority queue use:
SCHEDULER_PRIORITY_QUEUE = 'scrapy.pqueues.DownloaderAwarePriorityQueue'
Increase concurrency
Concurrency is the number of requests that are processed in parallel. There is
a global limit (CONCURRENT_REQUESTS) and an additional limit that
can be set either per domain (CONCURRENT_REQUESTS_PER_DOMAIN) or per
IP (CONCURRENT_REQUESTS_PER_IP).
Note
The scheduler priority queue recommended for broad crawls does not support
CONCURRENT_REQUESTS_PER_IP.
The default global concurrency limit in Scrapy is not suitable for crawling many different domains in parallel, so you will want to increase it. How much to increase it will depend on how much CPU and memory you crawler will have available.
A good starting point is 100:
CONCURRENT_REQUESTS = 100
But the best way to find out is by doing some trials and identifying at what concurrency your Scrapy process gets CPU bounded. For optimum performance, you should pick a concurrency where CPU usage is at 80-90%.
Increasing concurrency also increases memory usage. If memory usage is a concern, you might need to lower your global concurrency limit accordingly.
Increase Twisted IO thread pool maximum size
Currently Scrapy does DNS resolution in a blocking way with usage of thread pool. With higher concurrency levels the crawling could be slow or even fail hitting DNS resolver timeouts. Possible solution to increase the number of threads handling DNS queries. The DNS queue will be processed faster speeding up establishing of connection and crawling overall.
To increase maximum thread pool size use:
REACTOR_THREADPOOL_MAXSIZE = 20
Setup your own DNS
If you have multiple crawling processes and single central DNS, it can act like DoS attack on the DNS server resulting to slow down of entire network or even blocking your machines. To avoid this setup your own DNS server with local cache and upstream to some large DNS like OpenDNS or Verizon.
Reduce log level
When doing broad crawls you are often only interested in the crawl rates you
get and any errors found. These stats are reported by Scrapy when using the
INFO log level. In order to save CPU (and log storage requirements) you
should not use DEBUG log level when preforming large broad crawls in
production. Using DEBUG level when developing your (broad) crawler may be
fine though.
To set the log level use:
LOG_LEVEL = 'INFO'
Disable retries
Retrying failed HTTP requests can slow down the crawls substantially, specially when sites causes are very slow (or fail) to respond, thus causing a timeout error which gets retried many times, unnecessarily, preventing crawler capacity to be reused for other domains.
To disable retries use:
RETRY_ENABLED = False
Reduce download timeout
Unless you are crawling from a very slow connection (which shouldn’t be the case for broad crawls) reduce the download timeout so that stuck requests are discarded quickly and free up capacity to process the next ones.
To reduce the download timeout use:
DOWNLOAD_TIMEOUT = 15
Disable redirects
Consider disabling redirects, unless you are interested in following them. When doing broad crawls it’s common to save redirects and resolve them when revisiting the site at a later crawl. This also help to keep the number of request constant per crawl batch, otherwise redirect loops may cause the crawler to dedicate too many resources on any specific domain.
To disable redirects use:
REDIRECT_ENABLED = False
Enable crawling of “Ajax Crawlable Pages”
Some pages (up to 1%, based on empirical data from year 2013) declare themselves as ajax crawlable. This means they provide plain HTML version of content that is usually available only via AJAX. Pages can indicate it in two ways:
by using
#!in URL - this is the default way;by using a special meta tag - this way is used on “main”, “index” website pages.
Scrapy handles (1) automatically; to handle (2) enable AjaxCrawlMiddleware:
AJAXCRAWL_ENABLED = True
When doing broad crawls it’s common to crawl a lot of “index” web pages; AjaxCrawlMiddleware helps to crawl them correctly. It is turned OFF by default because it has some performance overhead, and enabling it for focused crawls doesn’t make much sense.
Crawl in BFO order
Scrapy crawls in DFO order by default.
In broad crawls, however, page crawling tends to be faster than page processing. As a result, unprocessed early requests stay in memory until the final depth is reached, which can significantly increase memory usage.
Crawl in BFO order instead to save memory.
Be mindful of memory leaks
If your broad crawl shows a high memory usage, in addition to crawling in BFO order and lowering concurrency you should debug your memory leaks.
Install a specific Twisted reactor
If the crawl is exceeding the system’s capabilities, you might want to try
installing a specific Twisted reactor, via the TWISTED_REACTOR setting.
Using your browser’s Developer Tools for scraping
Here is a general guide on how to use your browser’s Developer Tools to ease the scraping process. Today almost all browsers come with built in Developer Tools and although we will use Firefox in this guide, the concepts are applicable to any other browser.
In this guide we’ll introduce the basic tools to use from a browser’s Developer Tools by scraping quotes.toscrape.com.
Caveats with inspecting the live browser DOM
Since Developer Tools operate on a live browser DOM, what you’ll actually see
when inspecting the page source is not the original HTML, but a modified one
after applying some browser clean up and executing Javascript code. Firefox,
in particular, is known for adding <tbody> elements to tables. Scrapy, on
the other hand, does not modify the original page HTML, so you won’t be able to
extract any data if you use <tbody> in your XPath expressions.
Therefore, you should keep in mind the following things:
Disable Javascript while inspecting the DOM looking for XPaths to be used in Scrapy (in the Developer Tools settings click Disable JavaScript)
Never use full XPath paths, use relative and clever ones based on attributes (such as
id,class,width, etc) or any identifying features likecontains(@href, 'image').Never include
<tbody>elements in your XPath expressions unless you really know what you’re doing
Inspecting a website
By far the most handy feature of the Developer Tools is the Inspector feature, which allows you to inspect the underlying HTML code of any webpage. To demonstrate the Inspector, let’s look at the quotes.toscrape.com-site.
On the site we have a total of ten quotes from various authors with specific tags, as well as the Top Ten Tags. Let’s say we want to extract all the quotes on this page, without any meta-information about authors, tags, etc.
Instead of viewing the whole source code for the page, we can simply right click
on a quote and select Inspect Element (Q), which opens up the Inspector.
In it you should see something like this:
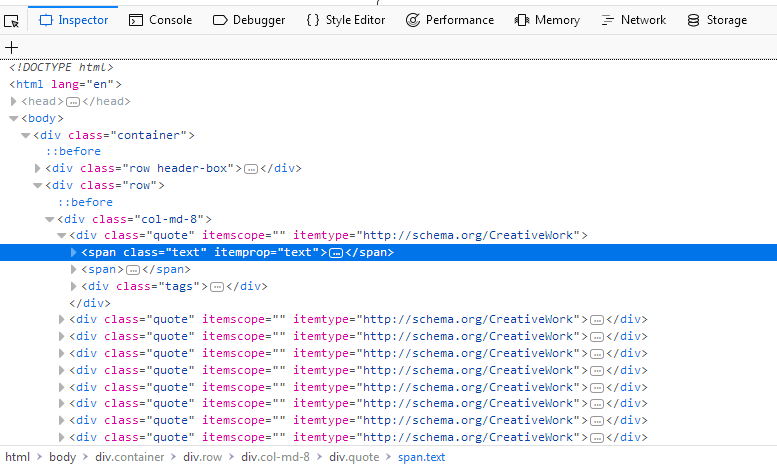
The interesting part for us is this:
<div class="quote" itemscope="" itemtype="http://schema.org/CreativeWork">
<span class="text" itemprop="text">(...)</span>
<span>(...)</span>
<div class="tags">(...)</div>
</div>
If you hover over the first div directly above the span tag highlighted
in the screenshot, you’ll see that the corresponding section of the webpage gets
highlighted as well. So now we have a section, but we can’t find our quote text
anywhere.
The advantage of the Inspector is that it automatically expands and collapses
sections and tags of a webpage, which greatly improves readability. You can
expand and collapse a tag by clicking on the arrow in front of it or by double
clicking directly on the tag. If we expand the span tag with the class=
"text" we will see the quote-text we clicked on. The Inspector lets you
copy XPaths to selected elements. Let’s try it out.
First open the Scrapy shell at https://quotes.toscrape.com/ in a terminal:
$ scrapy shell "https://quotes.toscrape.com/"
Then, back to your web browser, right-click on the span tag, select
Copy > XPath and paste it in the Scrapy shell like so:
>>> response.xpath('/html/body/div/div[2]/div[1]/div[1]/span[1]/text()').getall()
['“The world as we have created it is a process of our thinking. It cannot be changed without changing our thinking.”']
Adding text() at the end we are able to extract the first quote with this
basic selector. But this XPath is not really that clever. All it does is
go down a desired path in the source code starting from html. So let’s
see if we can refine our XPath a bit:
If we check the Inspector again we’ll see that directly beneath our
expanded div tag we have nine identical div tags, each with the
same attributes as our first. If we expand any of them, we’ll see the same
structure as with our first quote: Two span tags and one div tag. We can
expand each span tag with the class="text" inside our div tags and
see each quote:
<div class="quote" itemscope="" itemtype="http://schema.org/CreativeWork">
<span class="text" itemprop="text">
“The world as we have created it is a process of our thinking. It cannot be changed without changing our thinking.”
</span>
<span>(...)</span>
<div class="tags">(...)</div>
</div>
With this knowledge we can refine our XPath: Instead of a path to follow,
we’ll simply select all span tags with the class="text" by using
the has-class-extension:
>>> response.xpath('//span[has-class("text")]/text()').getall()
['“The world as we have created it is a process of our thinking. It cannot be changed without changing our thinking.”',
'“It is our choices, Harry, that show what we truly are, far more than our abilities.”',
'“There are only two ways to live your life. One is as though nothing is a miracle. The other is as though everything is a miracle.”',
...]
And with one simple, cleverer XPath we are able to extract all quotes from
the page. We could have constructed a loop over our first XPath to increase
the number of the last div, but this would have been unnecessarily
complex and by simply constructing an XPath with has-class("text")
we were able to extract all quotes in one line.
The Inspector has a lot of other helpful features, such as searching in the source code or directly scrolling to an element you selected. Let’s demonstrate a use case:
Say you want to find the Next button on the page. Type Next into the
search bar on the top right of the Inspector. You should get two results.
The first is a li tag with the class="next", the second the text
of an a tag. Right click on the a tag and select Scroll into View.
If you hover over the tag, you’ll see the button highlighted. From here
we could easily create a Link Extractor to
follow the pagination. On a simple site such as this, there may not be
the need to find an element visually but the Scroll into View function
can be quite useful on complex sites.
Note that the search bar can also be used to search for and test CSS
selectors. For example, you could search for span.text to find
all quote texts. Instead of a full text search, this searches for
exactly the span tag with the class="text" in the page.
The Network-tool
While scraping you may come across dynamic webpages where some parts of the page are loaded dynamically through multiple requests. While this can be quite tricky, the Network-tool in the Developer Tools greatly facilitates this task. To demonstrate the Network-tool, let’s take a look at the page quotes.toscrape.com/scroll.
The page is quite similar to the basic quotes.toscrape.com-page,
but instead of the above-mentioned Next button, the page
automatically loads new quotes when you scroll to the bottom. We
could go ahead and try out different XPaths directly, but instead
we’ll check another quite useful command from the Scrapy shell:
$ scrapy shell "quotes.toscrape.com/scroll"
(...)
>>> view(response)
A browser window should open with the webpage but with one
crucial difference: Instead of the quotes we just see a greenish
bar with the word Loading....

The view(response) command let’s us view the response our
shell or later our spider receives from the server. Here we see
that some basic template is loaded which includes the title,
the login-button and the footer, but the quotes are missing. This
tells us that the quotes are being loaded from a different request
than quotes.toscrape/scroll.
If you click on the Network tab, you will probably only see
two entries. The first thing we do is enable persistent logs by
clicking on Persist Logs. If this option is disabled, the
log is automatically cleared each time you navigate to a different
page. Enabling this option is a good default, since it gives us
control on when to clear the logs.
If we reload the page now, you’ll see the log get populated with six new requests.
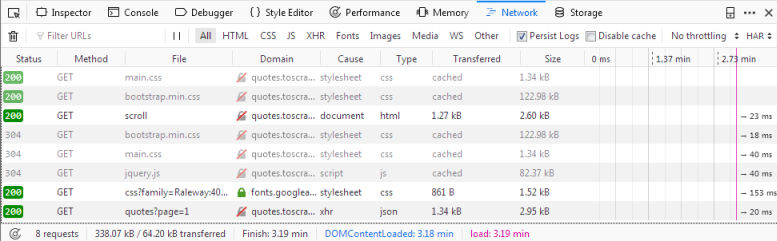
Here we see every request that has been made when reloading the page and can inspect each request and its response. So let’s find out where our quotes are coming from:
First click on the request with the name scroll. On the right
you can now inspect the request. In Headers you’ll find details
about the request headers, such as the URL, the method, the IP-address,
and so on. We’ll ignore the other tabs and click directly on Response.
What you should see in the Preview pane is the rendered HTML-code,
that is exactly what we saw when we called view(response) in the
shell. Accordingly the type of the request in the log is html.
The other requests have types like css or js, but what
interests us is the one request called quotes?page=1 with the
type json.
If we click on this request, we see that the request URL is
https://quotes.toscrape.com/api/quotes?page=1 and the response
is a JSON-object that contains our quotes. We can also right-click
on the request and open Open in new tab to get a better overview.
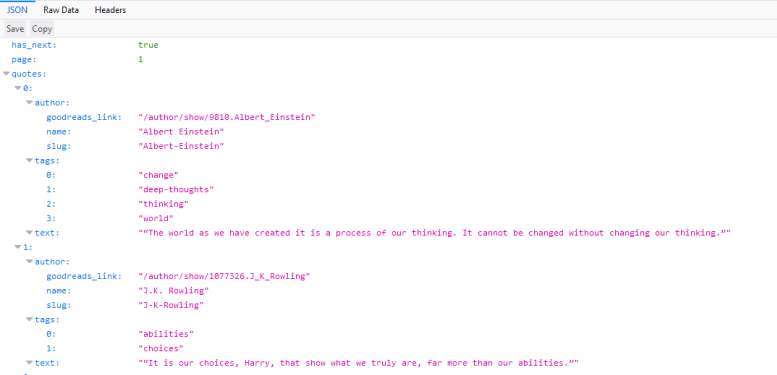
With this response we can now easily parse the JSON-object and also request each page to get every quote on the site:
import scrapy
import json
class QuoteSpider(scrapy.Spider):
name = 'quote'
allowed_domains = ['quotes.toscrape.com']
page = 1
start_urls = ['https://quotes.toscrape.com/api/quotes?page=1']
def parse(self, response):
data = json.loads(response.text)
for quote in data["quotes"]:
yield {"quote": quote["text"]}
if data["has_next"]:
self.page += 1
url = f"https://quotes.toscrape.com/api/quotes?page={self.page}"
yield scrapy.Request(url=url, callback=self.parse)
This spider starts at the first page of the quotes-API. With each
response, we parse the response.text and assign it to data.
This lets us operate on the JSON-object like on a Python dictionary.
We iterate through the quotes and print out the quote["text"].
If the handy has_next element is true (try loading
quotes.toscrape.com/api/quotes?page=10 in your browser or a
page-number greater than 10), we increment the page attribute
and yield a new request, inserting the incremented page-number
into our url.
In more complex websites, it could be difficult to easily reproduce the
requests, as we could need to add headers or cookies to make it work.
In those cases you can export the requests in cURL
format, by right-clicking on each of them in the network tool and using the
from_curl() method to generate an equivalent
request:
from scrapy import Request
request = Request.from_curl(
"curl 'https://quotes.toscrape.com/api/quotes?page=1' -H 'User-Agent: Mozil"
"la/5.0 (X11; Linux x86_64; rv:67.0) Gecko/20100101 Firefox/67.0' -H 'Acce"
"pt: */*' -H 'Accept-Language: ca,en-US;q=0.7,en;q=0.3' --compressed -H 'X"
"-Requested-With: XMLHttpRequest' -H 'Proxy-Authorization: Basic QFRLLTAzM"
"zEwZTAxLTk5MWUtNDFiNC1iZWRmLTJjNGI4M2ZiNDBmNDpAVEstMDMzMTBlMDEtOTkxZS00MW"
"I0LWJlZGYtMmM0YjgzZmI0MGY0' -H 'Connection: keep-alive' -H 'Referer: http"
"://quotes.toscrape.com/scroll' -H 'Cache-Control: max-age=0'")
Alternatively, if you want to know the arguments needed to recreate that
request you can use the curl_to_request_kwargs()
function to get a dictionary with the equivalent arguments:
- scrapy.utils.curl.curl_to_request_kwargs(curl_command: str, ignore_unknown_options: bool = True) dict[source]
Convert a cURL command syntax to Request kwargs.
Note that to translate a cURL command into a Scrapy request, you may use curl2scrapy.
As you can see, with a few inspections in the Network-tool we were able to easily replicate the dynamic requests of the scrolling functionality of the page. Crawling dynamic pages can be quite daunting and pages can be very complex, but it (mostly) boils down to identifying the correct request and replicating it in your spider.
Selecting dynamically-loaded content
Some webpages show the desired data when you load them in a web browser. However, when you download them using Scrapy, you cannot reach the desired data using selectors.
When this happens, the recommended approach is to find the data source and extract the data from it.
If you fail to do that, and you can nonetheless access the desired data through the DOM from your web browser, see Pre-rendering JavaScript.
Finding the data source
To extract the desired data, you must first find its source location.
If the data is in a non-text-based format, such as an image or a PDF document, use the network tool of your web browser to find the corresponding request, and reproduce it.
If your web browser lets you select the desired data as text, the data may be defined in embedded JavaScript code, or loaded from an external resource in a text-based format.
In that case, you can use a tool like wgrep to find the URL of that resource.
If the data turns out to come from the original URL itself, you must inspect the source code of the webpage to determine where the data is located.
If the data comes from a different URL, you will need to reproduce the corresponding request.
Inspecting the source code of a webpage
Sometimes you need to inspect the source code of a webpage (not the DOM) to determine where some desired data is located.
Use Scrapy’s fetch command to download the webpage contents as seen
by Scrapy:
scrapy fetch --nolog https://example.com > response.html
If the desired data is in embedded JavaScript code within a <script/>
element, see Parsing JavaScript code.
If you cannot find the desired data, first make sure it’s not just Scrapy: download the webpage with an HTTP client like curl or wget and see if the information can be found in the response they get.
If they get a response with the desired data, modify your Scrapy
Request to match that of the other HTTP client. For
example, try using the same user-agent string (USER_AGENT) or the
same headers.
If they also get a response without the desired data, you’ll need to take steps to make your request more similar to that of the web browser. See Reproducing requests.
Reproducing requests
Sometimes we need to reproduce a request the way our web browser performs it.
Use the network tool of your web browser to see how your web browser performs the desired request, and try to reproduce that request with Scrapy.
It might be enough to yield a Request with the same HTTP
method and URL. However, you may also need to reproduce the body, headers and
form parameters (see FormRequest) of that request.
As all major browsers allow to export the requests in cURL format, Scrapy incorporates the method
from_curl() to generate an equivalent
Request from a cURL command. To get more information
visit request from curl inside the network
tool section.
Once you get the expected response, you can extract the desired data from it.
You can reproduce any request with Scrapy. However, some times reproducing all necessary requests may not seem efficient in developer time. If that is your case, and crawling speed is not a major concern for you, you can alternatively consider JavaScript pre-rendering.
If you get the expected response sometimes, but not always, the issue is probably not your request, but the target server. The target server might be buggy, overloaded, or banning some of your requests.
Note that to translate a cURL command into a Scrapy request, you may use curl2scrapy.
Handling different response formats
Once you have a response with the desired data, how you extract the desired data from it depends on the type of response:
If the response is HTML or XML, use selectors as usual.
If the response is JSON, use
json.loads()to load the desired data fromresponse.text:data = json.loads(response.text)
If the desired data is inside HTML or XML code embedded within JSON data, you can load that HTML or XML code into a
Selectorand then use it as usual:selector = Selector(data['html'])
If the response is JavaScript, or HTML with a
<script/>element containing the desired data, see Parsing JavaScript code.If the response is CSS, use a regular expression to extract the desired data from
response.text.
If the response is an image or another format based on images (e.g. PDF), read the response as bytes from
response.bodyand use an OCR solution to extract the desired data as text.For example, you can use pytesseract. To read a table from a PDF, tabula-py may be a better choice.
If the response is SVG, or HTML with embedded SVG containing the desired data, you may be able to extract the desired data using selectors, since SVG is based on XML.
Otherwise, you might need to convert the SVG code into a raster image, and handle that raster image.
Parsing JavaScript code
If the desired data is hardcoded in JavaScript, you first need to get the JavaScript code:
If the JavaScript code is in a JavaScript file, simply read
response.text.If the JavaScript code is within a
<script/>element of an HTML page, use selectors to extract the text within that<script/>element.
Once you have a string with the JavaScript code, you can extract the desired data from it:
You might be able to use a regular expression to extract the desired data in JSON format, which you can then parse with
json.loads().For example, if the JavaScript code contains a separate line like
var data = {"field": "value"};you can extract that data as follows:>>> pattern = r'\bvar\s+data\s*=\s*(\{.*?\})\s*;\s*\n' >>> json_data = response.css('script::text').re_first(pattern) >>> json.loads(json_data) {'field': 'value'}
chompjs provides an API to parse JavaScript objects into a
dict.For example, if the JavaScript code contains
var data = {field: "value", secondField: "second value"};you can extract that data as follows:>>> import chompjs >>> javascript = response.css('script::text').get() >>> data = chompjs.parse_js_object(javascript) >>> data {'field': 'value', 'secondField': 'second value'}
Otherwise, use js2xml to convert the JavaScript code into an XML document that you can parse using selectors.
For example, if the JavaScript code contains
var data = {field: "value"};you can extract that data as follows:>>> import js2xml >>> import lxml.etree >>> from parsel import Selector >>> javascript = response.css('script::text').get() >>> xml = lxml.etree.tostring(js2xml.parse(javascript), encoding='unicode') >>> selector = Selector(text=xml) >>> selector.css('var[name="data"]').get() '<var name="data"><object><property name="field"><string>value</string></property></object></var>'
Pre-rendering JavaScript
On webpages that fetch data from additional requests, reproducing those requests that contain the desired data is the preferred approach. The effort is often worth the result: structured, complete data with minimum parsing time and network transfer.
However, sometimes it can be really hard to reproduce certain requests. Or you may need something that no request can give you, such as a screenshot of a webpage as seen in a web browser.
In these cases use the Splash JavaScript-rendering service, along with scrapy-splash for seamless integration.
Splash returns as HTML the DOM of a webpage, so that you can parse it with selectors. It provides great flexibility through configuration or scripting.
If you need something beyond what Splash offers, such as interacting with the DOM on-the-fly from Python code instead of using a previously-written script, or handling multiple web browser windows, you might need to use a headless browser instead.
Using a headless browser
A headless browser is a special web browser that provides an API for
automation. By installing the asyncio reactor,
it is possible to integrate asyncio-based libraries which handle headless browsers.
One such library is playwright-python (an official Python port of playwright). The following is a simple snippet to illustrate its usage within a Scrapy spider:
import scrapy
from playwright.async_api import async_playwright
class PlaywrightSpider(scrapy.Spider):
name = "playwright"
start_urls = ["data:,"] # avoid using the default Scrapy downloader
async def parse(self, response):
async with async_playwright() as pw:
browser = await pw.chromium.launch()
page = await browser.new_page()
await page.goto("https:/example.org")
title = await page.title()
return {"title": title}
However, using playwright-python directly as in the above example circumvents most of the Scrapy components (middlewares, dupefilter, etc). We recommend using scrapy-playwright for a better integration.
Debugging memory leaks
In Scrapy, objects such as requests, responses and items have a finite lifetime: they are created, used for a while, and finally destroyed.
From all those objects, the Request is probably the one with the longest lifetime, as it stays waiting in the Scheduler queue until it’s time to process it. For more info see Architecture overview.
As these Scrapy objects have a (rather long) lifetime, there is always the risk of accumulating them in memory without releasing them properly and thus causing what is known as a “memory leak”.
To help debugging memory leaks, Scrapy provides a built-in mechanism for tracking objects references called trackref, and you can also use a third-party library called muppy for more advanced memory debugging (see below for more info). Both mechanisms must be used from the Telnet Console.
Common causes of memory leaks
It happens quite often (sometimes by accident, sometimes on purpose) that the
Scrapy developer passes objects referenced in Requests (for example, using the
cb_kwargs or meta
attributes or the request callback function) and that effectively bounds the
lifetime of those referenced objects to the lifetime of the Request. This is,
by far, the most common cause of memory leaks in Scrapy projects, and a quite
difficult one to debug for newcomers.
In big projects, the spiders are typically written by different people and some of those spiders could be “leaking” and thus affecting the rest of the other (well-written) spiders when they get to run concurrently, which, in turn, affects the whole crawling process.
The leak could also come from a custom middleware, pipeline or extension that
you have written, if you are not releasing the (previously allocated) resources
properly. For example, allocating resources on spider_opened
but not releasing them on spider_closed may cause problems if
you’re running multiple spiders per process.
Too Many Requests?
By default Scrapy keeps the request queue in memory; it includes
Request objects and all objects
referenced in Request attributes (e.g. in cb_kwargs
and meta).
While not necessarily a leak, this can take a lot of memory. Enabling
persistent job queue could help keeping memory usage
in control.
Debugging memory leaks with trackref
trackref is a module provided by Scrapy to debug the most common cases of
memory leaks. It basically tracks the references to all live Request,
Response, Item, Spider and Selector objects.
You can enter the telnet console and inspect how many objects (of the classes
mentioned above) are currently alive using the prefs() function which is an
alias to the print_live_refs() function:
telnet localhost 6023
>>> prefs()
Live References
ExampleSpider 1 oldest: 15s ago
HtmlResponse 10 oldest: 1s ago
Selector 2 oldest: 0s ago
FormRequest 878 oldest: 7s ago
As you can see, that report also shows the “age” of the oldest object in each
class. If you’re running multiple spiders per process chances are you can
figure out which spider is leaking by looking at the oldest request or response.
You can get the oldest object of each class using the
get_oldest() function (from the telnet console).
Which objects are tracked?
The objects tracked by trackrefs are all from these classes (and all its
subclasses):
scrapy.Requestscrapy.Itemscrapy.Selector
A real example
Let’s see a concrete example of a hypothetical case of memory leaks. Suppose we have some spider with a line similar to this one:
return Request(f"http://www.somenastyspider.com/product.php?pid={product_id}",
callback=self.parse, cb_kwargs={'referer': response})
That line is passing a response reference inside a request which effectively ties the response lifetime to the requests’ one, and that would definitely cause memory leaks.
Let’s see how we can discover the cause (without knowing it
a priori, of course) by using the trackref tool.
After the crawler is running for a few minutes and we notice its memory usage has grown a lot, we can enter its telnet console and check the live references:
>>> prefs()
Live References
SomenastySpider 1 oldest: 15s ago
HtmlResponse 3890 oldest: 265s ago
Selector 2 oldest: 0s ago
Request 3878 oldest: 250s ago
The fact that there are so many live responses (and that they’re so old) is definitely suspicious, as responses should have a relatively short lifetime compared to Requests. The number of responses is similar to the number of requests, so it looks like they are tied in a some way. We can now go and check the code of the spider to discover the nasty line that is generating the leaks (passing response references inside requests).
Sometimes extra information about live objects can be helpful. Let’s check the oldest response:
>>> from scrapy.utils.trackref import get_oldest
>>> r = get_oldest('HtmlResponse')
>>> r.url
'http://www.somenastyspider.com/product.php?pid=123'
If you want to iterate over all objects, instead of getting the oldest one, you
can use the scrapy.utils.trackref.iter_all() function:
>>> from scrapy.utils.trackref import iter_all
>>> [r.url for r in iter_all('HtmlResponse')]
['http://www.somenastyspider.com/product.php?pid=123',
'http://www.somenastyspider.com/product.php?pid=584',
...]
Too many spiders?
If your project has too many spiders executed in parallel,
the output of prefs() can be difficult to read.
For this reason, that function has a ignore argument which can be used to
ignore a particular class (and all its subclases). For
example, this won’t show any live references to spiders:
>>> from scrapy.spiders import Spider
>>> prefs(ignore=Spider)
scrapy.utils.trackref module
Here are the functions available in the trackref module.
- class scrapy.utils.trackref.object_ref[source]
Inherit from this class if you want to track live instances with the
trackrefmodule.
- scrapy.utils.trackref.print_live_refs(class_name, ignore=NoneType)[source]
Print a report of live references, grouped by class name.
- scrapy.utils.trackref.get_oldest(class_name)[source]
Return the oldest object alive with the given class name, or
Noneif none is found. Useprint_live_refs()first to get a list of all tracked live objects per class name.
- scrapy.utils.trackref.iter_all(class_name)[source]
Return an iterator over all objects alive with the given class name, or
Noneif none is found. Useprint_live_refs()first to get a list of all tracked live objects per class name.
Debugging memory leaks with muppy
trackref provides a very convenient mechanism for tracking down memory
leaks, but it only keeps track of the objects that are more likely to cause
memory leaks. However, there are other cases where the memory leaks could come
from other (more or less obscure) objects. If this is your case, and you can’t
find your leaks using trackref, you still have another resource: the muppy
library.
You can use muppy from Pympler.
If you use pip, you can install muppy with the following command:
pip install Pympler
Here’s an example to view all Python objects available in the heap using muppy:
>>> from pympler import muppy
>>> all_objects = muppy.get_objects()
>>> len(all_objects)
28667
>>> from pympler import summary
>>> suml = summary.summarize(all_objects)
>>> summary.print_(suml)
types | # objects | total size
==================================== | =========== | ============
<class 'str | 9822 | 1.10 MB
<class 'dict | 1658 | 856.62 KB
<class 'type | 436 | 443.60 KB
<class 'code | 2974 | 419.56 KB
<class '_io.BufferedWriter | 2 | 256.34 KB
<class 'set | 420 | 159.88 KB
<class '_io.BufferedReader | 1 | 128.17 KB
<class 'wrapper_descriptor | 1130 | 88.28 KB
<class 'tuple | 1304 | 86.57 KB
<class 'weakref | 1013 | 79.14 KB
<class 'builtin_function_or_method | 958 | 67.36 KB
<class 'method_descriptor | 865 | 60.82 KB
<class 'abc.ABCMeta | 62 | 59.96 KB
<class 'list | 446 | 58.52 KB
<class 'int | 1425 | 43.20 KB
For more info about muppy, refer to the muppy documentation.
Leaks without leaks
Sometimes, you may notice that the memory usage of your Scrapy process will only increase, but never decrease. Unfortunately, this could happen even though neither Scrapy nor your project are leaking memory. This is due to a (not so well) known problem of Python, which may not return released memory to the operating system in some cases. For more information on this issue see:
The improvements proposed by Evan Jones, which are detailed in this paper, got merged in Python 2.5, but this only reduces the problem, it doesn’t fix it completely. To quote the paper:
Unfortunately, this patch can only free an arena if there are no more objects allocated in it anymore. This means that fragmentation is a large issue. An application could have many megabytes of free memory, scattered throughout all the arenas, but it will be unable to free any of it. This is a problem experienced by all memory allocators. The only way to solve it is to move to a compacting garbage collector, which is able to move objects in memory. This would require significant changes to the Python interpreter.
To keep memory consumption reasonable you can split the job into several smaller jobs or enable persistent job queue and stop/start spider from time to time.
Downloading and processing files and images
Scrapy provides reusable item pipelines for downloading files attached to a particular item (for example, when you scrape products and also want to download their images locally). These pipelines share a bit of functionality and structure (we refer to them as media pipelines), but typically you’ll either use the Files Pipeline or the Images Pipeline.
Both pipelines implement these features:
Avoid re-downloading media that was downloaded recently
Specifying where to store the media (filesystem directory, FTP server, Amazon S3 bucket, Google Cloud Storage bucket)
The Images Pipeline has a few extra functions for processing images:
Convert all downloaded images to a common format (JPG) and mode (RGB)
Thumbnail generation
Check images width/height to make sure they meet a minimum constraint
The pipelines also keep an internal queue of those media URLs which are currently being scheduled for download, and connect those responses that arrive containing the same media to that queue. This avoids downloading the same media more than once when it’s shared by several items.
Using the Files Pipeline
The typical workflow, when using the FilesPipeline goes like
this:
In a Spider, you scrape an item and put the URLs of the desired into a
file_urlsfield.The item is returned from the spider and goes to the item pipeline.
When the item reaches the
FilesPipeline, the URLs in thefile_urlsfield are scheduled for download using the standard Scrapy scheduler and downloader (which means the scheduler and downloader middlewares are reused), but with a higher priority, processing them before other pages are scraped. The item remains “locked” at that particular pipeline stage until the files have finish downloading (or fail for some reason).When the files are downloaded, another field (
files) will be populated with the results. This field will contain a list of dicts with information about the downloaded files, such as the downloaded path, the original scraped url (taken from thefile_urlsfield), the file checksum and the file status. The files in the list of thefilesfield will retain the same order of the originalfile_urlsfield. If some file failed downloading, an error will be logged and the file won’t be present in thefilesfield.
Using the Images Pipeline
Using the ImagesPipeline is a lot like using the FilesPipeline,
except the default field names used are different: you use image_urls for
the image URLs of an item and it will populate an images field for the information
about the downloaded images.
The advantage of using the ImagesPipeline for image files is that you
can configure some extra functions like generating thumbnails and filtering
the images based on their size.
The Images Pipeline requires Pillow 4.0.0 or greater. It is used for thumbnailing and normalizing images to JPEG/RGB format.
Enabling your Media Pipeline
To enable your media pipeline you must first add it to your project
ITEM_PIPELINES setting.
For Images Pipeline, use:
ITEM_PIPELINES = {'scrapy.pipelines.images.ImagesPipeline': 1}
For Files Pipeline, use:
ITEM_PIPELINES = {'scrapy.pipelines.files.FilesPipeline': 1}
Note
You can also use both the Files and Images Pipeline at the same time.
Then, configure the target storage setting to a valid value that will be used
for storing the downloaded images. Otherwise the pipeline will remain disabled,
even if you include it in the ITEM_PIPELINES setting.
For the Files Pipeline, set the FILES_STORE setting:
FILES_STORE = '/path/to/valid/dir'
For the Images Pipeline, set the IMAGES_STORE setting:
IMAGES_STORE = '/path/to/valid/dir'
File Naming
Default File Naming
By default, files are stored using an SHA-1 hash of their URLs for the file names.
For example, the following image URL:
http://www.example.com/image.jpg
Whose SHA-1 hash is:
3afec3b4765f8f0a07b78f98c07b83f013567a0a
Will be downloaded and stored using your chosen storage method and the following file name:
3afec3b4765f8f0a07b78f98c07b83f013567a0a.jpg
Custom File Naming
You may wish to use a different calculated file name for saved files. For example, classifying an image by including meta in the file name.
Customize file names by overriding the file_path method of your
media pipeline.
For example, an image pipeline with image URL:
http://www.example.com/product/images/large/front/0000000004166
Can be processed into a file name with a condensed hash and the perspective
front:
00b08510e4_front.jpg
By overriding file_path like this:
import hashlib
from os.path import splitext
def file_path(self, request, response=None, info=None, *, item=None):
image_url_hash = hashlib.shake_256(request.url.encode()).hexdigest(5)
image_perspective = request.url.split('/')[-2]
image_filename = f'{image_url_hash}_{image_perspective}.jpg'
return image_filename
Warning
If your custom file name scheme relies on meta data that can vary between scrapes it may lead to unexpected re-downloading of existing media using new file names.
For example, if your custom file name scheme uses a product title and the site changes an item’s product title between scrapes, Scrapy will re-download the same media using updated file names.
For more information about the file_path method, see Extending the Media Pipelines.
Supported Storage
File system storage
File system storage will save files to the following path:
<IMAGES_STORE>/full/<FILE_NAME>
Where:
<IMAGES_STORE>is the directory defined inIMAGES_STOREsetting for the Images Pipeline.fullis a sub-directory to separate full images from thumbnails (if used). For more info see Thumbnail generation for images.<FILE_NAME>is the file name assigned to the file. For more info see File Naming.
FTP server storage
New in version 2.0.
FILES_STORE and IMAGES_STORE can point to an FTP server.
Scrapy will automatically upload the files to the server.
FILES_STORE and IMAGES_STORE should be written in one of the
following forms:
ftp://username:password@address:port/path
ftp://address:port/path
If username and password are not provided, they are taken from the FTP_USER and
FTP_PASSWORD settings respectively.
FTP supports two different connection modes: active or passive. Scrapy uses
the passive connection mode by default. To use the active connection mode instead,
set the FEED_STORAGE_FTP_ACTIVE setting to True.
Amazon S3 storage
If botocore >= 1.4.87 is installed, FILES_STORE and
IMAGES_STORE can represent an Amazon S3 bucket. Scrapy will
automatically upload the files to the bucket.
For example, this is a valid IMAGES_STORE value:
IMAGES_STORE = 's3://bucket/images'
You can modify the Access Control List (ACL) policy used for the stored files,
which is defined by the FILES_STORE_S3_ACL and
IMAGES_STORE_S3_ACL settings. By default, the ACL is set to
private. To make the files publicly available use the public-read
policy:
IMAGES_STORE_S3_ACL = 'public-read'
For more information, see canned ACLs in the Amazon S3 Developer Guide.
You can also use other S3-like storages. Storages like self-hosted Minio or s3.scality. All you need to do is set endpoint option in you Scrapy settings:
AWS_ENDPOINT_URL = 'http://minio.example.com:9000'
For self-hosting you also might feel the need not to use SSL and not to verify SSL connection:
AWS_USE_SSL = False # or True (None by default)
AWS_VERIFY = False # or True (None by default)
Google Cloud Storage
FILES_STORE and IMAGES_STORE can represent a Google Cloud Storage
bucket. Scrapy will automatically upload the files to the bucket. (requires google-cloud-storage )
For example, these are valid IMAGES_STORE and GCS_PROJECT_ID settings:
IMAGES_STORE = 'gs://bucket/images/'
GCS_PROJECT_ID = 'project_id'
For information about authentication, see this documentation.
You can modify the Access Control List (ACL) policy used for the stored files,
which is defined by the FILES_STORE_GCS_ACL and
IMAGES_STORE_GCS_ACL settings. By default, the ACL is set to
'' (empty string) which means that Cloud Storage applies the bucket’s default object ACL to the object.
To make the files publicly available use the publicRead
policy:
IMAGES_STORE_GCS_ACL = 'publicRead'
For more information, see Predefined ACLs in the Google Cloud Platform Developer Guide.
Usage example
In order to use a media pipeline, first enable it.
Then, if a spider returns an item object with the URLs
field (file_urls or image_urls, for the Files or Images Pipeline
respectively), the pipeline will put the results under the respective field
(files or images).
When using item types for which fields are defined beforehand,
you must define both the URLs field and the results field. For example, when
using the images pipeline, items must define both the image_urls and the
images field. For instance, using the Item class:
import scrapy
class MyItem(scrapy.Item):
# ... other item fields ...
image_urls = scrapy.Field()
images = scrapy.Field()
If you want to use another field name for the URLs key or for the results key, it is also possible to override it.
For the Files Pipeline, set FILES_URLS_FIELD and/or
FILES_RESULT_FIELD settings:
FILES_URLS_FIELD = 'field_name_for_your_files_urls'
FILES_RESULT_FIELD = 'field_name_for_your_processed_files'
For the Images Pipeline, set IMAGES_URLS_FIELD and/or
IMAGES_RESULT_FIELD settings:
IMAGES_URLS_FIELD = 'field_name_for_your_images_urls'
IMAGES_RESULT_FIELD = 'field_name_for_your_processed_images'
If you need something more complex and want to override the custom pipeline behaviour, see Extending the Media Pipelines.
If you have multiple image pipelines inheriting from ImagePipeline and you want to have different settings in different pipelines you can set setting keys preceded with uppercase name of your pipeline class. E.g. if your pipeline is called MyPipeline and you want to have custom IMAGES_URLS_FIELD you define setting MYPIPELINE_IMAGES_URLS_FIELD and your custom settings will be used.
Additional features
File expiration
The Image Pipeline avoids downloading files that were downloaded recently. To
adjust this retention delay use the FILES_EXPIRES setting (or
IMAGES_EXPIRES, in case of Images Pipeline), which
specifies the delay in number of days:
# 120 days of delay for files expiration
FILES_EXPIRES = 120
# 30 days of delay for images expiration
IMAGES_EXPIRES = 30
The default value for both settings is 90 days.
If you have pipeline that subclasses FilesPipeline and you’d like to have different setting for it you can set setting keys preceded by uppercase class name. E.g. given pipeline class called MyPipeline you can set setting key:
MYPIPELINE_FILES_EXPIRES = 180
and pipeline class MyPipeline will have expiration time set to 180.
The last modified time from the file is used to determine the age of the file in days, which is then compared to the set expiration time to determine if the file is expired.
Thumbnail generation for images
The Images Pipeline can automatically create thumbnails of the downloaded images.
In order to use this feature, you must set IMAGES_THUMBS to a dictionary
where the keys are the thumbnail names and the values are their dimensions.
For example:
IMAGES_THUMBS = {
'small': (50, 50),
'big': (270, 270),
}
When you use this feature, the Images Pipeline will create thumbnails of the each specified size with this format:
<IMAGES_STORE>/thumbs/<size_name>/<image_id>.jpg
Where:
<size_name>is the one specified in theIMAGES_THUMBSdictionary keys (small,big, etc)<image_id>is the SHA-1 hash of the image url
Example of image files stored using small and big thumbnail names:
<IMAGES_STORE>/full/63bbfea82b8880ed33cdb762aa11fab722a90a24.jpg
<IMAGES_STORE>/thumbs/small/63bbfea82b8880ed33cdb762aa11fab722a90a24.jpg
<IMAGES_STORE>/thumbs/big/63bbfea82b8880ed33cdb762aa11fab722a90a24.jpg
The first one is the full image, as downloaded from the site.
Filtering out small images
When using the Images Pipeline, you can drop images which are too small, by
specifying the minimum allowed size in the IMAGES_MIN_HEIGHT and
IMAGES_MIN_WIDTH settings.
For example:
IMAGES_MIN_HEIGHT = 110
IMAGES_MIN_WIDTH = 110
Note
The size constraints don’t affect thumbnail generation at all.
It is possible to set just one size constraint or both. When setting both of them, only images that satisfy both minimum sizes will be saved. For the above example, images of sizes (105 x 105) or (105 x 200) or (200 x 105) will all be dropped because at least one dimension is shorter than the constraint.
By default, there are no size constraints, so all images are processed.
Allowing redirections
By default media pipelines ignore redirects, i.e. an HTTP redirection to a media file URL request will mean the media download is considered failed.
To handle media redirections, set this setting to True:
MEDIA_ALLOW_REDIRECTS = True
Extending the Media Pipelines
See here the methods that you can override in your custom Files Pipeline:
- class scrapy.pipelines.files.FilesPipeline[source]
- file_path(self, request, response=None, info=None, *, item=None)[source]
This method is called once per downloaded item. It returns the download path of the file originating from the specified
response.In addition to
response, this method receives the originalrequest,infoanditemYou can override this method to customize the download path of each file.
For example, if file URLs end like regular paths (e.g.
https://example.com/a/b/c/foo.png), you can use the following approach to download all files into thefilesfolder with their original filenames (e.g.files/foo.png):import os from urllib.parse import urlparse from scrapy.pipelines.files import FilesPipeline class MyFilesPipeline(FilesPipeline): def file_path(self, request, response=None, info=None, *, item=None): return 'files/' + os.path.basename(urlparse(request.url).path)
Similarly, you can use the
itemto determine the file path based on some item property.By default the
file_path()method returnsfull/<request URL hash>.<extension>.New in version 2.4: The item parameter.
- get_media_requests(item, info)[source]
As seen on the workflow, the pipeline will get the URLs of the images to download from the item. In order to do this, you can override the
get_media_requests()method and return a Request for each file URL:from itemadapter import ItemAdapter def get_media_requests(self, item, info): adapter = ItemAdapter(item) for file_url in adapter['file_urls']: yield scrapy.Request(file_url)
Those requests will be processed by the pipeline and, when they have finished downloading, the results will be sent to the
item_completed()method, as a list of 2-element tuples. Each tuple will contain(success, file_info_or_error)where:successis a boolean which isTrueif the image was downloaded successfully orFalseif it failed for some reasonfile_info_or_erroris a dict containing the following keys (if success isTrue) or aFailureif there was a problem.url- the url where the file was downloaded from. This is the url of the request returned from theget_media_requests()method.path- the path (relative toFILES_STORE) where the file was storedchecksum- a MD5 hash of the image contentsstatus- the file status indication.New in version 2.2.
It can be one of the following:
downloaded- file was downloaded.uptodate- file was not downloaded, as it was downloaded recently, according to the file expiration policy.cached- file was already scheduled for download, by another item sharing the same file.
The list of tuples received by
item_completed()is guaranteed to retain the same order of the requests returned from theget_media_requests()method.Here’s a typical value of the
resultsargument:[(True, {'checksum': '2b00042f7481c7b056c4b410d28f33cf', 'path': 'full/0a79c461a4062ac383dc4fade7bc09f1384a3910.jpg', 'url': 'http://www.example.com/files/product1.pdf', 'status': 'downloaded'}), (False, Failure(...))]
By default the
get_media_requests()method returnsNonewhich means there are no files to download for the item.
- item_completed(results, item, info)[source]
The
FilesPipeline.item_completed()method called when all file requests for a single item have completed (either finished downloading, or failed for some reason).The
item_completed()method must return the output that will be sent to subsequent item pipeline stages, so you must return (or drop) the item, as you would in any pipeline.Here is an example of the
item_completed()method where we store the downloaded file paths (passed in results) in thefile_pathsitem field, and we drop the item if it doesn’t contain any files:from itemadapter import ItemAdapter from scrapy.exceptions import DropItem def item_completed(self, results, item, info): file_paths = [x['path'] for ok, x in results if ok] if not file_paths: raise DropItem("Item contains no files") adapter = ItemAdapter(item) adapter['file_paths'] = file_paths return item
By default, the
item_completed()method returns the item.
See here the methods that you can override in your custom Images Pipeline:
- class scrapy.pipelines.images.ImagesPipeline[source]
The
ImagesPipelineis an extension of theFilesPipeline, customizing the field names and adding custom behavior for images.- file_path(self, request, response=None, info=None, *, item=None)[source]
This method is called once per downloaded item. It returns the download path of the file originating from the specified
response.In addition to
response, this method receives the originalrequest,infoanditemYou can override this method to customize the download path of each file.
For example, if file URLs end like regular paths (e.g.
https://example.com/a/b/c/foo.png), you can use the following approach to download all files into thefilesfolder with their original filenames (e.g.files/foo.png):import os from urllib.parse import urlparse from scrapy.pipelines.images import ImagesPipeline class MyImagesPipeline(ImagesPipeline): def file_path(self, request, response=None, info=None, *, item=None): return 'files/' + os.path.basename(urlparse(request.url).path)
Similarly, you can use the
itemto determine the file path based on some item property.By default the
file_path()method returnsfull/<request URL hash>.<extension>.New in version 2.4: The item parameter.
- get_media_requests(item, info)[source]
Works the same way as
FilesPipeline.get_media_requests()method, but using a different field name for image urls.Must return a Request for each image URL.
- item_completed(results, item, info)[source]
The
ImagesPipeline.item_completed()method is called when all image requests for a single item have completed (either finished downloading, or failed for some reason).Works the same way as
FilesPipeline.item_completed()method, but using a different field names for storing image downloading results.By default, the
item_completed()method returns the item.
Custom Images pipeline example
Here is a full example of the Images Pipeline whose methods are exemplified above:
import scrapy
from itemadapter import ItemAdapter
from scrapy.exceptions import DropItem
from scrapy.pipelines.images import ImagesPipeline
class MyImagesPipeline(ImagesPipeline):
def get_media_requests(self, item, info):
for image_url in item['image_urls']:
yield scrapy.Request(image_url)
def item_completed(self, results, item, info):
image_paths = [x['path'] for ok, x in results if ok]
if not image_paths:
raise DropItem("Item contains no images")
adapter = ItemAdapter(item)
adapter['image_paths'] = image_paths
return item
To enable your custom media pipeline component you must add its class import path to the
ITEM_PIPELINES setting, like in the following example:
ITEM_PIPELINES = {
'myproject.pipelines.MyImagesPipeline': 300
}
Deploying Spiders
This section describes the different options you have for deploying your Scrapy spiders to run them on a regular basis. Running Scrapy spiders in your local machine is very convenient for the (early) development stage, but not so much when you need to execute long-running spiders or move spiders to run in production continuously. This is where the solutions for deploying Scrapy spiders come in.
Popular choices for deploying Scrapy spiders are:
Scrapyd (open source)
Zyte Scrapy Cloud (cloud-based)
Deploying to a Scrapyd Server
Scrapyd is an open source application to run Scrapy spiders. It provides a server with HTTP API, capable of running and monitoring Scrapy spiders.
To deploy spiders to Scrapyd, you can use the scrapyd-deploy tool provided by the scrapyd-client package. Please refer to the scrapyd-deploy documentation for more information.
Scrapyd is maintained by some of the Scrapy developers.
Deploying to Zyte Scrapy Cloud
Zyte Scrapy Cloud is a hosted, cloud-based service by Zyte, the company behind Scrapy.
Zyte Scrapy Cloud removes the need to setup and monitor servers and provides a nice UI to manage spiders and review scraped items, logs and stats.
To deploy spiders to Zyte Scrapy Cloud you can use the shub command line tool. Please refer to the Zyte Scrapy Cloud documentation for more information.
Zyte Scrapy Cloud is compatible with Scrapyd and one can switch between
them as needed - the configuration is read from the scrapy.cfg file
just like scrapyd-deploy.
AutoThrottle extension
This is an extension for automatically throttling crawling speed based on load of both the Scrapy server and the website you are crawling.
Design goals
be nicer to sites instead of using default download delay of zero
automatically adjust Scrapy to the optimum crawling speed, so the user doesn’t have to tune the download delays to find the optimum one. The user only needs to specify the maximum concurrent requests it allows, and the extension does the rest.
How it works
AutoThrottle extension adjusts download delays dynamically to make spider send
AUTOTHROTTLE_TARGET_CONCURRENCY concurrent requests on average
to each remote website.
It uses download latency to compute the delays. The main idea is the
following: if a server needs latency seconds to respond, a client
should send a request each latency/N seconds to have N requests
processed in parallel.
Instead of adjusting the delays one can just set a small fixed
download delay and impose hard limits on concurrency using
CONCURRENT_REQUESTS_PER_DOMAIN or
CONCURRENT_REQUESTS_PER_IP options. It will provide a similar
effect, but there are some important differences:
because the download delay is small there will be occasional bursts of requests;
often non-200 (error) responses can be returned faster than regular responses, so with a small download delay and a hard concurrency limit crawler will be sending requests to server faster when server starts to return errors. But this is an opposite of what crawler should do - in case of errors it makes more sense to slow down: these errors may be caused by the high request rate.
AutoThrottle doesn’t have these issues.
Throttling algorithm
AutoThrottle algorithm adjusts download delays based on the following rules:
spiders always start with a download delay of
AUTOTHROTTLE_START_DELAY;when a response is received, the target download delay is calculated as
latency / Nwherelatencyis a latency of the response, andNisAUTOTHROTTLE_TARGET_CONCURRENCY.download delay for next requests is set to the average of previous download delay and the target download delay;
latencies of non-200 responses are not allowed to decrease the delay;
download delay can’t become less than
DOWNLOAD_DELAYor greater thanAUTOTHROTTLE_MAX_DELAY
Note
The AutoThrottle extension honours the standard Scrapy settings for
concurrency and delay. This means that it will respect
CONCURRENT_REQUESTS_PER_DOMAIN and
CONCURRENT_REQUESTS_PER_IP options and
never set a download delay lower than DOWNLOAD_DELAY.
In Scrapy, the download latency is measured as the time elapsed between establishing the TCP connection and receiving the HTTP headers.
Note that these latencies are very hard to measure accurately in a cooperative multitasking environment because Scrapy may be busy processing a spider callback, for example, and unable to attend downloads. However, these latencies should still give a reasonable estimate of how busy Scrapy (and ultimately, the server) is, and this extension builds on that premise.
Settings
The settings used to control the AutoThrottle extension are:
For more information see How it works.
AUTOTHROTTLE_ENABLED
Default: False
Enables the AutoThrottle extension.
AUTOTHROTTLE_START_DELAY
Default: 5.0
The initial download delay (in seconds).
AUTOTHROTTLE_MAX_DELAY
Default: 60.0
The maximum download delay (in seconds) to be set in case of high latencies.
AUTOTHROTTLE_TARGET_CONCURRENCY
Default: 1.0
Average number of requests Scrapy should be sending in parallel to remote websites.
By default, AutoThrottle adjusts the delay to send a single
concurrent request to each of the remote websites. Set this option to
a higher value (e.g. 2.0) to increase the throughput and the load on remote
servers. A lower AUTOTHROTTLE_TARGET_CONCURRENCY value
(e.g. 0.5) makes the crawler more conservative and polite.
Note that CONCURRENT_REQUESTS_PER_DOMAIN
and CONCURRENT_REQUESTS_PER_IP options are still respected
when AutoThrottle extension is enabled. This means that if
AUTOTHROTTLE_TARGET_CONCURRENCY is set to a value higher than
CONCURRENT_REQUESTS_PER_DOMAIN or
CONCURRENT_REQUESTS_PER_IP, the crawler won’t reach this number
of concurrent requests.
At every given time point Scrapy can be sending more or less concurrent
requests than AUTOTHROTTLE_TARGET_CONCURRENCY; it is a suggested
value the crawler tries to approach, not a hard limit.
AUTOTHROTTLE_DEBUG
Default: False
Enable AutoThrottle debug mode which will display stats on every response received, so you can see how the throttling parameters are being adjusted in real time.
Benchmarking
Scrapy comes with a simple benchmarking suite that spawns a local HTTP server and crawls it at the maximum possible speed. The goal of this benchmarking is to get an idea of how Scrapy performs in your hardware, in order to have a common baseline for comparisons. It uses a simple spider that does nothing and just follows links.
To run it use:
scrapy bench
You should see an output like this:
2016-12-16 21:18:48 [scrapy.utils.log] INFO: Scrapy 1.2.2 started (bot: quotesbot)
2016-12-16 21:18:48 [scrapy.utils.log] INFO: Overridden settings: {'CLOSESPIDER_TIMEOUT': 10, 'ROBOTSTXT_OBEY': True, 'SPIDER_MODULES': ['quotesbot.spiders'], 'LOGSTATS_INTERVAL': 1, 'BOT_NAME': 'quotesbot', 'LOG_LEVEL': 'INFO', 'NEWSPIDER_MODULE': 'quotesbot.spiders'}
2016-12-16 21:18:49 [scrapy.middleware] INFO: Enabled extensions:
['scrapy.extensions.closespider.CloseSpider',
'scrapy.extensions.logstats.LogStats',
'scrapy.extensions.telnet.TelnetConsole',
'scrapy.extensions.corestats.CoreStats']
2016-12-16 21:18:49 [scrapy.middleware] INFO: Enabled downloader middlewares:
['scrapy.downloadermiddlewares.robotstxt.RobotsTxtMiddleware',
'scrapy.downloadermiddlewares.httpauth.HttpAuthMiddleware',
'scrapy.downloadermiddlewares.downloadtimeout.DownloadTimeoutMiddleware',
'scrapy.downloadermiddlewares.defaultheaders.DefaultHeadersMiddleware',
'scrapy.downloadermiddlewares.useragent.UserAgentMiddleware',
'scrapy.downloadermiddlewares.retry.RetryMiddleware',
'scrapy.downloadermiddlewares.redirect.MetaRefreshMiddleware',
'scrapy.downloadermiddlewares.httpcompression.HttpCompressionMiddleware',
'scrapy.downloadermiddlewares.redirect.RedirectMiddleware',
'scrapy.downloadermiddlewares.cookies.CookiesMiddleware',
'scrapy.downloadermiddlewares.stats.DownloaderStats']
2016-12-16 21:18:49 [scrapy.middleware] INFO: Enabled spider middlewares:
['scrapy.spidermiddlewares.httperror.HttpErrorMiddleware',
'scrapy.spidermiddlewares.offsite.OffsiteMiddleware',
'scrapy.spidermiddlewares.referer.RefererMiddleware',
'scrapy.spidermiddlewares.urllength.UrlLengthMiddleware',
'scrapy.spidermiddlewares.depth.DepthMiddleware']
2016-12-16 21:18:49 [scrapy.middleware] INFO: Enabled item pipelines:
[]
2016-12-16 21:18:49 [scrapy.core.engine] INFO: Spider opened
2016-12-16 21:18:49 [scrapy.extensions.logstats] INFO: Crawled 0 pages (at 0 pages/min), scraped 0 items (at 0 items/min)
2016-12-16 21:18:50 [scrapy.extensions.logstats] INFO: Crawled 70 pages (at 4200 pages/min), scraped 0 items (at 0 items/min)
2016-12-16 21:18:51 [scrapy.extensions.logstats] INFO: Crawled 134 pages (at 3840 pages/min), scraped 0 items (at 0 items/min)
2016-12-16 21:18:52 [scrapy.extensions.logstats] INFO: Crawled 198 pages (at 3840 pages/min), scraped 0 items (at 0 items/min)
2016-12-16 21:18:53 [scrapy.extensions.logstats] INFO: Crawled 254 pages (at 3360 pages/min), scraped 0 items (at 0 items/min)
2016-12-16 21:18:54 [scrapy.extensions.logstats] INFO: Crawled 302 pages (at 2880 pages/min), scraped 0 items (at 0 items/min)
2016-12-16 21:18:55 [scrapy.extensions.logstats] INFO: Crawled 358 pages (at 3360 pages/min), scraped 0 items (at 0 items/min)
2016-12-16 21:18:56 [scrapy.extensions.logstats] INFO: Crawled 406 pages (at 2880 pages/min), scraped 0 items (at 0 items/min)
2016-12-16 21:18:57 [scrapy.extensions.logstats] INFO: Crawled 438 pages (at 1920 pages/min), scraped 0 items (at 0 items/min)
2016-12-16 21:18:58 [scrapy.extensions.logstats] INFO: Crawled 470 pages (at 1920 pages/min), scraped 0 items (at 0 items/min)
2016-12-16 21:18:59 [scrapy.core.engine] INFO: Closing spider (closespider_timeout)
2016-12-16 21:18:59 [scrapy.extensions.logstats] INFO: Crawled 518 pages (at 2880 pages/min), scraped 0 items (at 0 items/min)
2016-12-16 21:19:00 [scrapy.statscollectors] INFO: Dumping Scrapy stats:
{'downloader/request_bytes': 229995,
'downloader/request_count': 534,
'downloader/request_method_count/GET': 534,
'downloader/response_bytes': 1565504,
'downloader/response_count': 534,
'downloader/response_status_count/200': 534,
'finish_reason': 'closespider_timeout',
'finish_time': datetime.datetime(2016, 12, 16, 16, 19, 0, 647725),
'log_count/INFO': 17,
'request_depth_max': 19,
'response_received_count': 534,
'scheduler/dequeued': 533,
'scheduler/dequeued/memory': 533,
'scheduler/enqueued': 10661,
'scheduler/enqueued/memory': 10661,
'start_time': datetime.datetime(2016, 12, 16, 16, 18, 49, 799869)}
2016-12-16 21:19:00 [scrapy.core.engine] INFO: Spider closed (closespider_timeout)
That tells you that Scrapy is able to crawl about 3000 pages per minute in the hardware where you run it. Note that this is a very simple spider intended to follow links, any custom spider you write will probably do more stuff which results in slower crawl rates. How slower depends on how much your spider does and how well it’s written.
Use scrapy-bench for more complex benchmarking.
Jobs: pausing and resuming crawls
Sometimes, for big sites, it’s desirable to pause crawls and be able to resume them later.
Scrapy supports this functionality out of the box by providing the following facilities:
a scheduler that persists scheduled requests on disk
a duplicates filter that persists visited requests on disk
an extension that keeps some spider state (key/value pairs) persistent between batches
Job directory
To enable persistence support you just need to define a job directory through
the JOBDIR setting. This directory will be for storing all required data to
keep the state of a single job (i.e. a spider run). It’s important to note that
this directory must not be shared by different spiders, or even different
jobs/runs of the same spider, as it’s meant to be used for storing the state of
a single job.
How to use it
To start a spider with persistence support enabled, run it like this:
scrapy crawl somespider -s JOBDIR=crawls/somespider-1
Then, you can stop the spider safely at any time (by pressing Ctrl-C or sending a signal), and resume it later by issuing the same command:
scrapy crawl somespider -s JOBDIR=crawls/somespider-1
Keeping persistent state between batches
Sometimes you’ll want to keep some persistent spider state between pause/resume
batches. You can use the spider.state attribute for that, which should be a
dict. There’s a built-in extension that takes care of serializing, storing and
loading that attribute from the job directory, when the spider starts and
stops.
Here’s an example of a callback that uses the spider state (other spider code is omitted for brevity):
def parse_item(self, response):
# parse item here
self.state['items_count'] = self.state.get('items_count', 0) + 1
Persistence gotchas
There are a few things to keep in mind if you want to be able to use the Scrapy persistence support:
Request serialization
For persistence to work, Request objects must be
serializable with pickle, except for the callback and errback
values passed to their __init__ method, which must be methods of the
running Spider class.
If you wish to log the requests that couldn’t be serialized, you can set the
SCHEDULER_DEBUG setting to True in the project’s settings page.
It is False by default.
Coroutines
New in version 2.0.
Scrapy has partial support for the coroutine syntax.
Supported callables
The following callables may be defined as coroutines using async def, and
hence use coroutine syntax (e.g. await, async for, async with):
Requestcallbacks.Note
The callback output is not processed until the whole callback finishes.
As a side effect, if the callback raises an exception, none of its output is processed.
This is a known caveat of the current implementation that we aim to address in a future version of Scrapy.
The
process_item()method of item pipelines.The
process_request(),process_response(), andprocess_exception()methods of downloader middlewares.
Usage
There are several use cases for coroutines in Scrapy. Code that would return Deferreds when written for previous Scrapy versions, such as downloader middlewares and signal handlers, can be rewritten to be shorter and cleaner:
from itemadapter import ItemAdapter
class DbPipeline:
def _update_item(self, data, item):
adapter = ItemAdapter(item)
adapter['field'] = data
return item
def process_item(self, item, spider):
adapter = ItemAdapter(item)
dfd = db.get_some_data(adapter['id'])
dfd.addCallback(self._update_item, item)
return dfd
becomes:
from itemadapter import ItemAdapter
class DbPipeline:
async def process_item(self, item, spider):
adapter = ItemAdapter(item)
adapter['field'] = await db.get_some_data(adapter['id'])
return item
Coroutines may be used to call asynchronous code. This includes other
coroutines, functions that return Deferreds and functions that return
awaitable objects such as Future.
This means you can use many useful Python libraries providing such code:
class MySpiderDeferred(Spider):
# ...
async def parse(self, response):
additional_response = await treq.get('https://additional.url')
additional_data = await treq.content(additional_response)
# ... use response and additional_data to yield items and requests
class MySpiderAsyncio(Spider):
# ...
async def parse(self, response):
async with aiohttp.ClientSession() as session:
async with session.get('https://additional.url') as additional_response:
additional_data = await additional_response.text()
# ... use response and additional_data to yield items and requests
Note
Many libraries that use coroutines, such as aio-libs, require the
asyncio loop and to use them you need to
enable asyncio support in Scrapy.
Note
If you want to await on Deferreds while using the asyncio reactor,
you need to wrap them.
Common use cases for asynchronous code include:
requesting data from websites, databases and other services (in callbacks, pipelines and middlewares);
storing data in databases (in pipelines and middlewares);
delaying the spider initialization until some external event (in the
spider_openedhandler);calling asynchronous Scrapy methods like
ExecutionEngine.download(see the screenshot pipeline example).
asyncio
New in version 2.0.
Scrapy has partial support for asyncio. After you install the
asyncio reactor, you may use asyncio and
asyncio-powered libraries in any coroutine.
Installing the asyncio reactor
To enable asyncio support, set the TWISTED_REACTOR setting to
'twisted.internet.asyncioreactor.AsyncioSelectorReactor'.
If you are using CrawlerRunner, you also need to
install the AsyncioSelectorReactor
reactor manually. You can do that using
install_reactor():
install_reactor('twisted.internet.asyncioreactor.AsyncioSelectorReactor')
Using custom asyncio loops
You can also use custom asyncio event loops with the asyncio reactor. Set the
ASYNCIO_EVENT_LOOP setting to the import path of the desired event loop class to
use it instead of the default asyncio event loop.
Windows-specific notes
The Windows implementation of asyncio can use two event loop
implementations:
SelectorEventLoop, default before Python 3.8, required when using Twisted.ProactorEventLoop, default since Python 3.8, cannot work with Twisted.
So on Python 3.8+ the event loop class needs to be changed.
Changed in version 2.6.0: The event loop class is changed automatically when you change the
TWISTED_REACTOR setting or call
install_reactor().
To change the event loop class manually, call the following code before installing the reactor:
import asyncio
asyncio.set_event_loop_policy(asyncio.WindowsSelectorEventLoopPolicy())
You can put this in the same function that installs the reactor, if you do that
yourself, or in some code that runs before the reactor is installed, e.g.
settings.py.
Note
Other libraries you use may require
ProactorEventLoop, e.g. because it supports
subprocesses (this is the case with playwright), so you cannot use
them together with Scrapy on Windows (but you should be able to use
them on WSL or native Linux).
Awaiting on Deferreds
When the asyncio reactor isn’t installed, you can await on Deferreds in the
coroutines directly. When it is installed, this is not possible anymore, due to
specifics of the Scrapy coroutine integration (the coroutines are wrapped into
asyncio.Future objects, not into
Deferred directly), and you need to wrap them into
Futures. Scrapy provides two helpers for this:
- scrapy.utils.defer.deferred_to_future(d: twisted.internet.defer.Deferred) _asyncio.Future[source]
New in version 2.6.0.
Return an
asyncio.Futureobject that wraps d.When using the asyncio reactor, you cannot await on
Deferredobjects from Scrapy callables defined as coroutines, you can only await onFutureobjects. WrappingDeferredobjects intoFutureobjects allows you to wait on them:class MySpider(Spider): ... async def parse(self, response): d = treq.get('https://example.com/additional') additional_response = await deferred_to_future(d)
- scrapy.utils.defer.maybe_deferred_to_future(d: twisted.internet.defer.Deferred) Union[twisted.internet.defer.Deferred, _asyncio.Future][source]
New in version 2.6.0.
Return d as an object that can be awaited from a Scrapy callable defined as a coroutine.
What you can await in Scrapy callables defined as coroutines depends on the value of
TWISTED_REACTOR:When not using the asyncio reactor, you can only await on
Deferredobjects.When using the asyncio reactor, you can only await on
asyncio.Futureobjects.
If you want to write code that uses
Deferredobjects but works with any reactor, use this function on allDeferredobjects:class MySpider(Spider): ... async def parse(self, response): d = treq.get('https://example.com/additional') extra_response = await maybe_deferred_to_future(d)
Tip
If you need to use these functions in code that aims to be compatible
with lower versions of Scrapy that do not provide these functions,
down to Scrapy 2.0 (earlier versions do not support
asyncio), you can copy the implementation of these functions
into your own code.
- Frequently Asked Questions
Get answers to most frequently asked questions.
- Debugging Spiders
Learn how to debug common problems of your Scrapy spider.
- Spiders Contracts
Learn how to use contracts for testing your spiders.
- Common Practices
Get familiar with some Scrapy common practices.
- Broad Crawls
Tune Scrapy for crawling a lot domains in parallel.
- Using your browser’s Developer Tools for scraping
Learn how to scrape with your browser’s developer tools.
- Selecting dynamically-loaded content
Read webpage data that is loaded dynamically.
- Debugging memory leaks
Learn how to find and get rid of memory leaks in your crawler.
- Downloading and processing files and images
Download files and/or images associated with your scraped items.
- Deploying Spiders
Deploying your Scrapy spiders and run them in a remote server.
- AutoThrottle extension
Adjust crawl rate dynamically based on load.
- Benchmarking
Check how Scrapy performs on your hardware.
- Jobs: pausing and resuming crawls
Learn how to pause and resume crawls for large spiders.
- Coroutines
Use the coroutine syntax.
- asyncio
Extending Scrapy
Architecture overview
This document describes the architecture of Scrapy and how its components interact.
Overview
The following diagram shows an overview of the Scrapy architecture with its components and an outline of the data flow that takes place inside the system (shown by the red arrows). A brief description of the components is included below with links for more detailed information about them. The data flow is also described below.
Data flow
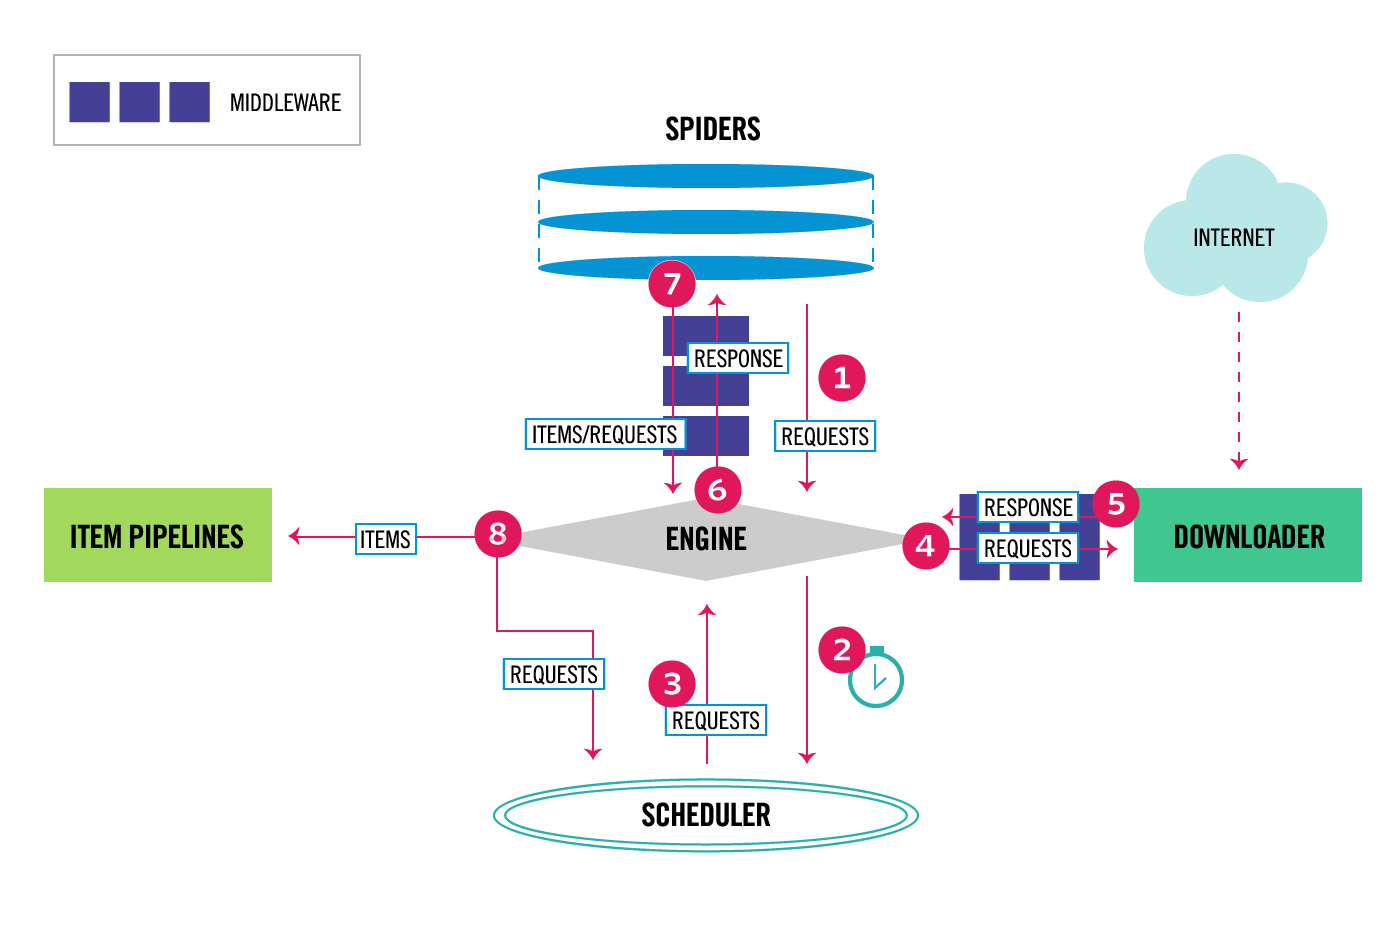
The data flow in Scrapy is controlled by the execution engine, and goes like this:
The Engine gets the initial Requests to crawl from the Spider.
The Engine schedules the Requests in the Scheduler and asks for the next Requests to crawl.
The Engine sends the Requests to the Downloader, passing through the Downloader Middlewares (see
process_request()).Once the page finishes downloading the Downloader generates a Response (with that page) and sends it to the Engine, passing through the Downloader Middlewares (see
process_response()).The Engine receives the Response from the Downloader and sends it to the Spider for processing, passing through the Spider Middleware (see
process_spider_input()).The Spider processes the Response and returns scraped items and new Requests (to follow) to the Engine, passing through the Spider Middleware (see
process_spider_output()).The Engine sends processed items to Item Pipelines, then send processed Requests to the Scheduler and asks for possible next Requests to crawl.
The process repeats (from step 3) until there are no more requests from the Scheduler.
Components
Scrapy Engine
The engine is responsible for controlling the data flow between all components of the system, and triggering events when certain actions occur. See the Data Flow section above for more details.
Scheduler
The scheduler receives requests from the engine and enqueues them for feeding them later (also to the engine) when the engine requests them.
Downloader
The Downloader is responsible for fetching web pages and feeding them to the engine which, in turn, feeds them to the spiders.
Spiders
Spiders are custom classes written by Scrapy users to parse responses and extract items from them or additional requests to follow. For more information see Spiders.
Item Pipeline
The Item Pipeline is responsible for processing the items once they have been extracted (or scraped) by the spiders. Typical tasks include cleansing, validation and persistence (like storing the item in a database). For more information see Item Pipeline.
Downloader middlewares
Downloader middlewares are specific hooks that sit between the Engine and the Downloader and process requests when they pass from the Engine to the Downloader, and responses that pass from Downloader to the Engine.
Use a Downloader middleware if you need to do one of the following:
process a request just before it is sent to the Downloader (i.e. right before Scrapy sends the request to the website);
change received response before passing it to a spider;
send a new Request instead of passing received response to a spider;
pass response to a spider without fetching a web page;
silently drop some requests.
For more information see Downloader Middleware.
Spider middlewares
Spider middlewares are specific hooks that sit between the Engine and the Spiders and are able to process spider input (responses) and output (items and requests).
Use a Spider middleware if you need to
post-process output of spider callbacks - change/add/remove requests or items;
post-process start_requests;
handle spider exceptions;
call errback instead of callback for some of the requests based on response content.
For more information see Spider Middleware.
Event-driven networking
Scrapy is written with Twisted, a popular event-driven networking framework for Python. Thus, it’s implemented using a non-blocking (aka asynchronous) code for concurrency.
For more information about asynchronous programming and Twisted see these links:
Downloader Middleware
The downloader middleware is a framework of hooks into Scrapy’s request/response processing. It’s a light, low-level system for globally altering Scrapy’s requests and responses.
Activating a downloader middleware
To activate a downloader middleware component, add it to the
DOWNLOADER_MIDDLEWARES setting, which is a dict whose keys are the
middleware class paths and their values are the middleware orders.
Here’s an example:
DOWNLOADER_MIDDLEWARES = {
'myproject.middlewares.CustomDownloaderMiddleware': 543,
}
The DOWNLOADER_MIDDLEWARES setting is merged with the
DOWNLOADER_MIDDLEWARES_BASE setting defined in Scrapy (and not meant
to be overridden) and then sorted by order to get the final sorted list of
enabled middlewares: the first middleware is the one closer to the engine and
the last is the one closer to the downloader. In other words,
the process_request()
method of each middleware will be invoked in increasing
middleware order (100, 200, 300, …) and the process_response() method
of each middleware will be invoked in decreasing order.
To decide which order to assign to your middleware see the
DOWNLOADER_MIDDLEWARES_BASE setting and pick a value according to
where you want to insert the middleware. The order does matter because each
middleware performs a different action and your middleware could depend on some
previous (or subsequent) middleware being applied.
If you want to disable a built-in middleware (the ones defined in
DOWNLOADER_MIDDLEWARES_BASE and enabled by default) you must define it
in your project’s DOWNLOADER_MIDDLEWARES setting and assign None
as its value. For example, if you want to disable the user-agent middleware:
DOWNLOADER_MIDDLEWARES = {
'myproject.middlewares.CustomDownloaderMiddleware': 543,
'scrapy.downloadermiddlewares.useragent.UserAgentMiddleware': None,
}
Finally, keep in mind that some middlewares may need to be enabled through a particular setting. See each middleware documentation for more info.
Writing your own downloader middleware
Each downloader middleware is a Python class that defines one or more of the methods defined below.
The main entry point is the from_crawler class method, which receives a
Crawler instance. The Crawler
object gives you access, for example, to the settings.
- class scrapy.downloadermiddlewares.DownloaderMiddleware
Note
Any of the downloader middleware methods may also return a deferred.
- process_request(request, spider)
This method is called for each request that goes through the download middleware.
process_request()should either: returnNone, return aResponseobject, return aRequestobject, or raiseIgnoreRequest.If it returns
None, Scrapy will continue processing this request, executing all other middlewares until, finally, the appropriate downloader handler is called the request performed (and its response downloaded).If it returns a
Responseobject, Scrapy won’t bother calling any otherprocess_request()orprocess_exception()methods, or the appropriate download function; it’ll return that response. Theprocess_response()methods of installed middleware is always called on every response.If it returns a
Requestobject, Scrapy will stop callingprocess_request()methods and reschedule the returned request. Once the newly returned request is performed, the appropriate middleware chain will be called on the downloaded response.If it raises an
IgnoreRequestexception, theprocess_exception()methods of installed downloader middleware will be called. If none of them handle the exception, the errback function of the request (Request.errback) is called. If no code handles the raised exception, it is ignored and not logged (unlike other exceptions).- Parameters
request (
Requestobject) – the request being processedspider (
Spiderobject) – the spider for which this request is intended
- process_response(request, response, spider)
process_response()should either: return aResponseobject, return aRequestobject or raise aIgnoreRequestexception.If it returns a
Response(it could be the same given response, or a brand-new one), that response will continue to be processed with theprocess_response()of the next middleware in the chain.If it returns a
Requestobject, the middleware chain is halted and the returned request is rescheduled to be downloaded in the future. This is the same behavior as if a request is returned fromprocess_request().If it raises an
IgnoreRequestexception, the errback function of the request (Request.errback) is called. If no code handles the raised exception, it is ignored and not logged (unlike other exceptions).
- process_exception(request, exception, spider)
Scrapy calls
process_exception()when a download handler or aprocess_request()(from a downloader middleware) raises an exception (including anIgnoreRequestexception)process_exception()should return: eitherNone, aResponseobject, or aRequestobject.If it returns
None, Scrapy will continue processing this exception, executing any otherprocess_exception()methods of installed middleware, until no middleware is left and the default exception handling kicks in.If it returns a
Responseobject, theprocess_response()method chain of installed middleware is started, and Scrapy won’t bother calling any otherprocess_exception()methods of middleware.If it returns a
Requestobject, the returned request is rescheduled to be downloaded in the future. This stops the execution ofprocess_exception()methods of the middleware the same as returning a response would.- Parameters
request (is a
Requestobject) – the request that generated the exceptionexception (an
Exceptionobject) – the raised exceptionspider (
Spiderobject) – the spider for which this request is intended
- from_crawler(cls, crawler)
If present, this classmethod is called to create a middleware instance from a
Crawler. It must return a new instance of the middleware. Crawler object provides access to all Scrapy core components like settings and signals; it is a way for middleware to access them and hook its functionality into Scrapy.- Parameters
crawler (
Crawlerobject) – crawler that uses this middleware
Built-in downloader middleware reference
This page describes all downloader middleware components that come with Scrapy. For information on how to use them and how to write your own downloader middleware, see the downloader middleware usage guide.
For a list of the components enabled by default (and their orders) see the
DOWNLOADER_MIDDLEWARES_BASE setting.
DefaultHeadersMiddleware
- class scrapy.downloadermiddlewares.defaultheaders.DefaultHeadersMiddleware[source]
This middleware sets all default requests headers specified in the
DEFAULT_REQUEST_HEADERSsetting.
DownloadTimeoutMiddleware
- class scrapy.downloadermiddlewares.downloadtimeout.DownloadTimeoutMiddleware[source]
This middleware sets the download timeout for requests specified in the
DOWNLOAD_TIMEOUTsetting ordownload_timeoutspider attribute.
Note
You can also set download timeout per-request using
download_timeout Request.meta key; this is supported
even when DownloadTimeoutMiddleware is disabled.
HttpAuthMiddleware
- class scrapy.downloadermiddlewares.httpauth.HttpAuthMiddleware[source]
This middleware authenticates all requests generated from certain spiders using Basic access authentication (aka. HTTP auth).
To enable HTTP authentication for a spider, set the
http_userandhttp_passspider attributes to the authentication data and thehttp_auth_domainspider attribute to the domain which requires this authentication (its subdomains will be also handled in the same way). You can sethttp_auth_domaintoNoneto enable the authentication for all requests but you risk leaking your authentication credentials to unrelated domains.Warning
In previous Scrapy versions HttpAuthMiddleware sent the authentication data with all requests, which is a security problem if the spider makes requests to several different domains. Currently if the
http_auth_domainattribute is not set, the middleware will use the domain of the first request, which will work for some spiders but not for others. In the future the middleware will produce an error instead.Example:
from scrapy.spiders import CrawlSpider class SomeIntranetSiteSpider(CrawlSpider): http_user = 'someuser' http_pass = 'somepass' http_auth_domain = 'intranet.example.com' name = 'intranet.example.com' # .. rest of the spider code omitted ...
HttpCacheMiddleware
- class scrapy.downloadermiddlewares.httpcache.HttpCacheMiddleware[source]
This middleware provides low-level cache to all HTTP requests and responses. It has to be combined with a cache storage backend as well as a cache policy.
Scrapy ships with three HTTP cache storage backends:
You can change the HTTP cache storage backend with the
HTTPCACHE_STORAGEsetting. Or you can also implement your own storage backend.Scrapy ships with two HTTP cache policies:
You can change the HTTP cache policy with the
HTTPCACHE_POLICYsetting. Or you can also implement your own policy.You can also avoid caching a response on every policy using
dont_cachemeta key equalsTrue.
Dummy policy (default)
- class scrapy.extensions.httpcache.DummyPolicy[source]
This policy has no awareness of any HTTP Cache-Control directives. Every request and its corresponding response are cached. When the same request is seen again, the response is returned without transferring anything from the Internet.
The Dummy policy is useful for testing spiders faster (without having to wait for downloads every time) and for trying your spider offline, when an Internet connection is not available. The goal is to be able to “replay” a spider run exactly as it ran before.
RFC2616 policy
- class scrapy.extensions.httpcache.RFC2616Policy[source]
This policy provides a RFC2616 compliant HTTP cache, i.e. with HTTP Cache-Control awareness, aimed at production and used in continuous runs to avoid downloading unmodified data (to save bandwidth and speed up crawls).
What is implemented:
Do not attempt to store responses/requests with
no-storecache-control directive setDo not serve responses from cache if
no-cachecache-control directive is set even for fresh responsesCompute freshness lifetime from
max-agecache-control directiveCompute freshness lifetime from
Expiresresponse headerCompute freshness lifetime from
Last-Modifiedresponse header (heuristic used by Firefox)Compute current age from
Ageresponse headerCompute current age from
DateheaderRevalidate stale responses based on
Last-Modifiedresponse headerRevalidate stale responses based on
ETagresponse headerSet
Dateheader for any received response missing itSupport
max-stalecache-control directive in requests
This allows spiders to be configured with the full RFC2616 cache policy, but avoid revalidation on a request-by-request basis, while remaining conformant with the HTTP spec.
Example:
Add
Cache-Control: max-stale=600to Request headers to accept responses that have exceeded their expiration time by no more than 600 seconds.See also: RFC2616, 14.9.3
What is missing:
Pragma: no-cachesupport https://www.w3.org/Protocols/rfc2616/rfc2616-sec14.html#sec14.9.1Varyheader support https://www.w3.org/Protocols/rfc2616/rfc2616-sec13.html#sec13.6Invalidation after updates or deletes https://www.w3.org/Protocols/rfc2616/rfc2616-sec13.html#sec13.10
… probably others ..
Filesystem storage backend (default)
- class scrapy.extensions.httpcache.FilesystemCacheStorage[source]
File system storage backend is available for the HTTP cache middleware.
Each request/response pair is stored in a different directory containing the following files:
request_body- the plain request bodyrequest_headers- the request headers (in raw HTTP format)response_body- the plain response bodyresponse_headers- the request headers (in raw HTTP format)meta- some metadata of this cache resource in Pythonrepr()format (grep-friendly format)pickled_meta- the same metadata inmetabut pickled for more efficient deserialization
The directory name is made from the request fingerprint (see
scrapy.utils.request.fingerprint), and one level of subdirectories is used to avoid creating too many files into the same directory (which is inefficient in many file systems). An example directory could be:/path/to/cache/dir/example.com/72/72811f648e718090f041317756c03adb0ada46c7
DBM storage backend
- class scrapy.extensions.httpcache.DbmCacheStorage[source]
A DBM storage backend is also available for the HTTP cache middleware.
By default, it uses the
dbm, but you can change it with theHTTPCACHE_DBM_MODULEsetting.
Writing your own storage backend
You can implement a cache storage backend by creating a Python class that defines the methods described below.
- class scrapy.extensions.httpcache.CacheStorage
- open_spider(spider)
This method gets called after a spider has been opened for crawling. It handles the
open_spidersignal.- Parameters
spider (
Spiderobject) – the spider which has been opened
- close_spider(spider)
This method gets called after a spider has been closed. It handles the
close_spidersignal.- Parameters
spider (
Spiderobject) – the spider which has been closed
- retrieve_response(spider, request)
Return response if present in cache, or
Noneotherwise.- Parameters
spider (
Spiderobject) – the spider which generated the requestrequest (
Requestobject) – the request to find cached response for
- store_response(spider, request, response)
Store the given response in the cache.
In order to use your storage backend, set:
HTTPCACHE_STORAGEto the Python import path of your custom storage class.
HTTPCache middleware settings
The HttpCacheMiddleware can be configured through the following
settings:
Default: False
Whether the HTTP cache will be enabled.
Default: 0
Expiration time for cached requests, in seconds.
Cached requests older than this time will be re-downloaded. If zero, cached requests will never expire.
Default: 'httpcache'
The directory to use for storing the (low-level) HTTP cache. If empty, the HTTP cache will be disabled. If a relative path is given, is taken relative to the project data dir. For more info see: Default structure of Scrapy projects.
Default: []
Don’t cache response with these HTTP codes.
Default: False
If enabled, requests not found in the cache will be ignored instead of downloaded.
Default: ['file']
Don’t cache responses with these URI schemes.
Default: 'scrapy.extensions.httpcache.FilesystemCacheStorage'
The class which implements the cache storage backend.
Default: 'dbm'
The database module to use in the DBM storage backend. This setting is specific to the DBM backend.
Default: 'scrapy.extensions.httpcache.DummyPolicy'
The class which implements the cache policy.
Default: False
If enabled, will compress all cached data with gzip. This setting is specific to the Filesystem backend.
Default: False
If enabled, will cache pages unconditionally.
A spider may wish to have all responses available in the cache, for
future use with Cache-Control: max-stale, for instance. The
DummyPolicy caches all responses but never revalidates them, and
sometimes a more nuanced policy is desirable.
This setting still respects Cache-Control: no-store directives in responses.
If you don’t want that, filter no-store out of the Cache-Control headers in
responses you feed to the cache middleware.
Default: []
List of Cache-Control directives in responses to be ignored.
Sites often set “no-store”, “no-cache”, “must-revalidate”, etc., but get upset at the traffic a spider can generate if it actually respects those directives. This allows to selectively ignore Cache-Control directives that are known to be unimportant for the sites being crawled.
We assume that the spider will not issue Cache-Control directives in requests unless it actually needs them, so directives in requests are not filtered.
HttpCompressionMiddleware
- class scrapy.downloadermiddlewares.httpcompression.HttpCompressionMiddleware[source]
This middleware allows compressed (gzip, deflate) traffic to be sent/received from web sites.
This middleware also supports decoding brotli-compressed as well as zstd-compressed responses, provided that brotlipy or zstandard is installed, respectively.
HttpCompressionMiddleware Settings
Default: True
Whether the Compression middleware will be enabled.
HttpProxyMiddleware
- class scrapy.downloadermiddlewares.httpproxy.HttpProxyMiddleware[source]
This middleware sets the HTTP proxy to use for requests, by setting the
proxymeta value forRequestobjects.Like the Python standard library module
urllib.request, it obeys the following environment variables:http_proxyhttps_proxyno_proxy
You can also set the meta key
proxyper-request, to a value likehttp://some_proxy_server:portorhttp://username:password@some_proxy_server:port. Keep in mind this value will take precedence overhttp_proxy/https_proxyenvironment variables, and it will also ignoreno_proxyenvironment variable.
RedirectMiddleware
- class scrapy.downloadermiddlewares.redirect.RedirectMiddleware[source]
This middleware handles redirection of requests based on response status.
The urls which the request goes through (while being redirected) can be found
in the redirect_urls Request.meta key.
The reason behind each redirect in redirect_urls can be found in the
redirect_reasons Request.meta key. For
example: [301, 302, 307, 'meta refresh'].
The format of a reason depends on the middleware that handled the corresponding
redirect. For example, RedirectMiddleware indicates the triggering
response status code as an integer, while MetaRefreshMiddleware
always uses the 'meta refresh' string as reason.
The RedirectMiddleware can be configured through the following
settings (see the settings documentation for more info):
If Request.meta has dont_redirect
key set to True, the request will be ignored by this middleware.
If you want to handle some redirect status codes in your spider, you can
specify these in the handle_httpstatus_list spider attribute.
For example, if you want the redirect middleware to ignore 301 and 302 responses (and pass them through to your spider) you can do this:
class MySpider(CrawlSpider):
handle_httpstatus_list = [301, 302]
The handle_httpstatus_list key of Request.meta can also be used to specify which response codes to
allow on a per-request basis. You can also set the meta key
handle_httpstatus_all to True if you want to allow any response code
for a request.
RedirectMiddleware settings
Default: True
Whether the Redirect middleware will be enabled.
Default: 20
The maximum number of redirections that will be followed for a single request. After this maximum, the request’s response is returned as is.
MetaRefreshMiddleware
- class scrapy.downloadermiddlewares.redirect.MetaRefreshMiddleware[source]
This middleware handles redirection of requests based on meta-refresh html tag.
The MetaRefreshMiddleware can be configured through the following
settings (see the settings documentation for more info):
This middleware obey REDIRECT_MAX_TIMES setting, dont_redirect,
redirect_urls and redirect_reasons request meta keys as described
for RedirectMiddleware
MetaRefreshMiddleware settings
Default: True
Whether the Meta Refresh middleware will be enabled.
Default: 100
The maximum meta-refresh delay (in seconds) to follow the redirection. Some sites use meta-refresh for redirecting to a session expired page, so we restrict automatic redirection to the maximum delay.
RetryMiddleware
- class scrapy.downloadermiddlewares.retry.RetryMiddleware[source]
A middleware to retry failed requests that are potentially caused by temporary problems such as a connection timeout or HTTP 500 error.
Failed pages are collected on the scraping process and rescheduled at the end, once the spider has finished crawling all regular (non failed) pages.
The RetryMiddleware can be configured through the following
settings (see the settings documentation for more info):
If Request.meta has dont_retry key
set to True, the request will be ignored by this middleware.
To retry requests from a spider callback, you can use the
get_retry_request() function:
- scrapy.downloadermiddlewares.retry.get_retry_request(request: scrapy.http.request.Request, *, spider: scrapy.spiders.Spider, reason: typing.Union[str, Exception] = 'unspecified', max_retry_times: typing.Optional[int] = None, priority_adjust: typing.Optional[int] = None, logger: logging.Logger = <Logger scrapy.downloadermiddlewares.retry (WARNING)>, stats_base_key: str = 'retry')[source]
Returns a new
Requestobject to retry the specified request, orNoneif retries of the specified request have been exhausted.For example, in a
Spidercallback, you could use it as follows:def parse(self, response): if not response.text: new_request_or_none = get_retry_request( response.request, spider=self, reason='empty', ) return new_request_or_none
spider is the
Spiderinstance which is asking for the retry request. It is used to access the settings and stats, and to provide extra logging context (seelogging.debug()).reason is a string or an
Exceptionobject that indicates the reason why the request needs to be retried. It is used to name retry stats.max_retry_times is a number that determines the maximum number of times that request can be retried. If not specified or
None, the number is read from themax_retry_timesmeta key of the request. If themax_retry_timesmeta key is not defined orNone, the number is read from theRETRY_TIMESsetting.priority_adjust is a number that determines how the priority of the new request changes in relation to request. If not specified, the number is read from the
RETRY_PRIORITY_ADJUSTsetting.logger is the logging.Logger object to be used when logging messages
stats_base_key is a string to be used as the base key for the retry-related job stats
RetryMiddleware Settings
Default: True
Whether the Retry middleware will be enabled.
Default: 2
Maximum number of times to retry, in addition to the first download.
Maximum number of retries can also be specified per-request using
max_retry_times attribute of Request.meta.
When initialized, the max_retry_times meta key takes higher
precedence over the RETRY_TIMES setting.
Default: [500, 502, 503, 504, 522, 524, 408, 429]
Which HTTP response codes to retry. Other errors (DNS lookup issues, connections lost, etc) are always retried.
In some cases you may want to add 400 to RETRY_HTTP_CODES because
it is a common code used to indicate server overload. It is not included by
default because HTTP specs say so.
RETRY_PRIORITY_ADJUST
Default: -1
Adjust retry request priority relative to original request:
a positive priority adjust means higher priority.
a negative priority adjust (default) means lower priority.
RobotsTxtMiddleware
- class scrapy.downloadermiddlewares.robotstxt.RobotsTxtMiddleware[source]
This middleware filters out requests forbidden by the robots.txt exclusion standard.
To make sure Scrapy respects robots.txt make sure the middleware is enabled and the
ROBOTSTXT_OBEYsetting is enabled.The
ROBOTSTXT_USER_AGENTsetting can be used to specify the user agent string to use for matching in the robots.txt file. If it isNone, the User-Agent header you are sending with the request or theUSER_AGENTsetting (in that order) will be used for determining the user agent to use in the robots.txt file.This middleware has to be combined with a robots.txt parser.
Scrapy ships with support for the following robots.txt parsers:
Protego (default)
You can change the robots.txt parser with the
ROBOTSTXT_PARSERsetting. Or you can also implement support for a new parser.
If Request.meta has
dont_obey_robotstxt key set to True
the request will be ignored by this middleware even if
ROBOTSTXT_OBEY is enabled.
Parsers vary in several aspects:
Language of implementation
Supported specification
Support for wildcard matching
Usage of length based rule: in particular for
AllowandDisallowdirectives, where the most specific rule based on the length of the path trumps the less specific (shorter) rule
Performance comparison of different parsers is available at the following link.
Protego parser
Based on Protego:
implemented in Python
is compliant with Google’s Robots.txt Specification
supports wildcard matching
uses the length based rule
Scrapy uses this parser by default.
RobotFileParser
Based on RobotFileParser:
is Python’s built-in robots.txt parser
is compliant with Martijn Koster’s 1996 draft specification
lacks support for wildcard matching
doesn’t use the length based rule
It is faster than Protego and backward-compatible with versions of Scrapy before 1.8.0.
In order to use this parser, set:
ROBOTSTXT_PARSERtoscrapy.robotstxt.PythonRobotParser
Reppy parser
Based on Reppy:
is a Python wrapper around Robots Exclusion Protocol Parser for C++
is compliant with Martijn Koster’s 1996 draft specification
supports wildcard matching
uses the length based rule
Native implementation, provides better speed than Protego.
In order to use this parser:
Install Reppy by running
pip install reppyWarning
Upstream issue #122 prevents reppy usage in Python 3.9+.
Set
ROBOTSTXT_PARSERsetting toscrapy.robotstxt.ReppyRobotParser
Robotexclusionrulesparser
Based on Robotexclusionrulesparser:
implemented in Python
is compliant with Martijn Koster’s 1996 draft specification
supports wildcard matching
doesn’t use the length based rule
In order to use this parser:
Install Robotexclusionrulesparser by running
pip install robotexclusionrulesparserSet
ROBOTSTXT_PARSERsetting toscrapy.robotstxt.RerpRobotParser
Implementing support for a new parser
You can implement support for a new robots.txt parser by subclassing
the abstract base class RobotParser and
implementing the methods described below.
- class scrapy.robotstxt.RobotParser[source]
- abstract allowed(url, user_agent)[source]
Return
Trueifuser_agentis allowed to crawlurl, otherwise returnFalse.
- abstract classmethod from_crawler(crawler, robotstxt_body)[source]
Parse the content of a robots.txt file as bytes. This must be a class method. It must return a new instance of the parser backend.
- Parameters
crawler (
Crawlerinstance) – crawler which made the requestrobotstxt_body (bytes) – content of a robots.txt file.
DownloaderStats
- class scrapy.downloadermiddlewares.stats.DownloaderStats[source]
Middleware that stores stats of all requests, responses and exceptions that pass through it.
To use this middleware you must enable the
DOWNLOADER_STATSsetting.
UserAgentMiddleware
AjaxCrawlMiddleware
- class scrapy.downloadermiddlewares.ajaxcrawl.AjaxCrawlMiddleware[source]
Middleware that finds ‘AJAX crawlable’ page variants based on meta-fragment html tag. See https://developers.google.com/search/docs/ajax-crawling/docs/getting-started for more info.
Note
Scrapy finds ‘AJAX crawlable’ pages for URLs like
'http://example.com/!#foo=bar'even without this middleware. AjaxCrawlMiddleware is necessary when URL doesn’t contain'!#'. This is often a case for ‘index’ or ‘main’ website pages.
AjaxCrawlMiddleware Settings
Default: False
Whether the AjaxCrawlMiddleware will be enabled. You may want to enable it for broad crawls.
HttpProxyMiddleware settings
Default: True
Whether or not to enable the HttpProxyMiddleware.
Default: "latin-1"
The default encoding for proxy authentication on HttpProxyMiddleware.
Spider Middleware
The spider middleware is a framework of hooks into Scrapy’s spider processing mechanism where you can plug custom functionality to process the responses that are sent to Spiders for processing and to process the requests and items that are generated from spiders.
Activating a spider middleware
To activate a spider middleware component, add it to the
SPIDER_MIDDLEWARES setting, which is a dict whose keys are the
middleware class path and their values are the middleware orders.
Here’s an example:
SPIDER_MIDDLEWARES = {
'myproject.middlewares.CustomSpiderMiddleware': 543,
}
The SPIDER_MIDDLEWARES setting is merged with the
SPIDER_MIDDLEWARES_BASE setting defined in Scrapy (and not meant to
be overridden) and then sorted by order to get the final sorted list of enabled
middlewares: the first middleware is the one closer to the engine and the last
is the one closer to the spider. In other words,
the process_spider_input()
method of each middleware will be invoked in increasing
middleware order (100, 200, 300, …), and the
process_spider_output() method
of each middleware will be invoked in decreasing order.
To decide which order to assign to your middleware see the
SPIDER_MIDDLEWARES_BASE setting and pick a value according to where
you want to insert the middleware. The order does matter because each
middleware performs a different action and your middleware could depend on some
previous (or subsequent) middleware being applied.
If you want to disable a builtin middleware (the ones defined in
SPIDER_MIDDLEWARES_BASE, and enabled by default) you must define it
in your project SPIDER_MIDDLEWARES setting and assign None as its
value. For example, if you want to disable the off-site middleware:
SPIDER_MIDDLEWARES = {
'myproject.middlewares.CustomSpiderMiddleware': 543,
'scrapy.spidermiddlewares.offsite.OffsiteMiddleware': None,
}
Finally, keep in mind that some middlewares may need to be enabled through a particular setting. See each middleware documentation for more info.
Writing your own spider middleware
Each spider middleware is a Python class that defines one or more of the methods defined below.
The main entry point is the from_crawler class method, which receives a
Crawler instance. The Crawler
object gives you access, for example, to the settings.
- class scrapy.spidermiddlewares.SpiderMiddleware
- process_spider_input(response, spider)
This method is called for each response that goes through the spider middleware and into the spider, for processing.
process_spider_input()should returnNoneor raise an exception.If it returns
None, Scrapy will continue processing this response, executing all other middlewares until, finally, the response is handed to the spider for processing.If it raises an exception, Scrapy won’t bother calling any other spider middleware
process_spider_input()and will call the request errback if there is one, otherwise it will start theprocess_spider_exception()chain. The output of the errback is chained back in the other direction forprocess_spider_output()to process it, orprocess_spider_exception()if it raised an exception.
- process_spider_output(response, result, spider)
This method is called with the results returned from the Spider, after it has processed the response.
process_spider_output()must return an iterable ofRequestobjects and item object.- Parameters
response (
Responseobject) – the response which generated this output from the spiderresult (an iterable of
Requestobjects and item object) – the result returned by the spiderspider (
Spiderobject) – the spider whose result is being processed
- process_spider_exception(response, exception, spider)
This method is called when a spider or
process_spider_output()method (from a previous spider middleware) raises an exception.process_spider_exception()should return eitherNoneor an iterable ofRequestor item objects.If it returns
None, Scrapy will continue processing this exception, executing any otherprocess_spider_exception()in the following middleware components, until no middleware components are left and the exception reaches the engine (where it’s logged and discarded).If it returns an iterable the
process_spider_output()pipeline kicks in, starting from the next spider middleware, and no otherprocess_spider_exception()will be called.
- process_start_requests(start_requests, spider)
This method is called with the start requests of the spider, and works similarly to the
process_spider_output()method, except that it doesn’t have a response associated and must return only requests (not items).It receives an iterable (in the
start_requestsparameter) and must return another iterable ofRequestobjects.Note
When implementing this method in your spider middleware, you should always return an iterable (that follows the input one) and not consume all
start_requestsiterator because it can be very large (or even unbounded) and cause a memory overflow. The Scrapy engine is designed to pull start requests while it has capacity to process them, so the start requests iterator can be effectively endless where there is some other condition for stopping the spider (like a time limit or item/page count).- Parameters
start_requests (an iterable of
Request) – the start requestsspider (
Spiderobject) – the spider to whom the start requests belong
- from_crawler(cls, crawler)
If present, this classmethod is called to create a middleware instance from a
Crawler. It must return a new instance of the middleware. Crawler object provides access to all Scrapy core components like settings and signals; it is a way for middleware to access them and hook its functionality into Scrapy.- Parameters
crawler (
Crawlerobject) – crawler that uses this middleware
Built-in spider middleware reference
This page describes all spider middleware components that come with Scrapy. For information on how to use them and how to write your own spider middleware, see the spider middleware usage guide.
For a list of the components enabled by default (and their orders) see the
SPIDER_MIDDLEWARES_BASE setting.
DepthMiddleware
- class scrapy.spidermiddlewares.depth.DepthMiddleware[source]
DepthMiddleware is used for tracking the depth of each Request inside the site being scraped. It works by setting
request.meta['depth'] = 0whenever there is no value previously set (usually just the first Request) and incrementing it by 1 otherwise.It can be used to limit the maximum depth to scrape, control Request priority based on their depth, and things like that.
The
DepthMiddlewarecan be configured through the following settings (see the settings documentation for more info):DEPTH_LIMIT- The maximum depth that will be allowed to crawl for any site. If zero, no limit will be imposed.DEPTH_STATS_VERBOSE- Whether to collect the number of requests for each depth.DEPTH_PRIORITY- Whether to prioritize the requests based on their depth.
HttpErrorMiddleware
- class scrapy.spidermiddlewares.httperror.HttpErrorMiddleware[source]
Filter out unsuccessful (erroneous) HTTP responses so that spiders don’t have to deal with them, which (most of the time) imposes an overhead, consumes more resources, and makes the spider logic more complex.
According to the HTTP standard, successful responses are those whose status codes are in the 200-300 range.
If you still want to process response codes outside that range, you can
specify which response codes the spider is able to handle using the
handle_httpstatus_list spider attribute or
HTTPERROR_ALLOWED_CODES setting.
For example, if you want your spider to handle 404 responses you can do this:
class MySpider(CrawlSpider):
handle_httpstatus_list = [404]
The handle_httpstatus_list key of Request.meta can also be used to specify which response codes to
allow on a per-request basis. You can also set the meta key handle_httpstatus_all
to True if you want to allow any response code for a request, and False to
disable the effects of the handle_httpstatus_all key.
Keep in mind, however, that it’s usually a bad idea to handle non-200 responses, unless you really know what you’re doing.
For more information see: HTTP Status Code Definitions.
HttpErrorMiddleware settings
Default: []
Pass all responses with non-200 status codes contained in this list.
Default: False
Pass all responses, regardless of its status code.
OffsiteMiddleware
- class scrapy.spidermiddlewares.offsite.OffsiteMiddleware[source]
Filters out Requests for URLs outside the domains covered by the spider.
This middleware filters out every request whose host names aren’t in the spider’s
allowed_domainsattribute. All subdomains of any domain in the list are also allowed. E.g. the rulewww.example.orgwill also allowbob.www.example.orgbut notwww2.example.comnorexample.com.When your spider returns a request for a domain not belonging to those covered by the spider, this middleware will log a debug message similar to this one:
DEBUG: Filtered offsite request to 'www.othersite.com': <GET http://www.othersite.com/some/page.html>
To avoid filling the log with too much noise, it will only print one of these messages for each new domain filtered. So, for example, if another request for
www.othersite.comis filtered, no log message will be printed. But if a request forsomeothersite.comis filtered, a message will be printed (but only for the first request filtered).If the spider doesn’t define an
allowed_domainsattribute, or the attribute is empty, the offsite middleware will allow all requests.If the request has the
dont_filterattribute set, the offsite middleware will allow the request even if its domain is not listed in allowed domains.
RefererMiddleware
- class scrapy.spidermiddlewares.referer.RefererMiddleware[source]
Populates Request
Refererheader, based on the URL of the Response which generated it.
RefererMiddleware settings
Default: True
Whether to enable referer middleware.
Default: 'scrapy.spidermiddlewares.referer.DefaultReferrerPolicy'
Referrer Policy to apply when populating Request “Referer” header.
Note
You can also set the Referrer Policy per request,
using the special "referrer_policy" Request.meta key,
with the same acceptable values as for the REFERRER_POLICY setting.
either a path to a
scrapy.spidermiddlewares.referer.ReferrerPolicysubclass — a custom policy or one of the built-in ones (see classes below),or one of the standard W3C-defined string values,
or the special
"scrapy-default".
String value |
Class name (as a string) |
|---|---|
|
|
|
|
|
|
|
|
- class scrapy.spidermiddlewares.referer.DefaultReferrerPolicy[source]
A variant of “no-referrer-when-downgrade”, with the addition that “Referer” is not sent if the parent request was using
file://ors3://scheme.
Warning
Scrapy’s default referrer policy — just like “no-referrer-when-downgrade”,
the W3C-recommended value for browsers — will send a non-empty
“Referer” header from any http(s):// to any https:// URL,
even if the domain is different.
“same-origin” may be a better choice if you want to remove referrer information for cross-domain requests.
- class scrapy.spidermiddlewares.referer.NoReferrerPolicy[source]
https://www.w3.org/TR/referrer-policy/#referrer-policy-no-referrer
The simplest policy is “no-referrer”, which specifies that no referrer information is to be sent along with requests made from a particular request client to any origin. The header will be omitted entirely.
- class scrapy.spidermiddlewares.referer.NoReferrerWhenDowngradePolicy[source]
https://www.w3.org/TR/referrer-policy/#referrer-policy-no-referrer-when-downgrade
The “no-referrer-when-downgrade” policy sends a full URL along with requests from a TLS-protected environment settings object to a potentially trustworthy URL, and requests from clients which are not TLS-protected to any origin.
Requests from TLS-protected clients to non-potentially trustworthy URLs, on the other hand, will contain no referrer information. A Referer HTTP header will not be sent.
This is a user agent’s default behavior, if no policy is otherwise specified.
Note
“no-referrer-when-downgrade” policy is the W3C-recommended default, and is used by major web browsers.
However, it is NOT Scrapy’s default referrer policy (see DefaultReferrerPolicy).
- class scrapy.spidermiddlewares.referer.SameOriginPolicy[source]
https://www.w3.org/TR/referrer-policy/#referrer-policy-same-origin
The “same-origin” policy specifies that a full URL, stripped for use as a referrer, is sent as referrer information when making same-origin requests from a particular request client.
Cross-origin requests, on the other hand, will contain no referrer information. A Referer HTTP header will not be sent.
- class scrapy.spidermiddlewares.referer.OriginPolicy[source]
https://www.w3.org/TR/referrer-policy/#referrer-policy-origin
The “origin” policy specifies that only the ASCII serialization of the origin of the request client is sent as referrer information when making both same-origin requests and cross-origin requests from a particular request client.
- class scrapy.spidermiddlewares.referer.StrictOriginPolicy[source]
https://www.w3.org/TR/referrer-policy/#referrer-policy-strict-origin
The “strict-origin” policy sends the ASCII serialization of the origin of the request client when making requests: - from a TLS-protected environment settings object to a potentially trustworthy URL, and - from non-TLS-protected environment settings objects to any origin.
Requests from TLS-protected request clients to non- potentially trustworthy URLs, on the other hand, will contain no referrer information. A Referer HTTP header will not be sent.
- class scrapy.spidermiddlewares.referer.OriginWhenCrossOriginPolicy[source]
https://www.w3.org/TR/referrer-policy/#referrer-policy-origin-when-cross-origin
The “origin-when-cross-origin” policy specifies that a full URL, stripped for use as a referrer, is sent as referrer information when making same-origin requests from a particular request client, and only the ASCII serialization of the origin of the request client is sent as referrer information when making cross-origin requests from a particular request client.
- class scrapy.spidermiddlewares.referer.StrictOriginWhenCrossOriginPolicy[source]
https://www.w3.org/TR/referrer-policy/#referrer-policy-strict-origin-when-cross-origin
The “strict-origin-when-cross-origin” policy specifies that a full URL, stripped for use as a referrer, is sent as referrer information when making same-origin requests from a particular request client, and only the ASCII serialization of the origin of the request client when making cross-origin requests:
from a TLS-protected environment settings object to a potentially trustworthy URL, and
from non-TLS-protected environment settings objects to any origin.
Requests from TLS-protected clients to non- potentially trustworthy URLs, on the other hand, will contain no referrer information. A Referer HTTP header will not be sent.
- class scrapy.spidermiddlewares.referer.UnsafeUrlPolicy[source]
https://www.w3.org/TR/referrer-policy/#referrer-policy-unsafe-url
The “unsafe-url” policy specifies that a full URL, stripped for use as a referrer, is sent along with both cross-origin requests and same-origin requests made from a particular request client.
Note: The policy’s name doesn’t lie; it is unsafe. This policy will leak origins and paths from TLS-protected resources to insecure origins. Carefully consider the impact of setting such a policy for potentially sensitive documents.
Warning
“unsafe-url” policy is NOT recommended.
UrlLengthMiddleware
- class scrapy.spidermiddlewares.urllength.UrlLengthMiddleware[source]
Filters out requests with URLs longer than URLLENGTH_LIMIT
The
UrlLengthMiddlewarecan be configured through the following settings (see the settings documentation for more info):URLLENGTH_LIMIT- The maximum URL length to allow for crawled URLs.
Extensions
The extensions framework provides a mechanism for inserting your own custom functionality into Scrapy.
Extensions are just regular classes.
Extension settings
Extensions use the Scrapy settings to manage their settings, just like any other Scrapy code.
It is customary for extensions to prefix their settings with their own name, to
avoid collision with existing (and future) extensions. For example, a
hypothetic extension to handle Google Sitemaps would use settings like
GOOGLESITEMAP_ENABLED, GOOGLESITEMAP_DEPTH, and so on.
Loading & activating extensions
Extensions are loaded and activated at startup by instantiating a single
instance of the extension class per spider being run. All the extension
initialization code must be performed in the class __init__ method.
To make an extension available, add it to the EXTENSIONS setting in
your Scrapy settings. In EXTENSIONS, each extension is represented
by a string: the full Python path to the extension’s class name. For example:
EXTENSIONS = {
'scrapy.extensions.corestats.CoreStats': 500,
'scrapy.extensions.telnet.TelnetConsole': 500,
}
As you can see, the EXTENSIONS setting is a dict where the keys are
the extension paths, and their values are the orders, which define the
extension loading order. The EXTENSIONS setting is merged with the
EXTENSIONS_BASE setting defined in Scrapy (and not meant to be
overridden) and then sorted by order to get the final sorted list of enabled
extensions.
As extensions typically do not depend on each other, their loading order is
irrelevant in most cases. This is why the EXTENSIONS_BASE setting
defines all extensions with the same order (0). However, this feature can
be exploited if you need to add an extension which depends on other extensions
already loaded.
Available, enabled and disabled extensions
Not all available extensions will be enabled. Some of them usually depend on a
particular setting. For example, the HTTP Cache extension is available by default
but disabled unless the HTTPCACHE_ENABLED setting is set.
Disabling an extension
In order to disable an extension that comes enabled by default (i.e. those
included in the EXTENSIONS_BASE setting) you must set its order to
None. For example:
EXTENSIONS = {
'scrapy.extensions.corestats.CoreStats': None,
}
Writing your own extension
Each extension is a Python class. The main entry point for a Scrapy extension
(this also includes middlewares and pipelines) is the from_crawler
class method which receives a Crawler instance. Through the Crawler object
you can access settings, signals, stats, and also control the crawling behaviour.
Typically, extensions connect to signals and perform tasks triggered by them.
Finally, if the from_crawler method raises the
NotConfigured exception, the extension will be
disabled. Otherwise, the extension will be enabled.
Sample extension
Here we will implement a simple extension to illustrate the concepts described in the previous section. This extension will log a message every time:
a spider is opened
a spider is closed
a specific number of items are scraped
The extension will be enabled through the MYEXT_ENABLED setting and the
number of items will be specified through the MYEXT_ITEMCOUNT setting.
Here is the code of such extension:
import logging
from scrapy import signals
from scrapy.exceptions import NotConfigured
logger = logging.getLogger(__name__)
class SpiderOpenCloseLogging:
def __init__(self, item_count):
self.item_count = item_count
self.items_scraped = 0
@classmethod
def from_crawler(cls, crawler):
# first check if the extension should be enabled and raise
# NotConfigured otherwise
if not crawler.settings.getbool('MYEXT_ENABLED'):
raise NotConfigured
# get the number of items from settings
item_count = crawler.settings.getint('MYEXT_ITEMCOUNT', 1000)
# instantiate the extension object
ext = cls(item_count)
# connect the extension object to signals
crawler.signals.connect(ext.spider_opened, signal=signals.spider_opened)
crawler.signals.connect(ext.spider_closed, signal=signals.spider_closed)
crawler.signals.connect(ext.item_scraped, signal=signals.item_scraped)
# return the extension object
return ext
def spider_opened(self, spider):
logger.info("opened spider %s", spider.name)
def spider_closed(self, spider):
logger.info("closed spider %s", spider.name)
def item_scraped(self, item, spider):
self.items_scraped += 1
if self.items_scraped % self.item_count == 0:
logger.info("scraped %d items", self.items_scraped)
Built-in extensions reference
General purpose extensions
Log Stats extension
Log basic stats like crawled pages and scraped items.
Core Stats extension
Enable the collection of core statistics, provided the stats collection is enabled (see Stats Collection).
Telnet console extension
Provides a telnet console for getting into a Python interpreter inside the currently running Scrapy process, which can be very useful for debugging.
The telnet console must be enabled by the TELNETCONSOLE_ENABLED
setting, and the server will listen in the port specified in
TELNETCONSOLE_PORT.
Memory usage extension
Note
This extension does not work in Windows.
Monitors the memory used by the Scrapy process that runs the spider and:
sends a notification e-mail when it exceeds a certain value
closes the spider when it exceeds a certain value
The notification e-mails can be triggered when a certain warning value is
reached (MEMUSAGE_WARNING_MB) and when the maximum value is reached
(MEMUSAGE_LIMIT_MB) which will also cause the spider to be closed
and the Scrapy process to be terminated.
This extension is enabled by the MEMUSAGE_ENABLED setting and
can be configured with the following settings:
Memory debugger extension
An extension for debugging memory usage. It collects information about:
objects uncollected by the Python garbage collector
objects left alive that shouldn’t. For more info, see Debugging memory leaks with trackref
To enable this extension, turn on the MEMDEBUG_ENABLED setting. The
info will be stored in the stats.
Close spider extension
Closes a spider automatically when some conditions are met, using a specific closing reason for each condition.
The conditions for closing a spider can be configured through the following settings:
Note
When a certain closing condition is met, requests which are
currently in the downloader queue (up to CONCURRENT_REQUESTS
requests) are still processed.
Default: 0
An integer which specifies a number of seconds. If the spider remains open for
more than that number of second, it will be automatically closed with the
reason closespider_timeout. If zero (or non set), spiders won’t be closed by
timeout.
Default: 0
An integer which specifies a number of items. If the spider scrapes more than
that amount and those items are passed by the item pipeline, the
spider will be closed with the reason closespider_itemcount.
If zero (or non set), spiders won’t be closed by number of passed items.
Default: 0
An integer which specifies the maximum number of responses to crawl. If the spider
crawls more than that, the spider will be closed with the reason
closespider_pagecount. If zero (or non set), spiders won’t be closed by
number of crawled responses.
Default: 0
An integer which specifies the maximum number of errors to receive before
closing the spider. If the spider generates more than that number of errors,
it will be closed with the reason closespider_errorcount. If zero (or non
set), spiders won’t be closed by number of errors.
StatsMailer extension
This simple extension can be used to send a notification e-mail every time a
domain has finished scraping, including the Scrapy stats collected. The email
will be sent to all recipients specified in the STATSMAILER_RCPTS
setting.
Emails can be sent using the MailSender class. To see a
full list of parameters, including examples on how to instantiate
MailSender and use mail settings, see
Sending e-mail.
Debugging extensions
Stack trace dump extension
Dumps information about the running process when a SIGQUIT or SIGUSR2 signal is received. The information dumped is the following:
engine status (using
scrapy.utils.engine.get_engine_status())live references (see Debugging memory leaks with trackref)
stack trace of all threads
After the stack trace and engine status is dumped, the Scrapy process continues running normally.
This extension only works on POSIX-compliant platforms (i.e. not Windows), because the SIGQUIT and SIGUSR2 signals are not available on Windows.
There are at least two ways to send Scrapy the SIGQUIT signal:
By pressing Ctrl-while a Scrapy process is running (Linux only?)
By running this command (assuming
<pid>is the process id of the Scrapy process):kill -QUIT <pid>
Debugger extension
Invokes a Python debugger inside a running Scrapy process when a SIGUSR2 signal is received. After the debugger is exited, the Scrapy process continues running normally.
For more info see Debugging in Python.
This extension only works on POSIX-compliant platforms (i.e. not Windows).
Core API
This section documents the Scrapy core API, and it’s intended for developers of extensions and middlewares.
Crawler API
The main entry point to Scrapy API is the Crawler
object, passed to extensions through the from_crawler class method. This
object provides access to all Scrapy core components, and it’s the only way for
extensions to access them and hook their functionality into Scrapy.
The Extension Manager is responsible for loading and keeping track of installed
extensions and it’s configured through the EXTENSIONS setting which
contains a dictionary of all available extensions and their order similar to
how you configure the downloader middlewares.
- class scrapy.crawler.Crawler(spidercls, settings)[source]
The Crawler object must be instantiated with a
scrapy.Spidersubclass and ascrapy.settings.Settingsobject.- settings
The settings manager of this crawler.
This is used by extensions & middlewares to access the Scrapy settings of this crawler.
For an introduction on Scrapy settings see Settings.
For the API see
Settingsclass.
- signals
The signals manager of this crawler.
This is used by extensions & middlewares to hook themselves into Scrapy functionality.
For an introduction on signals see Signals.
For the API see
SignalManagerclass.
- stats
The stats collector of this crawler.
This is used from extensions & middlewares to record stats of their behaviour, or access stats collected by other extensions.
For an introduction on stats collection see Stats Collection.
For the API see
StatsCollectorclass.
- extensions
The extension manager that keeps track of enabled extensions.
Most extensions won’t need to access this attribute.
For an introduction on extensions and a list of available extensions on Scrapy see Extensions.
- engine
The execution engine, which coordinates the core crawling logic between the scheduler, downloader and spiders.
Some extension may want to access the Scrapy engine, to inspect or modify the downloader and scheduler behaviour, although this is an advanced use and this API is not yet stable.
- spider
Spider currently being crawled. This is an instance of the spider class provided while constructing the crawler, and it is created after the arguments given in the
crawl()method.
- class scrapy.crawler.CrawlerRunner(settings=None)[source]
This is a convenient helper class that keeps track of, manages and runs crawlers inside an already setup
reactor.The CrawlerRunner object must be instantiated with a
Settingsobject.This class shouldn’t be needed (since Scrapy is responsible of using it accordingly) unless writing scripts that manually handle the crawling process. See Run Scrapy from a script for an example.
- crawl(crawler_or_spidercls, *args, **kwargs)[source]
Run a crawler with the provided arguments.
It will call the given Crawler’s
crawl()method, while keeping track of it so it can be stopped later.If
crawler_or_spiderclsisn’t aCrawlerinstance, this method will try to create one using this parameter as the spider class given to it.Returns a deferred that is fired when the crawling is finished.
- create_crawler(crawler_or_spidercls)[source]
Return a
Crawlerobject.If
crawler_or_spiderclsis a Crawler, it is returned as-is.If
crawler_or_spiderclsis a Spider subclass, a new Crawler is constructed for it.If
crawler_or_spiderclsis a string, this function finds a spider with this name in a Scrapy project (using spider loader), then creates a Crawler instance for it.
- class scrapy.crawler.CrawlerProcess(settings=None, install_root_handler=True)[source]
Bases:
scrapy.crawler.CrawlerRunnerA class to run multiple scrapy crawlers in a process simultaneously.
This class extends
CrawlerRunnerby adding support for starting areactorand handling shutdown signals, like the keyboard interrupt command Ctrl-C. It also configures top-level logging.This utility should be a better fit than
CrawlerRunnerif you aren’t running anotherreactorwithin your application.The CrawlerProcess object must be instantiated with a
Settingsobject.- Parameters
install_root_handler – whether to install root logging handler (default: True)
This class shouldn’t be needed (since Scrapy is responsible of using it accordingly) unless writing scripts that manually handle the crawling process. See Run Scrapy from a script for an example.
- crawl(crawler_or_spidercls, *args, **kwargs)
Run a crawler with the provided arguments.
It will call the given Crawler’s
crawl()method, while keeping track of it so it can be stopped later.If
crawler_or_spiderclsisn’t aCrawlerinstance, this method will try to create one using this parameter as the spider class given to it.Returns a deferred that is fired when the crawling is finished.
- create_crawler(crawler_or_spidercls)
Return a
Crawlerobject.If
crawler_or_spiderclsis a Crawler, it is returned as-is.If
crawler_or_spiderclsis a Spider subclass, a new Crawler is constructed for it.If
crawler_or_spiderclsis a string, this function finds a spider with this name in a Scrapy project (using spider loader), then creates a Crawler instance for it.
- start(stop_after_crawl=True, install_signal_handlers=True)[source]
This method starts a
reactor, adjusts its pool size toREACTOR_THREADPOOL_MAXSIZE, and installs a DNS cache based onDNSCACHE_ENABLEDandDNSCACHE_SIZE.If
stop_after_crawlis True, the reactor will be stopped after all crawlers have finished, usingjoin().
- stop()
Stops simultaneously all the crawling jobs taking place.
Returns a deferred that is fired when they all have ended.
Settings API
- scrapy.settings.SETTINGS_PRIORITIES
Dictionary that sets the key name and priority level of the default settings priorities used in Scrapy.
Each item defines a settings entry point, giving it a code name for identification and an integer priority. Greater priorities take more precedence over lesser ones when setting and retrieving values in the
Settingsclass.SETTINGS_PRIORITIES = { 'default': 0, 'command': 10, 'project': 20, 'spider': 30, 'cmdline': 40, }
For a detailed explanation on each settings sources, see: Settings.
- scrapy.settings.get_settings_priority(priority)[source]
Small helper function that looks up a given string priority in the
SETTINGS_PRIORITIESdictionary and returns its numerical value, or directly returns a given numerical priority.
- class scrapy.settings.Settings(values=None, priority='project')[source]
Bases:
scrapy.settings.BaseSettingsThis object stores Scrapy settings for the configuration of internal components, and can be used for any further customization.
It is a direct subclass and supports all methods of
BaseSettings. Additionally, after instantiation of this class, the new object will have the global default settings described on Built-in settings reference already populated.
- class scrapy.settings.BaseSettings(values=None, priority='project')[source]
Instances of this class behave like dictionaries, but store priorities along with their
(key, value)pairs, and can be frozen (i.e. marked immutable).Key-value entries can be passed on initialization with the
valuesargument, and they would take theprioritylevel (unlessvaluesis already an instance ofBaseSettings, in which case the existing priority levels will be kept). If thepriorityargument is a string, the priority name will be looked up inSETTINGS_PRIORITIES. Otherwise, a specific integer should be provided.Once the object is created, new settings can be loaded or updated with the
set()method, and can be accessed with the square bracket notation of dictionaries, or with theget()method of the instance and its value conversion variants. When requesting a stored key, the value with the highest priority will be retrieved.- copy()[source]
Make a deep copy of current settings.
This method returns a new instance of the
Settingsclass, populated with the same values and their priorities.Modifications to the new object won’t be reflected on the original settings.
- copy_to_dict()[source]
Make a copy of current settings and convert to a dict.
This method returns a new dict populated with the same values and their priorities as the current settings.
Modifications to the returned dict won’t be reflected on the original settings.
This method can be useful for example for printing settings in Scrapy shell.
- freeze()[source]
Disable further changes to the current settings.
After calling this method, the present state of the settings will become immutable. Trying to change values through the
set()method and its variants won’t be possible and will be alerted.
- getbool(name, default=False)[source]
Get a setting value as a boolean.
1,'1', True` and'True'returnTrue, while0,'0',False,'False'andNonereturnFalse.For example, settings populated through environment variables set to
'0'will returnFalsewhen using this method.
- getdict(name, default=None)[source]
Get a setting value as a dictionary. If the setting original type is a dictionary, a copy of it will be returned. If it is a string it will be evaluated as a JSON dictionary. In the case that it is a
BaseSettingsinstance itself, it will be converted to a dictionary, containing all its current settings values as they would be returned byget(), and losing all information about priority and mutability.
- getlist(name, default=None)[source]
Get a setting value as a list. If the setting original type is a list, a copy of it will be returned. If it’s a string it will be split by “,”.
For example, settings populated through environment variables set to
'one,two'will return a list [‘one’, ‘two’] when using this method.
- getpriority(name)[source]
Return the current numerical priority value of a setting, or
Noneif the givennamedoes not exist.- Parameters
name (str) – the setting name
- getwithbase(name)[source]
Get a composition of a dictionary-like setting and its _BASE counterpart.
- Parameters
name (str) – name of the dictionary-like setting
- maxpriority()[source]
Return the numerical value of the highest priority present throughout all settings, or the numerical value for
defaultfromSETTINGS_PRIORITIESif there are no settings stored.
- set(name, value, priority='project')[source]
Store a key/value attribute with a given priority.
Settings should be populated before configuring the Crawler object (through the
configure()method), otherwise they won’t have any effect.- Parameters
name (str) – the setting name
value (object) – the value to associate with the setting
priority (str or int) – the priority of the setting. Should be a key of
SETTINGS_PRIORITIESor an integer
- setmodule(module, priority='project')[source]
Store settings from a module with a given priority.
This is a helper function that calls
set()for every globally declared uppercase variable ofmodulewith the providedpriority.- Parameters
module (types.ModuleType or str) – the module or the path of the module
priority (str or int) – the priority of the settings. Should be a key of
SETTINGS_PRIORITIESor an integer
- update(values, priority='project')[source]
Store key/value pairs with a given priority.
This is a helper function that calls
set()for every item ofvalueswith the providedpriority.If
valuesis a string, it is assumed to be JSON-encoded and parsed into a dict withjson.loads()first. If it is aBaseSettingsinstance, the per-key priorities will be used and thepriorityparameter ignored. This allows inserting/updating settings with different priorities with a single command.- Parameters
values (dict or string or
BaseSettings) – the settings names and valuespriority (str or int) – the priority of the settings. Should be a key of
SETTINGS_PRIORITIESor an integer
SpiderLoader API
- class scrapy.spiderloader.SpiderLoader[source]
This class is in charge of retrieving and handling the spider classes defined across the project.
Custom spider loaders can be employed by specifying their path in the
SPIDER_LOADER_CLASSproject setting. They must fully implement thescrapy.interfaces.ISpiderLoaderinterface to guarantee an errorless execution.- from_settings(settings)[source]
This class method is used by Scrapy to create an instance of the class. It’s called with the current project settings, and it loads the spiders found recursively in the modules of the
SPIDER_MODULESsetting.- Parameters
settings (
Settingsinstance) – project settings
Signals API
- class scrapy.signalmanager.SignalManager(sender=_Anonymous)[source]
- connect(receiver, signal, **kwargs)[source]
Connect a receiver function to a signal.
The signal can be any object, although Scrapy comes with some predefined signals that are documented in the Signals section.
- Parameters
receiver (collections.abc.Callable) – the function to be connected
signal (object) – the signal to connect to
- disconnect(receiver, signal, **kwargs)[source]
Disconnect a receiver function from a signal. This has the opposite effect of the
connect()method, and the arguments are the same.
- disconnect_all(signal, **kwargs)[source]
Disconnect all receivers from the given signal.
- Parameters
signal (object) – the signal to disconnect from
- send_catch_log(signal, **kwargs)[source]
Send a signal, catch exceptions and log them.
The keyword arguments are passed to the signal handlers (connected through the
connect()method).
- send_catch_log_deferred(signal, **kwargs)[source]
Like
send_catch_log()but supports returningDeferredobjects from signal handlers.Returns a Deferred that gets fired once all signal handlers deferreds were fired. Send a signal, catch exceptions and log them.
The keyword arguments are passed to the signal handlers (connected through the
connect()method).
Stats Collector API
There are several Stats Collectors available under the
scrapy.statscollectors module and they all implement the Stats
Collector API defined by the StatsCollector
class (which they all inherit from).
- class scrapy.statscollectors.StatsCollector[source]
- get_value(key, default=None)[source]
Return the value for the given stats key or default if it doesn’t exist.
- inc_value(key, count=1, start=0)[source]
Increment the value of the given stats key, by the given count, assuming the start value given (when it’s not set).
- max_value(key, value)[source]
Set the given value for the given key only if current value for the same key is lower than value. If there is no current value for the given key, the value is always set.
- min_value(key, value)[source]
Set the given value for the given key only if current value for the same key is greater than value. If there is no current value for the given key, the value is always set.
The following methods are not part of the stats collection api but instead used when implementing custom stats collectors:
Signals
Scrapy uses signals extensively to notify when certain events occur. You can catch some of those signals in your Scrapy project (using an extension, for example) to perform additional tasks or extend Scrapy to add functionality not provided out of the box.
Even though signals provide several arguments, the handlers that catch them don’t need to accept all of them - the signal dispatching mechanism will only deliver the arguments that the handler receives.
You can connect to signals (or send your own) through the Signals API.
Here is a simple example showing how you can catch signals and perform some action:
from scrapy import signals
from scrapy import Spider
class DmozSpider(Spider):
name = "dmoz"
allowed_domains = ["dmoz.org"]
start_urls = [
"http://www.dmoz.org/Computers/Programming/Languages/Python/Books/",
"http://www.dmoz.org/Computers/Programming/Languages/Python/Resources/",
]
@classmethod
def from_crawler(cls, crawler, *args, **kwargs):
spider = super(DmozSpider, cls).from_crawler(crawler, *args, **kwargs)
crawler.signals.connect(spider.spider_closed, signal=signals.spider_closed)
return spider
def spider_closed(self, spider):
spider.logger.info('Spider closed: %s', spider.name)
def parse(self, response):
pass
Deferred signal handlers
Some signals support returning Deferred
objects from their handlers, allowing you to run asynchronous code that
does not block Scrapy. If a signal handler returns a
Deferred, Scrapy waits for that
Deferred to fire.
Let’s take an example:
class SignalSpider(scrapy.Spider):
name = 'signals'
start_urls = ['https://quotes.toscrape.com/page/1/']
@classmethod
def from_crawler(cls, crawler, *args, **kwargs):
spider = super(SignalSpider, cls).from_crawler(crawler, *args, **kwargs)
crawler.signals.connect(spider.item_scraped, signal=signals.item_scraped)
return spider
def item_scraped(self, item):
# Send the scraped item to the server
d = treq.post(
'http://example.com/post',
json.dumps(item).encode('ascii'),
headers={b'Content-Type': [b'application/json']}
)
# The next item will be scraped only after
# deferred (d) is fired
return d
def parse(self, response):
for quote in response.css('div.quote'):
yield {
'text': quote.css('span.text::text').get(),
'author': quote.css('small.author::text').get(),
'tags': quote.css('div.tags a.tag::text').getall(),
}
See the Built-in signals reference below to know which signals support
Deferred.
Built-in signals reference
Here’s the list of Scrapy built-in signals and their meaning.
Engine signals
engine_started
- scrapy.signals.engine_started()
Sent when the Scrapy engine has started crawling.
This signal supports returning deferreds from its handlers.
Note
This signal may be fired after the spider_opened signal,
depending on how the spider was started. So don’t rely on this signal
getting fired before spider_opened.
engine_stopped
- scrapy.signals.engine_stopped()
Sent when the Scrapy engine is stopped (for example, when a crawling process has finished).
This signal supports returning deferreds from its handlers.
Item signals
Note
As at max CONCURRENT_ITEMS items are processed in
parallel, many deferreds are fired together using
DeferredList. Hence the next
batch waits for the DeferredList
to fire and then runs the respective item signal handler for
the next batch of scraped items.
item_scraped
- scrapy.signals.item_scraped(item, response, spider)
Sent when an item has been scraped, after it has passed all the Item Pipeline stages (without being dropped).
This signal supports returning deferreds from its handlers.
- Parameters
item (item object) – the scraped item
spider (
Spiderobject) – the spider which scraped the itemresponse (
Responseobject) – the response from where the item was scraped
item_dropped
- scrapy.signals.item_dropped(item, response, exception, spider)
Sent after an item has been dropped from the Item Pipeline when some stage raised a
DropItemexception.This signal supports returning deferreds from its handlers.
- Parameters
item (item object) – the item dropped from the Item Pipeline
spider (
Spiderobject) – the spider which scraped the itemresponse (
Responseobject) – the response from where the item was droppedexception (
DropItemexception) – the exception (which must be aDropItemsubclass) which caused the item to be dropped
item_error
- scrapy.signals.item_error(item, response, spider, failure)
Sent when a Item Pipeline generates an error (i.e. raises an exception), except
DropItemexception.This signal supports returning deferreds from its handlers.
- Parameters
item (item object) – the item that caused the error in the Item Pipeline
response (
Responseobject) – the response being processed when the exception was raisedspider (
Spiderobject) – the spider which raised the exceptionfailure (twisted.python.failure.Failure) – the exception raised
Spider signals
spider_closed
- scrapy.signals.spider_closed(spider, reason)
Sent after a spider has been closed. This can be used to release per-spider resources reserved on
spider_opened.This signal supports returning deferreds from its handlers.
- Parameters
spider (
Spiderobject) – the spider which has been closedreason (str) – a string which describes the reason why the spider was closed. If it was closed because the spider has completed scraping, the reason is
'finished'. Otherwise, if the spider was manually closed by calling theclose_spiderengine method, then the reason is the one passed in thereasonargument of that method (which defaults to'cancelled'). If the engine was shutdown (for example, by hitting Ctrl-C to stop it) the reason will be'shutdown'.
spider_opened
- scrapy.signals.spider_opened(spider)
Sent after a spider has been opened for crawling. This is typically used to reserve per-spider resources, but can be used for any task that needs to be performed when a spider is opened.
This signal supports returning deferreds from its handlers.
- Parameters
spider (
Spiderobject) – the spider which has been opened
spider_idle
- scrapy.signals.spider_idle(spider)
Sent when a spider has gone idle, which means the spider has no further:
requests waiting to be downloaded
requests scheduled
items being processed in the item pipeline
If the idle state persists after all handlers of this signal have finished, the engine starts closing the spider. After the spider has finished closing, the
spider_closedsignal is sent.You may raise a
DontCloseSpiderexception to prevent the spider from being closed.Alternatively, you may raise a
CloseSpiderexception to provide a custom spider closing reason. An idle handler is the perfect place to put some code that assesses the final spider results and update the final closing reason accordingly (e.g. setting it to ‘too_few_results’ instead of ‘finished’).This signal does not support returning deferreds from its handlers.
- Parameters
spider (
Spiderobject) – the spider which has gone idle
Note
Scheduling some requests in your spider_idle handler does
not guarantee that it can prevent the spider from being closed,
although it sometimes can. That’s because the spider may still remain idle
if all the scheduled requests are rejected by the scheduler (e.g. filtered
due to duplication).
spider_error
- scrapy.signals.spider_error(failure, response, spider)
Sent when a spider callback generates an error (i.e. raises an exception).
This signal does not support returning deferreds from its handlers.
- Parameters
failure (twisted.python.failure.Failure) – the exception raised
response (
Responseobject) – the response being processed when the exception was raisedspider (
Spiderobject) – the spider which raised the exception
Request signals
request_scheduled
- scrapy.signals.request_scheduled(request, spider)
Sent when the engine schedules a
Request, to be downloaded later.This signal does not support returning deferreds from its handlers.
- Parameters
request (
Requestobject) – the request that reached the schedulerspider (
Spiderobject) – the spider that yielded the request
request_dropped
- scrapy.signals.request_dropped(request, spider)
Sent when a
Request, scheduled by the engine to be downloaded later, is rejected by the scheduler.This signal does not support returning deferreds from its handlers.
- Parameters
request (
Requestobject) – the request that reached the schedulerspider (
Spiderobject) – the spider that yielded the request
request_reached_downloader
- scrapy.signals.request_reached_downloader(request, spider)
Sent when a
Requestreached downloader.This signal does not support returning deferreds from its handlers.
- Parameters
request (
Requestobject) – the request that reached downloaderspider (
Spiderobject) – the spider that yielded the request
request_left_downloader
- scrapy.signals.request_left_downloader(request, spider)
New in version 2.0.
Sent when a
Requestleaves the downloader, even in case of failure.This signal does not support returning deferreds from its handlers.
- Parameters
request (
Requestobject) – the request that reached the downloaderspider (
Spiderobject) – the spider that yielded the request
bytes_received
New in version 2.2.
- scrapy.signals.bytes_received(data, request, spider)
Sent by the HTTP 1.1 and S3 download handlers when a group of bytes is received for a specific request. This signal might be fired multiple times for the same request, with partial data each time. For instance, a possible scenario for a 25 kb response would be two signals fired with 10 kb of data, and a final one with 5 kb of data.
Handlers for this signal can stop the download of a response while it is in progress by raising the
StopDownloadexception. Please refer to the Stopping the download of a Response topic for additional information and examples.This signal does not support returning deferreds from its handlers.
headers_received
New in version 2.5.
- scrapy.signals.headers_received(headers, body_length, request, spider)
Sent by the HTTP 1.1 and S3 download handlers when the response headers are available for a given request, before downloading any additional content.
Handlers for this signal can stop the download of a response while it is in progress by raising the
StopDownloadexception. Please refer to the Stopping the download of a Response topic for additional information and examples.This signal does not support returning deferreds from its handlers.
- Parameters
headers (
scrapy.http.headers.Headersobject) – the headers received by the download handlerbody_length (int) – expected size of the response body, in bytes
request (
Requestobject) – the request that generated the downloadspider (
Spiderobject) – the spider associated with the response
Response signals
response_received
- scrapy.signals.response_received(response, request, spider)
Sent when the engine receives a new
Responsefrom the downloader.This signal does not support returning deferreds from its handlers.
Note
The request argument might not contain the original request that
reached the downloader, if a Downloader Middleware modifies
the Response object and sets a specific request
attribute.
response_downloaded
- scrapy.signals.response_downloaded(response, request, spider)
Sent by the downloader right after a
HTTPResponseis downloaded.This signal does not support returning deferreds from its handlers.
Scheduler
The scheduler component receives requests from the engine and stores them into persistent and/or non-persistent data structures. It also gets those requests and feeds them back to the engine when it asks for a next request to be downloaded.
Overriding the default scheduler
You can use your own custom scheduler class by supplying its full
Python path in the SCHEDULER setting.
Minimal scheduler interface
- class scrapy.core.scheduler.BaseScheduler[source]
The scheduler component is responsible for storing requests received from the engine, and feeding them back upon request (also to the engine).
The original sources of said requests are:
Spider:
start_requestsmethod, requests created for URLs in thestart_urlsattribute, request callbacksSpider middleware:
process_spider_outputandprocess_spider_exceptionmethodsDownloader middleware:
process_request,process_responseandprocess_exceptionmethods
The order in which the scheduler returns its stored requests (via the
next_requestmethod) plays a great part in determining the order in which those requests are downloaded.The methods defined in this class constitute the minimal interface that the Scrapy engine will interact with.
- close(reason: str) Optional[twisted.internet.defer.Deferred][source]
Called when the spider is closed by the engine. It receives the reason why the crawl finished as argument and it’s useful to execute cleaning code.
- Parameters
reason (
str) – a string which describes the reason why the spider was closed
- abstract enqueue_request(request: scrapy.http.request.Request) bool[source]
Process a request received by the engine.
Return
Trueif the request is stored correctly,Falseotherwise.If
False, the engine will fire arequest_droppedsignal, and will not make further attempts to schedule the request at a later time. For reference, the default Scrapy scheduler returnsFalsewhen the request is rejected by the dupefilter.
- classmethod from_crawler(crawler: scrapy.crawler.Crawler)[source]
Factory method which receives the current
Crawlerobject as argument.
- abstract has_pending_requests() bool[source]
Trueif the scheduler has enqueued requests,Falseotherwise
- abstract next_request() Optional[scrapy.http.request.Request][source]
Return the next
Requestto be processed, orNoneto indicate that there are no requests to be considered ready at the moment.Returning
Noneimplies that no request from the scheduler will be sent to the downloader in the current reactor cycle. The engine will continue callingnext_requestuntilhas_pending_requestsisFalse.
- open(spider: scrapy.spiders.Spider) Optional[twisted.internet.defer.Deferred][source]
Called when the spider is opened by the engine. It receives the spider instance as argument and it’s useful to execute initialization code.
- Parameters
spider (
Spider) – the spider object for the current crawl
Default Scrapy scheduler
- class scrapy.core.scheduler.Scheduler(dupefilter, jobdir: Optional[str] = None, dqclass=None, mqclass=None, logunser: bool = False, stats=None, pqclass=None, crawler: Optional[scrapy.crawler.Crawler] = None)[source]
Default Scrapy scheduler. This implementation also handles duplication filtering via the
dupefilter.This scheduler stores requests into several priority queues (defined by the
SCHEDULER_PRIORITY_QUEUEsetting). In turn, said priority queues are backed by either memory or disk based queues (respectively defined by theSCHEDULER_MEMORY_QUEUEandSCHEDULER_DISK_QUEUEsettings).Request prioritization is almost entirely delegated to the priority queue. The only prioritization performed by this scheduler is using the disk-based queue if present (i.e. if the
JOBDIRsetting is defined) and falling back to the memory-based queue if a serialization error occurs. If the disk queue is not present, the memory one is used directly.- Parameters
dupefilter (
scrapy.dupefilters.BaseDupeFilterinstance or similar: any class that implements the BaseDupeFilter interface) – An object responsible for checking and filtering duplicate requests. The value for theDUPEFILTER_CLASSsetting is used by default.jobdir (
strorNone) – The path of a directory to be used for persisting the crawl’s state. The value for theJOBDIRsetting is used by default. See Jobs: pausing and resuming crawls.dqclass (class) – A class to be used as persistent request queue. The value for the
SCHEDULER_DISK_QUEUEsetting is used by default.mqclass (class) – A class to be used as non-persistent request queue. The value for the
SCHEDULER_MEMORY_QUEUEsetting is used by default.logunser (bool) – A boolean that indicates whether or not unserializable requests should be logged. The value for the
SCHEDULER_DEBUGsetting is used by default.stats (
scrapy.statscollectors.StatsCollectorinstance or similar: any class that implements the StatsCollector interface) – A stats collector object to record stats about the request scheduling process. The value for theSTATS_CLASSsetting is used by default.pqclass (class) – A class to be used as priority queue for requests. The value for the
SCHEDULER_PRIORITY_QUEUEsetting is used by default.crawler (
scrapy.crawler.Crawler) – The crawler object corresponding to the current crawl.
- close(reason: str) Optional[twisted.internet.defer.Deferred][source]
dump pending requests to disk if there is a disk queue
return the result of the dupefilter’s
closemethod
- enqueue_request(request: scrapy.http.request.Request) bool[source]
Unless the received request is filtered out by the Dupefilter, attempt to push it into the disk queue, falling back to pushing it into the memory queue.
Increment the appropriate stats, such as:
scheduler/enqueued,scheduler/enqueued/disk,scheduler/enqueued/memory.Return
Trueif the request was stored successfully,Falseotherwise.
- classmethod from_crawler(crawler) scrapy.core.scheduler.SchedulerTV[source]
Factory method, initializes the scheduler with arguments taken from the crawl settings
- next_request() Optional[scrapy.http.request.Request][source]
Return a
Requestobject from the memory queue, falling back to the disk queue if the memory queue is empty. ReturnNoneif there are no more enqueued requests.Increment the appropriate stats, such as:
scheduler/dequeued,scheduler/dequeued/disk,scheduler/dequeued/memory.
- open(spider: scrapy.spiders.Spider) Optional[twisted.internet.defer.Deferred][source]
initialize the memory queue
initialize the disk queue if the
jobdirattribute is a valid directoryreturn the result of the dupefilter’s
openmethod
Item Exporters
Once you have scraped your items, you often want to persist or export those items, to use the data in some other application. That is, after all, the whole purpose of the scraping process.
For this purpose Scrapy provides a collection of Item Exporters for different output formats, such as XML, CSV or JSON.
Using Item Exporters
If you are in a hurry, and just want to use an Item Exporter to output scraped data see the Feed exports. Otherwise, if you want to know how Item Exporters work or need more custom functionality (not covered by the default exports), continue reading below.
In order to use an Item Exporter, you must instantiate it with its required args. Each Item Exporter requires different arguments, so check each exporter documentation to be sure, in Built-in Item Exporters reference. After you have instantiated your exporter, you have to:
1. call the method start_exporting() in order to
signal the beginning of the exporting process
2. call the export_item() method for each item you want
to export
3. and finally call the finish_exporting() to signal
the end of the exporting process
Here you can see an Item Pipeline which uses multiple Item Exporters to group scraped items to different files according to the value of one of their fields:
from itemadapter import ItemAdapter
from scrapy.exporters import XmlItemExporter
class PerYearXmlExportPipeline:
"""Distribute items across multiple XML files according to their 'year' field"""
def open_spider(self, spider):
self.year_to_exporter = {}
def close_spider(self, spider):
for exporter, xml_file in self.year_to_exporter.values():
exporter.finish_exporting()
xml_file.close()
def _exporter_for_item(self, item):
adapter = ItemAdapter(item)
year = adapter['year']
if year not in self.year_to_exporter:
xml_file = open(f'{year}.xml', 'wb')
exporter = XmlItemExporter(xml_file)
exporter.start_exporting()
self.year_to_exporter[year] = (exporter, xml_file)
return self.year_to_exporter[year][0]
def process_item(self, item, spider):
exporter = self._exporter_for_item(item)
exporter.export_item(item)
return item
Serialization of item fields
By default, the field values are passed unmodified to the underlying serialization library, and the decision of how to serialize them is delegated to each particular serialization library.
However, you can customize how each field value is serialized before it is passed to the serialization library.
There are two ways to customize how a field will be serialized, which are described next.
1. Declaring a serializer in the field
If you use Item you can declare a serializer in the
field metadata. The serializer must be
a callable which receives a value and returns its serialized form.
Example:
import scrapy
def serialize_price(value):
return f'$ {str(value)}'
class Product(scrapy.Item):
name = scrapy.Field()
price = scrapy.Field(serializer=serialize_price)
2. Overriding the serialize_field() method
You can also override the serialize_field() method to
customize how your field value will be exported.
Make sure you call the base class serialize_field() method
after your custom code.
Example:
from scrapy.exporter import XmlItemExporter
class ProductXmlExporter(XmlItemExporter):
def serialize_field(self, field, name, value):
if name == 'price':
return f'$ {str(value)}'
return super().serialize_field(field, name, value)
Built-in Item Exporters reference
Here is a list of the Item Exporters bundled with Scrapy. Some of them contain output examples, which assume you’re exporting these two items:
Item(name='Color TV', price='1200')
Item(name='DVD player', price='200')
BaseItemExporter
- class scrapy.exporters.BaseItemExporter(fields_to_export=None, export_empty_fields=False, encoding='utf-8', indent=0, dont_fail=False)[source]
This is the (abstract) base class for all Item Exporters. It provides support for common features used by all (concrete) Item Exporters, such as defining what fields to export, whether to export empty fields, or which encoding to use.
These features can be configured through the
__init__method arguments which populate their respective instance attributes:fields_to_export,export_empty_fields,encoding,indent.New in version 2.0: The dont_fail parameter.
- serialize_field(field, name, value)[source]
Return the serialized value for the given field. You can override this method (in your custom Item Exporters) if you want to control how a particular field or value will be serialized/exported.
By default, this method looks for a serializer declared in the item field and returns the result of applying that serializer to the value. If no serializer is found, it returns the value unchanged.
- Parameters
field (
Fieldobject or adictinstance) – the field being serialized. If the source item object does not define field metadata, field is an emptydict.name (str) – the name of the field being serialized
value – the value being serialized
- start_exporting()[source]
Signal the beginning of the exporting process. Some exporters may use this to generate some required header (for example, the
XmlItemExporter). You must call this method before exporting any items.
- finish_exporting()[source]
Signal the end of the exporting process. Some exporters may use this to generate some required footer (for example, the
XmlItemExporter). You must always call this method after you have no more items to export.
- fields_to_export
A list with the name of the fields that will be exported, or
Noneif you want to export all fields. Defaults toNone.Some exporters (like
CsvItemExporter) respect the order of the fields defined in this attribute.When using item objects that do not expose all their possible fields, exporters that do not support exporting a different subset of fields per item will only export the fields found in the first item exported. Use
fields_to_exportto define all the fields to be exported.
- export_empty_fields
Whether to include empty/unpopulated item fields in the exported data. Defaults to
False. Some exporters (likeCsvItemExporter) ignore this attribute and always export all empty fields.This option is ignored for dict items.
- encoding
The output character encoding.
- indent
Amount of spaces used to indent the output on each level. Defaults to
0.indent=Noneselects the most compact representation, all items in the same line with no indentationindent<=0each item on its own line, no indentationindent>0each item on its own line, indented with the provided numeric value
PythonItemExporter
- class scrapy.exporters.PythonItemExporter(*, dont_fail=False, **kwargs)[source]
This is a base class for item exporters that extends
BaseItemExporterwith support for nested items.It serializes items to built-in Python types, so that any serialization library (e.g.
jsonor msgpack) can be used on top of it.
XmlItemExporter
- class scrapy.exporters.XmlItemExporter(file, item_element='item', root_element='items', **kwargs)[source]
Exports items in XML format to the specified file object.
- Parameters
The additional keyword arguments of this
__init__method are passed to theBaseItemExporter__init__method.A typical output of this exporter would be:
<?xml version="1.0" encoding="utf-8"?> <items> <item> <name>Color TV</name> <price>1200</price> </item> <item> <name>DVD player</name> <price>200</price> </item> </items>Unless overridden in the
serialize_field()method, multi-valued fields are exported by serializing each value inside a<value>element. This is for convenience, as multi-valued fields are very common.For example, the item:
Item(name=['John', 'Doe'], age='23')
Would be serialized as:
<?xml version="1.0" encoding="utf-8"?> <items> <item> <name> <value>John</value> <value>Doe</value> </name> <age>23</age> </item> </items>
CsvItemExporter
- class scrapy.exporters.CsvItemExporter(file, include_headers_line=True, join_multivalued=',', errors=None, **kwargs)[source]
Exports items in CSV format to the given file-like object. If the
fields_to_exportattribute is set, it will be used to define the CSV columns and their order. Theexport_empty_fieldsattribute has no effect on this exporter.- Parameters
file – the file-like object to use for exporting the data. Its
writemethod should acceptbytes(a disk file opened in binary mode, aio.BytesIOobject, etc)include_headers_line (str) – If enabled, makes the exporter output a header line with the field names taken from
BaseItemExporter.fields_to_exportor the first exported item fields.join_multivalued – The char (or chars) that will be used for joining multi-valued fields, if found.
errors (str) – The optional string that specifies how encoding and decoding errors are to be handled. For more information see
io.TextIOWrapper.
The additional keyword arguments of this
__init__method are passed to theBaseItemExporter__init__method, and the leftover arguments to thecsv.writer()function, so you can use anycsv.writer()function argument to customize this exporter.A typical output of this exporter would be:
product,price Color TV,1200 DVD player,200
PickleItemExporter
- class scrapy.exporters.PickleItemExporter(file, protocol=0, **kwargs)[source]
Exports items in pickle format to the given file-like object.
- Parameters
file – the file-like object to use for exporting the data. Its
writemethod should acceptbytes(a disk file opened in binary mode, aio.BytesIOobject, etc)protocol (int) – The pickle protocol to use.
For more information, see
pickle.The additional keyword arguments of this
__init__method are passed to theBaseItemExporter__init__method.Pickle isn’t a human readable format, so no output examples are provided.
PprintItemExporter
- class scrapy.exporters.PprintItemExporter(file, **kwargs)[source]
Exports items in pretty print format to the specified file object.
- Parameters
file – the file-like object to use for exporting the data. Its
writemethod should acceptbytes(a disk file opened in binary mode, aio.BytesIOobject, etc)
The additional keyword arguments of this
__init__method are passed to theBaseItemExporter__init__method.A typical output of this exporter would be:
{'name': 'Color TV', 'price': '1200'} {'name': 'DVD player', 'price': '200'}Longer lines (when present) are pretty-formatted.
JsonItemExporter
- class scrapy.exporters.JsonItemExporter(file, **kwargs)[source]
Exports items in JSON format to the specified file-like object, writing all objects as a list of objects. The additional
__init__method arguments are passed to theBaseItemExporter__init__method, and the leftover arguments to theJSONEncoder__init__method, so you can use anyJSONEncoder__init__method argument to customize this exporter.- Parameters
file – the file-like object to use for exporting the data. Its
writemethod should acceptbytes(a disk file opened in binary mode, aio.BytesIOobject, etc)
A typical output of this exporter would be:
[{"name": "Color TV", "price": "1200"}, {"name": "DVD player", "price": "200"}]Warning
JSON is very simple and flexible serialization format, but it doesn’t scale well for large amounts of data since incremental (aka. stream-mode) parsing is not well supported (if at all) among JSON parsers (on any language), and most of them just parse the entire object in memory. If you want the power and simplicity of JSON with a more stream-friendly format, consider using
JsonLinesItemExporterinstead, or splitting the output in multiple chunks.
JsonLinesItemExporter
- class scrapy.exporters.JsonLinesItemExporter(file, **kwargs)[source]
Exports items in JSON format to the specified file-like object, writing one JSON-encoded item per line. The additional
__init__method arguments are passed to theBaseItemExporter__init__method, and the leftover arguments to theJSONEncoder__init__method, so you can use anyJSONEncoder__init__method argument to customize this exporter.- Parameters
file – the file-like object to use for exporting the data. Its
writemethod should acceptbytes(a disk file opened in binary mode, aio.BytesIOobject, etc)
A typical output of this exporter would be:
{"name": "Color TV", "price": "1200"} {"name": "DVD player", "price": "200"}Unlike the one produced by
JsonItemExporter, the format produced by this exporter is well suited for serializing large amounts of data.
MarshalItemExporter
- Architecture overview
Understand the Scrapy architecture.
- Downloader Middleware
Customize how pages get requested and downloaded.
- Spider Middleware
Customize the input and output of your spiders.
- Extensions
Extend Scrapy with your custom functionality
- Core API
Use it on extensions and middlewares to extend Scrapy functionality
- Signals
See all available signals and how to work with them.
- Scheduler
Understand the scheduler component.
- Item Exporters
Quickly export your scraped items to a file (XML, CSV, etc).
All the rest
Release notes
Scrapy 2.6.1 (2022-03-01)
Fixes a regression introduced in 2.6.0 that would unset the request method when following redirects.
Scrapy 2.6.0 (2022-03-01)
Highlights:
Python 3.10 support
asyncio support is no longer considered experimental, and works out-of-the-box on Windows regardless of your Python version
Feed exports now support
pathlib.Pathoutput paths and per-feed item filtering and post-processing
Security bug fixes
When a
Requestobject with cookies defined gets a redirect response causing a newRequestobject to be scheduled, the cookies defined in the originalRequestobject are no longer copied into the newRequestobject.If you manually set the
Cookieheader on aRequestobject and the domain name of the redirect URL is not an exact match for the domain of the URL of the originalRequestobject, yourCookieheader is now dropped from the newRequestobject.The old behavior could be exploited by an attacker to gain access to your cookies. Please, see the cjvr-mfj7-j4j8 security advisory for more information.
Note
It is still possible to enable the sharing of cookies between different domains with a shared domain suffix (e.g.
example.comand any subdomain) by defining the shared domain suffix (e.g.example.com) as the cookie domain when defining your cookies. See the documentation of theRequestclass for more information.When the domain of a cookie, either received in the
Set-Cookieheader of a response or defined in aRequestobject, is set to a public suffix, the cookie is now ignored unless the cookie domain is the same as the request domain.The old behavior could be exploited by an attacker to inject cookies from a controlled domain into your cookiejar that could be sent to other domains not controlled by the attacker. Please, see the mfjm-vh54-3f96 security advisory for more information.
Modified requirements
The h2 dependency is now optional, only needed to enable HTTP/2 support. (issue 5113)
Backward-incompatible changes
The
formdataparameter ofFormRequest, if specified for a non-POST request, now overrides the URL query string, instead of being appended to it. (issue 2919, issue 3579)When a function is assigned to the
FEED_URI_PARAMSsetting, now the return value of that function, and not theparamsinput parameter, will determine the feed URI parameters, unless that return value isNone. (issue 4962, issue 4966)In
scrapy.core.engine.ExecutionEngine, methodscrawl(),download(),schedule(), andspider_is_idle()now raiseRuntimeErrorif called beforeopen_spider(). (issue 5090)These methods used to assume that
ExecutionEngine.slothad been defined by a prior call toopen_spider(), so they were raisingAttributeErrorinstead.If the API of the configured scheduler does not meet expectations,
TypeErroris now raised at startup time. Before, other exceptions would be raised at run time. (issue 3559)
Deprecation removals
scrapy.http.TextResponse.body_as_unicode, deprecated in Scrapy 2.2, has now been removed. (issue 5393)scrapy.item.BaseItem, deprecated in Scrapy 2.2, has now been removed. (issue 5398)scrapy.item.DictItem, deprecated in Scrapy 1.8, has now been removed. (issue 5398)scrapy.Spider.make_requests_from_url, deprecated in Scrapy 1.4, has now been removed. (issue 4178, issue 4356)
Deprecations
When a function is assigned to the
FEED_URI_PARAMSsetting, returningNoneor modifying theparamsinput parameter is now deprecated. Return a new dictionary instead. (issue 4962, issue 4966)scrapy.utils.reqseris deprecated. (issue 5130)Instead of
request_to_dict(), use the newRequest.to_dictmethod.Instead of
request_from_dict(), use the newscrapy.utils.request.request_from_dict()function.
In
scrapy.squeues, the following queue classes are deprecated:PickleFifoDiskQueueNonRequest,PickleLifoDiskQueueNonRequest,MarshalFifoDiskQueueNonRequest, andMarshalLifoDiskQueueNonRequest. You should instead use:PickleFifoDiskQueue,PickleLifoDiskQueue,MarshalFifoDiskQueue, andMarshalLifoDiskQueue. (issue 5117)Many aspects of
scrapy.core.engine.ExecutionEnginethat come from a time when this class could handle multipleSpiderobjects at a time have been deprecated. (issue 5090)The
has_capacity()method is deprecated.The
schedule()method is deprecated, usecrawl()ordownload()instead.The
open_spidersattribute is deprecated, usespiderinstead.The
spiderparameter is deprecated for the following methods:spider_is_idle()crawl()download()
Instead, call
open_spider()first to set theSpiderobject.
New features
You can now use item filtering to control which items are exported to each output feed. (issue 4575, issue 5178, issue 5161, issue 5203)
You can now apply post-processing to feeds, and built-in post-processing plugins are provided for output file compression. (issue 2174, issue 5168, issue 5190)
The
FEEDSsetting now supportspathlib.Pathobjects as keys. (issue 5383, issue 5384)Enabling asyncio while using Windows and Python 3.8 or later will automatically switch the asyncio event loop to one that allows Scrapy to work. See Windows-specific notes. (issue 4976, issue 5315)
The
genspidercommand now supports a start URL instead of a domain name. (issue 4439)scrapy.utils.defergained 2 new functions,deferred_to_future()andmaybe_deferred_to_future(), to help await on Deferreds when using the asyncio reactor. (issue 5288)Amazon S3 feed export storage gained support for temporary security credentials (
AWS_SESSION_TOKEN) and endpoint customization (AWS_ENDPOINT_URL). (issue 4998, issue 5210)New
LOG_FILE_APPENDsetting to allow truncating the log file. (issue 5279)Request.cookiesvalues that arebool,floatorintare cast tostr. (issue 5252, issue 5253)You may now raise
CloseSpiderfrom a handler of thespider_idlesignal to customize the reason why the spider is stopping. (issue 5191)When using
HttpProxyMiddleware, the proxy URL for non-HTTPS HTTP/1.1 requests no longer needs to include a URL scheme. (issue 4505, issue 4649)All built-in queues now expose a
peekmethod that returns the next queue object (likepop) but does not remove the returned object from the queue. (issue 5112)If the underlying queue does not support peeking (e.g. because you are not using
queuelib1.6.1 or later), thepeekmethod raisesNotImplementedError.RequestandResponsenow have anattributesattribute that makes subclassing easier. ForRequest, it also allows subclasses to work withscrapy.utils.request.request_from_dict(). (issue 1877, issue 5130, issue 5218)The
open()andclose()methods of the scheduler are now optional. (issue 3559)HTTP/1.1
TunnelErrorexceptions now only truncate response bodies longer than 1000 characters, instead of those longer than 32 characters, making it easier to debug such errors. (issue 4881, issue 5007)ItemLoadernow supports non-text responses. (issue 5145, issue 5269)
Bug fixes
The
TWISTED_REACTORandASYNCIO_EVENT_LOOPsettings are no longer ignored if defined incustom_settings. (issue 4485, issue 5352)Removed a module-level Twisted reactor import that could prevent using the asyncio reactor. (issue 5357)
The
startprojectcommand works with existing folders again. (issue 4665, issue 4676)The
FEED_URI_PARAMSsetting now behaves as documented. (issue 4962, issue 4966)Request.cb_kwargsonce again allows thecallbackkeyword. (issue 5237, issue 5251, issue 5264)Made
scrapy.utils.response.open_in_browser()support more complex HTML. (issue 5319, issue 5320)Fixed
CSVFeedSpider.quotecharbeing interpreted as the CSV file encoding. (issue 5391, issue 5394)Added missing setuptools to the list of dependencies. (issue 5122)
LinkExtractornow also works as expected with links that have comma-separatedrelattribute values includingnofollow. (issue 5225)Fixed a
TypeErrorthat could be raised during feed export parameter parsing. (issue 5359)
Documentation
asyncio support is no longer considered experimental. (issue 5332)
Included Windows-specific help for asyncio usage. (issue 4976, issue 5315)
Rewrote Using a headless browser with up-to-date best practices. (issue 4484, issue 4613)
Documented local file naming in media pipelines. (issue 5069, issue 5152)
Frequently Asked Questions now covers spider file name collision issues. (issue 2680, issue 3669)
Provided better context and instructions to disable the
URLLENGTH_LIMITsetting. (issue 5135, issue 5250)Documented that Reppy parser does not support Python 3.9+. (issue 5226, issue 5231)
Documented the scheduler component. (issue 3537, issue 3559)
Documented the method used by media pipelines to determine if a file has expired. (issue 5120, issue 5254)
Running multiple spiders in the same process now features
scrapy.utils.project.get_project_settings()usage. (issue 5070)Running multiple spiders in the same process now covers what happens when you define different per-spider values for some settings that cannot differ at run time. (issue 4485, issue 5352)
Extended the documentation of the
StatsMailerextension. (issue 5199, issue 5217)Added
JOBDIRto Settings. (issue 5173, issue 5224)Documented
Spider.attribute. (issue 5174, issue 5244)Documented
TextResponse.urljoin. (issue 1582)Added the
body_lengthparameter to the documented signature of theheaders_receivedsignal. (issue 5270)Clarified
SelectorList.getusage in the tutorial. (issue 5256)The documentation now features the shortest import path of classes with multiple import paths. (issue 2733, issue 5099)
quotes.toscrape.comreferences now use HTTPS instead of HTTP. (issue 5395, issue 5396)Added a link to our Discord server to Getting help. (issue 5421, issue 5422)
The pronunciation of the project name is now officially /ˈskreɪpaɪ/. (issue 5280, issue 5281)
Added the Scrapy logo to the README. (issue 5255, issue 5258)
Fixed issues and implemented minor improvements. (issue 3155, issue 4335, issue 5074, issue 5098, issue 5134, issue 5180, issue 5194, issue 5239, issue 5266, issue 5271, issue 5273, issue 5274, issue 5276, issue 5347, issue 5356, issue 5414, issue 5415, issue 5416, issue 5419, issue 5420)
Quality Assurance
Added support for Python 3.10. (issue 5212, issue 5221, issue 5265)
Significantly reduced memory usage by
scrapy.utils.response.response_httprepr(), used by theDownloaderStatsdownloader middleware, which is enabled by default. (issue 4964, issue 4972)Removed uses of the deprecated
optparsemodule. (issue 5366, issue 5374)Extended typing hints. (issue 5077, issue 5090, issue 5100, issue 5108, issue 5171, issue 5215, issue 5334)
Improved tests, fixed CI issues, removed unused code. (issue 5094, issue 5157, issue 5162, issue 5198, issue 5207, issue 5208, issue 5229, issue 5298, issue 5299, issue 5310, issue 5316, issue 5333, issue 5388, issue 5389, issue 5400, issue 5401, issue 5404, issue 5405, issue 5407, issue 5410, issue 5412, issue 5425, issue 5427)
Implemented improvements for contributors. (issue 5080, issue 5082, issue 5177, issue 5200)
Implemented cleanups. (issue 5095, issue 5106, issue 5209, issue 5228, issue 5235, issue 5245, issue 5246, issue 5292, issue 5314, issue 5322)
Scrapy 2.5.1 (2021-10-05)
Security bug fix:
If you use
HttpAuthMiddleware(i.e. thehttp_userandhttp_passspider attributes) for HTTP authentication, any request exposes your credentials to the request target.To prevent unintended exposure of authentication credentials to unintended domains, you must now additionally set a new, additional spider attribute,
http_auth_domain, and point it to the specific domain to which the authentication credentials must be sent.If the
http_auth_domainspider attribute is not set, the domain of the first request will be considered the HTTP authentication target, and authentication credentials will only be sent in requests targeting that domain.If you need to send the same HTTP authentication credentials to multiple domains, you can use
w3lib.http.basic_auth_header()instead to set the value of theAuthorizationheader of your requests.If you really want your spider to send the same HTTP authentication credentials to any domain, set the
http_auth_domainspider attribute toNone.Finally, if you are a user of scrapy-splash, know that this version of Scrapy breaks compatibility with scrapy-splash 0.7.2 and earlier. You will need to upgrade scrapy-splash to a greater version for it to continue to work.
Scrapy 2.5.0 (2021-04-06)
Highlights:
Official Python 3.9 support
Experimental HTTP/2 support
New
get_retry_request()function to retry requests from spider callbacksNew
headers_receivedsignal that allows stopping downloads earlyNew
Response.protocolattribute
Deprecation removals
Removed all code that was deprecated in 1.7.0 and had not already been removed in 2.4.0. (issue 4901)
Removed support for the
SCRAPY_PICKLED_SETTINGS_TO_OVERRIDEenvironment variable, deprecated in 1.8.0. (issue 4912)
Deprecations
The
scrapy.utils.py36module is now deprecated in favor ofscrapy.utils.asyncgen. (issue 4900)
New features
Experimental HTTP/2 support through a new download handler that can be assigned to the
httpsprotocol in theDOWNLOAD_HANDLERSsetting. (issue 1854, issue 4769, issue 5058, issue 5059, issue 5066)The new
scrapy.downloadermiddlewares.retry.get_retry_request()function may be used from spider callbacks or middlewares to handle the retrying of a request beyond the scenarios thatRetryMiddlewaresupports. (issue 3590, issue 3685, issue 4902)The new
headers_receivedsignal gives early access to response headers and allows stopping downloads. (issue 1772, issue 4897)The new
Response.protocolattribute gives access to the string that identifies the protocol used to download a response. (issue 4878)Stats now include the following entries that indicate the number of successes and failures in storing feeds:
feedexport/success_count/<storage type> feedexport/failed_count/<storage type>
Where
<storage type>is the feed storage backend class name, such asFileFeedStorageorFTPFeedStorage.The
UrlLengthMiddlewarespider middleware now logs ignored URLs withINFOlogging level instead ofDEBUG, and it now includes the following entry into stats to keep track of the number of ignored URLs:urllength/request_ignored_count
The
HttpCompressionMiddlewaredownloader middleware now logs the number of decompressed responses and the total count of resulting bytes:httpcompression/response_bytes httpcompression/response_count
Bug fixes
Fixed installation on PyPy installing PyDispatcher in addition to PyPyDispatcher, which could prevent Scrapy from working depending on which package got imported. (issue 4710, issue 4814)
When inspecting a callback to check if it is a generator that also returns a value, an exception is no longer raised if the callback has a docstring with lower indentation than the following code. (issue 4477, issue 4935)
The Content-Length header is no longer omitted from responses when using the default, HTTP/1.1 download handler (see
DOWNLOAD_HANDLERS). (issue 5009, issue 5034, issue 5045, issue 5057, issue 5062)Setting the
handle_httpstatus_allrequest meta key toFalsenow has the same effect as not setting it at all, instead of having the same effect as setting it toTrue. (issue 3851, issue 4694)
Documentation
Added instructions to install Scrapy in Windows using pip. (issue 4715, issue 4736)
Logging documentation now includes additional ways to filter logs. (issue 4216, issue 4257, issue 4965)
Covered how to deal with long lists of allowed domains in the FAQ. (issue 2263, issue 3667)
Covered scrapy-bench in Benchmarking. (issue 4996, issue 5016)
Clarified that one extension instance is created per crawler. (issue 5014)
Fixed some errors in examples. (issue 4829, issue 4830, issue 4907, issue 4909, issue 5008)
Fixed some external links, typos, and so on. (issue 4892, issue 4899, issue 4936, issue 4942, issue 5005, issue 5063)
The list of Request.meta keys is now sorted alphabetically. (issue 5061, issue 5065)
Updated references to Scrapinghub, which is now called Zyte. (issue 4973, issue 5072)
Added a mention to contributors in the README. (issue 4956)
Reduced the top margin of lists. (issue 4974)
Quality Assurance
Made Python 3.9 support official (issue 4757, issue 4759)
Extended typing hints (issue 4895)
Fixed deprecated uses of the Twisted API. (issue 4940, issue 4950, issue 5073)
Made our tests run with the new pip resolver. (issue 4710, issue 4814)
Added tests to ensure that coroutine support is tested. (issue 4987)
Migrated from Travis CI to GitHub Actions. (issue 4924)
Fixed CI issues. (issue 4986, issue 5020, issue 5022, issue 5027, issue 5052, issue 5053)
Implemented code refactorings, style fixes and cleanups. (issue 4911, issue 4982, issue 5001, issue 5002, issue 5076)
Scrapy 2.4.1 (2020-11-17)
Fixed feed exports overwrite support (issue 4845, issue 4857, issue 4859)
Fixed the AsyncIO event loop handling, which could make code hang (issue 4855, issue 4872)
Fixed the IPv6-capable DNS resolver
CachingHostnameResolverfor download handlers that callreactor.resolve(issue 4802, issue 4803)Fixed the output of the
genspidercommand showing placeholders instead of the import path of the generated spider module (issue 4874)Migrated Windows CI from Azure Pipelines to GitHub Actions (issue 4869, issue 4876)
Scrapy 2.4.0 (2020-10-11)
Highlights:
Python 3.5 support has been dropped.
The
file_pathmethod of media pipelines can now access the source item.This allows you to set a download file path based on item data.
The new
item_export_kwargskey of theFEEDSsetting allows to define keyword parameters to pass to item exporter classesYou can now choose whether feed exports overwrite or append to the output file.
For example, when using the
crawlorrunspidercommands, you can use the-Ooption instead of-oto overwrite the output file.Zstd-compressed responses are now supported if zstandard is installed.
In settings, where the import path of a class is required, it is now possible to pass a class object instead.
Modified requirements
Python 3.6 or greater is now required; support for Python 3.5 has been dropped
As a result:
When using PyPy, PyPy 7.2.0 or greater is now required
For Amazon S3 storage support in feed exports or media pipelines, botocore 1.4.87 or greater is now required
To use the images pipeline, Pillow 4.0.0 or greater is now required
(issue 4718, issue 4732, issue 4733, issue 4742, issue 4743, issue 4764)
Backward-incompatible changes
CookiesMiddlewareonce again discards cookies defined inRequest.headers.We decided to revert this bug fix, introduced in Scrapy 2.2.0, because it was reported that the current implementation could break existing code.
If you need to set cookies for a request, use the
Request.cookiesparameter.A future version of Scrapy will include a new, better implementation of the reverted bug fix.
Deprecation removals
scrapy.extensions.feedexport.S3FeedStorageno longer reads the values ofaccess_keyandsecret_keyfrom the running project settings when they are not passed to its__init__method; you must either pass those parameters to its__init__method or useS3FeedStorage.from_crawler(issue 4356, issue 4411, issue 4688)Rule.process_requestno longer admits callables which expect a singlerequestparameter, rather than bothrequestandresponse(issue 4818)
Deprecations
In custom media pipelines, signatures that do not accept a keyword-only
itemparameter in any of the methods that now support this parameter are now deprecated (issue 4628, issue 4686)In custom feed storage backend classes,
__init__method signatures that do not accept a keyword-onlyfeed_optionsparameter are now deprecated (issue 547, issue 716, issue 4512)The
scrapy.utils.python.WeakKeyCacheclass is now deprecated (issue 4684, issue 4701)The
scrapy.utils.boto.is_botocore()function is now deprecated, usescrapy.utils.boto.is_botocore_available()instead (issue 4734, issue 4776)
New features
The following methods of media pipelines now accept an
itemkeyword-only parameter containing the source item:In
scrapy.pipelines.files.FilesPipeline:file_downloaded()media_downloaded()media_to_download()
In
scrapy.pipelines.images.ImagesPipeline:file_downloaded()get_images()image_downloaded()media_downloaded()media_to_download()
The new
item_export_kwargskey of theFEEDSsetting allows to define keyword parameters to pass to item exporter classes (issue 4606, issue 4768)Feed exports gained overwrite support:
When using the
crawlorrunspidercommands, you can use the-Ooption instead of-oto overwrite the output fileYou can use the
overwritekey in theFEEDSsetting to configure whether to overwrite the output file (True) or append to its content (False)The
__init__andfrom_crawlermethods of feed storage backend classes now receive a new keyword-only parameter,feed_options, which is a dictionary of feed options
Zstd-compressed responses are now supported if zstandard is installed (issue 4831)
In settings, where the import path of a class is required, it is now possible to pass a class object instead (issue 3870, issue 3873).
This includes also settings where only part of its value is made of an import path, such as
DOWNLOADER_MIDDLEWARESorDOWNLOAD_HANDLERS.Downloader middlewares can now override
response.request.If a downloader middleware returns a
Responseobject fromprocess_response()orprocess_exception()with a customRequestobject assigned toresponse.request:The response is handled by the callback of that custom
Requestobject, instead of being handled by the callback of the originalRequestobjectThat custom
Requestobject is now sent as therequestargument to theresponse_receivedsignal, instead of the originalRequestobject
When using the FTP feed storage backend:
It is now possible to set the new
overwritefeed option toFalseto append to an existing file instead of overwriting itThe FTP password can now be omitted if it is not necessary
The
__init__method ofCsvItemExporternow supports anerrorsparameter to indicate how to handle encoding errors (issue 4755)When using asyncio, it is now possible to set a custom asyncio loop (issue 4306, issue 4414)
Serialized requests (see Jobs: pausing and resuming crawls) now support callbacks that are spider methods that delegate on other callable (issue 4756)
When a response is larger than
DOWNLOAD_MAXSIZE, the logged message is now a warning, instead of an error (issue 3874, issue 3886, issue 4752)
Bug fixes
The
genspidercommand no longer overwrites existing files unless the--forceoption is used (issue 4561, issue 4616, issue 4623)Cookies with an empty value are no longer considered invalid cookies (issue 4772)
The
runspidercommand now supports files with the.pywfile extension (issue 4643, issue 4646)The
HttpProxyMiddlewaremiddleware now simply ignores unsupported proxy values (issue 3331, issue 4778)Checks for generator callbacks with a
returnstatement no longer warn aboutreturnstatements in nested functions (issue 4720, issue 4721)The system file mode creation mask no longer affects the permissions of files generated using the
startprojectcommand (issue 4722)scrapy.utils.iterators.xmliter()now supports namespaced node names (issue 861, issue 4746)Requestobjects can now haveabout:URLs, which can work when using a headless browser (issue 4835)
Documentation
The
FEED_URI_PARAMSsetting is now documented (issue 4671, issue 4724)Improved the documentation of link extractors with an usage example from a spider callback and reference documentation for the
Linkclass (issue 4751, issue 4775)Clarified the impact of
CONCURRENT_REQUESTSwhen using theCloseSpiderextension (issue 4836)Removed references to Python 2’s
unicodetype (issue 4547, issue 4703)We now have an official deprecation policy (issue 4705)
Our documentation policies now cover usage of Sphinx’s
versionaddedandversionchangeddirectives, and we have removed usages referencing Scrapy 1.4.0 and earlier versions (issue 3971, issue 4310)Other documentation cleanups (issue 4090, issue 4782, issue 4800, issue 4801, issue 4809, issue 4816, issue 4825)
Quality assurance
Extended typing hints (issue 4243, issue 4691)
Added tests for the
checkcommand (issue 4663)Fixed test failures on Debian (issue 4726, issue 4727, issue 4735)
Improved Windows test coverage (issue 4723)
Switched to formatted string literals where possible (issue 4307, issue 4324, issue 4672)
Modernized
super()usage (issue 4707)Other code and test cleanups (issue 1790, issue 3288, issue 4165, issue 4564, issue 4651, issue 4714, issue 4738, issue 4745, issue 4747, issue 4761, issue 4765, issue 4804, issue 4817, issue 4820, issue 4822, issue 4839)
Scrapy 2.3.0 (2020-08-04)
Highlights:
Feed exports now support Google Cloud Storage as a storage backend
The new
FEED_EXPORT_BATCH_ITEM_COUNTsetting allows to deliver output items in batches of up to the specified number of items.It also serves as a workaround for delayed file delivery, which causes Scrapy to only start item delivery after the crawl has finished when using certain storage backends (S3, FTP, and now GCS).
The base implementation of item loaders has been moved into a separate library, itemloaders, allowing usage from outside Scrapy and a separate release schedule
Deprecation removals
Removed the following classes and their parent modules from
scrapy.linkextractors:htmlparser.HtmlParserLinkExtractorregex.RegexLinkExtractorsgml.BaseSgmlLinkExtractorsgml.SgmlLinkExtractor
Use
LinkExtractorinstead (issue 4356, issue 4679)
Deprecations
The
scrapy.utils.python.retry_on_eintrfunction is now deprecated (issue 4683)
New features
Feed exports support Google Cloud Storage (issue 685, issue 3608)
New
FEED_EXPORT_BATCH_ITEM_COUNTsetting for batch deliveries (issue 4250, issue 4434)The
parsecommand now allows specifying an output file (issue 4317, issue 4377)Request.from_curlandcurl_to_request_kwargs()now also support--data-raw(issue 4612)A
parsecallback may now be used in built-in spider subclasses, such asCrawlSpider(issue 712, issue 732, issue 781, issue 4254 )
Bug fixes
Fixed the CSV exporting of dataclass items and attr.s items (issue 4667, issue 4668)
Request.from_curlandcurl_to_request_kwargs()now set the request method toPOSTwhen a request body is specified and no request method is specified (issue 4612)The processing of ANSI escape sequences in enabled in Windows 10.0.14393 and later, where it is required for colored output (issue 4393, issue 4403)
Documentation
Updated the OpenSSL cipher list format link in the documentation about the
DOWNLOADER_CLIENT_TLS_CIPHERSsetting (issue 4653)Simplified the code example in Working with dataclass items (issue 4652)
Quality assurance
The base implementation of item loaders has been moved into itemloaders (issue 4005, issue 4516)
Fixed a silenced error in some scheduler tests (issue 4644, issue 4645)
Renewed the localhost certificate used for SSL tests (issue 4650)
Removed cookie-handling code specific to Python 2 (issue 4682)
Stopped using Python 2 unicode literal syntax (issue 4704)
Stopped using a backlash for line continuation (issue 4673)
Removed unneeded entries from the MyPy exception list (issue 4690)
Automated tests now pass on Windows as part of our continuous integration system (issue 4458)
Automated tests now pass on the latest PyPy version for supported Python versions in our continuous integration system (issue 4504)
Scrapy 2.2.1 (2020-07-17)
The
startprojectcommand no longer makes unintended changes to the permissions of files in the destination folder, such as removing execution permissions (issue 4662, issue 4666)
Scrapy 2.2.0 (2020-06-24)
Highlights:
Python 3.5.2+ is required now
dataclass objects and attrs objects are now valid item types
New
TextResponse.jsonmethodNew
bytes_receivedsignal that allows canceling response downloadCookiesMiddlewarefixes
Backward-incompatible changes
Support for Python 3.5.0 and 3.5.1 has been dropped; Scrapy now refuses to run with a Python version lower than 3.5.2, which introduced
typing.Type(issue 4615)
Deprecations
TextResponse.body_as_unicodeis now deprecated, useTextResponse.textinstead (issue 4546, issue 4555, issue 4579)scrapy.item.BaseItemis now deprecated, usescrapy.item.Iteminstead (issue 4534)
New features
dataclass objects and attrs objects are now valid item types, and a new itemadapter library makes it easy to write code that supports any item type (issue 2749, issue 2807, issue 3761, issue 3881, issue 4642)
A new
TextResponse.jsonmethod allows to deserialize JSON responses (issue 2444, issue 4460, issue 4574)A new
bytes_receivedsignal allows monitoring response download progress and stopping downloads (issue 4205, issue 4559)The dictionaries in the result list of a media pipeline now include a new key,
status, which indicates if the file was downloaded or, if the file was not downloaded, why it was not downloaded; seeFilesPipeline.get_media_requestsfor more information (issue 2893, issue 4486)When using Google Cloud Storage for a media pipeline, a warning is now logged if the configured credentials do not grant the required permissions (issue 4346, issue 4508)
Link extractors are now serializable, as long as you do not use lambdas for parameters; for example, you can now pass link extractors in
Request.cb_kwargsorRequest.metawhen persisting scheduled requests (issue 4554)Upgraded the pickle protocol that Scrapy uses from protocol 2 to protocol 4, improving serialization capabilities and performance (issue 4135, issue 4541)
scrapy.utils.misc.create_instance()now raises aTypeErrorexception if the resulting instance isNone(issue 4528, issue 4532)
Bug fixes
CookiesMiddlewareno longer discards cookies defined inRequest.headers(issue 1992, issue 2400)CookiesMiddlewareno longer re-encodes cookies defined asbytesin thecookiesparameter of the__init__method ofRequest(issue 2400, issue 3575)When
FEEDSdefines multiple URIs,FEED_STORE_EMPTYisFalseand the crawl yields no items, Scrapy no longer stops feed exports after the first URI (issue 4621, issue 4626)Spidercallbacks defined using coroutine syntax no longer need to return an iterable, and may instead return aRequestobject, an item, orNone(issue 4609)The
startprojectcommand now ensures that the generated project folders and files have the right permissions (issue 4604)Fix a
KeyErrorexception being sometimes raised fromscrapy.utils.datatypes.LocalWeakReferencedCache(issue 4597, issue 4599)When
FEEDSdefines multiple URIs, log messages about items being stored now contain information from the corresponding feed, instead of always containing information about only one of the feeds (issue 4619, issue 4629)
Documentation
Added a new section about accessing cb_kwargs from errbacks (issue 4598, issue 4634)
Covered chompjs in Parsing JavaScript code (issue 4556, issue 4562)
Removed from Coroutines the warning about the API being experimental (issue 4511, issue 4513)
Removed references to unsupported versions of Twisted (issue 4533)
Updated the description of the screenshot pipeline example, which now uses coroutine syntax instead of returning a
Deferred(issue 4514, issue 4593)Removed a misleading import line from the
scrapy.utils.log.configure_logging()code example (issue 4510, issue 4587)The display-on-hover behavior of internal documentation references now also covers links to commands,
Request.metakeys, settings and signals (issue 4495, issue 4563)It is again possible to download the documentation for offline reading (issue 4578, issue 4585)
Removed backslashes preceding
*argsand**kwargsin some function and method signatures (issue 4592, issue 4596)
Quality assurance
Adjusted the code base further to our style guidelines (issue 4237, issue 4525, issue 4538, issue 4539, issue 4540, issue 4542, issue 4543, issue 4544, issue 4545, issue 4557, issue 4558, issue 4566, issue 4568, issue 4572)
Removed remnants of Python 2 support (issue 4550, issue 4553, issue 4568)
Improved code sharing between the
crawlandrunspidercommands (issue 4548, issue 4552)Replaced
chain(*iterable)withchain.from_iterable(iterable)(issue 4635)You may now run the
asynciotests with Tox on any Python version (issue 4521)Updated test requirements to reflect an incompatibility with pytest 5.4 and 5.4.1 (issue 4588)
Improved
SpiderLoadertest coverage for scenarios involving duplicate spider names (issue 4549, issue 4560)Configured Travis CI to also run the tests with Python 3.5.2 (issue 4518, issue 4615)
Added a Pylint job to Travis CI (issue 3727)
Added a Mypy job to Travis CI (issue 4637)
Made use of set literals in tests (issue 4573)
Cleaned up the Travis CI configuration (issue 4517, issue 4519, issue 4522, issue 4537)
Scrapy 2.1.0 (2020-04-24)
Highlights:
New
FEEDSsetting to export to multiple feedsNew
Response.ip_addressattribute
Backward-incompatible changes
AssertionErrorexceptions triggered by assert statements have been replaced by new exception types, to support running Python in optimized mode (see-O) without changing Scrapy’s behavior in any unexpected ways.If you catch an
AssertionErrorexception from Scrapy, update your code to catch the corresponding new exception.
Deprecation removals
The
LOG_UNSERIALIZABLE_REQUESTSsetting is no longer supported, useSCHEDULER_DEBUGinstead (issue 4385)The
REDIRECT_MAX_METAREFRESH_DELAYsetting is no longer supported, useMETAREFRESH_MAXDELAYinstead (issue 4385)The
ChunkedTransferMiddlewaremiddleware has been removed, including the entirescrapy.downloadermiddlewares.chunkedmodule; chunked transfers work out of the box (issue 4431)The
spidersproperty has been removed fromCrawler, useCrawlerRunner.spider_loaderor instantiateSPIDER_LOADER_CLASSwith your settings instead (issue 4398)The
MultiValueDict,MultiValueDictKeyError, andSiteNodeclasses have been removed fromscrapy.utils.datatypes(issue 4400)
Deprecations
The
FEED_FORMATandFEED_URIsettings have been deprecated in favor of the newFEEDSsetting (issue 1336, issue 3858, issue 4507)
New features
A new setting,
FEEDS, allows configuring multiple output feeds with different settings each (issue 1336, issue 3858, issue 4507)The
crawlandrunspidercommands now support multiple-oparameters (issue 1336, issue 3858, issue 4507)The
crawlandrunspidercommands now support specifying an output format by appending:<format>to the output file (issue 1336, issue 3858, issue 4507)The new
Response.ip_addressattribute gives access to the IP address that originated a response (issue 3903, issue 3940)A warning is now issued when a value in
allowed_domainsincludes a port (issue 50, issue 3198, issue 4413)Zsh completion now excludes used option aliases from the completion list (issue 4438)
Bug fixes
Request serialization no longer breaks for callbacks that are spider attributes which are assigned a function with a different name (issue 4500)
Nonevalues inallowed_domainsno longer cause aTypeErrorexception (issue 4410)Zsh completion no longer allows options after arguments (issue 4438)
zope.interface 5.0.0 and later versions are now supported (issue 4447, issue 4448)
Spider.make_requests_from_url, deprecated in Scrapy 1.4.0, now issues a warning when used (issue 4412)
Documentation
Improved the documentation about signals that allow their handlers to return a
Deferred(issue 4295, issue 4390)Our PyPI entry now includes links for our documentation, our source code repository and our issue tracker (issue 4456)
Covered the curl2scrapy service in the documentation (issue 4206, issue 4455)
Removed references to the Guppy library, which only works in Python 2 (issue 4285, issue 4343)
Extended use of InterSphinx to link to Python 3 documentation (issue 4444, issue 4445)
Added support for Sphinx 3.0 and later (issue 4475, issue 4480, issue 4496, issue 4503)
Quality assurance
Removed warnings about using old, removed settings (issue 4404)
Removed a warning about importing
StringTransportfromtwisted.test.proto_helpersin Twisted 19.7.0 or newer (issue 4409)Removed outdated Debian package build files (issue 4384)
Removed
objectusage as a base class (issue 4430)Removed code that added support for old versions of Twisted that we no longer support (issue 4472)
Fixed code style issues (issue 4468, issue 4469, issue 4471, issue 4481)
Removed
twisted.internet.defer.returnValue()calls (issue 4443, issue 4446, issue 4489)
Scrapy 2.0.1 (2020-03-18)
Response.follow_allnow supports an empty URL iterable as input (issue 4408, issue 4420)Removed top-level
reactorimports to prevent errors about the wrong Twisted reactor being installed when setting a different Twisted reactor usingTWISTED_REACTOR(issue 4401, issue 4406)Fixed tests (issue 4422)
Scrapy 2.0.0 (2020-03-03)
Highlights:
Python 2 support has been removed
Partial coroutine syntax support and experimental
asynciosupportNew
Response.follow_allmethodFTP support for media pipelines
New
Response.certificateattributeIPv6 support through
DNS_RESOLVER
Backward-incompatible changes
Python 2 support has been removed, following Python 2 end-of-life on January 1, 2020 (issue 4091, issue 4114, issue 4115, issue 4121, issue 4138, issue 4231, issue 4242, issue 4304, issue 4309, issue 4373)
Retry gaveups (see
RETRY_TIMES) are now logged as errors instead of as debug information (issue 3171, issue 3566)File extensions that
LinkExtractorignores by default now also include7z,7zip,apk,bz2,cdr,dmg,ico,iso,tar,tar.gz,webm, andxz(issue 1837, issue 2067, issue 4066)The
METAREFRESH_IGNORE_TAGSsetting is now an empty list by default, following web browser behavior (issue 3844, issue 4311)The
HttpCompressionMiddlewarenow includes spaces after commas in the value of theAccept-Encodingheader that it sets, following web browser behavior (issue 4293)The
__init__method of custom download handlers (seeDOWNLOAD_HANDLERS) or subclasses of the following downloader handlers no longer receives asettingsparameter:scrapy.core.downloader.handlers.datauri.DataURIDownloadHandlerscrapy.core.downloader.handlers.file.FileDownloadHandler
Use the
from_settingsorfrom_crawlerclass methods to expose such a parameter to your custom download handlers.We have refactored the
scrapy.core.scheduler.Schedulerclass and related queue classes (seeSCHEDULER_PRIORITY_QUEUE,SCHEDULER_DISK_QUEUEandSCHEDULER_MEMORY_QUEUE) to make it easier to implement custom scheduler queue classes. See Changes to scheduler queue classes below for details.Overridden settings are now logged in a different format. This is more in line with similar information logged at startup (issue 4199)
Deprecation removals
The Scrapy shell no longer provides a sel proxy object, use
response.selectorinstead (issue 4347)LevelDB support has been removed (issue 4112)
The following functions have been removed from
scrapy.utils.python:isbinarytext,is_writable,setattr_default,stringify_dict(issue 4362)
Deprecations
Using environment variables prefixed with
SCRAPY_to override settings is deprecated (issue 4300, issue 4374, issue 4375)scrapy.linkextractors.FilteringLinkExtractoris deprecated, usescrapy.linkextractors.LinkExtractorinstead (issue 4045)The
noconnectquery string argument of proxy URLs is deprecated and should be removed from proxy URLs (issue 4198)The
nextmethod ofscrapy.utils.python.MutableChainis deprecated, use the globalnext()function orMutableChain.__next__instead (issue 4153)
New features
Added partial support for Python’s coroutine syntax and experimental support for
asyncioandasyncio-powered libraries (issue 4010, issue 4259, issue 4269, issue 4270, issue 4271, issue 4316, issue 4318)The new
Response.follow_allmethod offers the same functionality asResponse.followbut supports an iterable of URLs as input and returns an iterable of requests (issue 2582, issue 4057, issue 4286)Media pipelines now support FTP storage (issue 3928, issue 3961)
The new
Response.certificateattribute exposes the SSL certificate of the server as atwisted.internet.ssl.Certificateobject for HTTPS responses (issue 2726, issue 4054)A new
DNS_RESOLVERsetting allows enabling IPv6 support (issue 1031, issue 4227)A new
SCRAPER_SLOT_MAX_ACTIVE_SIZEsetting allows configuring the existing soft limit that pauses request downloads when the total response data being processed is too high (issue 1410, issue 3551)A new
TWISTED_REACTORsetting allows customizing thereactorthat Scrapy uses, allowing to enable asyncio support or deal with a common macOS issue (issue 2905, issue 4294)Scheduler disk and memory queues may now use the class methods
from_crawlerorfrom_settings(issue 3884)The new
Response.cb_kwargsattribute serves as a shortcut forResponse.request.cb_kwargs(issue 4331)Response.follownow supports aflagsparameter, for consistency withRequest(issue 4277, issue 4279)Item loader processors can now be regular functions, they no longer need to be methods (issue 3899)
Rulenow accepts anerrbackparameter (issue 4000)Requestno longer requires acallbackparameter when anerrbackparameter is specified (issue 3586, issue 4008)LogFormatternow supports some additional methods:download_errorfor download errorsitem_errorfor exceptions raised during item processing by item pipelinesspider_errorfor exceptions raised from spider callbacks
The
FEED_URIsetting now supportspathlib.Pathvalues (issue 3731, issue 4074)A new
request_left_downloadersignal is sent when a request leaves the downloader (issue 4303)Scrapy logs a warning when it detects a request callback or errback that uses
yieldbut also returns a value, since the returned value would be lost (issue 3484, issue 3869)Spiderobjects now raise anAttributeErrorexception if they do not have astart_urlsattribute nor reimplementstart_requests, but have astart_urlattribute (issue 4133, issue 4170)BaseItemExportersubclasses may now usesuper().__init__(**kwargs)instead ofself._configure(kwargs)in their__init__method, passingdont_fail=Trueto the parent__init__method if needed, and accessingkwargsatself._kwargsafter calling their parent__init__method (issue 4193, issue 4370)A new
keep_fragmentsparameter ofscrapy.utils.request.request_fingerprint()allows to generate different fingerprints for requests with different fragments in their URL (issue 4104)Download handlers (see
DOWNLOAD_HANDLERS) may now use thefrom_settingsandfrom_crawlerclass methods that other Scrapy components already supported (issue 4126)scrapy.utils.python.MutableChain.__iter__now returnsself, allowing it to be used as a sequence (issue 4153)
Bug fixes
The
crawlcommand now also exits with exit code 1 when an exception happens before the crawling starts (issue 4175, issue 4207)LinkExtractor.extract_linksno longer re-encodes the query string or URLs from non-UTF-8 responses in UTF-8 (issue 998, issue 1403, issue 1949, issue 4321)The first spider middleware (see
SPIDER_MIDDLEWARES) now also processes exceptions raised from callbacks that are generators (issue 4260, issue 4272)Redirects to URLs starting with 3 slashes (
///) are now supported (issue 4032, issue 4042)Requestno longer accepts strings asurlsimply because they have a colon (issue 2552, issue 4094)The correct encoding is now used for attach names in
MailSender(issue 4229, issue 4239)RFPDupeFilter, the defaultDUPEFILTER_CLASS, no longer writes an extra\rcharacter on each line in Windows, which made the size of therequests.seenfile unnecessarily large on that platform (issue 4283)Z shell auto-completion now looks for
.htmlfiles, not.httpfiles, and covers the-hcommand-line switch (issue 4122, issue 4291)Adding items to a
scrapy.utils.datatypes.LocalCacheobject without alimitdefined no longer raises aTypeErrorexception (issue 4123)Fixed a typo in the message of the
ValueErrorexception raised whenscrapy.utils.misc.create_instance()gets bothsettingsandcrawlerset toNone(issue 4128)
Documentation
API documentation now links to an online, syntax-highlighted view of the corresponding source code (issue 4148)
Links to unexisting documentation pages now allow access to the sidebar (issue 4152, issue 4169)
Cross-references within our documentation now display a tooltip when hovered (issue 4173, issue 4183)
Improved the documentation about
LinkExtractor.extract_linksand simplified Link Extractors (issue 4045)Clarified how
ItemLoader.itemworks (issue 3574, issue 4099)Clarified that
logging.basicConfig()should not be used when also usingCrawlerProcess(issue 2149, issue 2352, issue 3146, issue 3960)Clarified the requirements for
Requestobjects when using persistence (issue 4124, issue 4139)Clarified how to install a custom image pipeline (issue 4034, issue 4252)
Fixed the signatures of the
file_pathmethod in media pipeline examples (issue 4290)Covered a backward-incompatible change in Scrapy 1.7.0 affecting custom
scrapy.core.scheduler.Schedulersubclasses (issue 4274)Improved the
README.rstandCODE_OF_CONDUCT.mdfiles (issue 4059)Documentation examples are now checked as part of our test suite and we have fixed some of the issues detected (issue 4142, issue 4146, issue 4171, issue 4184, issue 4190)
Fixed logic issues, broken links and typos (issue 4247, issue 4258, issue 4282, issue 4288, issue 4305, issue 4308, issue 4323, issue 4338, issue 4359, issue 4361)
Improved consistency when referring to the
__init__method of an object (issue 4086, issue 4088)Fixed an inconsistency between code and output in Scrapy at a glance (issue 4213)
Extended
intersphinxusage (issue 4147, issue 4172, issue 4185, issue 4194, issue 4197)We now use a recent version of Python to build the documentation (issue 4140, issue 4249)
Cleaned up documentation (issue 4143, issue 4275)
Quality assurance
Re-enabled proxy
CONNECTtests (issue 2545, issue 4114)Added Bandit security checks to our test suite (issue 4162, issue 4181)
Added Flake8 style checks to our test suite and applied many of the corresponding changes (issue 3944, issue 3945, issue 4137, issue 4157, issue 4167, issue 4174, issue 4186, issue 4195, issue 4238, issue 4246, issue 4355, issue 4360, issue 4365)
Improved test coverage (issue 4097, issue 4218, issue 4236)
Started reporting slowest tests, and improved the performance of some of them (issue 4163, issue 4164)
Fixed broken tests and refactored some tests (issue 4014, issue 4095, issue 4244, issue 4268, issue 4372)
Modified the tox configuration to allow running tests with any Python version, run Bandit and Flake8 tests by default, and enforce a minimum tox version programmatically (issue 4179)
Cleaned up code (issue 3937, issue 4208, issue 4209, issue 4210, issue 4212, issue 4369, issue 4376, issue 4378)
Changes to scheduler queue classes
The following changes may impact any custom queue classes of all types:
The
pushmethod no longer receives a second positional parameter containingrequest.priority * -1. If you need that value, get it from the first positional parameter,request, instead, or use the newpriority()method inscrapy.core.scheduler.ScrapyPriorityQueuesubclasses.
The following changes may impact custom priority queue classes:
In the
__init__method or thefrom_crawlerorfrom_settingsclass methods:The parameter that used to contain a factory function,
qfactory, is now passed as a keyword parameter nameddownstream_queue_cls.A new keyword parameter has been added:
key. It is a string that is always an empty string for memory queues and indicates theJOB_DIRvalue for disk queues.The parameter for disk queues that contains data from the previous crawl,
startpriosorslot_startprios, is now passed as a keyword parameter namedstartprios.The
serializeparameter is no longer passed. The disk queue class must take care of request serialization on its own before writing to disk, using therequest_to_dict()andrequest_from_dict()functions from thescrapy.utils.reqsermodule.
The following changes may impact custom disk and memory queue classes:
The signature of the
__init__method is now__init__(self, crawler, key).
The following changes affect specifically the
ScrapyPriorityQueue and
DownloaderAwarePriorityQueue classes from
scrapy.core.scheduler and may affect subclasses:
In the
__init__method, most of the changes described above apply.__init__may still receive all parameters as positional parameters, however:downstream_queue_cls, which replacedqfactory, must be instantiated differently.qfactorywas instantiated with a priority value (integer).Instances of
downstream_queue_clsshould be created using the newScrapyPriorityQueue.qfactoryorDownloaderAwarePriorityQueue.pqfactorymethods.The new
keyparameter displaced thestartpriosparameter 1 position to the right.
The following class attributes have been added:
crawlerdownstream_queue_cls(details above)key(details above)
The
serializeattribute has been removed (details above)
The following changes affect specifically the
ScrapyPriorityQueue class and may affect
subclasses:
A new
priority()method has been added which, given a request, returnsrequest.priority * -1.It is used in
push()to make up for the removal of itspriorityparameter.The
spiderattribute has been removed. Usecrawler.spiderinstead.
The following changes affect specifically the
DownloaderAwarePriorityQueue class and may
affect subclasses:
A new
pqueuesattribute offers a mapping of downloader slot names to the corresponding instances ofdownstream_queue_cls.
Scrapy 1.8.2 (2022-03-01)
Security bug fixes:
When a
Requestobject with cookies defined gets a redirect response causing a newRequestobject to be scheduled, the cookies defined in the originalRequestobject are no longer copied into the newRequestobject.If you manually set the
Cookieheader on aRequestobject and the domain name of the redirect URL is not an exact match for the domain of the URL of the originalRequestobject, yourCookieheader is now dropped from the newRequestobject.The old behavior could be exploited by an attacker to gain access to your cookies. Please, see the cjvr-mfj7-j4j8 security advisory for more information.
Note
It is still possible to enable the sharing of cookies between different domains with a shared domain suffix (e.g.
example.comand any subdomain) by defining the shared domain suffix (e.g.example.com) as the cookie domain when defining your cookies. See the documentation of theRequestclass for more information.When the domain of a cookie, either received in the
Set-Cookieheader of a response or defined in aRequestobject, is set to a public suffix, the cookie is now ignored unless the cookie domain is the same as the request domain.The old behavior could be exploited by an attacker to inject cookies into your requests to some other domains. Please, see the mfjm-vh54-3f96 security advisory for more information.
Scrapy 1.8.1 (2021-10-05)
Security bug fix:
If you use
HttpAuthMiddleware(i.e. thehttp_userandhttp_passspider attributes) for HTTP authentication, any request exposes your credentials to the request target.To prevent unintended exposure of authentication credentials to unintended domains, you must now additionally set a new, additional spider attribute,
http_auth_domain, and point it to the specific domain to which the authentication credentials must be sent.If the
http_auth_domainspider attribute is not set, the domain of the first request will be considered the HTTP authentication target, and authentication credentials will only be sent in requests targeting that domain.If you need to send the same HTTP authentication credentials to multiple domains, you can use
w3lib.http.basic_auth_header()instead to set the value of theAuthorizationheader of your requests.If you really want your spider to send the same HTTP authentication credentials to any domain, set the
http_auth_domainspider attribute toNone.Finally, if you are a user of scrapy-splash, know that this version of Scrapy breaks compatibility with scrapy-splash 0.7.2 and earlier. You will need to upgrade scrapy-splash to a greater version for it to continue to work.
Scrapy 1.8.0 (2019-10-28)
Highlights:
Dropped Python 3.4 support and updated minimum requirements; made Python 3.8 support official
New
Request.from_curlclass methodNew
ROBOTSTXT_PARSERandROBOTSTXT_USER_AGENTsettingsNew
DOWNLOADER_CLIENT_TLS_CIPHERSandDOWNLOADER_CLIENT_TLS_VERBOSE_LOGGINGsettings
Backward-incompatible changes
Python 3.4 is no longer supported, and some of the minimum requirements of Scrapy have also changed:
cssselect 0.9.1
cryptography 2.0
lxml 3.5.0
pyOpenSSL 16.2.0
queuelib 1.4.2
service_identity 16.0.0
six 1.10.0
Twisted 17.9.0 (16.0.0 with Python 2)
zope.interface 4.1.3
JSONRequestis now calledJsonRequestfor consistency with similar classes (issue 3929, issue 3982)If you are using a custom context factory (
DOWNLOADER_CLIENTCONTEXTFACTORY), its__init__method must accept two new parameters:tls_verbose_loggingandtls_ciphers(issue 2111, issue 3392, issue 3442, issue 3450)ItemLoadernow turns the values of its input item into lists:>>> item = MyItem() >>> item['field'] = 'value1' >>> loader = ItemLoader(item=item) >>> item['field'] ['value1']
This is needed to allow adding values to existing fields (
loader.add_value('field', 'value2')).(issue 3804, issue 3819, issue 3897, issue 3976, issue 3998, issue 4036)
See also Deprecation removals below.
New features
A new
Request.from_curlclass method allows creating a request from a cURL command (issue 2985, issue 3862)A new
ROBOTSTXT_PARSERsetting allows choosing which robots.txt parser to use. It includes built-in support for RobotFileParser, Protego (default), Reppy, and Robotexclusionrulesparser, and allows you to implement support for additional parsers (issue 754, issue 2669, issue 3796, issue 3935, issue 3969, issue 4006)A new
ROBOTSTXT_USER_AGENTsetting allows defining a separate user agent string to use for robots.txt parsing (issue 3931, issue 3966)Ruleno longer requires aLinkExtractorparameter (issue 781, issue 4016)Use the new
DOWNLOADER_CLIENT_TLS_CIPHERSsetting to customize the TLS/SSL ciphers used by the default HTTP/1.1 downloader (issue 3392, issue 3442)Set the new
DOWNLOADER_CLIENT_TLS_VERBOSE_LOGGINGsetting toTrueto enable debug-level messages about TLS connection parameters after establishing HTTPS connections (issue 2111, issue 3450)Callbacks that receive keyword arguments (see
Request.cb_kwargs) can now be tested using the new@cb_kwargsspider contract (issue 3985, issue 3988)When a
@scrapesspider contract fails, all missing fields are now reported (issue 766, issue 3939)Custom log formats can now drop messages by having the corresponding methods of the configured
LOG_FORMATTERreturnNone(issue 3984, issue 3987)A much improved completion definition is now available for Zsh (issue 4069)
Bug fixes
ItemLoader.load_item()no longer makes later calls toItemLoader.get_output_value()orItemLoader.load_item()return empty data (issue 3804, issue 3819, issue 3897, issue 3976, issue 3998, issue 4036)Fixed
DummyStatsCollectorraising aTypeErrorexception (issue 4007, issue 4052)FilesPipeline.file_pathandImagesPipeline.file_pathno longer choose file extensions that are not registered with IANA (issue 1287, issue 3953, issue 3954)When using botocore to persist files in S3, all botocore-supported headers are properly mapped now (issue 3904, issue 3905)
FTP passwords in
FEED_URIcontaining percent-escaped characters are now properly decoded (issue 3941)A memory-handling and error-handling issue in
scrapy.utils.ssl.get_temp_key_info()has been fixed (issue 3920)
Documentation
The documentation now covers how to define and configure a custom log format (issue 3616, issue 3660)
API documentation added for
MarshalItemExporterandPythonItemExporter(issue 3973)API documentation added for
BaseItemandItemMeta(issue 3999)Minor documentation fixes (issue 2998, issue 3398, issue 3597, issue 3894, issue 3934, issue 3978, issue 3993, issue 4022, issue 4028, issue 4033, issue 4046, issue 4050, issue 4055, issue 4056, issue 4061, issue 4072, issue 4071, issue 4079, issue 4081, issue 4089, issue 4093)
Deprecation removals
scrapy.xlibhas been removed (issue 4015)
Deprecations
The LevelDB storage backend (
scrapy.extensions.httpcache.LeveldbCacheStorage) ofHttpCacheMiddlewareis deprecated (issue 4085, issue 4092)Use of the undocumented
SCRAPY_PICKLED_SETTINGS_TO_OVERRIDEenvironment variable is deprecated (issue 3910)scrapy.item.DictItemis deprecated, useIteminstead (issue 3999)
Other changes
Minimum versions of optional Scrapy requirements that are covered by continuous integration tests have been updated:
Lower versions of these optional requirements may work, but it is not guaranteed (issue 3892)
GitHub templates for bug reports and feature requests (issue 3126, issue 3471, issue 3749, issue 3754)
Continuous integration fixes (issue 3923)
Code cleanup (issue 3391, issue 3907, issue 3946, issue 3950, issue 4023, issue 4031)
Scrapy 1.7.4 (2019-10-21)
Revert the fix for issue 3804 (issue 3819), which has a few undesired side effects (issue 3897, issue 3976).
As a result, when an item loader is initialized with an item,
ItemLoader.load_item() once again
makes later calls to ItemLoader.get_output_value() or ItemLoader.load_item() return empty data.
Scrapy 1.7.3 (2019-08-01)
Enforce lxml 4.3.5 or lower for Python 3.4 (issue 3912, issue 3918).
Scrapy 1.7.2 (2019-07-23)
Fix Python 2 support (issue 3889, issue 3893, issue 3896).
Scrapy 1.7.1 (2019-07-18)
Re-packaging of Scrapy 1.7.0, which was missing some changes in PyPI.
Scrapy 1.7.0 (2019-07-18)
Note
Make sure you install Scrapy 1.7.1. The Scrapy 1.7.0 package in PyPI is the result of an erroneous commit tagging and does not include all the changes described below.
Highlights:
Improvements for crawls targeting multiple domains
A cleaner way to pass arguments to callbacks
A new class for JSON requests
Improvements for rule-based spiders
New features for feed exports
Backward-incompatible changes
429is now part of theRETRY_HTTP_CODESsetting by defaultThis change is backward incompatible. If you don’t want to retry
429, you must overrideRETRY_HTTP_CODESaccordingly.Crawler,CrawlerRunner.crawlandCrawlerRunner.create_crawlerno longer accept aSpidersubclass instance, they only accept aSpidersubclass now.Spidersubclass instances were never meant to work, and they were not working as one would expect: instead of using the passedSpidersubclass instance, theirfrom_crawlermethod was called to generate a new instance.Non-default values for the
SCHEDULER_PRIORITY_QUEUEsetting may stop working. Scheduler priority queue classes now need to handleRequestobjects instead of arbitrary Python data structures.An additional
crawlerparameter has been added to the__init__method of theSchedulerclass. Custom scheduler subclasses which don’t accept arbitrary parameters in their__init__method might break because of this change.For more information, see
SCHEDULER.
See also Deprecation removals below.
New features
A new scheduler priority queue,
scrapy.pqueues.DownloaderAwarePriorityQueue, may be enabled for a significant scheduling improvement on crawls targeting multiple web domains, at the cost of noCONCURRENT_REQUESTS_PER_IPsupport (issue 3520)A new
Request.cb_kwargsattribute provides a cleaner way to pass keyword arguments to callback methods (issue 1138, issue 3563)A new
JSONRequestclass offers a more convenient way to build JSON requests (issue 3504, issue 3505)A
process_requestcallback passed to theRule__init__method now receives theResponseobject that originated the request as its second argument (issue 3682)A new
restrict_textparameter for theLinkExtractor__init__method allows filtering links by linking text (issue 3622, issue 3635)A new
FEED_STORAGE_S3_ACLsetting allows defining a custom ACL for feeds exported to Amazon S3 (issue 3607)A new
FEED_STORAGE_FTP_ACTIVEsetting allows using FTP’s active connection mode for feeds exported to FTP servers (issue 3829)A new
METAREFRESH_IGNORE_TAGSsetting allows overriding which HTML tags are ignored when searching a response for HTML meta tags that trigger a redirect (issue 1422, issue 3768)A new
redirect_reasonsrequest meta key exposes the reason (status code, meta refresh) behind every followed redirect (issue 3581, issue 3687)The
SCRAPY_CHECKvariable is now set to thetruestring during runs of thecheckcommand, which allows detecting contract check runs from code (issue 3704, issue 3739)A new
Item.deepcopy()method makes it easier to deep-copy items (issue 1493, issue 3671)CoreStatsalso logselapsed_time_secondsnow (issue 3638)Exceptions from
ItemLoaderinput and output processors are now more verbose (issue 3836, issue 3840)Crawler,CrawlerRunner.crawlandCrawlerRunner.create_crawlernow fail gracefully if they receive aSpidersubclass instance instead of the subclass itself (issue 2283, issue 3610, issue 3872)
Bug fixes
process_spider_exception()is now also invoked for generators (issue 220, issue 2061)System exceptions like KeyboardInterrupt are no longer caught (issue 3726)
ItemLoader.load_item()no longer makes later calls toItemLoader.get_output_value()orItemLoader.load_item()return empty data (issue 3804, issue 3819)The images pipeline (
ImagesPipeline) no longer ignores these Amazon S3 settings:AWS_ENDPOINT_URL,AWS_REGION_NAME,AWS_USE_SSL,AWS_VERIFY(issue 3625)Fixed a memory leak in
scrapy.pipelines.media.MediaPipelineaffecting, for example, non-200 responses and exceptions from custom middlewares (issue 3813)Requests with private callbacks are now correctly unserialized from disk (issue 3790)
FormRequest.from_response()now handles invalid methods like major web browsers (issue 3777, issue 3794)
Documentation
A new topic, Selecting dynamically-loaded content, covers recommended approaches to read dynamically-loaded data (issue 3703)
Broad Crawls now features information about memory usage (issue 1264, issue 3866)
The documentation of
Rulenow covers how to access the text of a link when usingCrawlSpider(issue 3711, issue 3712)A new section, Writing your own storage backend, covers writing a custom cache storage backend for
HttpCacheMiddleware(issue 3683, issue 3692)A new FAQ entry, How to split an item into multiple items in an item pipeline?, explains what to do when you want to split an item into multiple items from an item pipeline (issue 2240, issue 3672)
Updated the FAQ entry about crawl order to explain why the first few requests rarely follow the desired order (issue 1739, issue 3621)
The
LOGSTATS_INTERVALsetting (issue 3730), theFilesPipeline.file_pathandImagesPipeline.file_pathmethods (issue 2253, issue 3609) and theCrawler.stop()method (issue 3842) are now documentedSome parts of the documentation that were confusing or misleading are now clearer (issue 1347, issue 1789, issue 2289, issue 3069, issue 3615, issue 3626, issue 3668, issue 3670, issue 3673, issue 3728, issue 3762, issue 3861, issue 3882)
Minor documentation fixes (issue 3648, issue 3649, issue 3662, issue 3674, issue 3676, issue 3694, issue 3724, issue 3764, issue 3767, issue 3791, issue 3797, issue 3806, issue 3812)
Deprecation removals
The following deprecated APIs have been removed (issue 3578):
scrapy.conf(useCrawler.settings)From
scrapy.core.downloader.handlers:http.HttpDownloadHandler(usehttp10.HTTP10DownloadHandler)
scrapy.loader.ItemLoader._get_values(use_get_xpathvalues)scrapy.loader.XPathItemLoader(useItemLoader)scrapy.log(see Logging)From
scrapy.pipelines:files.FilesPipeline.file_key(usefile_path)images.ImagesPipeline.file_key(usefile_path)images.ImagesPipeline.image_key(usefile_path)images.ImagesPipeline.thumb_key(usethumb_path)
From both
scrapy.selectorandscrapy.selector.lxmlsel:From
scrapy.selector.csstranslator:ScrapyGenericTranslator(use parsel.csstranslator.GenericTranslator)ScrapyHTMLTranslator(use parsel.csstranslator.HTMLTranslator)ScrapyXPathExpr(use parsel.csstranslator.XPathExpr)
From
Selector:_root(both the__init__method argument and the object property, useroot)extract_unquoted(usegetall)select(usexpath)
From
SelectorList:extract_unquoted(usegetall)select(usexpath)x(usexpath)
scrapy.spiders.BaseSpider(useSpider)From
Spider(and subclasses):DOWNLOAD_DELAY(use download_delay)set_crawler(usefrom_crawler())
scrapy.spiders.spiders(useSpiderLoader)scrapy.telnet(usescrapy.extensions.telnet)From
scrapy.utils.python:str_to_unicode(useto_unicode)unicode_to_str(useto_bytes)
scrapy.utils.response.body_or_str
The following deprecated settings have also been removed (issue 3578):
SPIDER_MANAGER_CLASS(useSPIDER_LOADER_CLASS)
Deprecations
The
queuelib.PriorityQueuevalue for theSCHEDULER_PRIORITY_QUEUEsetting is deprecated. Usescrapy.pqueues.ScrapyPriorityQueueinstead.process_requestcallbacks passed toRulethat do not accept two arguments are deprecated.The following modules are deprecated:
scrapy.utils.http(use w3lib.http)scrapy.utils.markup(use w3lib.html)scrapy.utils.multipart(use urllib3)
The
scrapy.utils.datatypes.MergeDictclass is deprecated for Python 3 code bases. UseChainMapinstead. (issue 3878)The
scrapy.utils.gz.is_gzippedfunction is deprecated. Usescrapy.utils.gz.gzip_magic_numberinstead.
Other changes
It is now possible to run all tests from the same tox environment in parallel; the documentation now covers this and other ways to run tests (issue 3707)
It is now possible to generate an API documentation coverage report (issue 3806, issue 3810, issue 3860)
The documentation policies now require docstrings (issue 3701) that follow PEP 257 (issue 3748)
Internal fixes and cleanup (issue 3629, issue 3643, issue 3684, issue 3698, issue 3734, issue 3735, issue 3736, issue 3737, issue 3809, issue 3821, issue 3825, issue 3827, issue 3833, issue 3857, issue 3877)
Scrapy 1.6.0 (2019-01-30)
Highlights:
better Windows support;
Python 3.7 compatibility;
big documentation improvements, including a switch from
.extract_first()+.extract()API to.get()+.getall()API;feed exports, FilePipeline and MediaPipeline improvements;
better extensibility:
item_errorandrequest_reached_downloadersignals;from_crawlersupport for feed exporters, feed storages and dupefilters.scrapy.contractsfixes and new features;telnet console security improvements, first released as a backport in Scrapy 1.5.2 (2019-01-22);
clean-up of the deprecated code;
various bug fixes, small new features and usability improvements across the codebase.
Selector API changes
While these are not changes in Scrapy itself, but rather in the parsel
library which Scrapy uses for xpath/css selectors, these changes are
worth mentioning here. Scrapy now depends on parsel >= 1.5, and
Scrapy documentation is updated to follow recent parsel API conventions.
Most visible change is that .get() and .getall() selector
methods are now preferred over .extract_first() and .extract().
We feel that these new methods result in a more concise and readable code.
See extract() and extract_first() for more details.
Note
There are currently no plans to deprecate .extract()
and .extract_first() methods.
Another useful new feature is the introduction of Selector.attrib and
SelectorList.attrib properties, which make it easier to get
attributes of HTML elements. See Selecting element attributes.
CSS selectors are cached in parsel >= 1.5, which makes them faster when the same CSS path is used many times. This is very common in case of Scrapy spiders: callbacks are usually called several times, on different pages.
If you’re using custom Selector or SelectorList subclasses,
a backward incompatible change in parsel may affect your code.
See parsel changelog for a detailed description, as well as for the
full list of improvements.
Telnet console
Backward incompatible: Scrapy’s telnet console now requires username and password. See Telnet Console for more details. This change fixes a security issue; see Scrapy 1.5.2 (2019-01-22) release notes for details.
New extensibility features
from_crawlersupport is added to feed exporters and feed storages. This, among other things, allows to access Scrapy settings from custom feed storages and exporters (issue 1605, issue 3348).from_crawlersupport is added to dupefilters (issue 2956); this allows to access e.g. settings or a spider from a dupefilter.item_erroris fired when an error happens in a pipeline (issue 3256);request_reached_downloaderis fired when Downloader gets a new Request; this signal can be useful e.g. for custom Schedulers (issue 3393).new SitemapSpider
sitemap_filter()method which allows to select sitemap entries based on their attributes in SitemapSpider subclasses (issue 3512).Lazy loading of Downloader Handlers is now optional; this enables better initialization error handling in custom Downloader Handlers (issue 3394).
New FilePipeline and MediaPipeline features
Expose more options for S3FilesStore:
AWS_ENDPOINT_URL,AWS_USE_SSL,AWS_VERIFY,AWS_REGION_NAME. For example, this allows to use alternative or self-hosted AWS-compatible providers (issue 2609, issue 3548).ACL support for Google Cloud Storage:
FILES_STORE_GCS_ACLandIMAGES_STORE_GCS_ACL(issue 3199).
scrapy.contracts improvements
Exceptions in contracts code are handled better (issue 3377);
dont_filter=Trueis used for contract requests, which allows to test different callbacks with the same URL (issue 3381);request_clsattribute in Contract subclasses allow to use different Request classes in contracts, for example FormRequest (issue 3383).Fixed errback handling in contracts, e.g. for cases where a contract is executed for URL which returns non-200 response (issue 3371).
Usability improvements
more stats for RobotsTxtMiddleware (issue 3100)
INFO log level is used to show telnet host/port (issue 3115)
a message is added to IgnoreRequest in RobotsTxtMiddleware (issue 3113)
better validation of
urlargument inResponse.follow(issue 3131)non-zero exit code is returned from Scrapy commands when error happens on spider initialization (issue 3226)
Link extraction improvements: “ftp” is added to scheme list (issue 3152); “flv” is added to common video extensions (issue 3165)
better error message when an exporter is disabled (issue 3358);
scrapy shell --helpmentions syntax required for local files (./file.html) - issue 3496.Referer header value is added to RFPDupeFilter log messages (issue 3588)
Bug fixes
fixed issue with extra blank lines in .csv exports under Windows (issue 3039);
proper handling of pickling errors in Python 3 when serializing objects for disk queues (issue 3082)
flags are now preserved when copying Requests (issue 3342);
FormRequest.from_response clickdata shouldn’t ignore elements with
input[type=image](issue 3153).FormRequest.from_response should preserve duplicate keys (issue 3247)
Documentation improvements
Docs are re-written to suggest .get/.getall API instead of .extract/.extract_first. Also, Selectors docs are updated and re-structured to match latest parsel docs; they now contain more topics, such as Selecting element attributes or Extensions to CSS Selectors (issue 3390).
Using your browser’s Developer Tools for scraping is a new tutorial which replaces old Firefox and Firebug tutorials (issue 3400).
SCRAPY_PROJECT environment variable is documented (issue 3518);
troubleshooting section is added to install instructions (issue 3517);
improved links to beginner resources in the tutorial (issue 3367, issue 3468);
fixed
RETRY_HTTP_CODESdefault values in docs (issue 3335);remove unused
DEPTH_STATSoption from docs (issue 3245);other cleanups (issue 3347, issue 3350, issue 3445, issue 3544, issue 3605).
Deprecation removals
Compatibility shims for pre-1.0 Scrapy module names are removed (issue 3318):
scrapy.commandscrapy.contrib(with all submodules)scrapy.contrib_exp(with all submodules)scrapy.dupefilterscrapy.linkextractorscrapy.projectscrapy.spiderscrapy.spidermanagerscrapy.squeuescrapy.statsscrapy.statscolscrapy.utils.decorator
See Module Relocations for more information, or use suggestions from Scrapy 1.5.x deprecation warnings to update your code.
Other deprecation removals:
Deprecated scrapy.interfaces.ISpiderManager is removed; please use scrapy.interfaces.ISpiderLoader.
Deprecated
CrawlerSettingsclass is removed (issue 3327).Deprecated
Settings.overridesandSettings.defaultsattributes are removed (issue 3327, issue 3359).
Other improvements, cleanups
All Scrapy tests now pass on Windows; Scrapy testing suite is executed in a Windows environment on CI (issue 3315).
Python 3.7 support (issue 3326, issue 3150, issue 3547).
Testing and CI fixes (issue 3526, issue 3538, issue 3308, issue 3311, issue 3309, issue 3305, issue 3210, issue 3299)
scrapy.http.cookies.CookieJar.clearaccepts “domain”, “path” and “name” optional arguments (issue 3231).additional files are included to sdist (issue 3495);
code style fixes (issue 3405, issue 3304);
unneeded .strip() call is removed (issue 3519);
collections.deque is used to store MiddlewareManager methods instead of a list (issue 3476)
Scrapy 1.5.2 (2019-01-22)
Security bugfix: Telnet console extension can be easily exploited by rogue websites POSTing content to http://localhost:6023, we haven’t found a way to exploit it from Scrapy, but it is very easy to trick a browser to do so and elevates the risk for local development environment.
The fix is backward incompatible, it enables telnet user-password authentication by default with a random generated password. If you can’t upgrade right away, please consider setting
TELNETCONSOLE_PORTout of its default value.See telnet console documentation for more info
Backport CI build failure under GCE environment due to boto import error.
Scrapy 1.5.1 (2018-07-12)
This is a maintenance release with important bug fixes, but no new features:
O(N^2)gzip decompression issue which affected Python 3 and PyPy is fixed (issue 3281);skipping of TLS validation errors is improved (issue 3166);
Ctrl-C handling is fixed in Python 3.5+ (issue 3096);
testing fixes (issue 3092, issue 3263);
documentation improvements (issue 3058, issue 3059, issue 3089, issue 3123, issue 3127, issue 3189, issue 3224, issue 3280, issue 3279, issue 3201, issue 3260, issue 3284, issue 3298, issue 3294).
Scrapy 1.5.0 (2017-12-29)
This release brings small new features and improvements across the codebase. Some highlights:
Google Cloud Storage is supported in FilesPipeline and ImagesPipeline.
Crawling with proxy servers becomes more efficient, as connections to proxies can be reused now.
Warnings, exception and logging messages are improved to make debugging easier.
scrapy parsecommand now allows to set custom request meta via--metaargument.Compatibility with Python 3.6, PyPy and PyPy3 is improved; PyPy and PyPy3 are now supported officially, by running tests on CI.
Better default handling of HTTP 308, 522 and 524 status codes.
Documentation is improved, as usual.
Backward Incompatible Changes
Scrapy 1.5 drops support for Python 3.3.
Default Scrapy User-Agent now uses https link to scrapy.org (issue 2983). This is technically backward-incompatible; override
USER_AGENTif you relied on old value.Logging of settings overridden by
custom_settingsis fixed; this is technically backward-incompatible because the logger changes from[scrapy.utils.log]to[scrapy.crawler]. If you’re parsing Scrapy logs, please update your log parsers (issue 1343).LinkExtractor now ignores
m4vextension by default, this is change in behavior.522 and 524 status codes are added to
RETRY_HTTP_CODES(issue 2851)
New features
Support
<link>tags inResponse.follow(issue 2785)Support for
ptpythonREPL (issue 2654)Google Cloud Storage support for FilesPipeline and ImagesPipeline (issue 2923).
New
--metaoption of the “scrapy parse” command allows to pass additional request.meta (issue 2883)Populate spider variable when using
shell.inspect_response(issue 2812)Handle HTTP 308 Permanent Redirect (issue 2844)
Add 522 and 524 to
RETRY_HTTP_CODES(issue 2851)Log versions information at startup (issue 2857)
scrapy.mail.MailSendernow works in Python 3 (it requires Twisted 17.9.0)Connections to proxy servers are reused (issue 2743)
Add template for a downloader middleware (issue 2755)
Explicit message for NotImplementedError when parse callback not defined (issue 2831)
CrawlerProcess got an option to disable installation of root log handler (issue 2921)
LinkExtractor now ignores
m4vextension by defaultBetter log messages for responses over
DOWNLOAD_WARNSIZEandDOWNLOAD_MAXSIZElimits (issue 2927)Show warning when a URL is put to
Spider.allowed_domainsinstead of a domain (issue 2250).
Bug fixes
Fix logging of settings overridden by
custom_settings; this is technically backward-incompatible because the logger changes from[scrapy.utils.log]to[scrapy.crawler], so please update your log parsers if needed (issue 1343)Default Scrapy User-Agent now uses https link to scrapy.org (issue 2983). This is technically backward-incompatible; override
USER_AGENTif you relied on old value.Fix PyPy and PyPy3 test failures, support them officially (issue 2793, issue 2935, issue 2990, issue 3050, issue 2213, issue 3048)
Fix DNS resolver when
DNSCACHE_ENABLED=False(issue 2811)Add
cryptographyfor Debian Jessie tox test env (issue 2848)Add verification to check if Request callback is callable (issue 2766)
Port
extras/qpsclient.pyto Python 3 (issue 2849)Use getfullargspec under the scenes for Python 3 to stop DeprecationWarning (issue 2862)
Update deprecated test aliases (issue 2876)
Fix
SitemapSpidersupport for alternate links (issue 2853)
Docs
Added missing bullet point for the
AUTOTHROTTLE_TARGET_CONCURRENCYsetting. (issue 2756)Update Contributing docs, document new support channels (issue 2762, issue:3038)
Include references to Scrapy subreddit in the docs
Fix broken links; use https:// for external links (issue 2978, issue 2982, issue 2958)
Document CloseSpider extension better (issue 2759)
Use
pymongo.collection.Collection.insert_one()in MongoDB example (issue 2781)Spelling mistake and typos (issue 2828, issue 2837, issue 2884, issue 2924)
Clarify
CSVFeedSpider.headersdocumentation (issue 2826)Document
DontCloseSpiderexception and clarifyspider_idle(issue 2791)Update “Releases” section in README (issue 2764)
Fix rst syntax in
DOWNLOAD_FAIL_ON_DATALOSSdocs (issue 2763)Small fix in description of startproject arguments (issue 2866)
Clarify data types in Response.body docs (issue 2922)
Add a note about
request.meta['depth']to DepthMiddleware docs (issue 2374)Add a note about
request.meta['dont_merge_cookies']to CookiesMiddleware docs (issue 2999)Up-to-date example of project structure (issue 2964, issue 2976)
A better example of ItemExporters usage (issue 2989)
Document
from_crawlermethods for spider and downloader middlewares (issue 3019)
Scrapy 1.4.0 (2017-05-18)
Scrapy 1.4 does not bring that many breathtaking new features but quite a few handy improvements nonetheless.
Scrapy now supports anonymous FTP sessions with customizable user and
password via the new FTP_USER and FTP_PASSWORD settings.
And if you’re using Twisted version 17.1.0 or above, FTP is now available
with Python 3.
There’s a new response.follow method
for creating requests; it is now a recommended way to create Requests
in Scrapy spiders. This method makes it easier to write correct
spiders; response.follow has several advantages over creating
scrapy.Request objects directly:
it handles relative URLs;
it works properly with non-ascii URLs on non-UTF8 pages;
in addition to absolute and relative URLs it supports Selectors; for
<a>elements it can also extract their href values.
For example, instead of this:
for href in response.css('li.page a::attr(href)').extract():
url = response.urljoin(href)
yield scrapy.Request(url, self.parse, encoding=response.encoding)
One can now write this:
for a in response.css('li.page a'):
yield response.follow(a, self.parse)
Link extractors are also improved. They work similarly to what a regular
modern browser would do: leading and trailing whitespace are removed
from attributes (think href=" http://example.com") when building
Link objects. This whitespace-stripping also happens for action
attributes with FormRequest.
Please also note that link extractors do not canonicalize URLs by default anymore. This was puzzling users every now and then, and it’s not what browsers do in fact, so we removed that extra transformation on extracted links.
For those of you wanting more control on the Referer: header that Scrapy
sends when following links, you can set your own Referrer Policy.
Prior to Scrapy 1.4, the default RefererMiddleware would simply and
blindly set it to the URL of the response that generated the HTTP request
(which could leak information on your URL seeds).
By default, Scrapy now behaves much like your regular browser does.
And this policy is fully customizable with W3C standard values
(or with something really custom of your own if you wish).
See REFERRER_POLICY for details.
To make Scrapy spiders easier to debug, Scrapy logs more stats by default in 1.4: memory usage stats, detailed retry stats, detailed HTTP error code stats. A similar change is that HTTP cache path is also visible in logs now.
Last but not least, Scrapy now has the option to make JSON and XML items
more human-readable, with newlines between items and even custom indenting
offset, using the new FEED_EXPORT_INDENT setting.
Enjoy! (Or read on for the rest of changes in this release.)
Deprecations and Backward Incompatible Changes
Default to
canonicalize=Falseinscrapy.linkextractors.LinkExtractor(issue 2537, fixes issue 1941 and issue 1982): warning, this is technically backward-incompatibleEnable memusage extension by default (issue 2539, fixes issue 2187); this is technically backward-incompatible so please check if you have any non-default
MEMUSAGE_***options set.EDITORenvironment variable now takes precedence overEDITORoption defined in settings.py (issue 1829); Scrapy default settings no longer depend on environment variables. This is technically a backward incompatible change.Spider.make_requests_from_urlis deprecated (issue 1728, fixes issue 1495).
New Features
Accept proxy credentials in
proxyrequest meta key (issue 2526)Support brotli-compressed content; requires optional brotlipy (issue 2535)
New response.follow shortcut for creating requests (issue 1940)
Added
flagsargument and attribute toRequestobjects (issue 2047)Support Anonymous FTP (issue 2342)
Added
retry/count,retry/max_reachedandretry/reason_count/<reason>stats toRetryMiddleware(issue 2543)Added
httperror/response_ignored_countandhttperror/response_ignored_status_count/<status>stats toHttpErrorMiddleware(issue 2566)Customizable
Referrer policyinRefererMiddleware(issue 2306)New
data:URI download handler (issue 2334, fixes issue 2156)Log cache directory when HTTP Cache is used (issue 2611, fixes issue 2604)
Warn users when project contains duplicate spider names (fixes issue 2181)
scrapy.utils.datatypes.CaselessDictnow acceptsMappinginstances and not only dicts (issue 2646)Media downloads, with
FilesPipelineorImagesPipeline, can now optionally handle HTTP redirects using the newMEDIA_ALLOW_REDIRECTSsetting (issue 2616, fixes issue 2004)Accept non-complete responses from websites using a new
DOWNLOAD_FAIL_ON_DATALOSSsetting (issue 2590, fixes issue 2586)Optional pretty-printing of JSON and XML items via
FEED_EXPORT_INDENTsetting (issue 2456, fixes issue 1327)Allow dropping fields in
FormRequest.from_responseformdata whenNonevalue is passed (issue 667)Per-request retry times with the new
max_retry_timesmeta key (issue 2642)python -m scrapyas a more explicit alternative toscrapycommand (issue 2740)
Bug fixes
LinkExtractor now strips leading and trailing whitespaces from attributes (issue 2547, fixes issue 1614)
Properly handle whitespaces in action attribute in
FormRequest(issue 2548)Buffer CONNECT response bytes from proxy until all HTTP headers are received (issue 2495, fixes issue 2491)
FTP downloader now works on Python 3, provided you use Twisted>=17.1 (issue 2599)
Use body to choose response type after decompressing content (issue 2393, fixes issue 2145)
Always decompress
Content-Encoding: gzipatHttpCompressionMiddlewarestage (issue 2391)Respect custom log level in
Spider.custom_settings(issue 2581, fixes issue 1612)‘make htmlview’ fix for macOS (issue 2661)
Remove “commands” from the command list (issue 2695)
Fix duplicate Content-Length header for POST requests with empty body (issue 2677)
Properly cancel large downloads, i.e. above
DOWNLOAD_MAXSIZE(issue 1616)ImagesPipeline: fixed processing of transparent PNG images with palette (issue 2675)
Cleanups & Refactoring
Tests: remove temp files and folders (issue 2570), fixed ProjectUtilsTest on macOS (issue 2569), use portable pypy for Linux on Travis CI (issue 2710)
Separate building request from
_requests_to_followin CrawlSpider (issue 2562)Remove “Python 3 progress” badge (issue 2567)
Add a couple more lines to
.gitignore(issue 2557)Remove bumpversion prerelease configuration (issue 2159)
Add codecov.yml file (issue 2750)
Set context factory implementation based on Twisted version (issue 2577, fixes issue 2560)
Add omitted
selfarguments in default project middleware template (issue 2595)Remove redundant
slot.add_request()call in ExecutionEngine (issue 2617)Catch more specific
os.errorexception inscrapy.pipelines.files.FSFilesStore(issue 2644)Change “localhost” test server certificate (issue 2720)
Remove unused
MEMUSAGE_REPORTsetting (issue 2576)
Documentation
Binary mode is required for exporters (issue 2564, fixes issue 2553)
Mention issue with
FormRequest.from_responsedue to bug in lxml (issue 2572)Use single quotes uniformly in templates (issue 2596)
Document
ftp_userandftp_passwordmeta keys (issue 2587)Removed section on deprecated
contrib/(issue 2636)Recommend Anaconda when installing Scrapy on Windows (issue 2477, fixes issue 2475)
FAQ: rewrite note on Python 3 support on Windows (issue 2690)
Rearrange selector sections (issue 2705)
Remove
__nonzero__fromSelectorListdocs (issue 2683)Mention how to disable request filtering in documentation of
DUPEFILTER_CLASSsetting (issue 2714)Add sphinx_rtd_theme to docs setup readme (issue 2668)
Open file in text mode in JSON item writer example (issue 2729)
Clarify
allowed_domainsexample (issue 2670)
Scrapy 1.3.3 (2017-03-10)
Bug fixes
Make
SpiderLoaderraiseImportErroragain by default for missing dependencies and wrongSPIDER_MODULES. These exceptions were silenced as warnings since 1.3.0. A new setting is introduced to toggle between warning or exception if needed ; seeSPIDER_LOADER_WARN_ONLYfor details.
Scrapy 1.3.2 (2017-02-13)
Bug fixes
Preserve request class when converting to/from dicts (utils.reqser) (issue 2510).
Use consistent selectors for author field in tutorial (issue 2551).
Fix TLS compatibility in Twisted 17+ (issue 2558)
Scrapy 1.3.1 (2017-02-08)
New features
Support
'True'and'False'string values for boolean settings (issue 2519); you can now do something likescrapy crawl myspider -s REDIRECT_ENABLED=False.Support kwargs with
response.xpath()to use XPath variables and ad-hoc namespaces declarations ; this requires at least Parsel v1.1 (issue 2457).Add support for Python 3.6 (issue 2485).
Run tests on PyPy (warning: some tests still fail, so PyPy is not supported yet).
Bug fixes
Enforce
DNS_TIMEOUTsetting (issue 2496).Fix
viewcommand ; it was a regression in v1.3.0 (issue 2503).Fix tests regarding
*_EXPIRES settingswith Files/Images pipelines (issue 2460).Fix name of generated pipeline class when using basic project template (issue 2466).
Fix compatibility with Twisted 17+ (issue 2496, issue 2528).
Fix
scrapy.Iteminheritance on Python 3.6 (issue 2511).Enforce numeric values for components order in
SPIDER_MIDDLEWARES,DOWNLOADER_MIDDLEWARES,EXTENSIONSandSPIDER_CONTRACTS(issue 2420).
Documentation
Reword Code of Conduct section and upgrade to Contributor Covenant v1.4 (issue 2469).
Clarify that passing spider arguments converts them to spider attributes (issue 2483).
Document
formidargument onFormRequest.from_response()(issue 2497).Add .rst extension to README files (issue 2507).
Mention LevelDB cache storage backend (issue 2525).
Use
yieldin sample callback code (issue 2533).Add note about HTML entities decoding with
.re()/.re_first()(issue 1704).Typos (issue 2512, issue 2534, issue 2531).
Cleanups
Remove redundant check in
MetaRefreshMiddleware(issue 2542).Faster checks in
LinkExtractorfor allow/deny patterns (issue 2538).Remove dead code supporting old Twisted versions (issue 2544).
Scrapy 1.3.0 (2016-12-21)
This release comes rather soon after 1.2.2 for one main reason:
it was found out that releases since 0.18 up to 1.2.2 (included) use
some backported code from Twisted (scrapy.xlib.tx.*),
even if newer Twisted modules are available.
Scrapy now uses twisted.web.client and twisted.internet.endpoints directly.
(See also cleanups below.)
As it is a major change, we wanted to get the bug fix out quickly while not breaking any projects using the 1.2 series.
New Features
MailSendernow accepts single strings as values fortoandccarguments (issue 2272)scrapy fetch url,scrapy shell urlandfetch(url)inside Scrapy shell now follow HTTP redirections by default (issue 2290); Seefetchandshellfor details.HttpErrorMiddlewarenow logs errors withINFOlevel instead ofDEBUG; this is technically backward incompatible so please check your log parsers.By default, logger names now use a long-form path, e.g.
[scrapy.extensions.logstats], instead of the shorter “top-level” variant of prior releases (e.g.[scrapy]); this is backward incompatible if you have log parsers expecting the short logger name part. You can switch back to short logger names usingLOG_SHORT_NAMESset toTrue.
Dependencies & Cleanups
Scrapy now requires Twisted >= 13.1 which is the case for many Linux distributions already.
As a consequence, we got rid of
scrapy.xlib.tx.*modules, which copied some of Twisted code for users stuck with an “old” Twisted versionChunkedTransferMiddlewareis deprecated and removed from the default downloader middlewares.
Scrapy 1.2.3 (2017-03-03)
Packaging fix: disallow unsupported Twisted versions in setup.py
Scrapy 1.2.2 (2016-12-06)
Bug fixes
Fix a cryptic traceback when a pipeline fails on
open_spider()(issue 2011)Fix embedded IPython shell variables (fixing issue 396 that re-appeared in 1.2.0, fixed in issue 2418)
A couple of patches when dealing with robots.txt:
handle (non-standard) relative sitemap URLs (issue 2390)
handle non-ASCII URLs and User-Agents in Python 2 (issue 2373)
Documentation
Document
"download_latency"key inRequest’smetadict (issue 2033)Remove page on (deprecated & unsupported) Ubuntu packages from ToC (issue 2335)
A few fixed typos (issue 2346, issue 2369, issue 2369, issue 2380) and clarifications (issue 2354, issue 2325, issue 2414)
Other changes
Advertize conda-forge as Scrapy’s official conda channel (issue 2387)
More helpful error messages when trying to use
.css()or.xpath()on non-Text Responses (issue 2264)startprojectcommand now generates a samplemiddlewares.pyfile (issue 2335)Add more dependencies’ version info in
scrapy versionverbose output (issue 2404)Remove all
*.pycfiles from source distribution (issue 2386)
Scrapy 1.2.1 (2016-10-21)
Bug fixes
Include OpenSSL’s more permissive default ciphers when establishing TLS/SSL connections (issue 2314).
Fix “Location” HTTP header decoding on non-ASCII URL redirects (issue 2321).
Documentation
Fix JsonWriterPipeline example (issue 2302).
Various notes: issue 2330 on spider names, issue 2329 on middleware methods processing order, issue 2327 on getting multi-valued HTTP headers as lists.
Other changes
Removed
www.fromstart_urlsin built-in spider templates (issue 2299).
Scrapy 1.2.0 (2016-10-03)
New Features
New
FEED_EXPORT_ENCODINGsetting to customize the encoding used when writing items to a file. This can be used to turn off\uXXXXescapes in JSON output. This is also useful for those wanting something else than UTF-8 for XML or CSV output (issue 2034).startprojectcommand now supports an optional destination directory to override the default one based on the project name (issue 2005).New
SCHEDULER_DEBUGsetting to log requests serialization failures (issue 1610).JSON encoder now supports serialization of
setinstances (issue 2058).Interpret
application/json-amazonui-streamingasTextResponse(issue 1503).scrapyis imported by default when using shell tools (shell, inspect_response) (issue 2248).
Bug fixes
DefaultRequestHeaders middleware now runs before UserAgent middleware (issue 2088). Warning: this is technically backward incompatible, though we consider this a bug fix.
HTTP cache extension and plugins that use the
.scrapydata directory now work outside projects (issue 1581). Warning: this is technically backward incompatible, though we consider this a bug fix.Selectordoes not allow passing bothresponseandtextanymore (issue 2153).Fixed logging of wrong callback name with
scrapy parse(issue 2169).Fix for an odd gzip decompression bug (issue 1606).
Fix for selected callbacks when using
CrawlSpiderwithscrapy parse(issue 2225).Fix for invalid JSON and XML files when spider yields no items (issue 872).
Implement
flush()forStreamLoggeravoiding a warning in logs (issue 2125).
Refactoring
canonicalize_urlhas been moved to w3lib.url (issue 2168).
Tests & Requirements
Scrapy’s new requirements baseline is Debian 8 “Jessie”. It was previously Ubuntu 12.04 Precise. What this means in practice is that we run continuous integration tests with these (main) packages versions at a minimum: Twisted 14.0, pyOpenSSL 0.14, lxml 3.4.
Scrapy may very well work with older versions of these packages (the code base still has switches for older Twisted versions for example) but it is not guaranteed (because it’s not tested anymore).
Documentation
Grammar fixes: issue 2128, issue 1566.
Download stats badge removed from README (issue 2160).
New Scrapy architecture diagram (issue 2165).
Updated
Responseparameters documentation (issue 2197).Reworded misleading
RANDOMIZE_DOWNLOAD_DELAYdescription (issue 2190).Add StackOverflow as a support channel (issue 2257).
Scrapy 1.1.4 (2017-03-03)
Packaging fix: disallow unsupported Twisted versions in setup.py
Scrapy 1.1.3 (2016-09-22)
Bug fixes
Class attributes for subclasses of
ImagesPipelineandFilesPipelinework as they did before 1.1.1 (issue 2243, fixes issue 2198)
Documentation
Overview and tutorial rewritten to use http://toscrape.com websites (issue 2236, issue 2249, issue 2252).
Scrapy 1.1.2 (2016-08-18)
Bug fixes
Introduce a missing
IMAGES_STORE_S3_ACLsetting to override the default ACL policy inImagesPipelinewhen uploading images to S3 (note that default ACL policy is “private” – instead of “public-read” – since Scrapy 1.1.0)IMAGES_EXPIRESdefault value set back to 90 (the regression was introduced in 1.1.1)
Scrapy 1.1.1 (2016-07-13)
Bug fixes
Add “Host” header in CONNECT requests to HTTPS proxies (issue 2069)
Use response
bodywhen choosing response class (issue 2001, fixes issue 2000)Do not fail on canonicalizing URLs with wrong netlocs (issue 2038, fixes issue 2010)
a few fixes for
HttpCompressionMiddleware(andSitemapSpider):Do not decode HEAD responses (issue 2008, fixes issue 1899)
Handle charset parameter in gzip Content-Type header (issue 2050, fixes issue 2049)
Do not decompress gzip octet-stream responses (issue 2065, fixes issue 2063)
Catch (and ignore with a warning) exception when verifying certificate against IP-address hosts (issue 2094, fixes issue 2092)
Make
FilesPipelineandImagesPipelinebackward compatible again regarding the use of legacy class attributes for customization (issue 1989, fixes issue 1985)
New features
Enable genspider command outside project folder (issue 2052)
Retry HTTPS CONNECT
TunnelErrorby default (issue 1974)
Documentation
FEED_TEMPDIRsetting at lexicographical position (commit 9b3c72c)Use idiomatic
.extract_first()in overview (issue 1994)Update years in copyright notice (commit c2c8036)
Add information and example on errbacks (issue 1995)
Use “url” variable in downloader middleware example (issue 2015)
Grammar fixes (issue 2054, issue 2120)
New FAQ entry on using BeautifulSoup in spider callbacks (issue 2048)
Add notes about Scrapy not working on Windows with Python 3 (issue 2060)
Encourage complete titles in pull requests (issue 2026)
Tests
Upgrade py.test requirement on Travis CI and Pin pytest-cov to 2.2.1 (issue 2095)
Scrapy 1.1.0 (2016-05-11)
This 1.1 release brings a lot of interesting features and bug fixes:
Scrapy 1.1 has beta Python 3 support (requires Twisted >= 15.5). See Beta Python 3 Support for more details and some limitations.
Hot new features:
Item loaders now support nested loaders (issue 1467).
FormRequest.from_responseimprovements (issue 1382, issue 1137).Added setting
AUTOTHROTTLE_TARGET_CONCURRENCYand improved AutoThrottle docs (issue 1324).Added
response.textto get body as unicode (issue 1730).Anonymous S3 connections (issue 1358).
Deferreds in downloader middlewares (issue 1473). This enables better robots.txt handling (issue 1471).
HTTP caching now follows RFC2616 more closely, added settings
HTTPCACHE_ALWAYS_STOREandHTTPCACHE_IGNORE_RESPONSE_CACHE_CONTROLS(issue 1151).Selectors were extracted to the parsel library (issue 1409). This means you can use Scrapy Selectors without Scrapy and also upgrade the selectors engine without needing to upgrade Scrapy.
HTTPS downloader now does TLS protocol negotiation by default, instead of forcing TLS 1.0. You can also set the SSL/TLS method using the new
DOWNLOADER_CLIENT_TLS_METHOD.
These bug fixes may require your attention:
Don’t retry bad requests (HTTP 400) by default (issue 1289). If you need the old behavior, add
400toRETRY_HTTP_CODES.Fix shell files argument handling (issue 1710, issue 1550). If you try
scrapy shell index.htmlit will try to load the URL http://index.html, usescrapy shell ./index.htmlto load a local file.Robots.txt compliance is now enabled by default for newly-created projects (issue 1724). Scrapy will also wait for robots.txt to be downloaded before proceeding with the crawl (issue 1735). If you want to disable this behavior, update
ROBOTSTXT_OBEYinsettings.pyfile after creating a new project.Exporters now work on unicode, instead of bytes by default (issue 1080). If you use
PythonItemExporter, you may want to update your code to disable binary mode which is now deprecated.Accept XML node names containing dots as valid (issue 1533).
When uploading files or images to S3 (with
FilesPipelineorImagesPipeline), the default ACL policy is now “private” instead of “public” Warning: backward incompatible!. You can useFILES_STORE_S3_ACLto change it.We’ve reimplemented
canonicalize_url()for more correct output, especially for URLs with non-ASCII characters (issue 1947). This could change link extractors output compared to previous Scrapy versions. This may also invalidate some cache entries you could still have from pre-1.1 runs. Warning: backward incompatible!.
Keep reading for more details on other improvements and bug fixes.
Beta Python 3 Support
We have been hard at work to make Scrapy run on Python 3. As a result, now you can run spiders on Python 3.3, 3.4 and 3.5 (Twisted >= 15.5 required). Some features are still missing (and some may never be ported).
Almost all builtin extensions/middlewares are expected to work. However, we are aware of some limitations in Python 3:
Scrapy does not work on Windows with Python 3
Sending emails is not supported
FTP download handler is not supported
Telnet console is not supported
Additional New Features and Enhancements
Scrapy now has a Code of Conduct (issue 1681).
Command line tool now has completion for zsh (issue 934).
Improvements to
scrapy shell:Support for bpython and configure preferred Python shell via
SCRAPY_PYTHON_SHELL(issue 1100, issue 1444).Support URLs without scheme (issue 1498) Warning: backward incompatible!
Bring back support for relative file path (issue 1710, issue 1550).
Added
MEMUSAGE_CHECK_INTERVAL_SECONDSsetting to change default check interval (issue 1282).Download handlers are now lazy-loaded on first request using their scheme (issue 1390, issue 1421).
HTTPS download handlers do not force TLS 1.0 anymore; instead, OpenSSL’s
SSLv23_method()/TLS_method()is used allowing to try negotiating with the remote hosts the highest TLS protocol version it can (issue 1794, issue 1629).RedirectMiddlewarenow skips the status codes fromhandle_httpstatus_liston spider attribute or inRequest’smetakey (issue 1334, issue 1364, issue 1447).Form submission:
now works with
<button>elements too (issue 1469).an empty string is now used for submit buttons without a value (issue 1472)
Dict-like settings now have per-key priorities (issue 1135, issue 1149 and issue 1586).
Sending non-ASCII emails (issue 1662)
CloseSpiderandSpiderStateextensions now get disabled if no relevant setting is set (issue 1723, issue 1725).Added method
ExecutionEngine.close(issue 1423).Added method
CrawlerRunner.create_crawler(issue 1528).Scheduler priority queue can now be customized via
SCHEDULER_PRIORITY_QUEUE(issue 1822)..ppslinks are now ignored by default in link extractors (issue 1835).temporary data folder for FTP and S3 feed storages can be customized using a new
FEED_TEMPDIRsetting (issue 1847).FilesPipelineandImagesPipelinesettings are now instance attributes instead of class attributes, enabling spider-specific behaviors (issue 1891).JsonItemExporternow formats opening and closing square brackets on their own line (first and last lines of output file) (issue 1950).If available,
botocoreis used forS3FeedStorage,S3DownloadHandlerandS3FilesStore(issue 1761, issue 1883).Tons of documentation updates and related fixes (issue 1291, issue 1302, issue 1335, issue 1683, issue 1660, issue 1642, issue 1721, issue 1727, issue 1879).
Other refactoring, optimizations and cleanup (issue 1476, issue 1481, issue 1477, issue 1315, issue 1290, issue 1750, issue 1881).
Deprecations and Removals
Added
to_bytesandto_unicode, deprecatedstr_to_unicodeandunicode_to_strfunctions (issue 778).binary_is_textis introduced, to replace use ofisbinarytext(but with inverse return value) (issue 1851)The
optional_featuresset has been removed (issue 1359).The
--lsprofcommand line option has been removed (issue 1689). Warning: backward incompatible, but doesn’t break user code.The following datatypes were deprecated (issue 1720):
scrapy.utils.datatypes.MultiValueDictKeyErrorscrapy.utils.datatypes.MultiValueDictscrapy.utils.datatypes.SiteNode
The previously bundled
scrapy.xlib.pydispatchlibrary was deprecated and replaced by pydispatcher.
Relocations
telnetconsolewas relocated toextensions/(issue 1524).Note: telnet is not enabled on Python 3 (https://github.com/scrapy/scrapy/pull/1524#issuecomment-146985595)
Bugfixes
Scrapy does not retry requests that got a
HTTP 400 Bad Requestresponse anymore (issue 1289). Warning: backward incompatible!Support empty password for http_proxy config (issue 1274).
Interpret
application/x-jsonasTextResponse(issue 1333).Support link rel attribute with multiple values (issue 1201).
Fixed
scrapy.http.FormRequest.from_responsewhen there is a<base>tag (issue 1564).Fixed
TEMPLATES_DIRhandling (issue 1575).Various
FormRequestfixes (issue 1595, issue 1596, issue 1597).Makes
_monkeypatchesmore robust (issue 1634).Fixed bug on
XMLItemExporterwith non-string fields in items (issue 1738).Fixed startproject command in macOS (issue 1635).
Fixed
PythonItemExporterand CSVExporter for non-string item types (issue 1737).Various logging related fixes (issue 1294, issue 1419, issue 1263, issue 1624, issue 1654, issue 1722, issue 1726 and issue 1303).
Fixed bug in
utils.template.render_templatefile()(issue 1212).sitemaps extraction from
robots.txtis now case-insensitive (issue 1902).HTTPS+CONNECT tunnels could get mixed up when using multiple proxies to same remote host (issue 1912).
Scrapy 1.0.7 (2017-03-03)
Packaging fix: disallow unsupported Twisted versions in setup.py
Scrapy 1.0.6 (2016-05-04)
FIX: RetryMiddleware is now robust to non-standard HTTP status codes (issue 1857)
FIX: Filestorage HTTP cache was checking wrong modified time (issue 1875)
DOC: Support for Sphinx 1.4+ (issue 1893)
DOC: Consistency in selectors examples (issue 1869)
Scrapy 1.0.5 (2016-02-04)
FIX: [Backport] Ignore bogus links in LinkExtractors (fixes issue 907, commit 108195e)
TST: Changed buildbot makefile to use ‘pytest’ (commit 1f3d90a)
DOC: Fixed typos in tutorial and media-pipeline (commit 808a9ea and commit 803bd87)
DOC: Add AjaxCrawlMiddleware to DOWNLOADER_MIDDLEWARES_BASE in settings docs (commit aa94121)
Scrapy 1.0.4 (2015-12-30)
Ignoring xlib/tx folder, depending on Twisted version. (commit 7dfa979)
Run on new travis-ci infra (commit 6e42f0b)
Spelling fixes (commit 823a1cc)
escape nodename in xmliter regex (commit da3c155)
test xml nodename with dots (commit 4418fc3)
TST don’t use broken Pillow version in tests (commit a55078c)
disable log on version command. closes #1426 (commit 86fc330)
disable log on startproject command (commit db4c9fe)
Add PyPI download stats badge (commit df2b944)
don’t run tests twice on Travis if a PR is made from a scrapy/scrapy branch (commit a83ab41)
Add Python 3 porting status badge to the README (commit 73ac80d)
fixed RFPDupeFilter persistence (commit 97d080e)
TST a test to show that dupefilter persistence is not working (commit 97f2fb3)
explicit close file on file:// scheme handler (commit d9b4850)
Disable dupefilter in shell (commit c0d0734)
DOC: Add captions to toctrees which appear in sidebar (commit aa239ad)
DOC Removed pywin32 from install instructions as it’s already declared as dependency. (commit 10eb400)
Added installation notes about using Conda for Windows and other OSes. (commit 1c3600a)
Fixed minor grammar issues. (commit 7f4ddd5)
fixed a typo in the documentation. (commit b71f677)
Version 1 now exists (commit 5456c0e)
fix another invalid xpath error (commit 0a1366e)
fix ValueError: Invalid XPath: //div/[id=”not-exists”]/text() on selectors.rst (commit ca8d60f)
Typos corrections (commit 7067117)
fix typos in downloader-middleware.rst and exceptions.rst, middlware -> middleware (commit 32f115c)
Add note to Ubuntu install section about Debian compatibility (commit 23fda69)
Replace alternative macOS install workaround with virtualenv (commit 98b63ee)
Reference Homebrew’s homepage for installation instructions (commit 1925db1)
Add oldest supported tox version to contributing docs (commit 5d10d6d)
Note in install docs about pip being already included in python>=2.7.9 (commit 85c980e)
Add non-python dependencies to Ubuntu install section in the docs (commit fbd010d)
Add macOS installation section to docs (commit d8f4cba)
DOC(ENH): specify path to rtd theme explicitly (commit de73b1a)
minor: scrapy.Spider docs grammar (commit 1ddcc7b)
Make common practices sample code match the comments (commit 1b85bcf)
nextcall repetitive calls (heartbeats). (commit 55f7104)
Backport fix compatibility with Twisted 15.4.0 (commit b262411)
pin pytest to 2.7.3 (commit a6535c2)
Merge pull request #1512 from mgedmin/patch-1 (commit 8876111)
Merge pull request #1513 from mgedmin/patch-2 (commit 5d4daf8)
Typo (commit f8d0682)
Fix list formatting (commit 5f83a93)
fix Scrapy squeue tests after recent changes to queuelib (commit 3365c01)
Merge pull request #1475 from rweindl/patch-1 (commit 2d688cd)
Update tutorial.rst (commit fbc1f25)
Merge pull request #1449 from rhoekman/patch-1 (commit 7d6538c)
Small grammatical change (commit 8752294)
Add openssl version to version command (commit 13c45ac)
Scrapy 1.0.3 (2015-08-11)
add service_identity to Scrapy install_requires (commit cbc2501)
Workaround for travis#296 (commit 66af9cd)
Scrapy 1.0.2 (2015-08-06)
Twisted 15.3.0 does not raises PicklingError serializing lambda functions (commit b04dd7d)
Minor method name fix (commit 6f85c7f)
minor: scrapy.Spider grammar and clarity (commit 9c9d2e0)
Put a blurb about support channels in CONTRIBUTING (commit c63882b)
Fixed typos (commit a9ae7b0)
Fix doc reference. (commit 7c8a4fe)
Scrapy 1.0.1 (2015-07-01)
Unquote request path before passing to FTPClient, it already escape paths (commit cc00ad2)
include tests/ to source distribution in MANIFEST.in (commit eca227e)
DOC Fix SelectJmes documentation (commit b8567bc)
DOC Bring Ubuntu and Archlinux outside of Windows subsection (commit 392233f)
DOC remove version suffix from Ubuntu package (commit 5303c66)
DOC Update release date for 1.0 (commit c89fa29)
Scrapy 1.0.0 (2015-06-19)
You will find a lot of new features and bugfixes in this major release. Make sure to check our updated overview to get a glance of some of the changes, along with our brushed tutorial.
Support for returning dictionaries in spiders
Declaring and returning Scrapy Items is no longer necessary to collect the scraped data from your spider, you can now return explicit dictionaries instead.
Classic version
class MyItem(scrapy.Item):
url = scrapy.Field()
class MySpider(scrapy.Spider):
def parse(self, response):
return MyItem(url=response.url)
New version
class MySpider(scrapy.Spider):
def parse(self, response):
return {'url': response.url}
Per-spider settings (GSoC 2014)
Last Google Summer of Code project accomplished an important redesign of the mechanism used for populating settings, introducing explicit priorities to override any given setting. As an extension of that goal, we included a new level of priority for settings that act exclusively for a single spider, allowing them to redefine project settings.
Start using it by defining a custom_settings
class variable in your spider:
class MySpider(scrapy.Spider):
custom_settings = {
"DOWNLOAD_DELAY": 5.0,
"RETRY_ENABLED": False,
}
Read more about settings population: Settings
Python Logging
Scrapy 1.0 has moved away from Twisted logging to support Python built in’s as default logging system. We’re maintaining backward compatibility for most of the old custom interface to call logging functions, but you’ll get warnings to switch to the Python logging API entirely.
Old version
from scrapy import log
log.msg('MESSAGE', log.INFO)
New version
import logging
logging.info('MESSAGE')
Logging with spiders remains the same, but on top of the
log() method you’ll have access to a custom
logger created for the spider to issue log
events:
class MySpider(scrapy.Spider):
def parse(self, response):
self.logger.info('Response received')
Read more in the logging documentation: Logging
Crawler API refactoring (GSoC 2014)
Another milestone for last Google Summer of Code was a refactoring of the internal API, seeking a simpler and easier usage. Check new core interface in: Core API
A common situation where you will face these changes is while running Scrapy from scripts. Here’s a quick example of how to run a Spider manually with the new API:
from scrapy.crawler import CrawlerProcess
process = CrawlerProcess({
'USER_AGENT': 'Mozilla/4.0 (compatible; MSIE 7.0; Windows NT 5.1)'
})
process.crawl(MySpider)
process.start()
Bear in mind this feature is still under development and its API may change until it reaches a stable status.
See more examples for scripts running Scrapy: Common Practices
Module Relocations
There’s been a large rearrangement of modules trying to improve the general
structure of Scrapy. Main changes were separating various subpackages into
new projects and dissolving both scrapy.contrib and scrapy.contrib_exp
into top level packages. Backward compatibility was kept among internal
relocations, while importing deprecated modules expect warnings indicating
their new place.
Full list of relocations
Outsourced packages
Note
These extensions went through some minor changes, e.g. some setting names were changed. Please check the documentation in each new repository to get familiar with the new usage.
Old location |
New location |
|---|---|
scrapy.commands.deploy |
scrapyd-client (See other alternatives here: Deploying Spiders) |
scrapy.contrib.djangoitem |
|
scrapy.webservice |
scrapy.contrib_exp and scrapy.contrib dissolutions
Old location |
New location |
|---|---|
scrapy.contrib_exp.downloadermiddleware.decompression |
scrapy.downloadermiddlewares.decompression |
scrapy.contrib_exp.iterators |
scrapy.utils.iterators |
scrapy.contrib.downloadermiddleware |
scrapy.downloadermiddlewares |
scrapy.contrib.exporter |
scrapy.exporters |
scrapy.contrib.linkextractors |
scrapy.linkextractors |
scrapy.contrib.loader |
scrapy.loader |
scrapy.contrib.loader.processor |
scrapy.loader.processors |
scrapy.contrib.pipeline |
scrapy.pipelines |
scrapy.contrib.spidermiddleware |
scrapy.spidermiddlewares |
scrapy.contrib.spiders |
scrapy.spiders |
|
scrapy.extensions.* |
Plural renames and Modules unification
Old location |
New location |
|---|---|
scrapy.command |
scrapy.commands |
scrapy.dupefilter |
scrapy.dupefilters |
scrapy.linkextractor |
scrapy.linkextractors |
scrapy.spider |
scrapy.spiders |
scrapy.squeue |
scrapy.squeues |
scrapy.statscol |
scrapy.statscollectors |
scrapy.utils.decorator |
scrapy.utils.decorators |
Class renames
Old location |
New location |
|---|---|
scrapy.spidermanager.SpiderManager |
scrapy.spiderloader.SpiderLoader |
Settings renames
Old location |
New location |
|---|---|
SPIDER_MANAGER_CLASS |
SPIDER_LOADER_CLASS |
Changelog
New Features and Enhancements
Python logging (issue 1060, issue 1235, issue 1236, issue 1240, issue 1259, issue 1278, issue 1286)
FEED_EXPORT_FIELDS option (issue 1159, issue 1224)
Dns cache size and timeout options (issue 1132)
support namespace prefix in xmliter_lxml (issue 963)
Reactor threadpool max size setting (issue 1123)
Allow spiders to return dicts. (issue 1081)
Add Response.urljoin() helper (issue 1086)
look in ~/.config/scrapy.cfg for user config (issue 1098)
handle TLS SNI (issue 1101)
Selectorlist extract first (issue 624, issue 1145)
Added JmesSelect (issue 1016)
add gzip compression to filesystem http cache backend (issue 1020)
CSS support in link extractors (issue 983)
httpcache dont_cache meta #19 #689 (issue 821)
add signal to be sent when request is dropped by the scheduler (issue 961)
avoid download large response (issue 946)
Allow to specify the quotechar in CSVFeedSpider (issue 882)
Add referer to “Spider error processing” log message (issue 795)
process robots.txt once (issue 896)
GSoC Per-spider settings (issue 854)
Add project name validation (issue 817)
GSoC API cleanup (issue 816, issue 1128, issue 1147, issue 1148, issue 1156, issue 1185, issue 1187, issue 1258, issue 1268, issue 1276, issue 1285, issue 1284)
Be more responsive with IO operations (issue 1074 and issue 1075)
Do leveldb compaction for httpcache on closing (issue 1297)
Deprecations and Removals
Deprecate htmlparser link extractor (issue 1205)
remove deprecated code from FeedExporter (issue 1155)
a leftover for.15 compatibility (issue 925)
drop support for CONCURRENT_REQUESTS_PER_SPIDER (issue 895)
Drop old engine code (issue 911)
Deprecate SgmlLinkExtractor (issue 777)
Relocations
Move exporters/__init__.py to exporters.py (issue 1242)
Move base classes to their packages (issue 1218, issue 1233)
Module relocation (issue 1181, issue 1210)
rename SpiderManager to SpiderLoader (issue 1166)
Remove djangoitem (issue 1177)
remove scrapy deploy command (issue 1102)
dissolve contrib_exp (issue 1134)
Deleted bin folder from root, fixes #913 (issue 914)
Remove jsonrpc based webservice (issue 859)
Move Test cases under project root dir (issue 827, issue 841)
Fix backward incompatibility for relocated paths in settings (issue 1267)
Documentation
CrawlerProcess documentation (issue 1190)
Favoring web scraping over screen scraping in the descriptions (issue 1188)
Some improvements for Scrapy tutorial (issue 1180)
Documenting Files Pipeline together with Images Pipeline (issue 1150)
deployment docs tweaks (issue 1164)
Added deployment section covering scrapyd-deploy and shub (issue 1124)
Adding more settings to project template (issue 1073)
some improvements to overview page (issue 1106)
Updated link in docs/topics/architecture.rst (issue 647)
DOC reorder topics (issue 1022)
updating list of Request.meta special keys (issue 1071)
DOC document download_timeout (issue 898)
DOC simplify extension docs (issue 893)
Leaks docs (issue 894)
DOC document from_crawler method for item pipelines (issue 904)
Spider_error doesn’t support deferreds (issue 1292)
Corrections & Sphinx related fixes (issue 1220, issue 1219, issue 1196, issue 1172, issue 1171, issue 1169, issue 1160, issue 1154, issue 1127, issue 1112, issue 1105, issue 1041, issue 1082, issue 1033, issue 944, issue 866, issue 864, issue 796, issue 1260, issue 1271, issue 1293, issue 1298)
Bugfixes
Item multi inheritance fix (issue 353, issue 1228)
ItemLoader.load_item: iterate over copy of fields (issue 722)
Fix Unhandled error in Deferred (RobotsTxtMiddleware) (issue 1131, issue 1197)
Force to read DOWNLOAD_TIMEOUT as int (issue 954)
scrapy.utils.misc.load_object should print full traceback (issue 902)
Fix bug for “.local” host name (issue 878)
Fix for Enabled extensions, middlewares, pipelines info not printed anymore (issue 879)
fix dont_merge_cookies bad behaviour when set to false on meta (issue 846)
Python 3 In Progress Support
disable scrapy.telnet if twisted.conch is not available (issue 1161)
fix Python 3 syntax errors in ajaxcrawl.py (issue 1162)
more python3 compatibility changes for urllib (issue 1121)
assertItemsEqual was renamed to assertCountEqual in Python 3. (issue 1070)
Import unittest.mock if available. (issue 1066)
updated deprecated cgi.parse_qsl to use six’s parse_qsl (issue 909)
Prevent Python 3 port regressions (issue 830)
PY3: use MutableMapping for python 3 (issue 810)
PY3: use six.BytesIO and six.moves.cStringIO (issue 803)
PY3: fix xmlrpclib and email imports (issue 801)
PY3: use six for robotparser and urlparse (issue 800)
PY3: use six.iterkeys, six.iteritems, and tempfile (issue 799)
PY3: fix has_key and use six.moves.configparser (issue 798)
PY3: use six.moves.cPickle (issue 797)
PY3 make it possible to run some tests in Python3 (issue 776)
Tests
remove unnecessary lines from py3-ignores (issue 1243)
Fix remaining warnings from pytest while collecting tests (issue 1206)
Add docs build to travis (issue 1234)
TST don’t collect tests from deprecated modules. (issue 1165)
install service_identity package in tests to prevent warnings (issue 1168)
Fix deprecated settings API in tests (issue 1152)
Add test for webclient with POST method and no body given (issue 1089)
py3-ignores.txt supports comments (issue 1044)
modernize some of the asserts (issue 835)
selector.__repr__ test (issue 779)
Code refactoring
CSVFeedSpider cleanup: use iterate_spider_output (issue 1079)
remove unnecessary check from scrapy.utils.spider.iter_spider_output (issue 1078)
Pydispatch pep8 (issue 992)
Removed unused ‘load=False’ parameter from walk_modules() (issue 871)
For consistency, use
job_dirhelper inSpiderStateextension. (issue 805)rename “sflo” local variables to less cryptic “log_observer” (issue 775)
Scrapy 0.24.6 (2015-04-20)
encode invalid xpath with unicode_escape under PY2 (commit 07cb3e5)
fix IPython shell scope issue and load IPython user config (commit 2c8e573)
Fix small typo in the docs (commit d694019)
Fix small typo (commit f92fa83)
Converted sel.xpath() calls to response.xpath() in Extracting the data (commit c2c6d15)
Scrapy 0.24.5 (2015-02-25)
Support new _getEndpoint Agent signatures on Twisted 15.0.0 (commit 540b9bc)
DOC a couple more references are fixed (commit b4c454b)
DOC fix a reference (commit e3c1260)
t.i.b.ThreadedResolver is now a new-style class (commit 9e13f42)
S3DownloadHandler: fix auth for requests with quoted paths/query params (commit cdb9a0b)
fixed the variable types in mailsender documentation (commit bb3a848)
Reset items_scraped instead of item_count (commit edb07a4)
Tentative attention message about what document to read for contributions (commit 7ee6f7a)
mitmproxy 0.10.1 needs netlib 0.10.1 too (commit 874fcdd)
pin mitmproxy 0.10.1 as >0.11 does not work with tests (commit c6b21f0)
Test the parse command locally instead of against an external url (commit c3a6628)
Patches Twisted issue while closing the connection pool on HTTPDownloadHandler (commit d0bf957)
Updates documentation on dynamic item classes. (commit eeb589a)
Merge pull request #943 from Lazar-T/patch-3 (commit 5fdab02)
typo (commit b0ae199)
pywin32 is required by Twisted. closes #937 (commit 5cb0cfb)
Update install.rst (commit 781286b)
Merge pull request #928 from Lazar-T/patch-1 (commit b415d04)
comma instead of fullstop (commit 627b9ba)
Merge pull request #885 from jsma/patch-1 (commit de909ad)
Update request-response.rst (commit 3f3263d)
SgmlLinkExtractor - fix for parsing <area> tag with Unicode present (commit 49b40f0)
Scrapy 0.24.4 (2014-08-09)
pem file is used by mockserver and required by scrapy bench (commit 5eddc68)
scrapy bench needs scrapy.tests* (commit d6cb999)
Scrapy 0.24.3 (2014-08-09)
no need to waste travis-ci time on py3 for 0.24 (commit 8e080c1)
Update installation docs (commit 1d0c096)
There is a trove classifier for Scrapy framework! (commit 4c701d7)
update other places where w3lib version is mentioned (commit d109c13)
Update w3lib requirement to 1.8.0 (commit 39d2ce5)
Use w3lib.html.replace_entities() (remove_entities() is deprecated) (commit 180d3ad)
set zip_safe=False (commit a51ee8b)
do not ship tests package (commit ee3b371)
scrapy.bat is not needed anymore (commit c3861cf)
Modernize setup.py (commit 362e322)
headers can not handle non-string values (commit 94a5c65)
fix ftp test cases (commit a274a7f)
The sum up of travis-ci builds are taking like 50min to complete (commit ae1e2cc)
Update shell.rst typo (commit e49c96a)
removes weird indentation in the shell results (commit 1ca489d)
improved explanations, clarified blog post as source, added link for XPath string functions in the spec (commit 65c8f05)
renamed UserTimeoutError and ServerTimeouterror #583 (commit 037f6ab)
adding some xpath tips to selectors docs (commit 2d103e0)
fix tests to account for https://github.com/scrapy/w3lib/pull/23 (commit f8d366a)
get_func_args maximum recursion fix #728 (commit 81344ea)
Updated input/output processor example according to #560. (commit f7c4ea8)
Fixed Python syntax in tutorial. (commit db59ed9)
Add test case for tunneling proxy (commit f090260)
Bugfix for leaking Proxy-Authorization header to remote host when using tunneling (commit d8793af)
Extract links from XHTML documents with MIME-Type “application/xml” (commit ed1f376)
Merge pull request #793 from roysc/patch-1 (commit 91a1106)
Fix typo in commands.rst (commit 743e1e2)
better testcase for settings.overrides.setdefault (commit e22daaf)
Using CRLF as line marker according to http 1.1 definition (commit 5ec430b)
Scrapy 0.24.2 (2014-07-08)
Use a mutable mapping to proxy deprecated settings.overrides and settings.defaults attribute (commit e5e8133)
there is not support for python3 yet (commit 3cd6146)
Update python compatible version set to Debian packages (commit fa5d76b)
DOC fix formatting in release notes (commit c6a9e20)
Scrapy 0.24.1 (2014-06-27)
Fix deprecated CrawlerSettings and increase backward compatibility with .defaults attribute (commit 8e3f20a)
Scrapy 0.24.0 (2014-06-26)
Enhancements
Add new lxml based LinkExtractor to replace unmaintained SgmlLinkExtractor (issue 559, issue 761, issue 763)
Cleanup settings API - part of per-spider settings GSoC project (issue 737)
Add UTF8 encoding header to templates (issue 688, issue 762)
Telnet console now binds to 127.0.0.1 by default (issue 699)
Update Debian/Ubuntu install instructions (issue 509, issue 549)
Disable smart strings in lxml XPath evaluations (issue 535)
Restore filesystem based cache as default for http cache middleware (issue 541, issue 500, issue 571)
Expose current crawler in Scrapy shell (issue 557)
Improve testsuite comparing CSV and XML exporters (issue 570)
New
offsite/filteredandoffsite/domainsstats (issue 566)Support process_links as generator in CrawlSpider (issue 555)
Verbose logging and new stats counters for DupeFilter (issue 553)
Add a mimetype parameter to
MailSender.send()(issue 602)Generalize file pipeline log messages (issue 622)
Replace unencodeable codepoints with html entities in SGMLLinkExtractor (issue 565)
Converted SEP documents to rst format (issue 629, issue 630, issue 638, issue 632, issue 636, issue 640, issue 635, issue 634, issue 639, issue 637, issue 631, issue 633, issue 641, issue 642)
Tests and docs for clickdata’s nr index in FormRequest (issue 646, issue 645)
Allow to disable a downloader handler just like any other component (issue 650)
Log when a request is discarded after too many redirections (issue 654)
Log error responses if they are not handled by spider callbacks (issue 612, issue 656)
Add content-type check to http compression mw (issue 193, issue 660)
Run pypy tests using latest pypi from ppa (issue 674)
Run test suite using pytest instead of trial (issue 679)
Build docs and check for dead links in tox environment (issue 687)
Make scrapy.version_info a tuple of integers (issue 681, issue 692)
Infer exporter’s output format from filename extensions (issue 546, issue 659, issue 760)
Support case-insensitive domains in
url_is_from_any_domain()(issue 693)Remove pep8 warnings in project and spider templates (issue 698)
Tests and docs for
request_fingerprintfunction (issue 597)Update SEP-19 for GSoC project
per-spider settings(issue 705)Set exit code to non-zero when contracts fails (issue 727)
Add a setting to control what class is instantiated as Downloader component (issue 738)
Pass response in
item_droppedsignal (issue 724)Improve
scrapy checkcontracts command (issue 733, issue 752)Document
spider.closed()shortcut (issue 719)Document
request_scheduledsignal (issue 746)Add a note about reporting security issues (issue 697)
Add LevelDB http cache storage backend (issue 626, issue 500)
Sort spider list output of
scrapy listcommand (issue 742)Multiple documentation enhancements and fixes (issue 575, issue 587, issue 590, issue 596, issue 610, issue 617, issue 618, issue 627, issue 613, issue 643, issue 654, issue 675, issue 663, issue 711, issue 714)
Bugfixes
Encode unicode URL value when creating Links in RegexLinkExtractor (issue 561)
Ignore None values in ItemLoader processors (issue 556)
Fix link text when there is an inner tag in SGMLLinkExtractor and HtmlParserLinkExtractor (issue 485, issue 574)
Fix wrong checks on subclassing of deprecated classes (issue 581, issue 584)
Handle errors caused by inspect.stack() failures (issue 582)
Fix a reference to unexistent engine attribute (issue 593, issue 594)
Fix dynamic itemclass example usage of type() (issue 603)
Use lucasdemarchi/codespell to fix typos (issue 628)
Fix default value of attrs argument in SgmlLinkExtractor to be tuple (issue 661)
Fix XXE flaw in sitemap reader (issue 676)
Fix engine to support filtered start requests (issue 707)
Fix offsite middleware case on urls with no hostnames (issue 745)
Testsuite doesn’t require PIL anymore (issue 585)
Scrapy 0.22.2 (released 2014-02-14)
fix a reference to unexistent engine.slots. closes #593 (commit 13c099a)
downloaderMW doc typo (spiderMW doc copy remnant) (commit 8ae11bf)
Correct typos (commit 1346037)
Scrapy 0.22.1 (released 2014-02-08)
localhost666 can resolve under certain circumstances (commit 2ec2279)
test inspect.stack failure (commit cc3eda3)
Handle cases when inspect.stack() fails (commit 8cb44f9)
Fix wrong checks on subclassing of deprecated classes. closes #581 (commit 46d98d6)
Docs: 4-space indent for final spider example (commit 13846de)
Fix HtmlParserLinkExtractor and tests after #485 merge (commit 368a946)
BaseSgmlLinkExtractor: Fixed the missing space when the link has an inner tag (commit b566388)
BaseSgmlLinkExtractor: Added unit test of a link with an inner tag (commit c1cb418)
BaseSgmlLinkExtractor: Fixed unknown_endtag() so that it only set current_link=None when the end tag match the opening tag (commit 7e4d627)
Fix tests for Travis-CI build (commit 76c7e20)
replace unencodable codepoints with html entities. fixes #562 and #285 (commit 5f87b17)
RegexLinkExtractor: encode URL unicode value when creating Links (commit d0ee545)
Updated the tutorial crawl output with latest output. (commit 8da65de)
Updated shell docs with the crawler reference and fixed the actual shell output. (commit 875b9ab)
PEP8 minor edits. (commit f89efaf)
Expose current crawler in the Scrapy shell. (commit 5349cec)
Unused re import and PEP8 minor edits. (commit 387f414)
Ignore None’s values when using the ItemLoader. (commit 0632546)
DOC Fixed HTTPCACHE_STORAGE typo in the default value which is now Filesystem instead Dbm. (commit cde9a8c)
show Ubuntu setup instructions as literal code (commit fb5c9c5)
Update Ubuntu installation instructions (commit 70fb105)
Merge pull request #550 from stray-leone/patch-1 (commit 6f70b6a)
modify the version of Scrapy Ubuntu package (commit 725900d)
fix 0.22.0 release date (commit af0219a)
fix typos in news.rst and remove (not released yet) header (commit b7f58f4)
Scrapy 0.22.0 (released 2014-01-17)
Enhancements
[Backward incompatible] Switched HTTPCacheMiddleware backend to filesystem (issue 541) To restore old backend set
HTTPCACHE_STORAGEtoscrapy.contrib.httpcache.DbmCacheStorageProxy https:// urls using CONNECT method (issue 392, issue 397)
Add a middleware to crawl ajax crawleable pages as defined by google (issue 343)
Rename scrapy.spider.BaseSpider to scrapy.spider.Spider (issue 510, issue 519)
Selectors register EXSLT namespaces by default (issue 472)
Unify item loaders similar to selectors renaming (issue 461)
Make
RFPDupeFilterclass easily subclassable (issue 533)Improve test coverage and forthcoming Python 3 support (issue 525)
Promote startup info on settings and middleware to INFO level (issue 520)
Support partials in
get_func_argsutil (issue 506, issue:504)Allow running individual tests via tox (issue 503)
Update extensions ignored by link extractors (issue 498)
Add middleware methods to get files/images/thumbs paths (issue 490)
Improve offsite middleware tests (issue 478)
Add a way to skip default Referer header set by RefererMiddleware (issue 475)
Do not send
x-gzipin defaultAccept-Encodingheader (issue 469)Support defining http error handling using settings (issue 466)
Use modern python idioms wherever you find legacies (issue 497)
Improve and correct documentation (issue 527, issue 524, issue 521, issue 517, issue 512, issue 505, issue 502, issue 489, issue 465, issue 460, issue 425, issue 536)
Fixes
Update Selector class imports in CrawlSpider template (issue 484)
Fix unexistent reference to
engine.slots(issue 464)Do not try to call
body_as_unicode()on a non-TextResponse instance (issue 462)Warn when subclassing XPathItemLoader, previously it only warned on instantiation. (issue 523)
Warn when subclassing XPathSelector, previously it only warned on instantiation. (issue 537)
Multiple fixes to memory stats (issue 531, issue 530, issue 529)
Fix overriding url in
FormRequest.from_response()(issue 507)Fix tests runner under pip 1.5 (issue 513)
Fix logging error when spider name is unicode (issue 479)
Scrapy 0.20.2 (released 2013-12-09)
Update CrawlSpider Template with Selector changes (commit 6d1457d)
fix method name in tutorial. closes GH-480 (commit b4fc359
Scrapy 0.20.1 (released 2013-11-28)
include_package_data is required to build wheels from published sources (commit 5ba1ad5)
process_parallel was leaking the failures on its internal deferreds. closes #458 (commit 419a780)
Scrapy 0.20.0 (released 2013-11-08)
Enhancements
New Selector’s API including CSS selectors (issue 395 and issue 426),
Request/Response url/body attributes are now immutable (modifying them had been deprecated for a long time)
ITEM_PIPELINESis now defined as a dict (instead of a list)Sitemap spider can fetch alternate URLs (issue 360)
Selector.remove_namespaces()now remove namespaces from element’s attributes. (issue 416)Paved the road for Python 3.3+ (issue 435, issue 436, issue 431, issue 452)
New item exporter using native python types with nesting support (issue 366)
Tune HTTP1.1 pool size so it matches concurrency defined by settings (commit b43b5f575)
scrapy.mail.MailSender now can connect over TLS or upgrade using STARTTLS (issue 327)
New FilesPipeline with functionality factored out from ImagesPipeline (issue 370, issue 409)
Recommend Pillow instead of PIL for image handling (issue 317)
Added Debian packages for Ubuntu Quantal and Raring (commit 86230c0)
Mock server (used for tests) can listen for HTTPS requests (issue 410)
Remove multi spider support from multiple core components (issue 422, issue 421, issue 420, issue 419, issue 423, issue 418)
Travis-CI now tests Scrapy changes against development versions of
w3libandqueuelibpython packages.Add pypy 2.1 to continuous integration tests (commit ecfa7431)
Pylinted, pep8 and removed old-style exceptions from source (issue 430, issue 432)
Use importlib for parametric imports (issue 445)
Handle a regression introduced in Python 2.7.5 that affects XmlItemExporter (issue 372)
Bugfix crawling shutdown on SIGINT (issue 450)
Do not submit
resettype inputs in FormRequest.from_response (commit b326b87)Do not silence download errors when request errback raises an exception (commit 684cfc0)
Bugfixes
Fix tests under Django 1.6 (commit b6bed44c)
Lot of bugfixes to retry middleware under disconnections using HTTP 1.1 download handler
Fix inconsistencies among Twisted releases (issue 406)
Fix invalid variable name in setup.py (issue 429)
Fix tutorial references (issue 387)
Improve request-response docs (issue 391)
Improve best practices docs (issue 399, issue 400, issue 401, issue 402)
Improve django integration docs (issue 404)
Document
bindaddressrequest meta (commit 37c24e01d7)Improve
Requestclass documentation (issue 226)
Other
Dropped Python 2.6 support (issue 448)
Add cssselect python package as install dependency
Drop libxml2 and multi selector’s backend support, lxml is required from now on.
Minimum Twisted version increased to 10.0.0, dropped Twisted 8.0 support.
Running test suite now requires
mockpython library (issue 390)
Thanks
Thanks to everyone who contribute to this release!
List of contributors sorted by number of commits:
69 Daniel Graña <dangra@...>
37 Pablo Hoffman <pablo@...>
13 Mikhail Korobov <kmike84@...>
9 Alex Cepoi <alex.cepoi@...>
9 alexanderlukanin13 <alexander.lukanin.13@...>
8 Rolando Espinoza La fuente <darkrho@...>
8 Lukasz Biedrycki <lukasz.biedrycki@...>
6 Nicolas Ramirez <nramirez.uy@...>
3 Paul Tremberth <paul.tremberth@...>
2 Martin Olveyra <molveyra@...>
2 Stefan <misc@...>
2 Rolando Espinoza <darkrho@...>
2 Loren Davie <loren@...>
2 irgmedeiros <irgmedeiros@...>
1 Stefan Koch <taikano@...>
1 Stefan <cct@...>
1 scraperdragon <dragon@...>
1 Kumara Tharmalingam <ktharmal@...>
1 Francesco Piccinno <stack.box@...>
1 Marcos Campal <duendex@...>
1 Dragon Dave <dragon@...>
1 Capi Etheriel <barraponto@...>
1 cacovsky <amarquesferraz@...>
1 Berend Iwema <berend@...>
Scrapy 0.18.4 (released 2013-10-10)
IPython refuses to update the namespace. fix #396 (commit 3d32c4f)
Fix AlreadyCalledError replacing a request in shell command. closes #407 (commit b1d8919)
Fix start_requests laziness and early hangs (commit 89faf52)
Scrapy 0.18.3 (released 2013-10-03)
fix regression on lazy evaluation of start requests (commit 12693a5)
forms: do not submit reset inputs (commit e429f63)
increase unittest timeouts to decrease travis false positive failures (commit 912202e)
backport master fixes to json exporter (commit cfc2d46)
Fix permission and set umask before generating sdist tarball (commit 06149e0)
Scrapy 0.18.2 (released 2013-09-03)
Backport
scrapy checkcommand fixes and backward compatible multi crawler process(issue 339)
Scrapy 0.18.1 (released 2013-08-27)
remove extra import added by cherry picked changes (commit d20304e)
fix crawling tests under twisted pre 11.0.0 (commit 1994f38)
py26 can not format zero length fields {} (commit abf756f)
test PotentiaDataLoss errors on unbound responses (commit b15470d)
Treat responses without content-length or Transfer-Encoding as good responses (commit c4bf324)
do no include ResponseFailed if http11 handler is not enabled (commit 6cbe684)
New HTTP client wraps connection lost in ResponseFailed exception. fix #373 (commit 1a20bba)
limit travis-ci build matrix (commit 3b01bb8)
Merge pull request #375 from peterarenot/patch-1 (commit fa766d7)
Fixed so it refers to the correct folder (commit 3283809)
added Quantal & Raring to support Ubuntu releases (commit 1411923)
fix retry middleware which didn’t retry certain connection errors after the upgrade to http1 client, closes GH-373 (commit bb35ed0)
fix XmlItemExporter in Python 2.7.4 and 2.7.5 (commit de3e451)
minor updates to 0.18 release notes (commit c45e5f1)
fix contributors list format (commit 0b60031)
Scrapy 0.18.0 (released 2013-08-09)
Lot of improvements to testsuite run using Tox, including a way to test on pypi
Handle GET parameters for AJAX crawleable urls (commit 3fe2a32)
Use lxml recover option to parse sitemaps (issue 347)
Bugfix cookie merging by hostname and not by netloc (issue 352)
Support disabling
HttpCompressionMiddlewareusing a flag setting (issue 359)Support xml namespaces using
iternodesparser inXMLFeedSpider(issue 12)Support
dont_cacherequest meta flag (issue 19)Bugfix
scrapy.utils.gz.gunzipbroken by changes in python 2.7.4 (commit 4dc76e)Bugfix url encoding on
SgmlLinkExtractor(issue 24)Bugfix
TakeFirstprocessor shouldn’t discard zero (0) value (issue 59)Support nested items in xml exporter (issue 66)
Improve cookies handling performance (issue 77)
Log dupe filtered requests once (issue 105)
Split redirection middleware into status and meta based middlewares (issue 78)
Use HTTP1.1 as default downloader handler (issue 109 and issue 318)
Support xpath form selection on
FormRequest.from_response(issue 185)Bugfix unicode decoding error on
SgmlLinkExtractor(issue 199)Bugfix signal dispatching on pypi interpreter (issue 205)
Improve request delay and concurrency handling (issue 206)
Add RFC2616 cache policy to
HttpCacheMiddleware(issue 212)Allow customization of messages logged by engine (issue 214)
Multiples improvements to
DjangoItem(issue 217, issue 218, issue 221)Extend Scrapy commands using setuptools entry points (issue 260)
Allow spider
allowed_domainsvalue to be set/tuple (issue 261)Support
settings.getdict(issue 269)Simplify internal
scrapy.core.scraperslot handling (issue 271)Added
Item.copy(issue 290)Collect idle downloader slots (issue 297)
Add
ftp://scheme downloader handler (issue 329)Added downloader benchmark webserver and spider tools Benchmarking
Moved persistent (on disk) queues to a separate project (queuelib) which Scrapy now depends on
Add Scrapy commands using external libraries (issue 260)
Added
--pdboption toscrapycommand line toolAdded
XPathSelector.remove_namespaceswhich allows to remove all namespaces from XML documents for convenience (to work with namespace-less XPaths). Documented in Selectors.Several improvements to spider contracts
New default middleware named MetaRefreshMiddldeware that handles meta-refresh html tag redirections,
MetaRefreshMiddldeware and RedirectMiddleware have different priorities to address #62
added from_crawler method to spiders
added system tests with mock server
more improvements to macOS compatibility (thanks Alex Cepoi)
several more cleanups to singletons and multi-spider support (thanks Nicolas Ramirez)
support custom download slots
added –spider option to “shell” command.
log overridden settings when Scrapy starts
Thanks to everyone who contribute to this release. Here is a list of contributors sorted by number of commits:
130 Pablo Hoffman <pablo@...>
97 Daniel Graña <dangra@...>
20 Nicolás Ramírez <nramirez.uy@...>
13 Mikhail Korobov <kmike84@...>
12 Pedro Faustino <pedrobandim@...>
11 Steven Almeroth <sroth77@...>
5 Rolando Espinoza La fuente <darkrho@...>
4 Michal Danilak <mimino.coder@...>
4 Alex Cepoi <alex.cepoi@...>
4 Alexandr N Zamaraev (aka tonal) <tonal@...>
3 paul <paul.tremberth@...>
3 Martin Olveyra <molveyra@...>
3 Jordi Llonch <llonchj@...>
3 arijitchakraborty <myself.arijit@...>
2 Shane Evans <shane.evans@...>
2 joehillen <joehillen@...>
2 Hart <HartSimha@...>
2 Dan <ellisd23@...>
1 Zuhao Wan <wanzuhao@...>
1 whodatninja <blake@...>
1 vkrest <v.krestiannykov@...>
1 tpeng <pengtaoo@...>
1 Tom Mortimer-Jones <tom@...>
1 Rocio Aramberri <roschegel@...>
1 Pedro <pedro@...>
1 notsobad <wangxiaohugg@...>
1 Natan L <kuyanatan.nlao@...>
1 Mark Grey <mark.grey@...>
1 Luan <luanpab@...>
1 Libor Nenadál <libor.nenadal@...>
1 Juan M Uys <opyate@...>
1 Jonas Brunsgaard <jonas.brunsgaard@...>
1 Ilya Baryshev <baryshev@...>
1 Hasnain Lakhani <m.hasnain.lakhani@...>
1 Emanuel Schorsch <emschorsch@...>
1 Chris Tilden <chris.tilden@...>
1 Capi Etheriel <barraponto@...>
1 cacovsky <amarquesferraz@...>
1 Berend Iwema <berend@...>
Scrapy 0.16.5 (released 2013-05-30)
obey request method when Scrapy deploy is redirected to a new endpoint (commit 8c4fcee)
fix inaccurate downloader middleware documentation. refs #280 (commit 40667cb)
doc: remove links to diveintopython.org, which is no longer available. closes #246 (commit bd58bfa)
Find form nodes in invalid html5 documents (commit e3d6945)
Fix typo labeling attrs type bool instead of list (commit a274276)
Scrapy 0.16.4 (released 2013-01-23)
fixes spelling errors in documentation (commit 6d2b3aa)
add doc about disabling an extension. refs #132 (commit c90de33)
Fixed error message formatting. log.err() doesn’t support cool formatting and when error occurred, the message was: “ERROR: Error processing %(item)s” (commit c16150c)
lint and improve images pipeline error logging (commit 56b45fc)
fixed doc typos (commit 243be84)
add documentation topics: Broad Crawls & Common Practices (commit 1fbb715)
fix bug in Scrapy parse command when spider is not specified explicitly. closes #209 (commit c72e682)
Update docs/topics/commands.rst (commit 28eac7a)
Scrapy 0.16.3 (released 2012-12-07)
Remove concurrency limitation when using download delays and still ensure inter-request delays are enforced (commit 487b9b5)
add error details when image pipeline fails (commit 8232569)
improve macOS compatibility (commit 8dcf8aa)
setup.py: use README.rst to populate long_description (commit 7b5310d)
doc: removed obsolete references to ClientForm (commit 80f9bb6)
correct docs for default storage backend (commit 2aa491b)
doc: removed broken proxyhub link from FAQ (commit bdf61c4)
Fixed docs typo in SpiderOpenCloseLogging example (commit 7184094)
Scrapy 0.16.2 (released 2012-11-09)
Scrapy contracts: python2.6 compat (commit a4a9199)
Scrapy contracts verbose option (commit ec41673)
proper unittest-like output for Scrapy contracts (commit 86635e4)
added open_in_browser to debugging doc (commit c9b690d)
removed reference to global Scrapy stats from settings doc (commit dd55067)
Fix SpiderState bug in Windows platforms (commit 58998f4)
Scrapy 0.16.1 (released 2012-10-26)
fixed LogStats extension, which got broken after a wrong merge before the 0.16 release (commit 8c780fd)
better backward compatibility for scrapy.conf.settings (commit 3403089)
extended documentation on how to access crawler stats from extensions (commit c4da0b5)
removed .hgtags (no longer needed now that Scrapy uses git) (commit d52c188)
fix dashes under rst headers (commit fa4f7f9)
set release date for 0.16.0 in news (commit e292246)
Scrapy 0.16.0 (released 2012-10-18)
Scrapy changes:
added Spiders Contracts, a mechanism for testing spiders in a formal/reproducible way
added options
-oand-tto therunspidercommanddocumented AutoThrottle extension and added to extensions installed by default. You still need to enable it with
AUTOTHROTTLE_ENABLEDmajor Stats Collection refactoring: removed separation of global/per-spider stats, removed stats-related signals (
stats_spider_opened, etc). Stats are much simpler now, backward compatibility is kept on the Stats Collector API and signals.added
process_start_requests()method to spider middlewaresdropped Signals singleton. Signals should now be accessed through the Crawler.signals attribute. See the signals documentation for more info.
dropped Stats Collector singleton. Stats can now be accessed through the Crawler.stats attribute. See the stats collection documentation for more info.
documented Core API
lxmlis now the default selectors backend instead oflibxml2ported FormRequest.from_response() to use lxml instead of ClientForm
removed modules:
scrapy.xlib.BeautifulSoupandscrapy.xlib.ClientFormSitemapSpider: added support for sitemap urls ending in .xml and .xml.gz, even if they advertise a wrong content type (commit 10ed28b)
StackTraceDump extension: also dump trackref live references (commit fe2ce93)
nested items now fully supported in JSON and JSONLines exporters
added
cookiejarRequest meta key to support multiple cookie sessions per spiderdecoupled encoding detection code to w3lib.encoding, and ported Scrapy code to use that module
dropped support for Python 2.5. See https://blog.scrapinghub.com/2012/02/27/scrapy-0-15-dropping-support-for-python-2-5/
dropped support for Twisted 2.5
added
REFERER_ENABLEDsetting, to control referer middlewarechanged default user agent to:
Scrapy/VERSION (+http://scrapy.org)removed (undocumented)
HTMLImageLinkExtractorclass fromscrapy.contrib.linkextractors.imageremoved per-spider settings (to be replaced by instantiating multiple crawler objects)
USER_AGENTspider attribute will no longer work, useuser_agentattribute insteadDOWNLOAD_TIMEOUTspider attribute will no longer work, usedownload_timeoutattribute insteadremoved
ENCODING_ALIASESsetting, as encoding auto-detection has been moved to the w3lib librarypromoted DjangoItem to main contrib
LogFormatter method now return dicts(instead of strings) to support lazy formatting (issue 164, commit dcef7b0)
downloader handlers (
DOWNLOAD_HANDLERSsetting) now receive settings as the first argument of the__init__methodreplaced memory usage acounting with (more portable) resource module, removed
scrapy.utils.memorymoduleremoved signal:
scrapy.mail.mail_sentremoved
TRACK_REFSsetting, now trackrefs is always enabledDBM is now the default storage backend for HTTP cache middleware
number of log messages (per level) are now tracked through Scrapy stats (stat name:
log_count/LEVEL)number received responses are now tracked through Scrapy stats (stat name:
response_received_count)removed
scrapy.log.startedattribute
Scrapy 0.14.4
added precise to supported Ubuntu distros (commit b7e46df)
fixed bug in json-rpc webservice reported in https://groups.google.com/forum/#!topic/scrapy-users/qgVBmFybNAQ/discussion. also removed no longer supported ‘run’ command from extras/scrapy-ws.py (commit 340fbdb)
meta tag attributes for content-type http equiv can be in any order. #123 (commit 0cb68af)
replace “import Image” by more standard “from PIL import Image”. closes #88 (commit 4d17048)
return trial status as bin/runtests.sh exit value. #118 (commit b7b2e7f)
Scrapy 0.14.3
forgot to include pydispatch license. #118 (commit fd85f9c)
include egg files used by testsuite in source distribution. #118 (commit c897793)
update docstring in project template to avoid confusion with genspider command, which may be considered as an advanced feature. refs #107 (commit 2548dcc)
added note to docs/topics/firebug.rst about google directory being shut down (commit 668e352)
don’t discard slot when empty, just save in another dict in order to recycle if needed again. (commit 8e9f607)
do not fail handling unicode xpaths in libxml2 backed selectors (commit b830e95)
fixed minor mistake in Request objects documentation (commit bf3c9ee)
fixed minor defect in link extractors documentation (commit ba14f38)
removed some obsolete remaining code related to sqlite support in Scrapy (commit 0665175)
Scrapy 0.14.2
move buffer pointing to start of file before computing checksum. refs #92 (commit 6a5bef2)
Compute image checksum before persisting images. closes #92 (commit 9817df1)
remove leaking references in cached failures (commit 673a120)
fixed bug in MemoryUsage extension: get_engine_status() takes exactly 1 argument (0 given) (commit 11133e9)
fixed struct.error on http compression middleware. closes #87 (commit 1423140)
ajax crawling wasn’t expanding for unicode urls (commit 0de3fb4)
Catch start_requests iterator errors. refs #83 (commit 454a21d)
Speed-up libxml2 XPathSelector (commit 2fbd662)
updated versioning doc according to recent changes (commit 0a070f5)
scrapyd: fixed documentation link (commit 2b4e4c3)
extras/makedeb.py: no longer obtaining version from git (commit caffe0e)
Scrapy 0.14.1
extras/makedeb.py: no longer obtaining version from git (commit caffe0e)
bumped version to 0.14.1 (commit 6cb9e1c)
fixed reference to tutorial directory (commit 4b86bd6)
doc: removed duplicated callback argument from Request.replace() (commit 1aeccdd)
fixed formatting of scrapyd doc (commit 8bf19e6)
Dump stacks for all running threads and fix engine status dumped by StackTraceDump extension (commit 14a8e6e)
added comment about why we disable ssl on boto images upload (commit 5223575)
SSL handshaking hangs when doing too many parallel connections to S3 (commit 63d583d)
change tutorial to follow changes on dmoz site (commit bcb3198)
Avoid _disconnectedDeferred AttributeError exception in Twisted>=11.1.0 (commit 98f3f87)
allow spider to set autothrottle max concurrency (commit 175a4b5)
Scrapy 0.14
New features and settings
Support for AJAX crawleable urls
New persistent scheduler that stores requests on disk, allowing to suspend and resume crawls (r2737)
added
-ooption toscrapy crawl, a shortcut for dumping scraped items into a file (or standard output using-)Added support for passing custom settings to Scrapyd
schedule.jsonapi (r2779, r2783)New
ChunkedTransferMiddleware(enabled by default) to support chunked transfer encoding (r2769)Add boto 2.0 support for S3 downloader handler (r2763)
In request errbacks, offending requests are now received in
failure.requestattribute (r2738)- Big downloader refactoring to support per domain/ip concurrency limits (r2732)
CONCURRENT_REQUESTS_PER_SPIDERsetting has been deprecated and replaced by:
check the documentation for more details
Added builtin caching DNS resolver (r2728)
Moved Amazon AWS-related components/extensions (SQS spider queue, SimpleDB stats collector) to a separate project: [scaws](https://github.com/scrapinghub/scaws) (r2706, r2714)
Moved spider queues to scrapyd:
scrapy.spiderqueue->scrapyd.spiderqueue(r2708)Moved sqlite utils to scrapyd:
scrapy.utils.sqlite->scrapyd.sqlite(r2781)Real support for returning iterators on
start_requests()method. The iterator is now consumed during the crawl when the spider is getting idle (r2704)Added
REDIRECT_ENABLEDsetting to quickly enable/disable the redirect middleware (r2697)Added
RETRY_ENABLEDsetting to quickly enable/disable the retry middleware (r2694)Added
CloseSpiderexception to manually close spiders (r2691)Improved encoding detection by adding support for HTML5 meta charset declaration (r2690)
Refactored close spider behavior to wait for all downloads to finish and be processed by spiders, before closing the spider (r2688)
Added
SitemapSpider(see documentation in Spiders page) (r2658)Added
LogStatsextension for periodically logging basic stats (like crawled pages and scraped items) (r2657)Make handling of gzipped responses more robust (#319, r2643). Now Scrapy will try and decompress as much as possible from a gzipped response, instead of failing with an
IOError.Simplified !MemoryDebugger extension to use stats for dumping memory debugging info (r2639)
Added new command to edit spiders:
scrapy edit(r2636) and-eflag togenspidercommand that uses it (r2653)Changed default representation of items to pretty-printed dicts. (r2631). This improves default logging by making log more readable in the default case, for both Scraped and Dropped lines.
Added
spider_errorsignal (r2628)Added
COOKIES_ENABLEDsetting (r2625)Stats are now dumped to Scrapy log (default value of
STATS_DUMPsetting has been changed toTrue). This is to make Scrapy users more aware of Scrapy stats and the data that is collected there.Added support for dynamically adjusting download delay and maximum concurrent requests (r2599)
Added new DBM HTTP cache storage backend (r2576)
Added
listjobs.jsonAPI to Scrapyd (r2571)CsvItemExporter: addedjoin_multivaluedparameter (r2578)Added namespace support to
xmliter_lxml(r2552)Improved cookies middleware by making
COOKIES_DEBUGnicer and documenting it (r2579)Several improvements to Scrapyd and Link extractors
Code rearranged and removed
- Merged item passed and item scraped concepts, as they have often proved confusing in the past. This means: (r2630)
original item_scraped signal was removed
original item_passed signal was renamed to item_scraped
old log lines
Scraped Item...were removedold log lines
Passed Item...were renamed toScraped Item...lines and downgraded toDEBUGlevel
Removed unused function:
scrapy.utils.request.request_info()(r2577)Removed googledir project from
examples/googledir. There’s now a new example project calleddirbotavailable on GitHub: https://github.com/scrapy/dirbotRemoved support for default field values in Scrapy items (r2616)
Removed experimental crawlspider v2 (r2632)
Removed scheduler middleware to simplify architecture. Duplicates filter is now done in the scheduler itself, using the same dupe filtering class as before (
DUPEFILTER_CLASSsetting) (r2640)Removed support for passing urls to
scrapy crawlcommand (usescrapy parseinstead) (r2704)Removed deprecated Execution Queue (r2704)
Removed (undocumented) spider context extension (from scrapy.contrib.spidercontext) (r2780)
removed
CONCURRENT_SPIDERSsetting (use scrapyd maxproc instead) (r2789)Renamed attributes of core components: downloader.sites -> downloader.slots, scraper.sites -> scraper.slots (r2717, r2718)
Renamed setting
CLOSESPIDER_ITEMPASSEDtoCLOSESPIDER_ITEMCOUNT(r2655). Backward compatibility kept.
Scrapy 0.12
The numbers like #NNN reference tickets in the old issue tracker (Trac) which is no longer available.
New features and improvements
Passed item is now sent in the
itemargument of theitem_passed(#273)Added verbose option to
scrapy versioncommand, useful for bug reports (#298)HTTP cache now stored by default in the project data dir (#279)
Added project data storage directory (#276, #277)
Documented file structure of Scrapy projects (see command-line tool doc)
New lxml backend for XPath selectors (#147)
Per-spider settings (#245)
Support exit codes to signal errors in Scrapy commands (#248)
Added
-cargument toscrapy shellcommandMade
libxml2optional (#260)New
deploycommand (#261)Added
CLOSESPIDER_PAGECOUNTsetting (#253)Added
CLOSESPIDER_ERRORCOUNTsetting (#254)
Scrapyd changes
Scrapyd now uses one process per spider
It stores one log file per spider run, and rotate them keeping the latest 5 logs per spider (by default)
A minimal web ui was added, available at http://localhost:6800 by default
There is now a
scrapy servercommand to start a Scrapyd server of the current project
Changes to settings
added
HTTPCACHE_ENABLEDsetting (False by default) to enable HTTP cache middlewarechanged
HTTPCACHE_EXPIRATION_SECSsemantics: now zero means “never expire”.
Deprecated/obsoleted functionality
Deprecated
runservercommand in favor ofservercommand which starts a Scrapyd server. See also: Scrapyd changesDeprecated
queuecommand in favor of using Scrapydschedule.jsonAPI. See also: Scrapyd changesRemoved the !LxmlItemLoader (experimental contrib which never graduated to main contrib)
Scrapy 0.10
The numbers like #NNN reference tickets in the old issue tracker (Trac) which is no longer available.
New features and improvements
New Scrapy service called
scrapydfor deploying Scrapy crawlers in production (#218) (documentation available)Simplified Images pipeline usage which doesn’t require subclassing your own images pipeline now (#217)
Scrapy shell now shows the Scrapy log by default (#206)
Refactored execution queue in a common base code and pluggable backends called “spider queues” (#220)
New persistent spider queue (based on SQLite) (#198), available by default, which allows to start Scrapy in server mode and then schedule spiders to run.
Added documentation for Scrapy command-line tool and all its available sub-commands. (documentation available)
Feed exporters with pluggable backends (#197) (documentation available)
Deferred signals (#193)
Added two new methods to item pipeline open_spider(), close_spider() with deferred support (#195)
Support for overriding default request headers per spider (#181)
Replaced default Spider Manager with one with similar functionality but not depending on Twisted Plugins (#186)
Split Debian package into two packages - the library and the service (#187)
Scrapy log refactoring (#188)
New extension for keeping persistent spider contexts among different runs (#203)
Added
dont_redirectrequest.meta key for avoiding redirects (#233)Added
dont_retryrequest.meta key for avoiding retries (#234)
Command-line tool changes
New
scrapycommand which replaces the oldscrapy-ctl.py(#199) - there is only one globalscrapycommand now, instead of onescrapy-ctl.pyper project - Addedscrapy.batscript for running more conveniently from WindowsAdded bash completion to command-line tool (#210)
Renamed command
starttorunserver(#209)
API changes
urlandbodyattributes of Request objects are now read-only (#230)Request.copy()andRequest.replace()now also copies theircallbackanderrbackattributes (#231)Removed
UrlFilterMiddlewarefromscrapy.contrib(already disabled by default)Offsite middleware doesn’t filter out any request coming from a spider that doesn’t have a allowed_domains attribute (#225)
Removed Spider Manager
load()method. Now spiders are loaded in the__init__method itself.- Changes to Scrapy Manager (now called “Crawler”):
scrapy.core.manager.ScrapyManagerclass renamed toscrapy.crawler.Crawlerscrapy.core.manager.scrapymanagersingleton moved toscrapy.project.crawler
Moved module:
scrapy.contrib.spidermanagertoscrapy.spidermanagerSpider Manager singleton moved from
scrapy.spider.spidersto thespiders` attribute of ``scrapy.project.crawlersingleton.- moved Stats Collector classes: (#204)
scrapy.stats.collector.StatsCollectortoscrapy.statscol.StatsCollectorscrapy.stats.collector.SimpledbStatsCollectortoscrapy.contrib.statscol.SimpledbStatsCollector
default per-command settings are now specified in the
default_settingsattribute of command object class (#201)- changed arguments of Item pipeline
process_item()method from(spider, item)to(item, spider) backward compatibility kept (with deprecation warning)
- changed arguments of Item pipeline
- moved
scrapy.core.signalsmodule toscrapy.signals backward compatibility kept (with deprecation warning)
- moved
- moved
scrapy.core.exceptionsmodule toscrapy.exceptions backward compatibility kept (with deprecation warning)
- moved
added
handles_request()class method toBaseSpiderdropped
scrapy.log.exc()function (usescrapy.log.err()instead)dropped
componentargument ofscrapy.log.msg()functiondropped
scrapy.log.log_levelattributeAdded
from_settings()class methods to Spider Manager, and Item Pipeline Manager
Changes to settings
Added
HTTPCACHE_IGNORE_SCHEMESsetting to ignore certain schemes on !HttpCacheMiddleware (#225)Added
SPIDER_QUEUE_CLASSsetting which defines the spider queue to use (#220)Added
KEEP_ALIVEsetting (#220)Removed
SERVICE_QUEUEsetting (#220)Removed
COMMANDS_SETTINGS_MODULEsetting (#201)Renamed
REQUEST_HANDLERStoDOWNLOAD_HANDLERSand make download handlers classes (instead of functions)
Scrapy 0.9
The numbers like #NNN reference tickets in the old issue tracker (Trac) which is no longer available.
New features and improvements
Added SMTP-AUTH support to scrapy.mail
New settings added:
MAIL_USER,MAIL_PASS(r2065 | #149)Added new scrapy-ctl view command - To view URL in the browser, as seen by Scrapy (r2039)
Added web service for controlling Scrapy process (this also deprecates the web console. (r2053 | #167)
Support for running Scrapy as a service, for production systems (r1988, r2054, r2055, r2056, r2057 | #168)
Added wrapper induction library (documentation only available in source code for now). (r2011)
Simplified and improved response encoding support (r1961, r1969)
Added
LOG_ENCODINGsetting (r1956, documentation available)Added
RANDOMIZE_DOWNLOAD_DELAYsetting (enabled by default) (r1923, doc available)MailSenderis no longer IO-blocking (r1955 | #146)Linkextractors and new Crawlspider now handle relative base tag urls (r1960 | #148)
Several improvements to Item Loaders and processors (r2022, r2023, r2024, r2025, r2026, r2027, r2028, r2029, r2030)
Added support for adding variables to telnet console (r2047 | #165)
Support for requests without callbacks (r2050 | #166)
API changes
Change
Spider.domain_nametoSpider.name(SEP-012, r1975)Response.encodingis now the detected encoding (r1961)HttpErrorMiddlewarenow returns None or raises an exception (r2006 | #157)Added
ExecutionQueuefor feeding spiders to scrape (r2034)Removed
ExecutionEnginesingleton (r2039)Ported
S3ImagesStore(images pipeline) to use boto and threads (r2033)Moved module:
scrapy.management.telnettoscrapy.telnet(r2047)
Changes to default settings
Changed default
SCHEDULER_ORDERtoDFO(r1939)
Scrapy 0.8
The numbers like #NNN reference tickets in the old issue tracker (Trac) which is no longer available.
New features
Added DEFAULT_RESPONSE_ENCODING setting (r1809)
Added
dont_clickargument toFormRequest.from_response()method (r1813, r1816)Added
clickdataargument toFormRequest.from_response()method (r1802, r1803)Added support for HTTP proxies (
HttpProxyMiddleware) (r1781, r1785)Offsite spider middleware now logs messages when filtering out requests (r1841)
Backward-incompatible changes
Changed
scrapy.utils.response.get_meta_refresh()signature (r1804)Removed deprecated
scrapy.item.ScrapedItemclass - usescrapy.item.Item instead(r1838)Removed deprecated
scrapy.xpathmodule - usescrapy.selectorinstead. (r1836)Removed deprecated
core.signals.domain_opensignal - usecore.signals.domain_openedinstead (r1822)log.msg()now receives aspiderargument (r1822)Old domain argument has been deprecated and will be removed in 0.9. For spiders, you should always use the
spiderargument and pass spider references. If you really want to pass a string, use thecomponentargument instead.
Changed core signals
domain_opened,domain_closed,domain_idle- Changed Item pipeline to use spiders instead of domains
The
domainargument ofprocess_item()item pipeline method was changed tospider, the new signature is:process_item(spider, item)(r1827 | #105)To quickly port your code (to work with Scrapy 0.8) just use
spider.domain_namewhere you previously useddomain.
- Changed Stats API to use spiders instead of domains (r1849 | #113)
StatsCollectorwas changed to receive spider references (instead of domains) in its methods (set_value,inc_value, etc).added
StatsCollector.iter_spider_stats()methodremoved
StatsCollector.list_domains()methodAlso, Stats signals were renamed and now pass around spider references (instead of domains). Here’s a summary of the changes:
To quickly port your code (to work with Scrapy 0.8) just use
spider.domain_namewhere you previously useddomain.spider_statscontains exactly the same data asdomain_stats.
CloseDomainextension moved toscrapy.contrib.closespider.CloseSpider(r1833)- Its settings were also renamed:
CLOSEDOMAIN_TIMEOUTtoCLOSESPIDER_TIMEOUTCLOSEDOMAIN_ITEMCOUNTtoCLOSESPIDER_ITEMCOUNT
Removed deprecated
SCRAPYSETTINGS_MODULEenvironment variable - useSCRAPY_SETTINGS_MODULEinstead (r1840)Renamed setting:
REQUESTS_PER_DOMAINtoCONCURRENT_REQUESTS_PER_SPIDER(r1830, r1844)Renamed setting:
CONCURRENT_DOMAINStoCONCURRENT_SPIDERS(r1830)Refactored HTTP Cache middleware
HTTP Cache middleware has been heavilty refactored, retaining the same functionality except for the domain sectorization which was removed. (r1843 )
Renamed exception:
DontCloseDomaintoDontCloseSpider(r1859 | #120)Renamed extension:
DelayedCloseDomaintoSpiderCloseDelay(r1861 | #121)Removed obsolete
scrapy.utils.markup.remove_escape_charsfunction - usescrapy.utils.markup.replace_escape_charsinstead (r1865)
Scrapy 0.7
First release of Scrapy.
Contributing to Scrapy
Important
Double check that you are reading the most recent version of this document at https://docs.scrapy.org/en/master/contributing.html
There are many ways to contribute to Scrapy. Here are some of them:
Blog about Scrapy. Tell the world how you’re using Scrapy. This will help newcomers with more examples and will help the Scrapy project to increase its visibility.
Report bugs and request features in the issue tracker, trying to follow the guidelines detailed in Reporting bugs below.
Submit patches for new functionalities and/or bug fixes. Please read Writing patches and Submitting patches below for details on how to write and submit a patch.
Join the Scrapy subreddit and share your ideas on how to improve Scrapy. We’re always open to suggestions.
Answer Scrapy questions at Stack Overflow.
Reporting bugs
Note
Please report security issues only to scrapy-security@googlegroups.com. This is a private list only open to trusted Scrapy developers, and its archives are not public.
Well-written bug reports are very helpful, so keep in mind the following guidelines when you’re going to report a new bug.
check the FAQ first to see if your issue is addressed in a well-known question
if you have a general question about Scrapy usage, please ask it at Stack Overflow (use “scrapy” tag).
check the open issues to see if the issue has already been reported. If it has, don’t dismiss the report, but check the ticket history and comments. If you have additional useful information, please leave a comment, or consider sending a pull request with a fix.
search the scrapy-users list and Scrapy subreddit to see if it has been discussed there, or if you’re not sure if what you’re seeing is a bug. You can also ask in the
#scrapyIRC channel.write complete, reproducible, specific bug reports. The smaller the test case, the better. Remember that other developers won’t have your project to reproduce the bug, so please include all relevant files required to reproduce it. See for example StackOverflow’s guide on creating a Minimal, Complete, and Verifiable example exhibiting the issue.
the most awesome way to provide a complete reproducible example is to send a pull request which adds a failing test case to the Scrapy testing suite (see Submitting patches). This is helpful even if you don’t have an intention to fix the issue yourselves.
include the output of
scrapy version -vso developers working on your bug know exactly which version and platform it occurred on, which is often very helpful for reproducing it, or knowing if it was already fixed.
Writing patches
The better a patch is written, the higher the chances that it’ll get accepted and the sooner it will be merged.
Well-written patches should:
contain the minimum amount of code required for the specific change. Small patches are easier to review and merge. So, if you’re doing more than one change (or bug fix), please consider submitting one patch per change. Do not collapse multiple changes into a single patch. For big changes consider using a patch queue.
pass all unit-tests. See Running tests below.
include one (or more) test cases that check the bug fixed or the new functionality added. See Writing tests below.
if you’re adding or changing a public (documented) API, please include the documentation changes in the same patch. See Documentation policies below.
if you’re adding a private API, please add a regular expression to the
coverage_ignore_pyobjectsvariable ofdocs/conf.pyto exclude the new private API from documentation coverage checks.To see if your private API is skipped properly, generate a documentation coverage report as follows:
tox -e docs-coverage
if you are removing deprecated code, first make sure that at least 1 year (12 months) has passed since the release that introduced the deprecation. See Deprecation policy.
Submitting patches
The best way to submit a patch is to issue a pull request on GitHub, optionally creating a new issue first.
Remember to explain what was fixed or the new functionality (what it is, why it’s needed, etc). The more info you include, the easier will be for core developers to understand and accept your patch.
You can also discuss the new functionality (or bug fix) before creating the patch, but it’s always good to have a patch ready to illustrate your arguments and show that you have put some additional thought into the subject. A good starting point is to send a pull request on GitHub. It can be simple enough to illustrate your idea, and leave documentation/tests for later, after the idea has been validated and proven useful. Alternatively, you can start a conversation in the Scrapy subreddit to discuss your idea first.
Sometimes there is an existing pull request for the problem you’d like to solve, which is stalled for some reason. Often the pull request is in a right direction, but changes are requested by Scrapy maintainers, and the original pull request author hasn’t had time to address them. In this case consider picking up this pull request: open a new pull request with all commits from the original pull request, as well as additional changes to address the raised issues. Doing so helps a lot; it is not considered rude as long as the original author is acknowledged by keeping his/her commits.
You can pull an existing pull request to a local branch
by running git fetch upstream pull/$PR_NUMBER/head:$BRANCH_NAME_TO_CREATE
(replace ‘upstream’ with a remote name for scrapy repository,
$PR_NUMBER with an ID of the pull request, and $BRANCH_NAME_TO_CREATE
with a name of the branch you want to create locally).
See also: https://help.github.com/en/github/collaborating-with-issues-and-pull-requests/checking-out-pull-requests-locally#modifying-an-inactive-pull-request-locally.
When writing GitHub pull requests, try to keep titles short but descriptive. E.g. For bug #411: “Scrapy hangs if an exception raises in start_requests” prefer “Fix hanging when exception occurs in start_requests (#411)” instead of “Fix for #411”. Complete titles make it easy to skim through the issue tracker.
Finally, try to keep aesthetic changes (PEP 8 compliance, unused imports removal, etc) in separate commits from functional changes. This will make pull requests easier to review and more likely to get merged.
Coding style
Please follow these coding conventions when writing code for inclusion in Scrapy:
Unless otherwise specified, follow PEP 8.
It’s OK to use lines longer than 79 chars if it improves the code readability.
Don’t put your name in the code you contribute; git provides enough metadata to identify author of the code. See https://help.github.com/en/github/using-git/setting-your-username-in-git for setup instructions.
Documentation policies
For reference documentation of API members (classes, methods, etc.) use
docstrings and make sure that the Sphinx documentation uses the
autodoc extension to pull the docstrings. API reference
documentation should follow docstring conventions (PEP 257) and be
IDE-friendly: short, to the point, and it may provide short examples.
Other types of documentation, such as tutorials or topics, should be covered in
files within the docs/ directory. This includes documentation that is
specific to an API member, but goes beyond API reference documentation.
In any case, if something is covered in a docstring, use the
autodoc extension to pull the docstring into the
documentation instead of duplicating the docstring in files within the
docs/ directory.
Documentation updates that cover new or modified features must use Sphinx’s
versionadded and versionchanged directives. Use
VERSION as version, we will replace it with the actual version right before
the corresponding release. When we release a new major or minor version of
Scrapy, we remove these directives if they are older than 3 years.
Documentation about deprecated features must be removed as those features are deprecated, so that new readers do not run into it. New deprecations and deprecation removals are documented in the release notes.
Tests
Tests are implemented using the Twisted unit-testing framework. Running tests requires tox.
Running tests
To run all tests:
tox
To run a specific test (say tests/test_loader.py) use:
tox -- tests/test_loader.py
To run the tests on a specific tox environment, use
-e <name> with an environment name from tox.ini. For example, to run
the tests with Python 3.6 use:
tox -e py36
You can also specify a comma-separated list of environments, and use tox’s parallel mode to run the tests on multiple environments in parallel:
tox -e py36,py38 -p auto
To pass command-line options to pytest, add them after
-- in your call to tox. Using -- overrides the
default positional arguments defined in tox.ini, so you must include those
default positional arguments (scrapy tests) after -- as well:
tox -- scrapy tests -x # stop after first failure
You can also use the pytest-xdist plugin. For example, to run all tests on the Python 3.6 tox environment using all your CPU cores:
tox -e py36 -- scrapy tests -n auto
To see coverage report install coverage
(pip install coverage) and run:
coverage report
see output of coverage --help for more options like html or xml report.
Writing tests
All functionality (including new features and bug fixes) must include a test case to check that it works as expected, so please include tests for your patches if you want them to get accepted sooner.
Scrapy uses unit-tests, which are located in the tests/ directory. Their module name typically resembles the full path of the module they’re testing. For example, the item loaders code is in:
scrapy.loader
And their unit-tests are in:
tests/test_loader.py
Versioning and API stability
Versioning
There are 3 numbers in a Scrapy version: A.B.C
A is the major version. This will rarely change and will signify very large changes.
B is the release number. This will include many changes including features and things that possibly break backward compatibility, although we strive to keep these cases at a minimum.
C is the bugfix release number.
Backward-incompatibilities are explicitly mentioned in the release notes, and may require special attention before upgrading.
Development releases do not follow 3-numbers version and are generally
released as dev suffixed versions, e.g. 1.3dev.
Note
With Scrapy 0.* series, Scrapy used odd-numbered versions for development releases. This is not the case anymore from Scrapy 1.0 onwards.
Starting with Scrapy 1.0, all releases should be considered production-ready.
For example:
1.1.1 is the first bugfix release of the 1.1 series (safe to use in production)
API stability
API stability was one of the major goals for the 1.0 release.
Methods or functions that start with a single dash (_) are private and
should never be relied as stable.
Also, keep in mind that stable doesn’t mean complete: stable APIs could grow new methods or functionality but the existing methods should keep working the same way.
Deprecation policy
We aim to maintain support for deprecated Scrapy features for at least 1 year.
For example, if a feature is deprecated in a Scrapy version released on June 15th 2020, that feature should continue to work in versions released on June 14th 2021 or before that.
Any new Scrapy release after a year may remove support for that deprecated feature.
All deprecated features removed in a Scrapy release are explicitly mentioned in the release notes.
- Release notes
See what has changed in recent Scrapy versions.
- Contributing to Scrapy
Learn how to contribute to the Scrapy project.
- Versioning and API stability
Understand Scrapy versioning and API stability.